Product settings
Once you’ve completed the one time setup, you can use the admin user to access Qbo settings.
The configuration and management of data sources is discussed in the corresponding section of this guide.
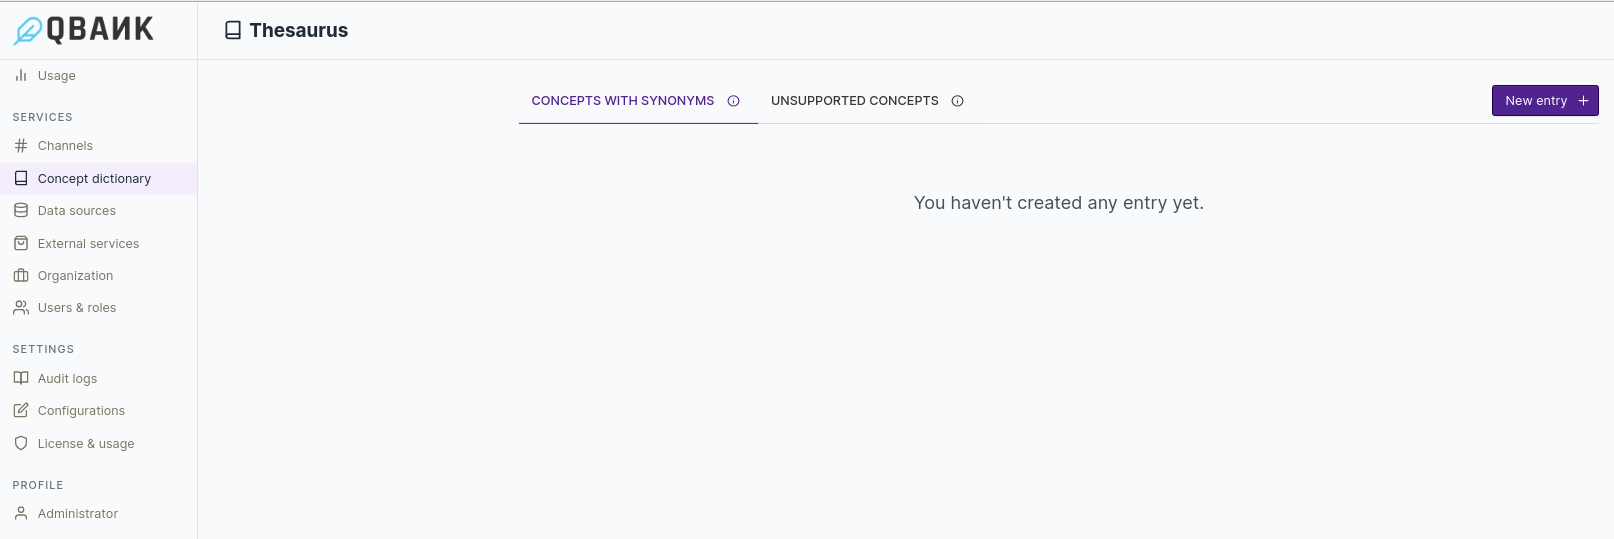
Concept dictionary
The Concept dictionary contains information about terms that are related to all the data sources that may be set up within Qbo. There are two key kinds of information that can be provided. One is the list of synonyms for a concept, and the other is a list of unsupported concepts.
Concepts with synonyms
Concepts with synonyms is a component under concept dictionary that allows users to define synonyms and associate it to a certain concept. This allows Qbo to recognize a synonym and translate it to the associated concept.
To add a concept with synonyms, click on New entry. Specify the Phrase or the concept that you wanted to have synonyms, select qbo
under QueryBot Name and list down the synonyms to be associated to the phrase in the Add synonyms field. Finally, click on Save changes.
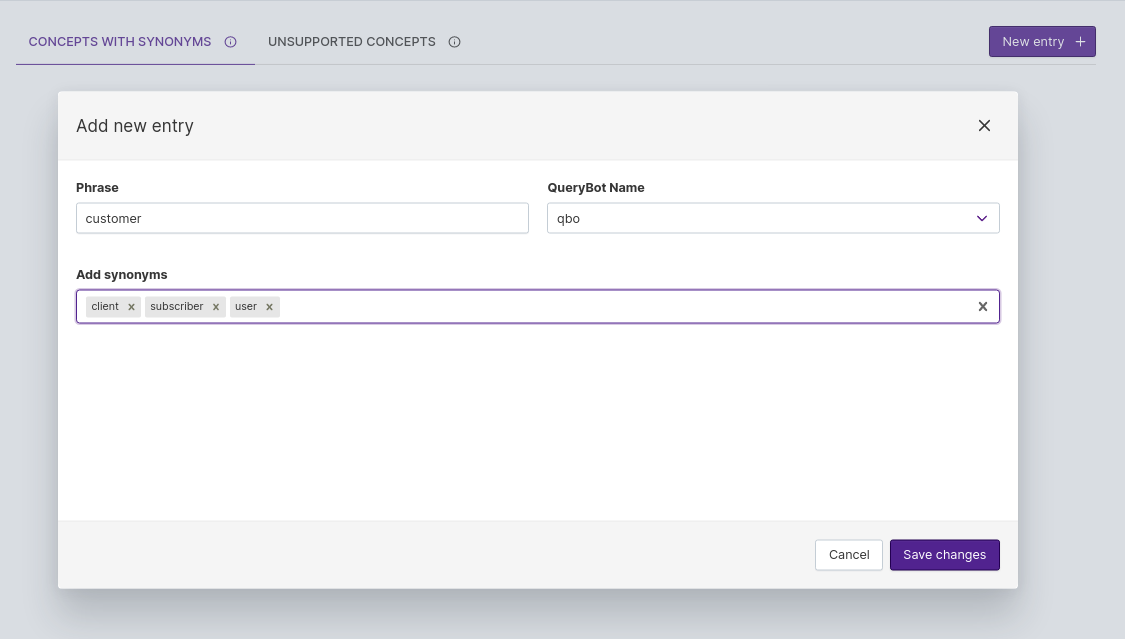
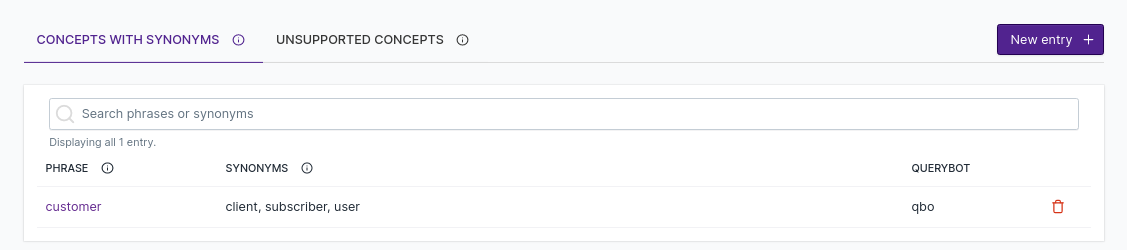
With the example below, the concept customer can now be referred as user, client or subscriber in Qbo.
Unsupported concepts
Concepts that are not supported can also be defined under the Unsupported concepts. Unsupported concepts could be defined for reasons like unavailabilty of data, issues with the quality of data, inability of Qbo to appropriately answer some kinds of queries, etc.
To add an unsupported concept, click on New entry. Specify the Phrase or the concept that is not yet supported, select qbo
under QueryBot Name and fill out Text field to explain why the concept is not supported. Finally, click on Save changes.
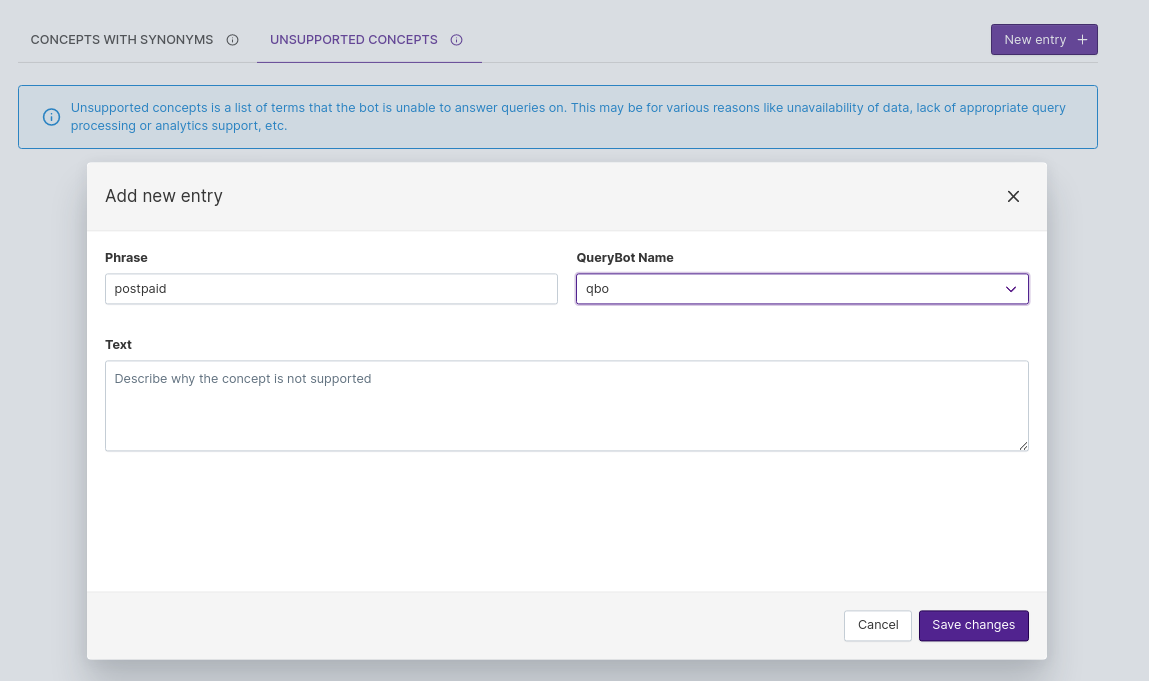
Below is an example of defining an unsupported concept.

Once concepts with synonyms or unsupported concepts have been defined, it is necessary to Reload the data source to reflect the changes.
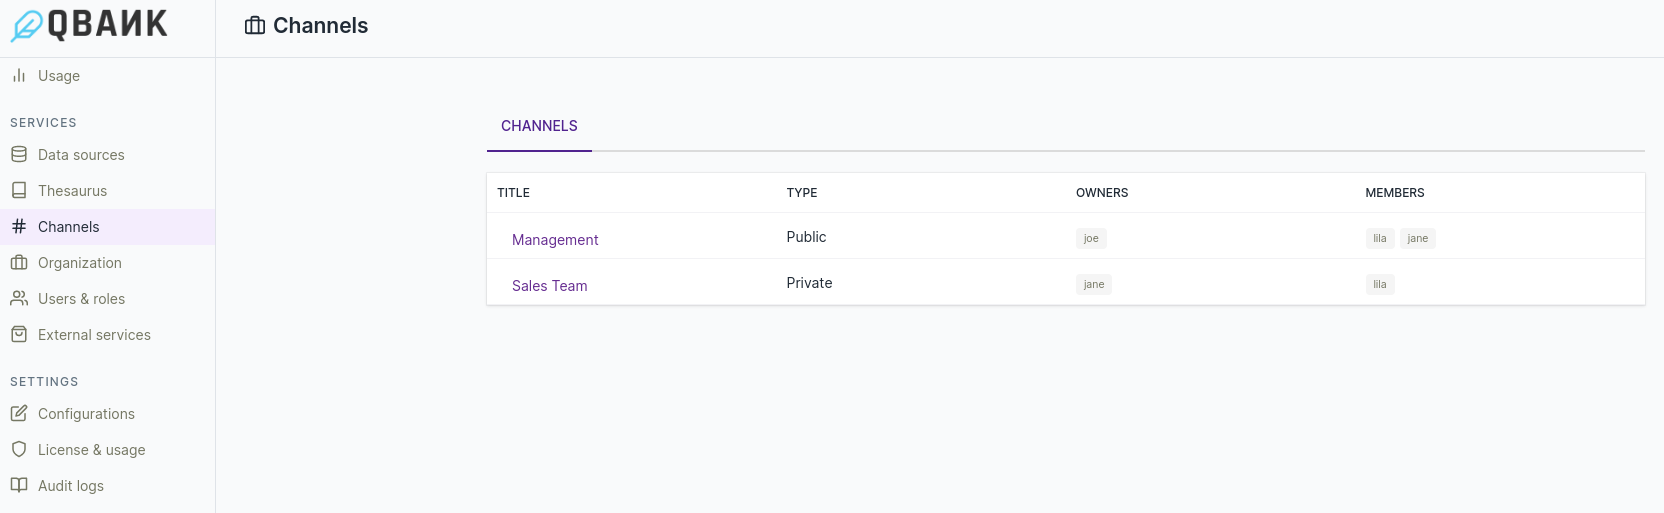
Channels
A channel is a place where a team or an individual can create threads that allow them to interact with Qbo to work towards a common goal. A channel can be a project, activity, or topic. It can be set to either private or public.
Note
All channels created by users will be visible in the admin panel section.
For more information about channels, see the user guide Channels section.
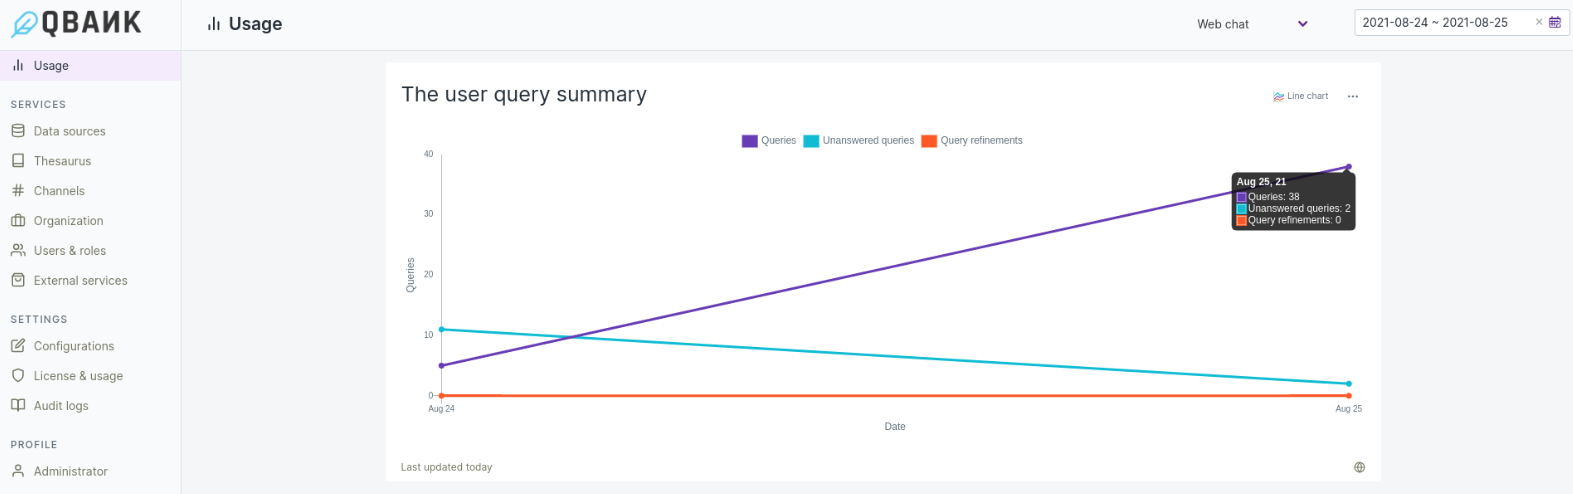
Usage metrics
The usage metrics module displays metrics like the trend of number of distinct users by day and the number of sessions by day. You can specify a timeframe or use the default duration.
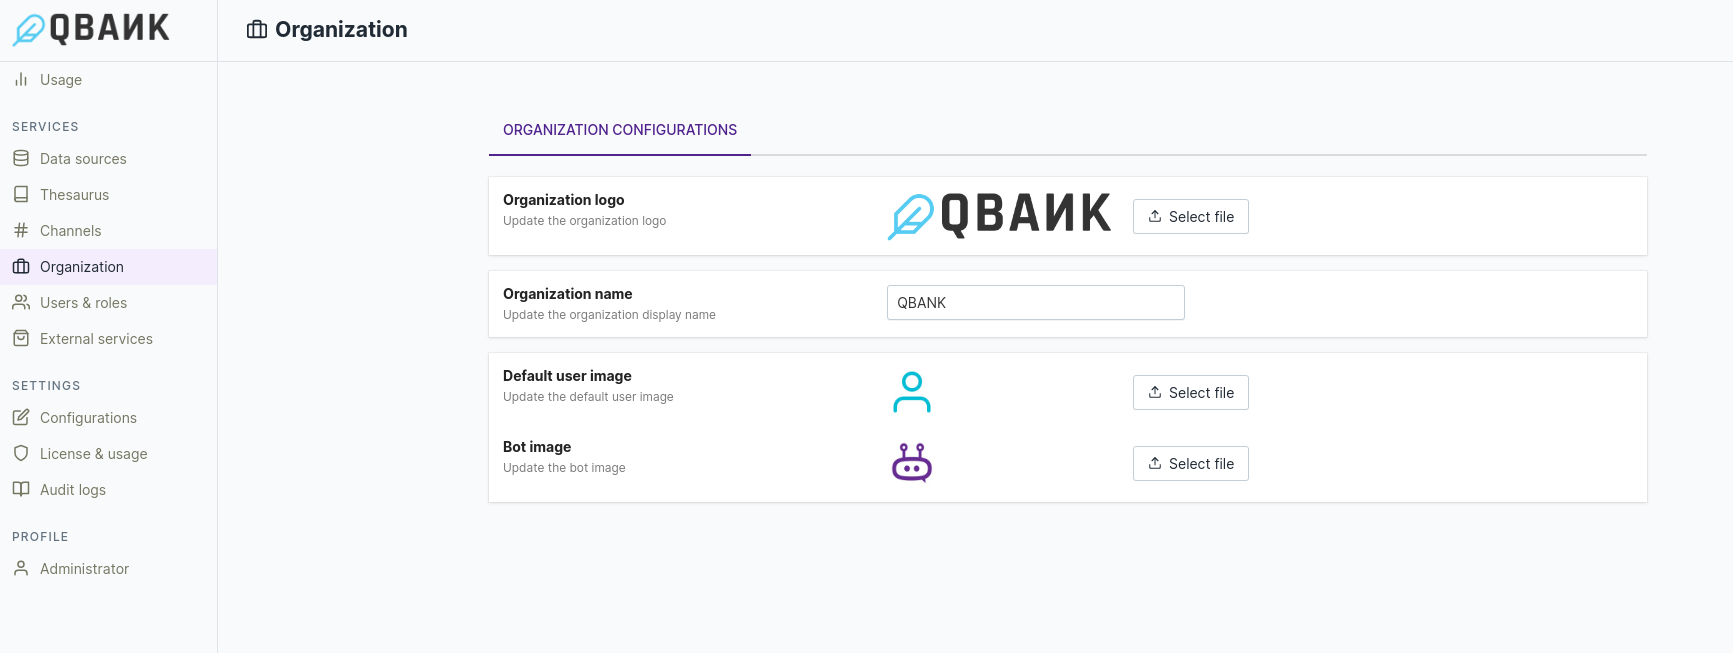
Organizational settings
In the organization settings module, you can edit the organization name, logo, and other organization-wide settings like the bot image and the default user image.
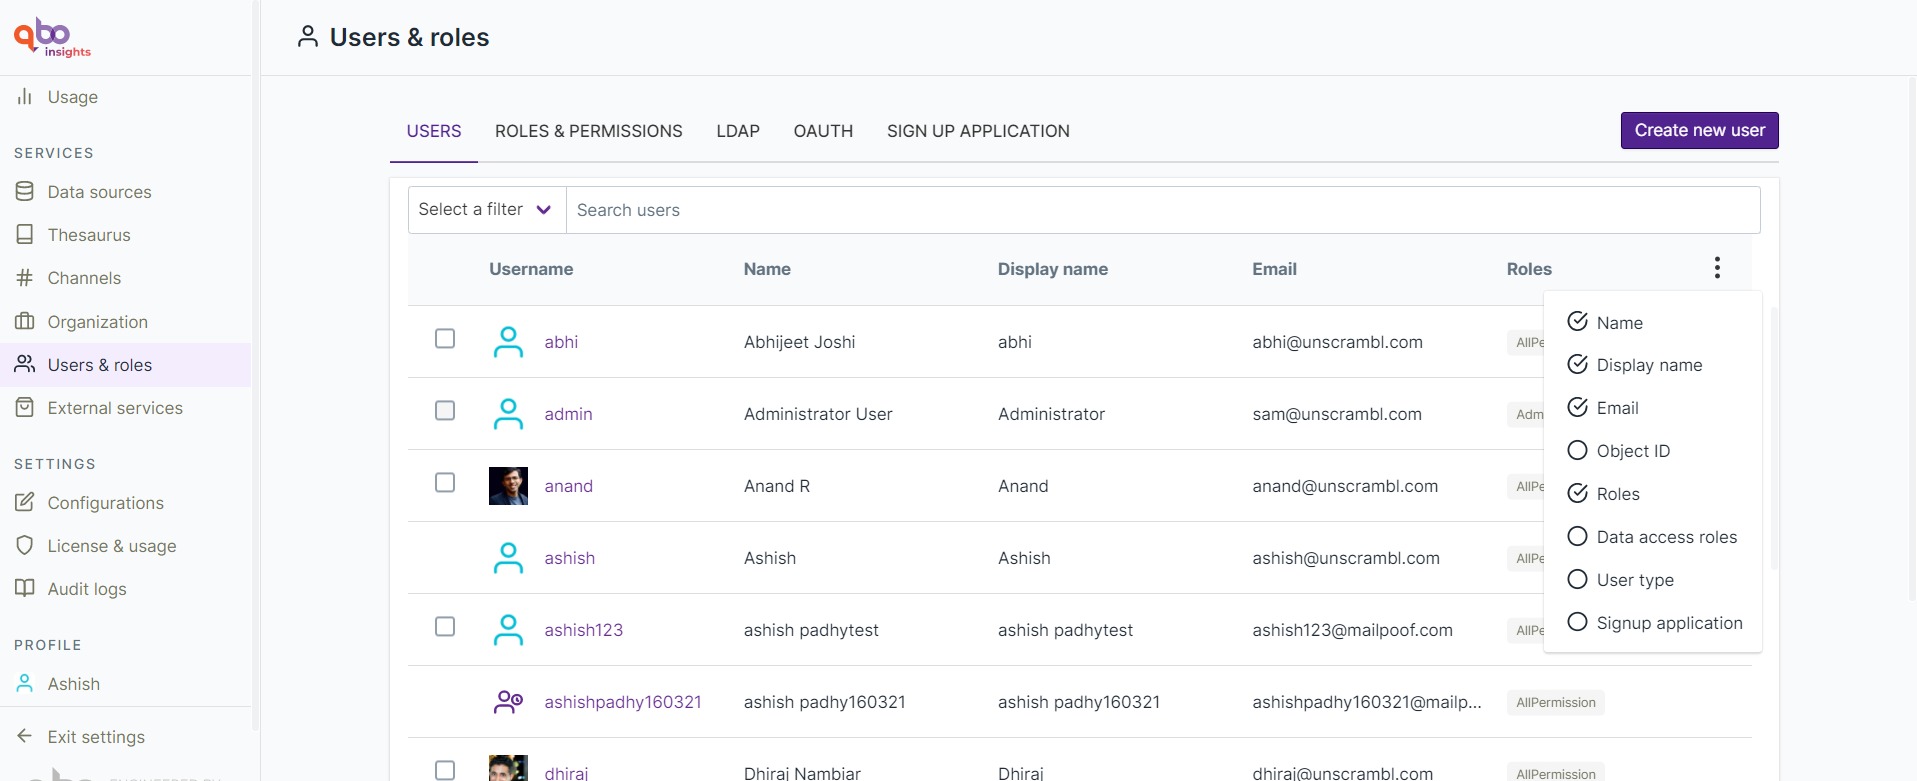
User & role management
In the user and role management module, you can add, delete, and edit user accounts and roles.
The admin user and the Administrator role cannot be modified or deleted.
The user management interface as shown below shows a list of users and their attributes.
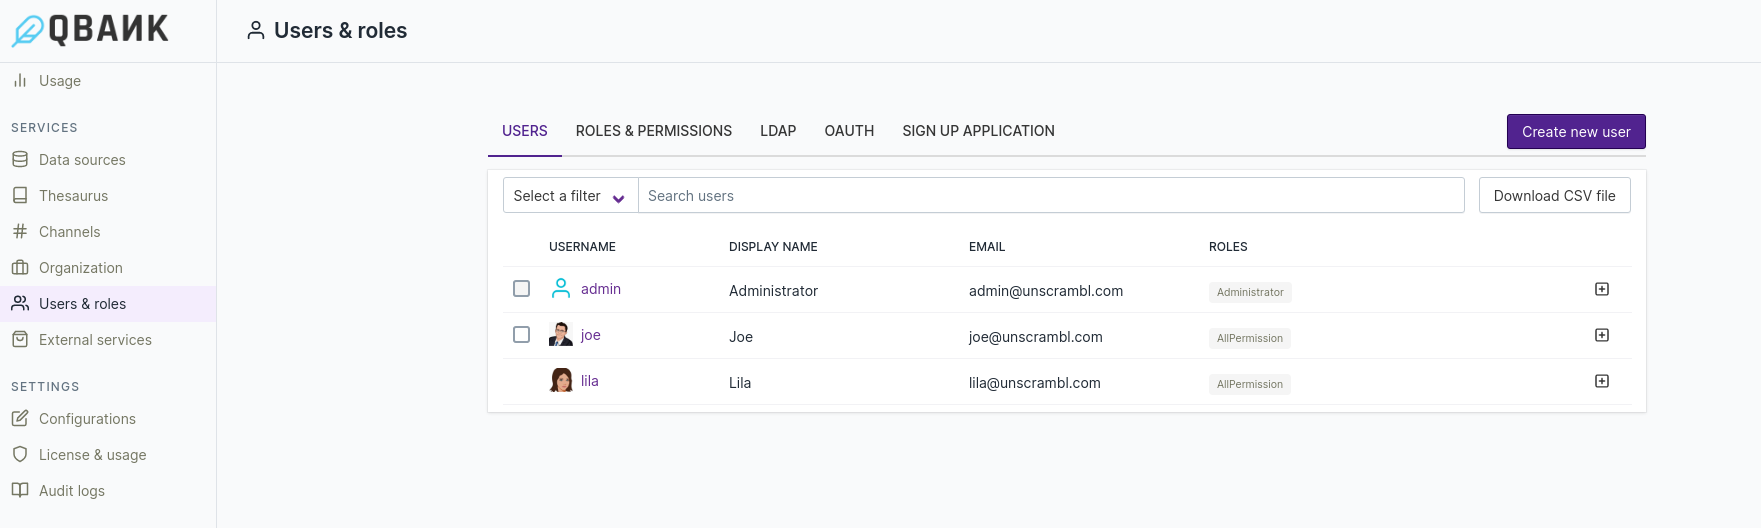
Users
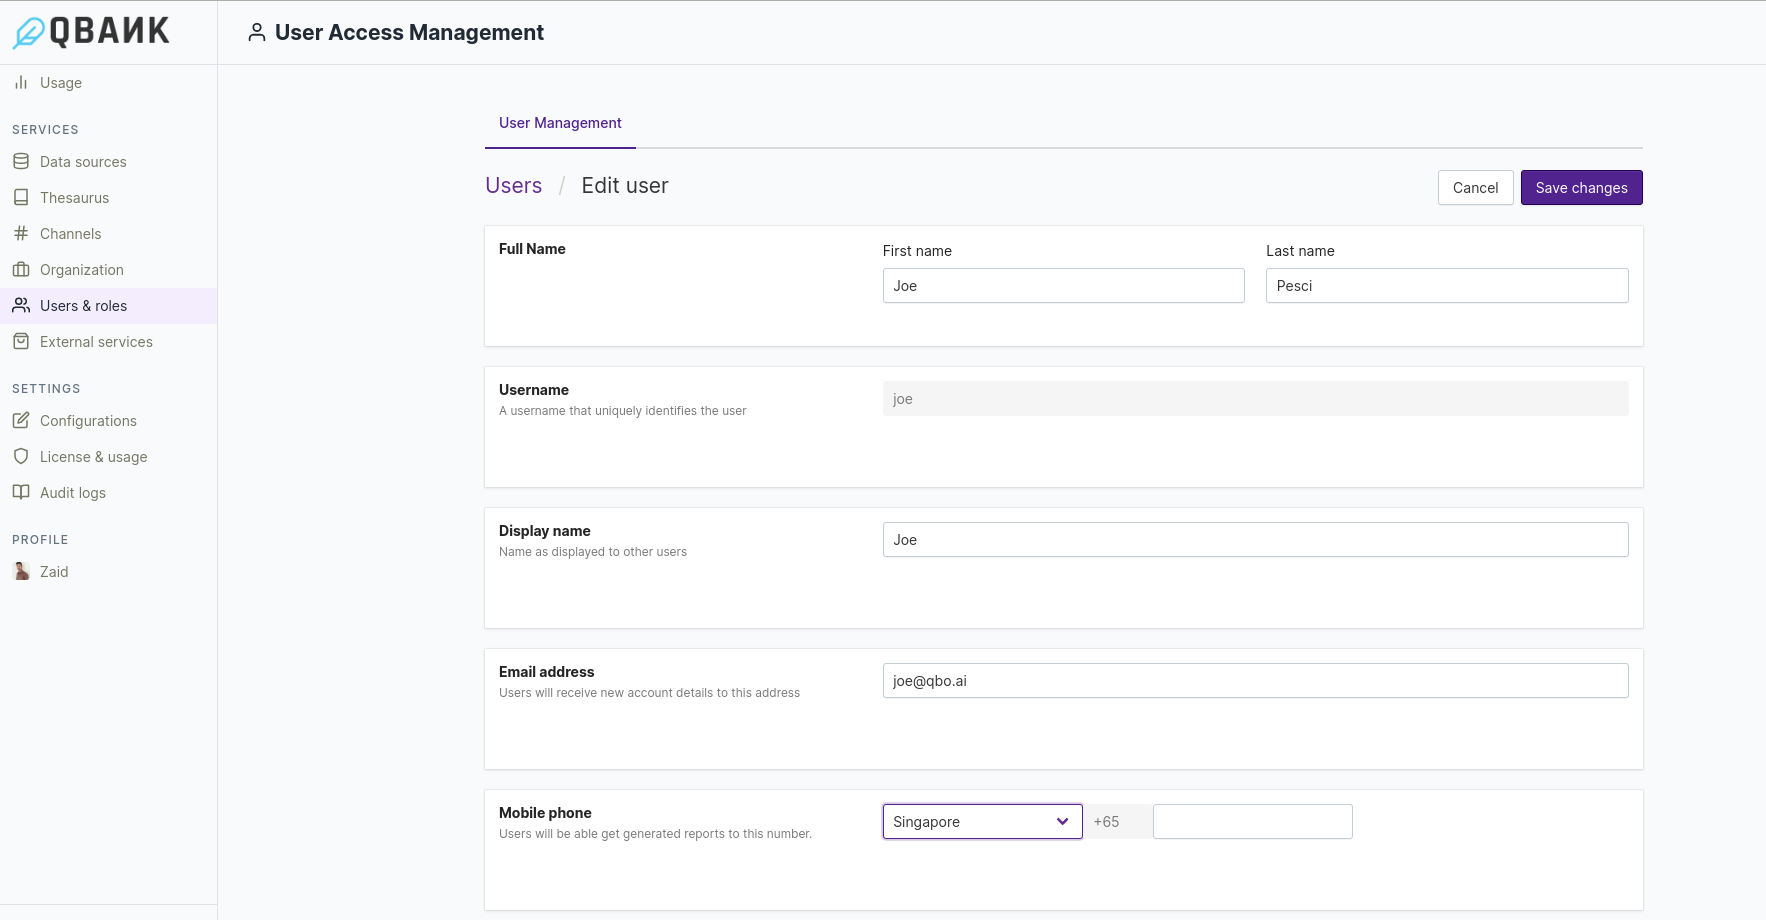
Click on a username to edit information about that user account or reset the account’s password.
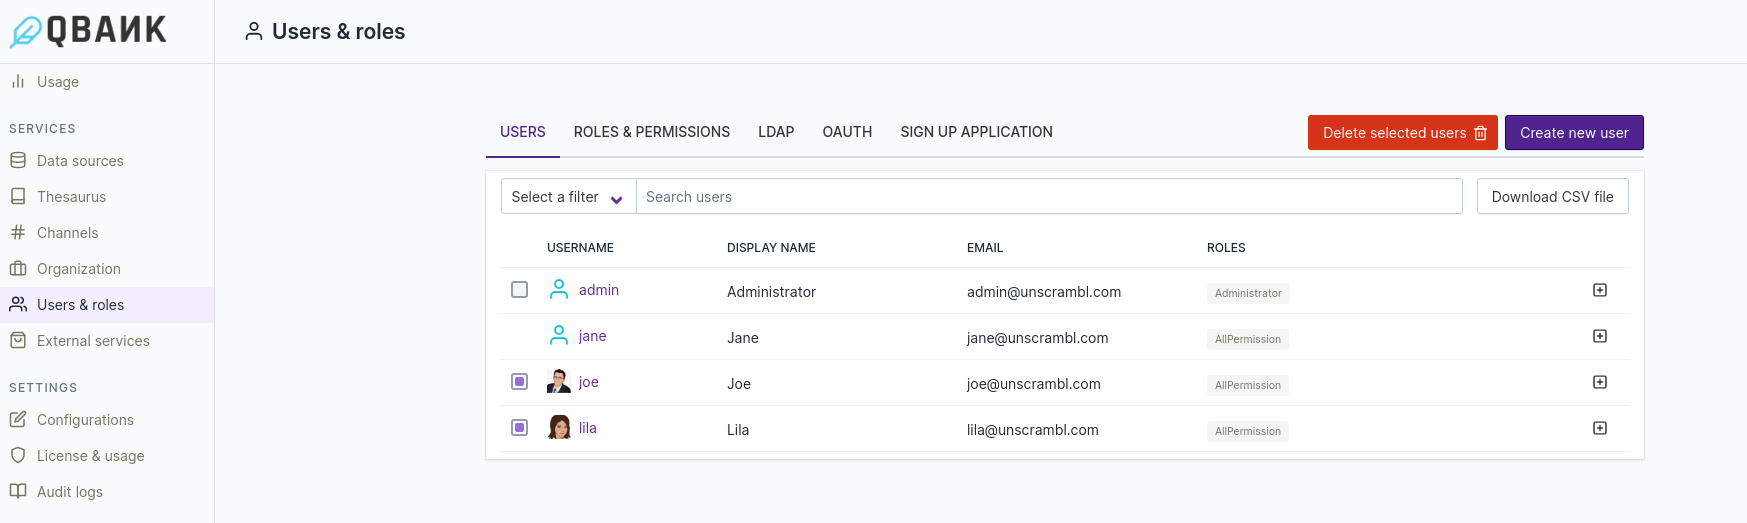
To delete one or more users, select the accounts you want to remove by ticking the checkbox beside them. Click the Delete Selected Users button to remove the accounts.
Forgot password
If this is enabled, and a user forgets their password, they can use the Forgot password? link to receive an email
containing the reset password
instructions. Qbo sends this to the user’s registered email address.
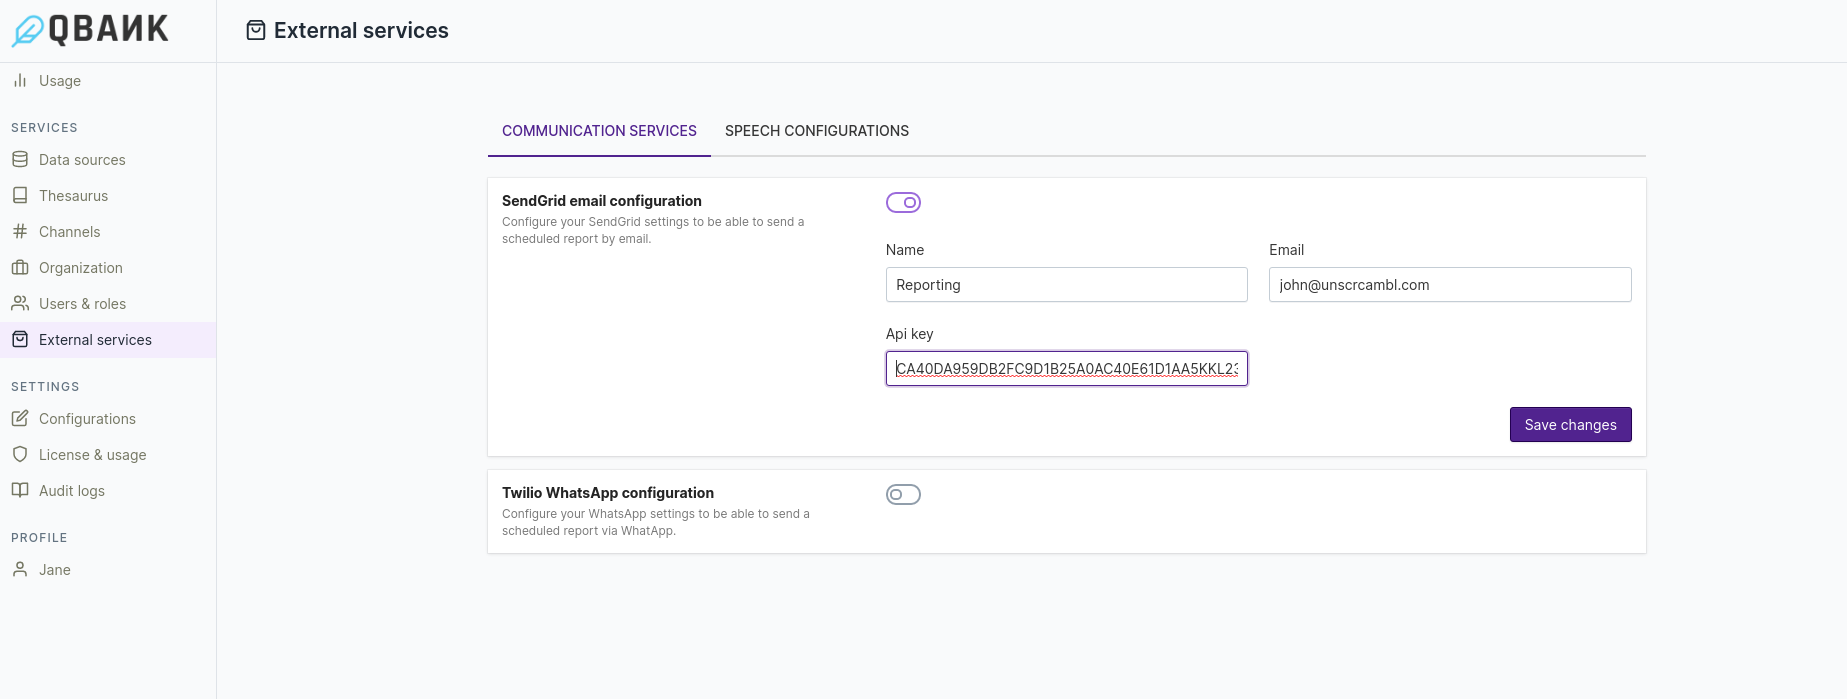
Prerequisites
To ensure that the forgot password functionality will work as expected:
Add the
resetPasswordConfigurationcode below to thechai.jsonfile.Configure the
send grid configurationsetting in the External services section.Map usernames to email addresses.
Add this code to chai.json:
"resetPasswordConfiguration": {
    "expiredResetPasswordLinkCleanupPeriodInDays": 1,
    "resetPasswordLinkExpirationWindowInMinutes": 30,
    "resetPasswordMailTemplateConfiguration": {
         "resetPasswordLinkExpirationWindowInMinutesParameterName": "minutes",
         "resetPasswordLinkParameterName": "activationLink",
         "templateId": "d-038c9bdc5a3949a39f55d622e2f7a945",
         "userDisplayNameParameterName": "name"
     }
  }
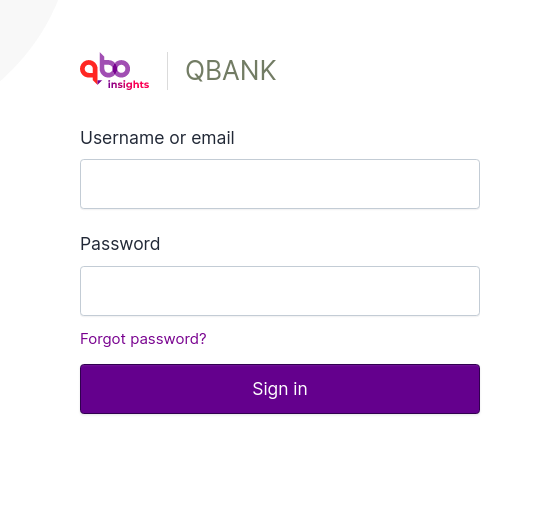
If configured correctly, you will see the Forgot password? option on your login screen.
Reset your password
Click the
Forgot password?link. Enter your username or email address in the Reset your password page. Click the Sent reset instructions button to reset your password.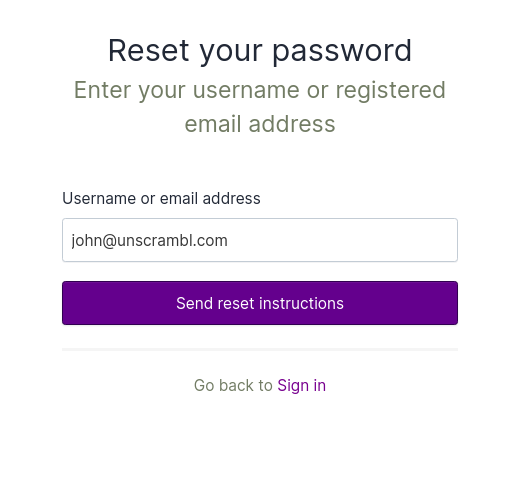
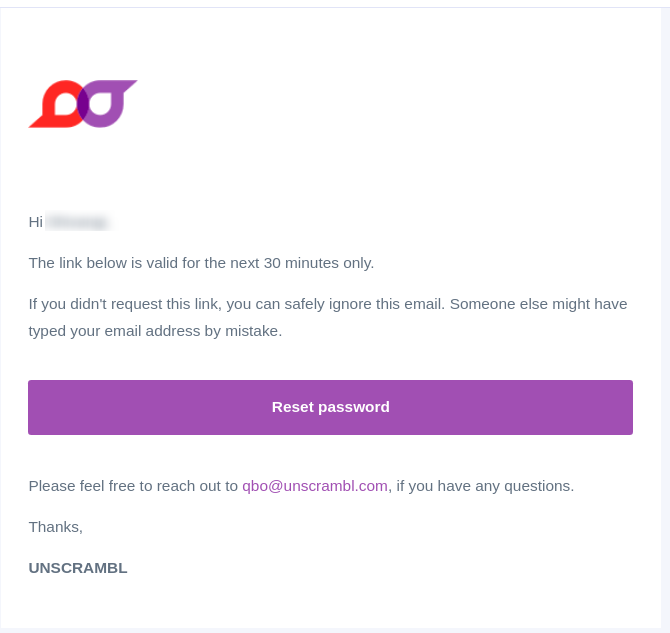
Qbo will send an email to your registered email address. Open the email and click the Reset password button.
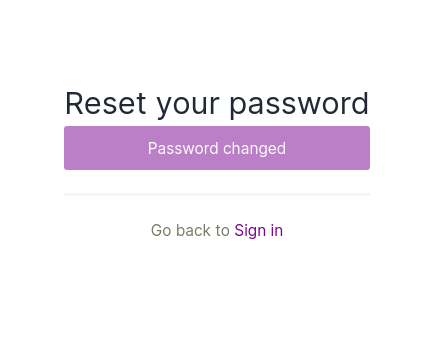
Enter your new password in the Reset your password page, enter it again to confirm, then click the Change password button.
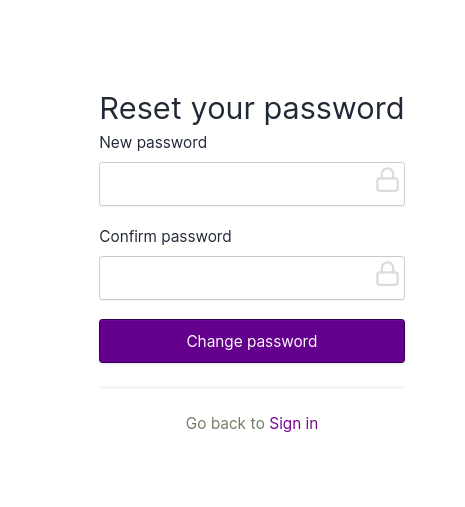
Click the Sign in link on the Password changed page. Log in with your new password.
Roles & Permissions
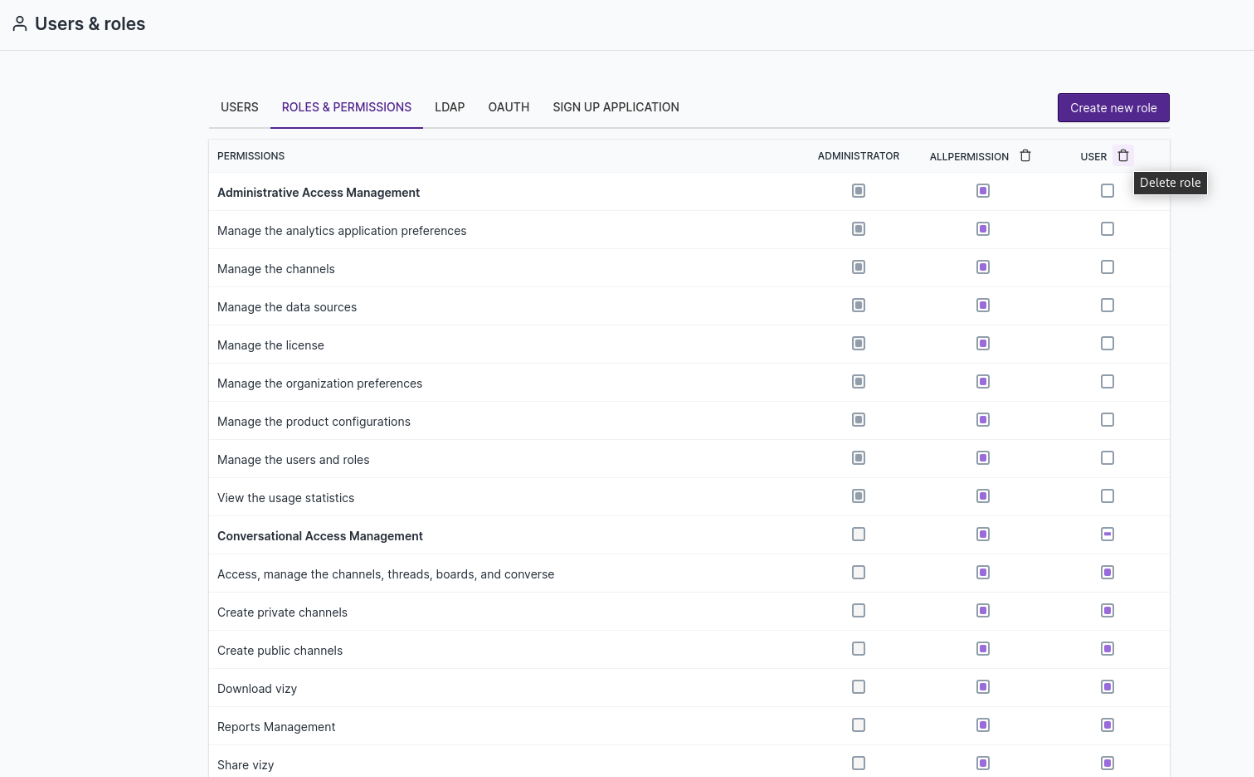
The roles tab displays the currently configured roles. You can also view the permissions associated with each role.
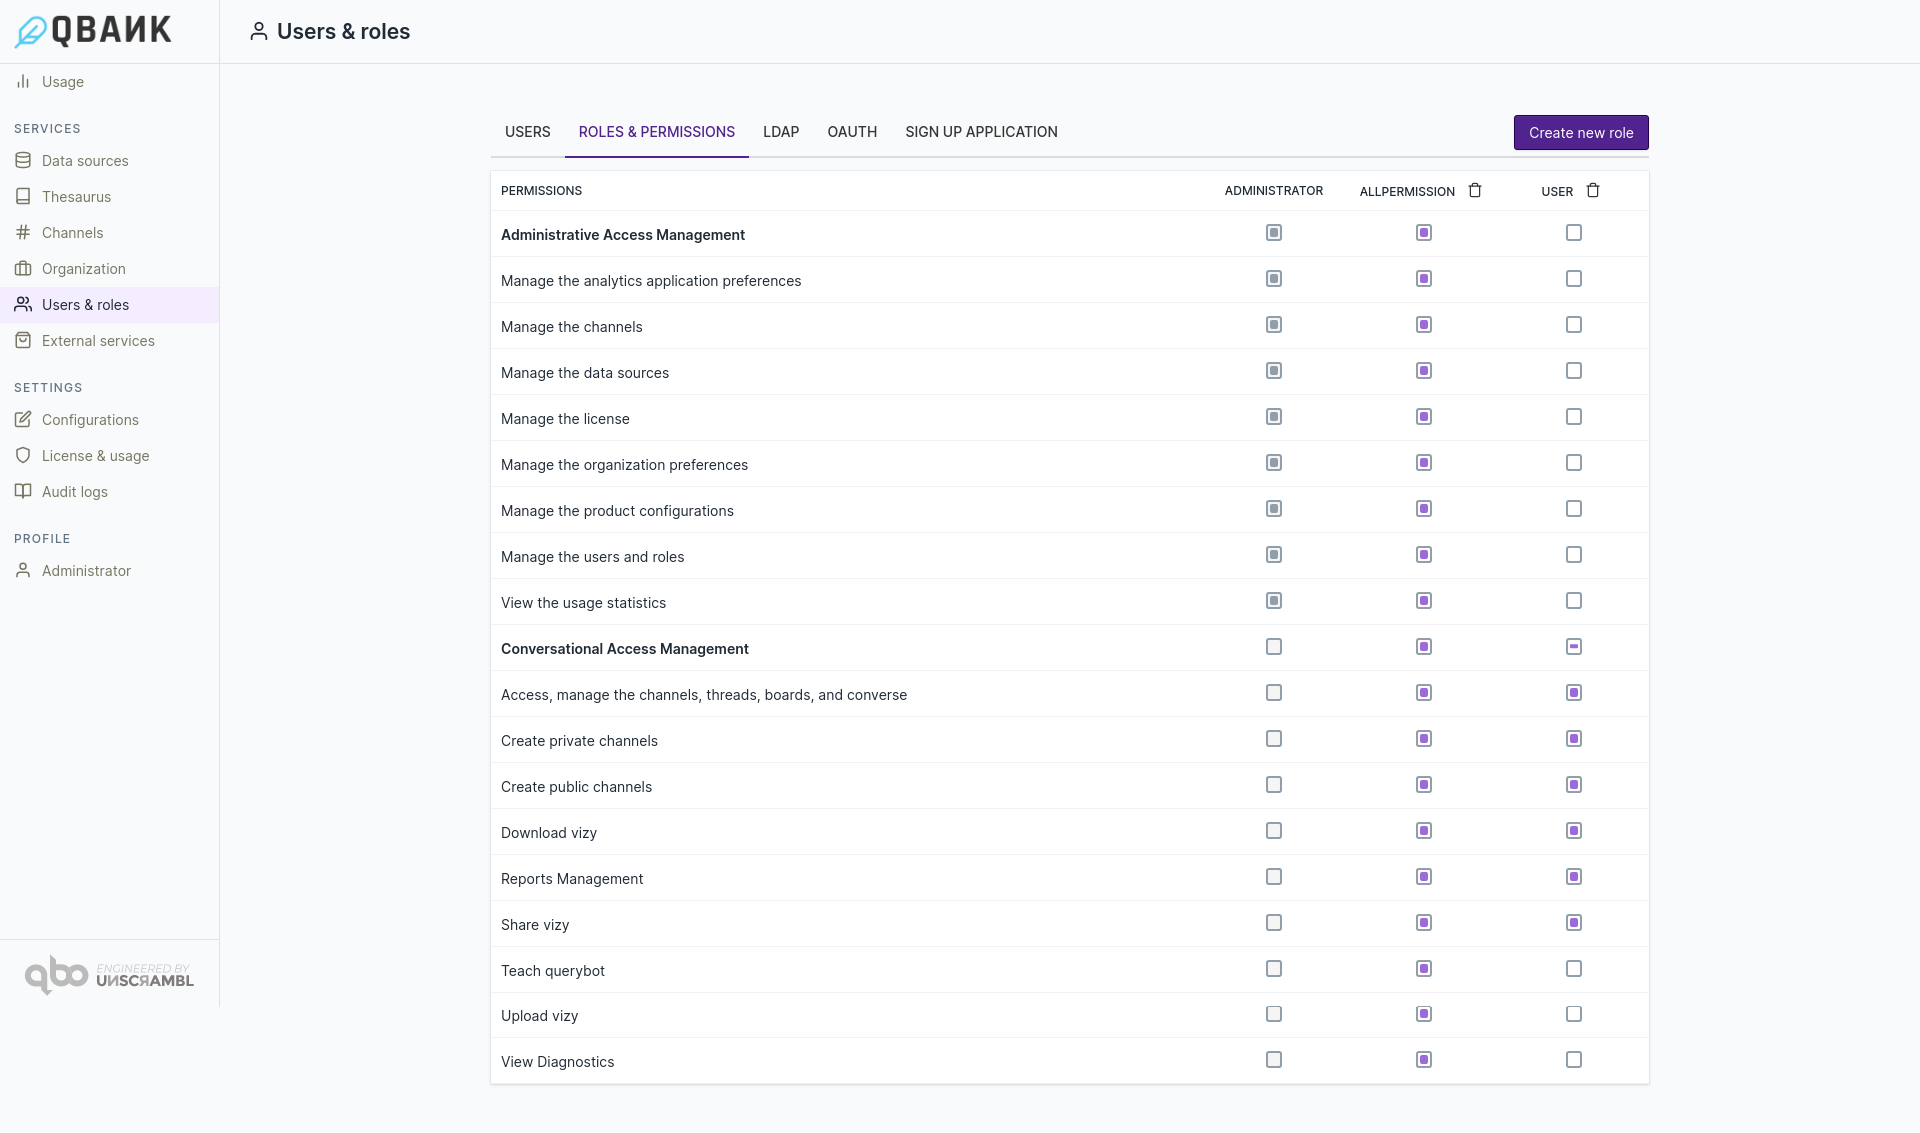
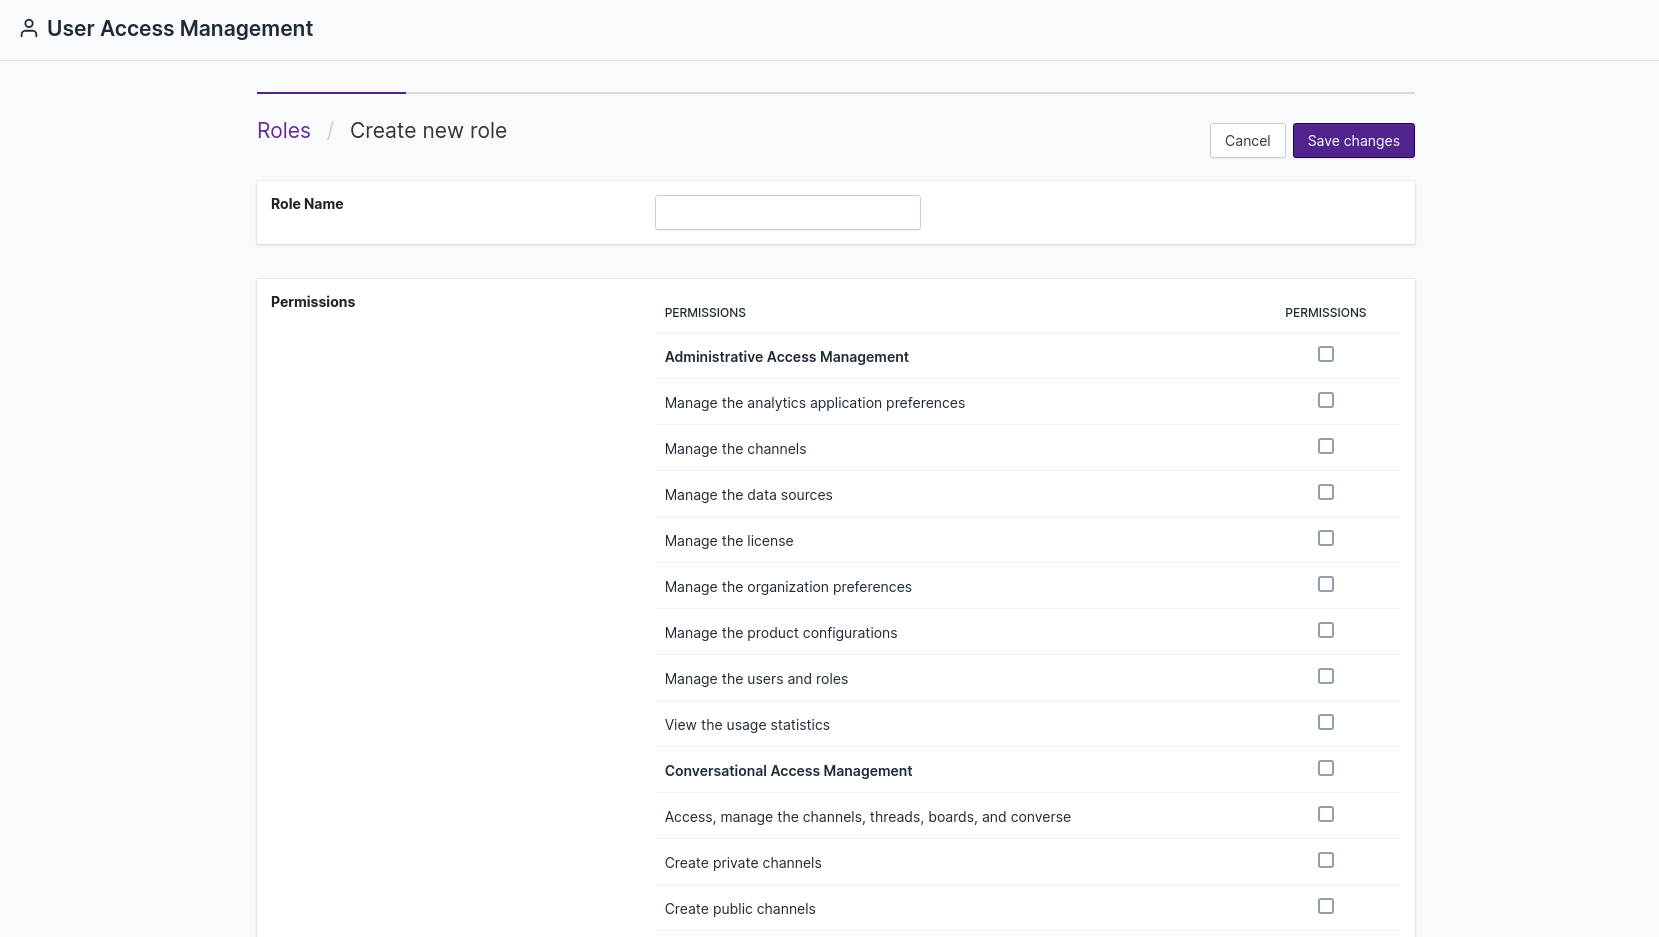
To create a role, click the Create new role button. Enter a name for the new role and assign permissions to it.
To delete a role, click on it and then click the Delete Selected Roles button that appears. Please note that to be deleted, a role must not be assigned to any user.
Note
Users with Administrator/AllPermissions roles cannot view their own user details.
LDAP configurations
If your organization has an LDAP server, you can add users from this server to Qbo. A user will then be able to sign into Qbo using their LDAP username and password. Qbo supports:
Active Directory
OpenLDAP
Active Directory
Server settings
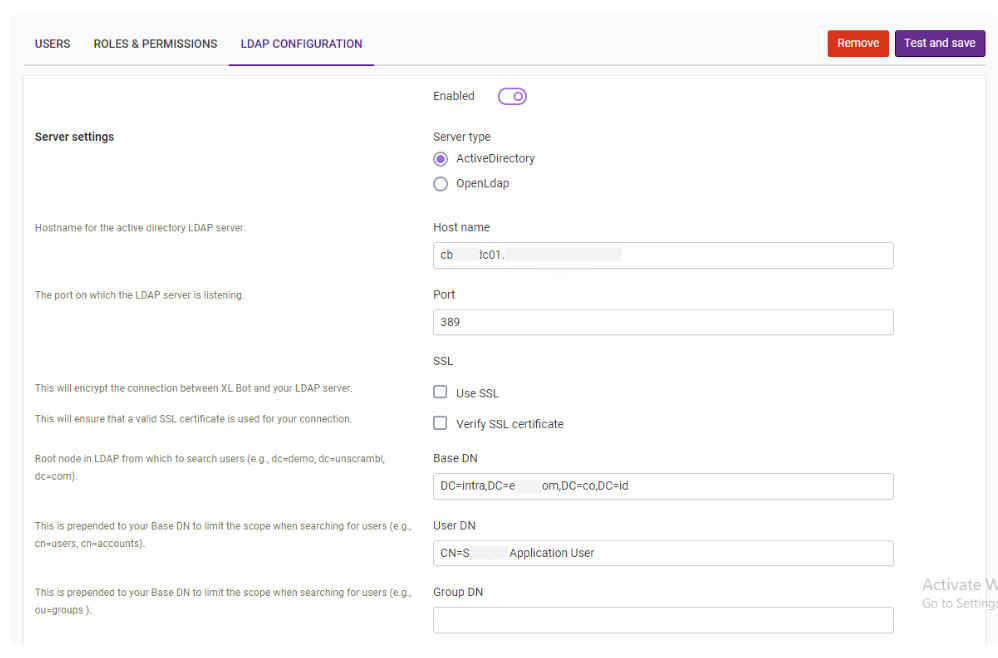
Server type:                    LDAP server type (ActiveDirectory).
Hostname:                       Host address of the LDAP server.
Port:                           Port of the LDAP server.
Use SSL:                        If the server uses a secure connection.
Verify SSL certificate:         If the server’s certificate is trusted by an authority (true) or self-signed
                                (false).
Base DN:                        Base directory of the LDAP server.
User DN:                        A name that includes an object's entire path to the root of the LDAP namespace.
Group DN:                       Currently unused.
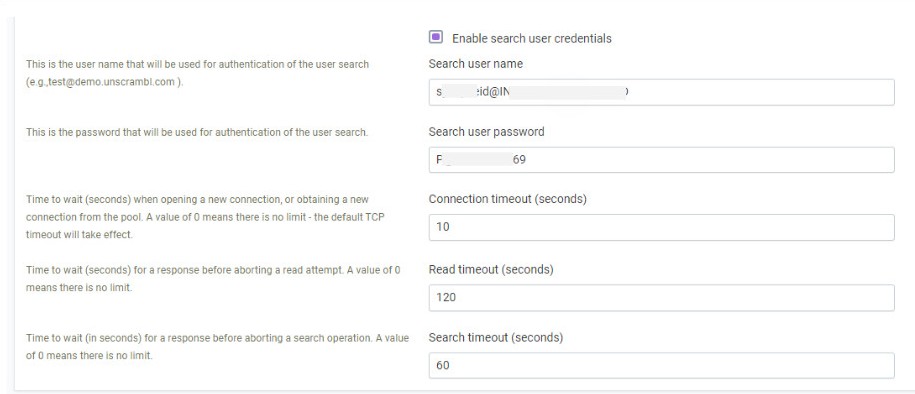
Enable search user credentials: This is used when we send search queries to the LDAP server. Some server
                                allows anonymous search requests (this can be left unchecked in those cases).
Search user name:               The user name that will be used for authentication of the user search
Search user password:           The password that will be used for authentication of the user search.
Connection timeout (seconds):   Timeout when connecting to the LDAP server.
Read timeout (seconds):         Timeout when waiting for an answer from the LDAP server.
Search timeout (seconds):       Timeout when waiting for search query from the LDAP server.
User schema

User schema specifies how a user is represented by the LDAP server in an organization.

User object class:                user
Username attribute:               sAMAccountName
Username RDN attribute:           dn
User first name attribute:        givenName
User last name attribute:         sn
User display name attribute:      displayName
User email attribute:             userPrincipalName
User unique identifier attribute: sAMAccountName
For example, John Doe in an organization’s Active Directory LDAP server:
{
"users": [
    {
    "dn": "CN=John Doe,OU=Vendor,DC=intra,DC=yourcompany,DC=co,DC=id",
    "userPrincipalName": "SCRAM.JohnS@intra.yourcompany.co.id",
    "sAMAccountName": "SCRAM.JohnS",
    "mail": "SCRAM.JohnS@ab.co.id",
    "whenCreated": "20190422113605.0Z",
    "pwdLastSet": "132305589928005513",
    "userAccountControl": "512",
    "sn": "Doe",
    "givenName": "John",
    "cn": "John Doe",
    "displayName": "scram.John Doe"
    }
    ],
    "groups": [

    ],
    "other": [

    ]
    }","time":"2020-06-01T05: 48: 44.336Z","v":0} Full result {"users":[{"dn":"CN=JohnDoe,
    OU=Vendor,
    DC=intra,
    DC=yourcompany,
    DC=co,
    DC=id","userPrincipalName":"SCRAM.JohnS@intra.yourcompany.co.id","sAMAccountName":"SCRAM.JohnS","mail":"SCRAM.JohnS@ab.co.id",
    "whenCreated":"20190422113605.0Z","pwdLastSet":"132305589928005513","userAccountControl":"512","sn":"Doe",
    "givenName":"John","cn":"JohnDoe","displayName":"scram.JohnDoe"}],"groups":[],"other":[]}
}
Add an LDAP user to Qbo by searching and updating user details.
Search LDAP User
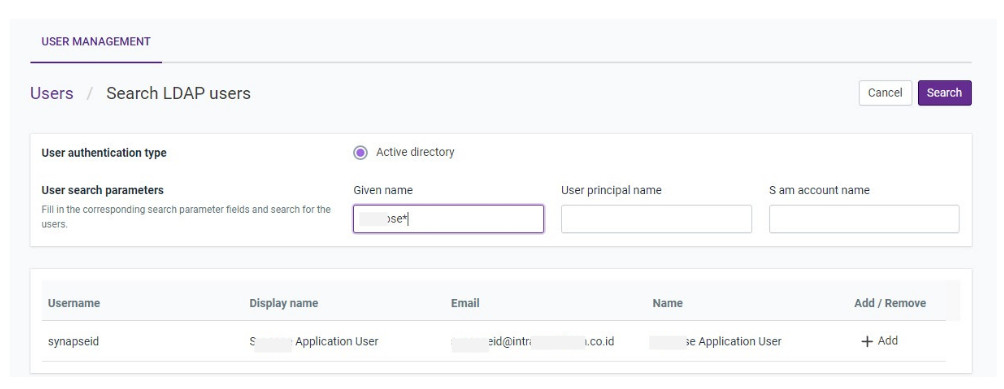
Add LDAP user to Qbo

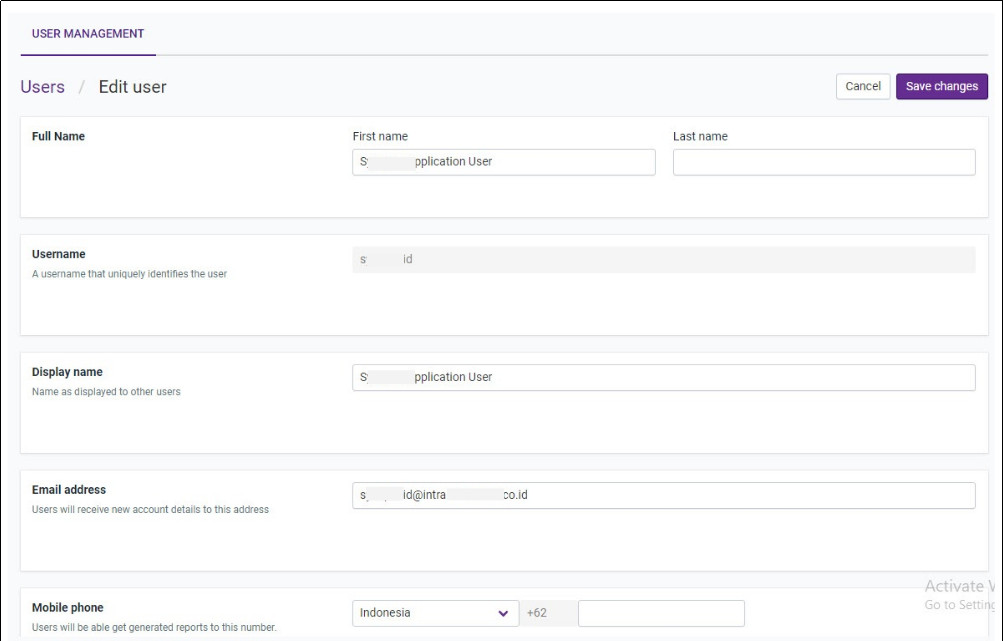
Edit LDAP (user) added
OpenLDAP
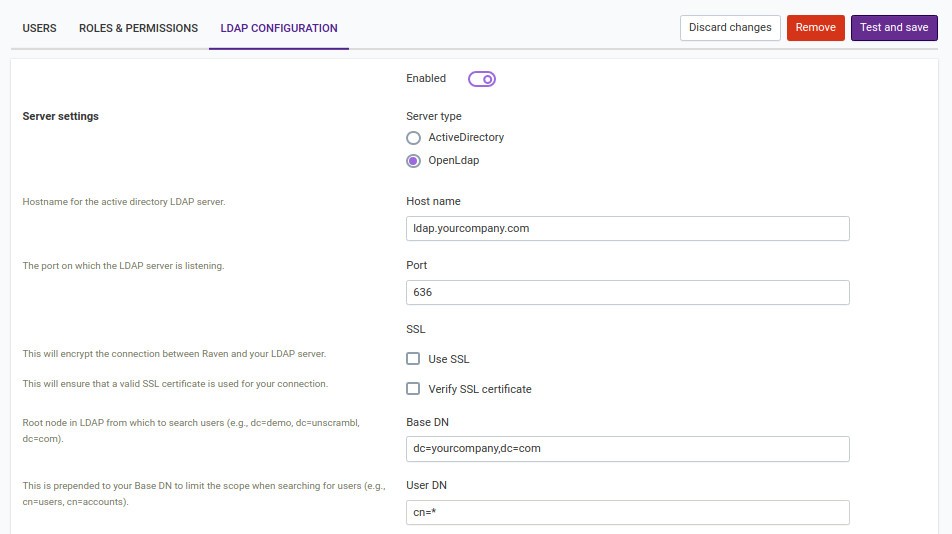
Server settings
Server type:                    LDAP server type (Open LDAP).
Hostname:                       Host address of the LDAP server.
Port:                           Port of the LDAP server.
Use SSL:                        If the server uses a secure connection.
Verify SSL certificate:         If the server’s certificate is trusted by an authority (true) or self-signed
                                (false).
Base DN:                        Base directory of the LDAP server.
User DN:                        UserDN.
Group DN:                       Currently unused.
Enable search user credentials: Used when we send search queries to the LDAP server. Some servers
                                allow anonymous search requests (this can be left unchecked in those cases).
Connection timeout (seconds):   Timeout when connecting to the LDAP server.
Read timeout (seconds):         Timeout when waiting for an answer from the LDAP server.
Search timeout (seconds):       Timeout when waiting for search query from the LDAP server.
User schema
User schema sets how a user is represented by the LDAP server in an organization.

User object class:                inetOrgPerson
Username attribute:               uid
Username RDN attribute:           dn
User first name attribute:        givenName
User last name attribute:         sn
User display name attribute:      displayName
User email attribute:             mail
User unique identifier attribute: uid
For example, John Doe in an organization’s LDAP server:
{
"dn": "cn=John Doe,ou=People,dc=yourcompany,dc=com",
"controls": [],
"cn": "John Doe",
"givenName": "John",
"gidNumber": "500",
"sn": "Doe",
"objectClass": [
    "inetOrgPerson",
    "posixAccount",
    "top",
    "sambaSamAccount"
],
"uid": "john",
"uidNumber": "10009",
"homeDirectory": "/gemenon/home/john",
"loginShell": "/bin/bash",
"mobile": "+1 (222) 213 1234",
"sambaSID": "S-2-6-31-1383322941-1231234567-1345676223-1998",
"displayName": "John Doe",
"sambaAcctFlags": "[U]",
"mail": "john@yourcompany.com",
"title": "Software Developer"
}
Add LDAP users to Qbo by searching and updating user details.
OAuth configurations
You can add OAuth - Open Authorization - to allow users to login with OAuth services like Active Directory. OAuth does not share password information, but instead uses authorization tokens to demonstrate user-Qbo identity. Qbo supports OAuth for Active Directory. It is not necessary to create a user for Qbo, nor is it necessary to remember any username or password for Qbo.
To configure OAuth, you’ll need a client ID and client secret. Register your application on the Azure portal
to get these.
Find out more about OAuth about OAuth.
Register an application
Before your application can authenticate Active Directory users, you must register your application and get its
client ID and client secret.
Navigate to the Microsoft identity platform for developers in the Azure portal - App registrations page. You can login using a personal or work Microsoft account.
Click New registration.

Enter your application’s registration information on the Register an application page:
In the Name section, enter a meaningful application name that will be displayed to users of the app. For example,
qbo.In the Supported account types section, select Accounts in any organizational directory and personal Microsoft accounts.
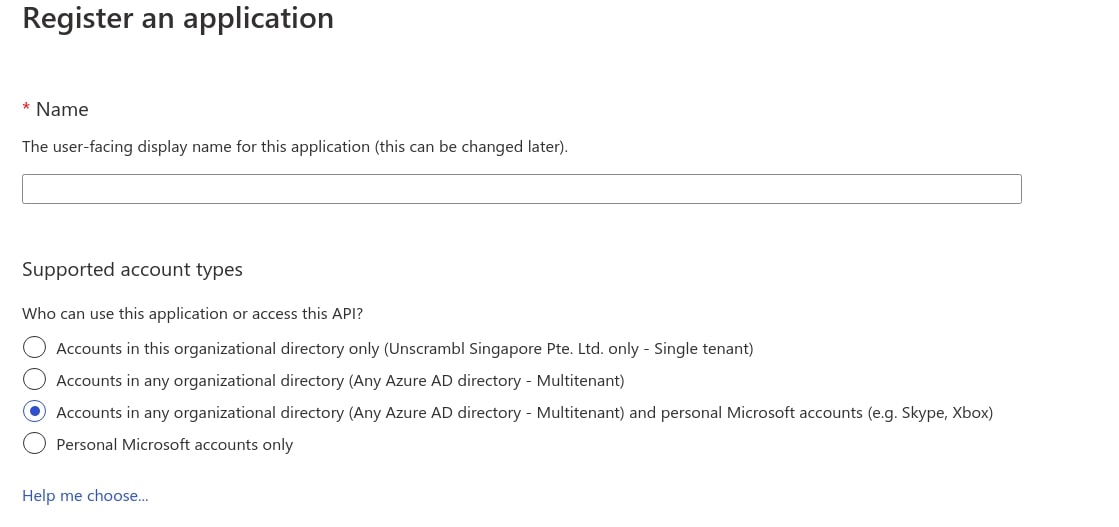
Click Register to create the application.
On the app Overview page, copy the Application (client) ID value . You can use it as the
client idduring OAuth configuration.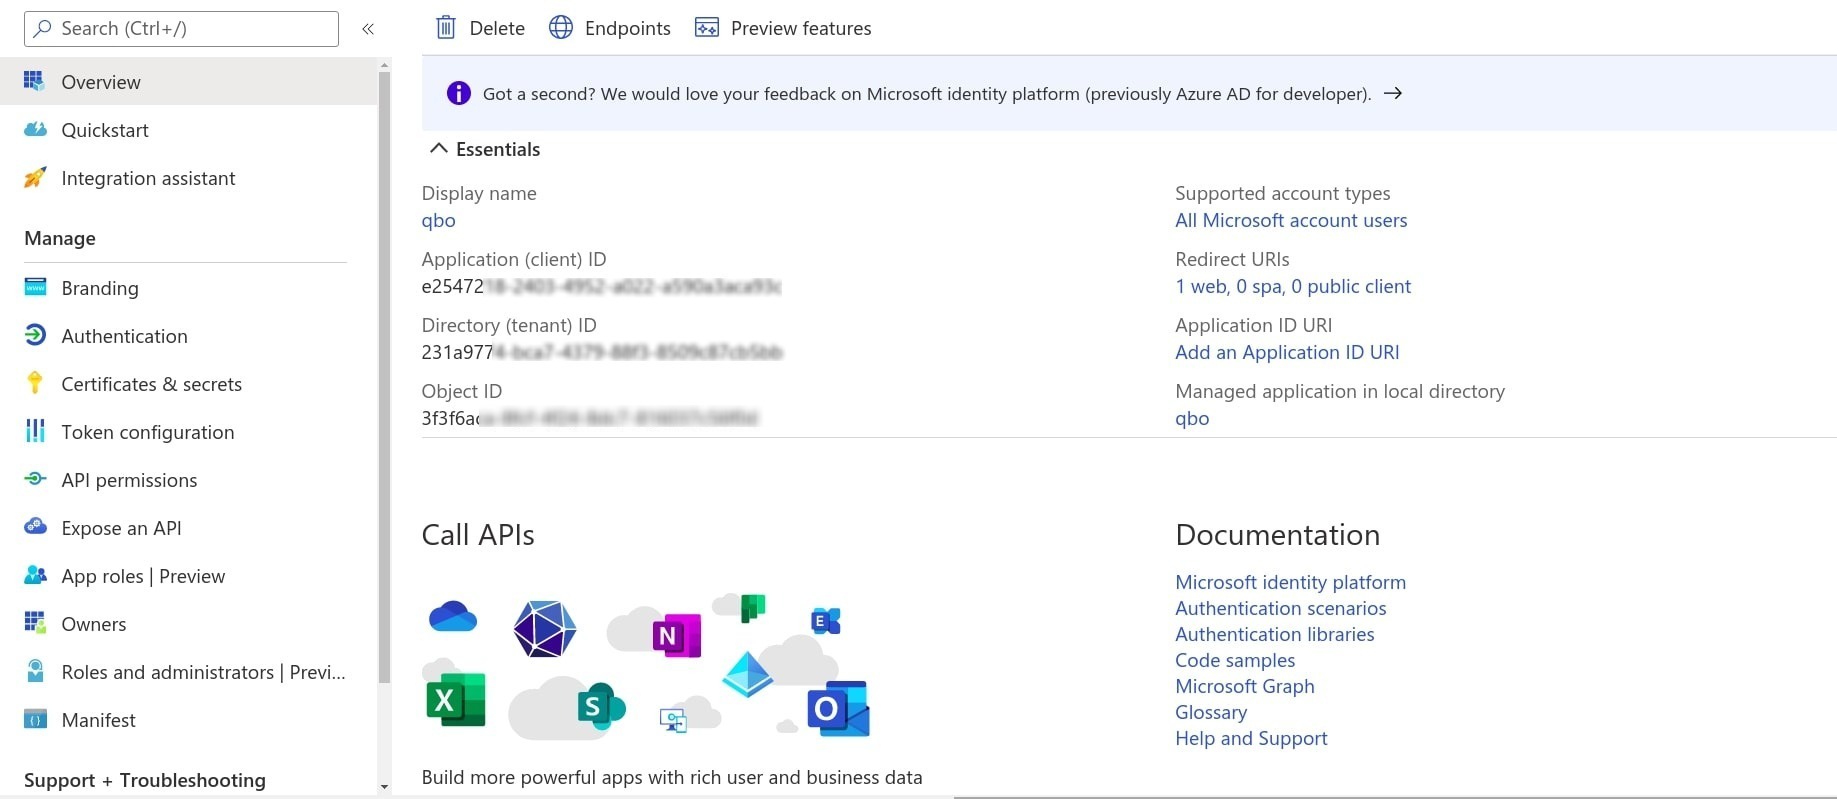
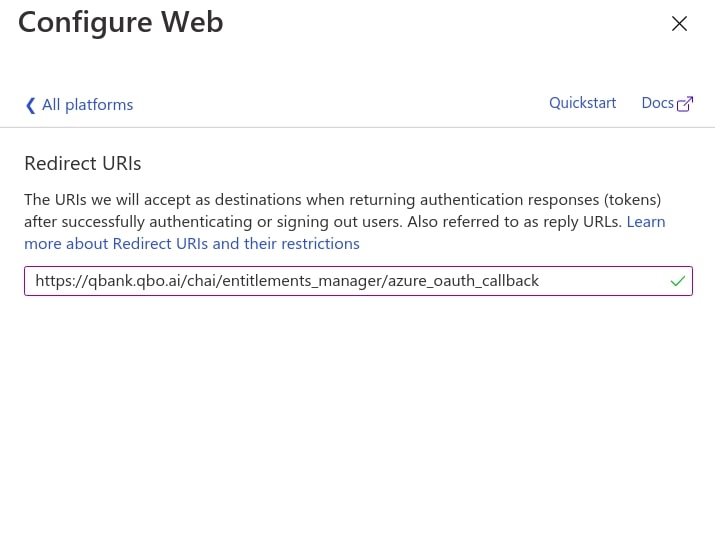
Click Authentication under Manage. Click the Add a platform button and select Web applications.

For web applications, provide the base URL of your application. For example,
http://localhost:3154/chaiorhttps://qbank.qbo.ai/chaimight be the URL for a web application.Add
entitlements_manager/azure_oauth_callbackin your base URL. For example,https://qbank.qbo.ai/chai/entitlements_manager/azure_oauth_callbackand click the Configure button.
Note
The redirect URI must begin with the scheme https. There are some exceptions for localhost redirect URIs.
For web applications, select Certificates & secrets under Manage. Click the New client secret button. Enter a value in Description - for example, NewSecret, select any option for Expires, and click Add.
Copy the Application (client) secret value. While configuring OAuth, you can use it as the
client secret.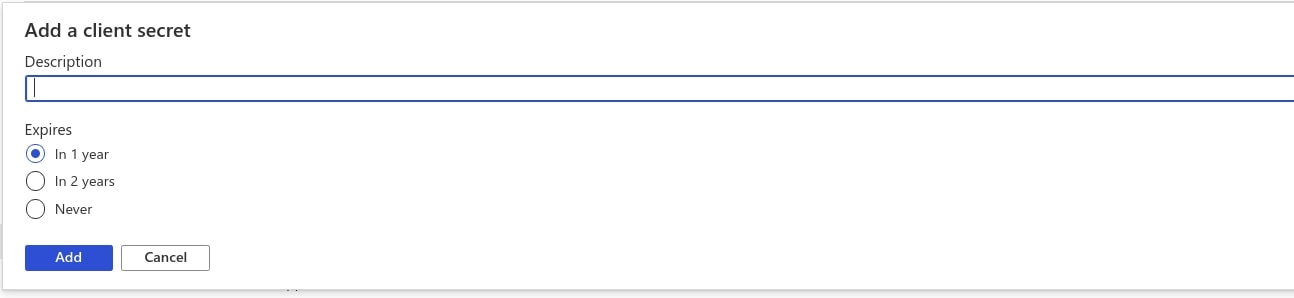
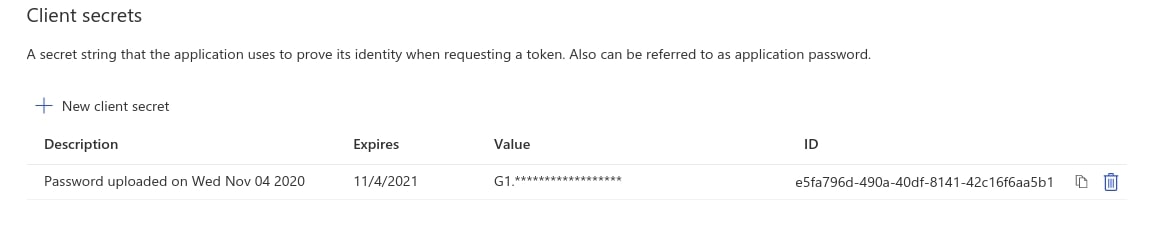
Note
Ensure you copy the client secret value - you won’t see this again next time you visit this screen.
Configure Qbo
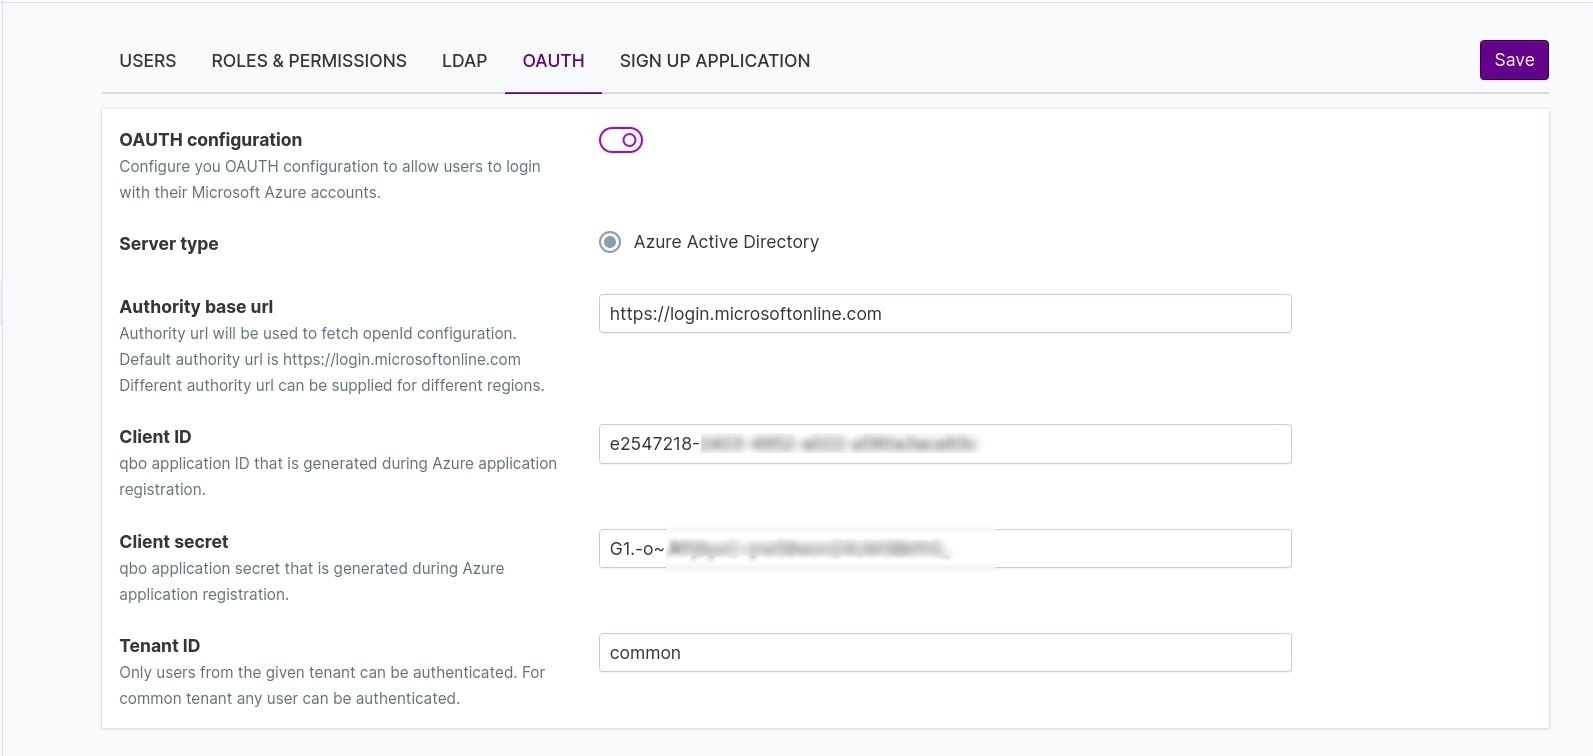
Authority base url: For Azure, the authority base URL should be https://login.microsoftonline.com.
Client ID: The application (client) ID that the Azure portal (during registration) assigned your app.
Client secret: The application (client) secret that you created in the app registration portal for your app.
Tenant ID: The tenant value in the path of the request can be used to control who can sign into the application. To
ensure that your application supports both personal accounts and Azure work accounts,
we suggest that you use Common as the tenant authentication.
Login page: Users will now see the Sign in with Microsoft button on their login screens.
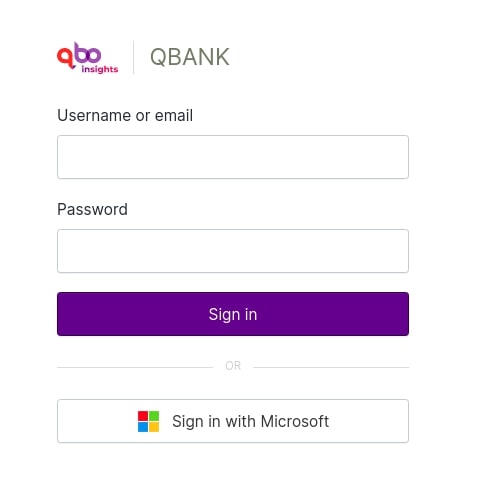
You can connect to Qbo by clicking the Sign in with Microsoft button.
Signup applications
You can add multiple users by allowing them to sign up with your Qbo instance.
Select Users & Roles from the navigation menu and click the Sign up Application tab
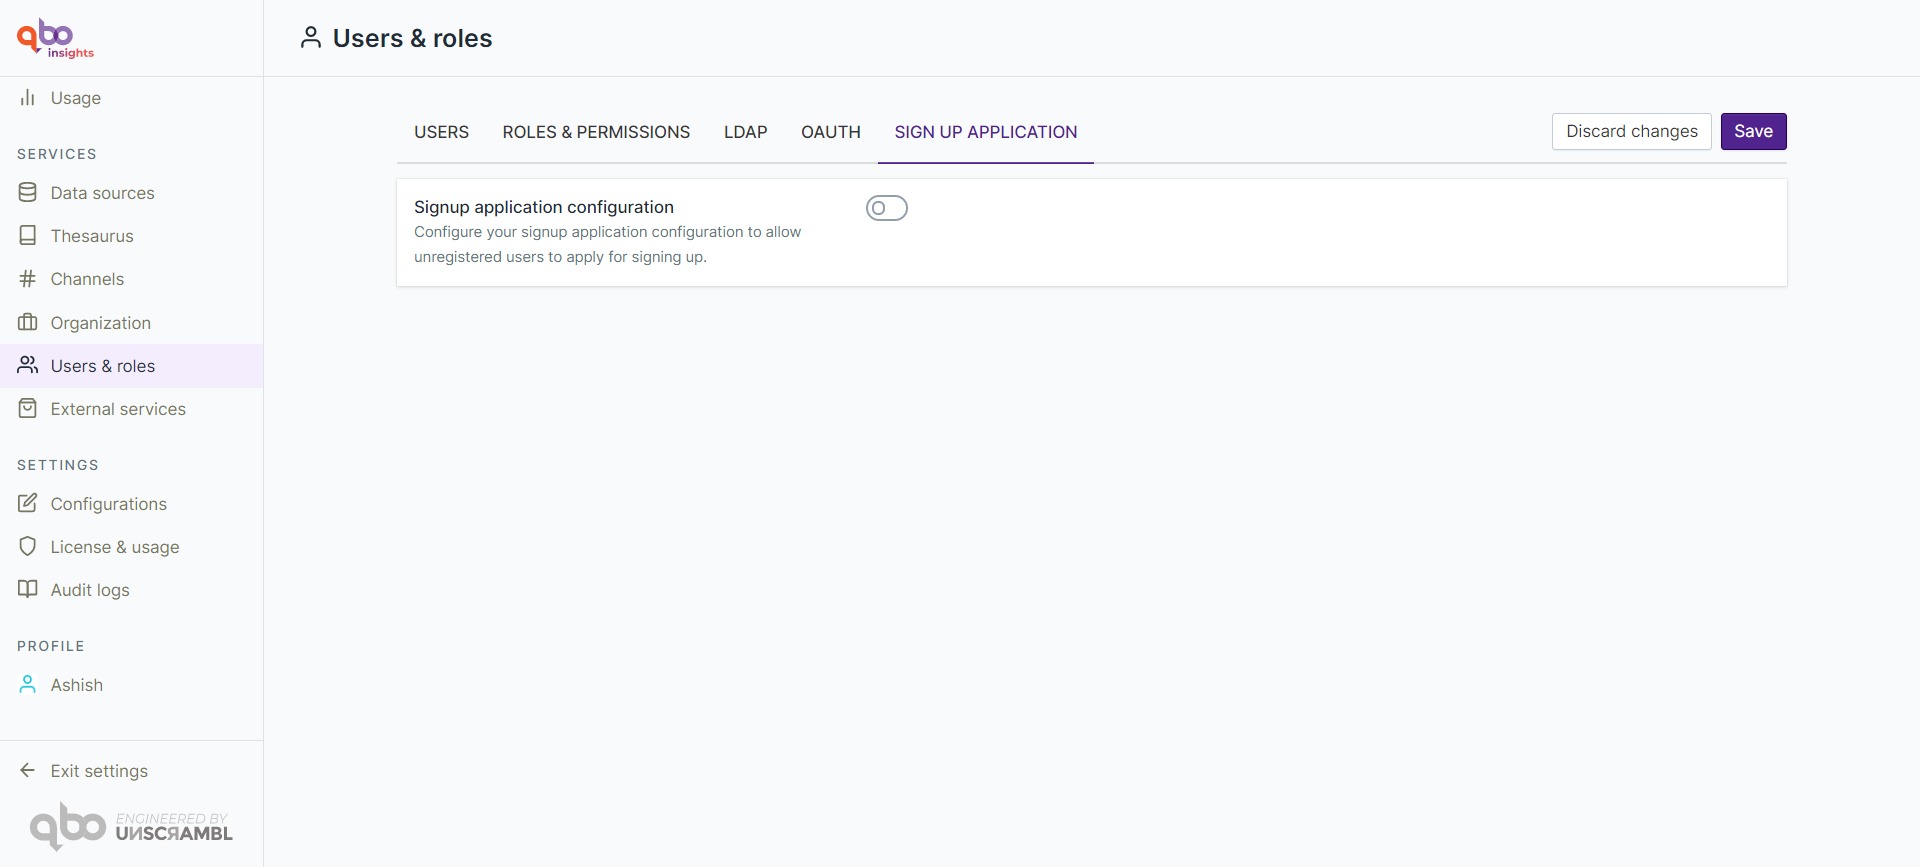
Enable Signup application configuration and input these fields:
Default user roles: Select a default user role to be assigned to new users.
Default data access role names: Select data sources that a new user will have access to by default.
Allowed email domains: Restrict unauthorized access to your Qbo instances by whitelisting specific domains and only allowing users from those domains to access the application. To add a domain, enter
@and then the domain name.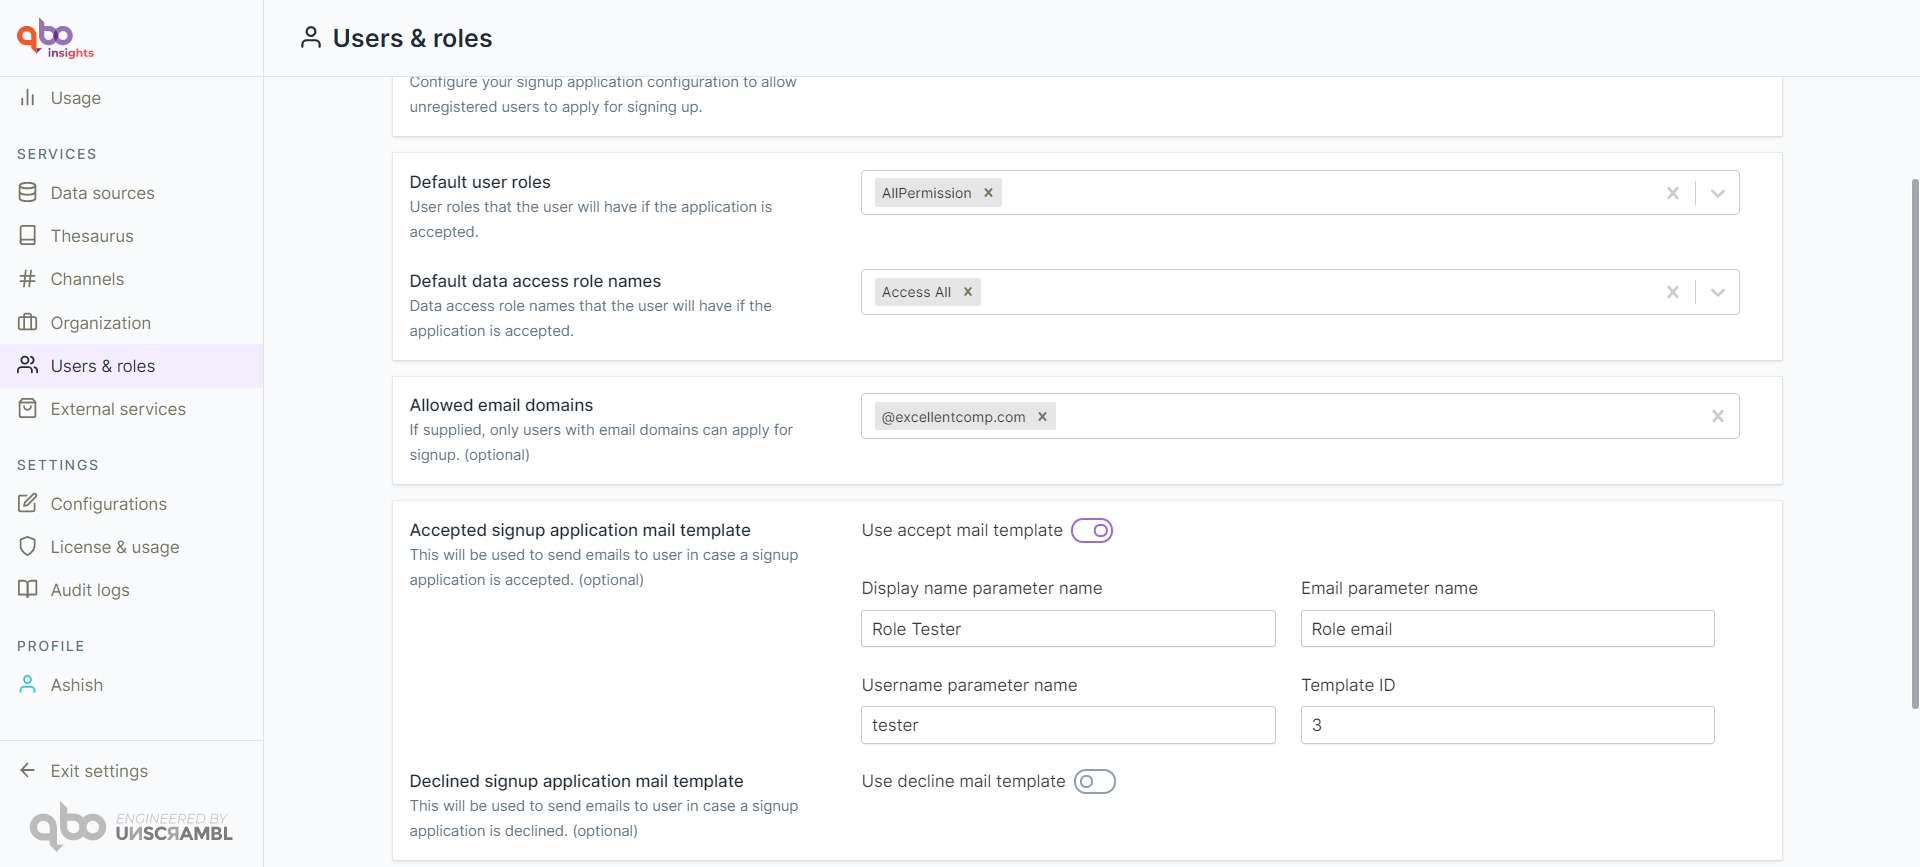
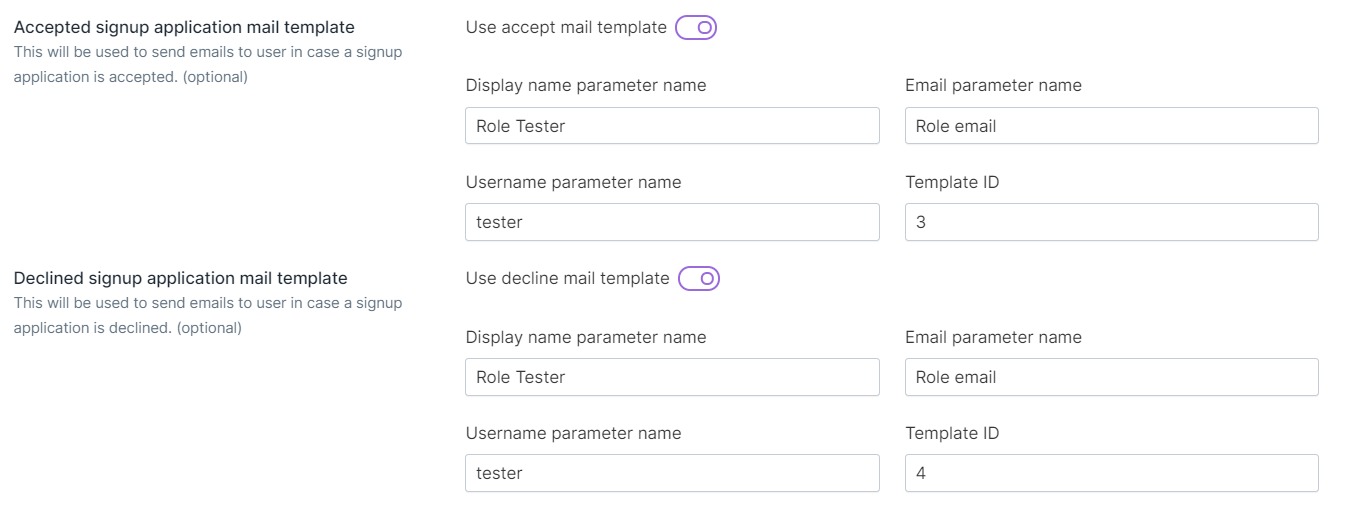
Accepted signup application mail template
Display name parameter name - Display name in the email.
Email parameter name: Sender name for the email.
Username parameter name: Username of the email sender.
Template ID: Enter the ID of an email template to use for successful signup emails.
Declined signup application mail template
Display name parameter name: Display name for the email.
Email parameter name: Email sender name for the email.
Username parameter name: Username of the email sender.
Template ID: Enter the ID of an email template to use for emails to users whose signup was declined.
Auto process configuration
You can automate the process of accepting and declining signups when any user is qualified, based on the conditions you configure.
Select:
Auto accept to automatically create user accounts for signups that meet your conditions.
Auto decline to automatically reject signups that don’t meet your conditions.
None to use the default manual process for accepting or rejecting applications.

To save your configuration changes, click the Save button in the top right corner of the page. Once changes are saved, users will be allowed to self-register.

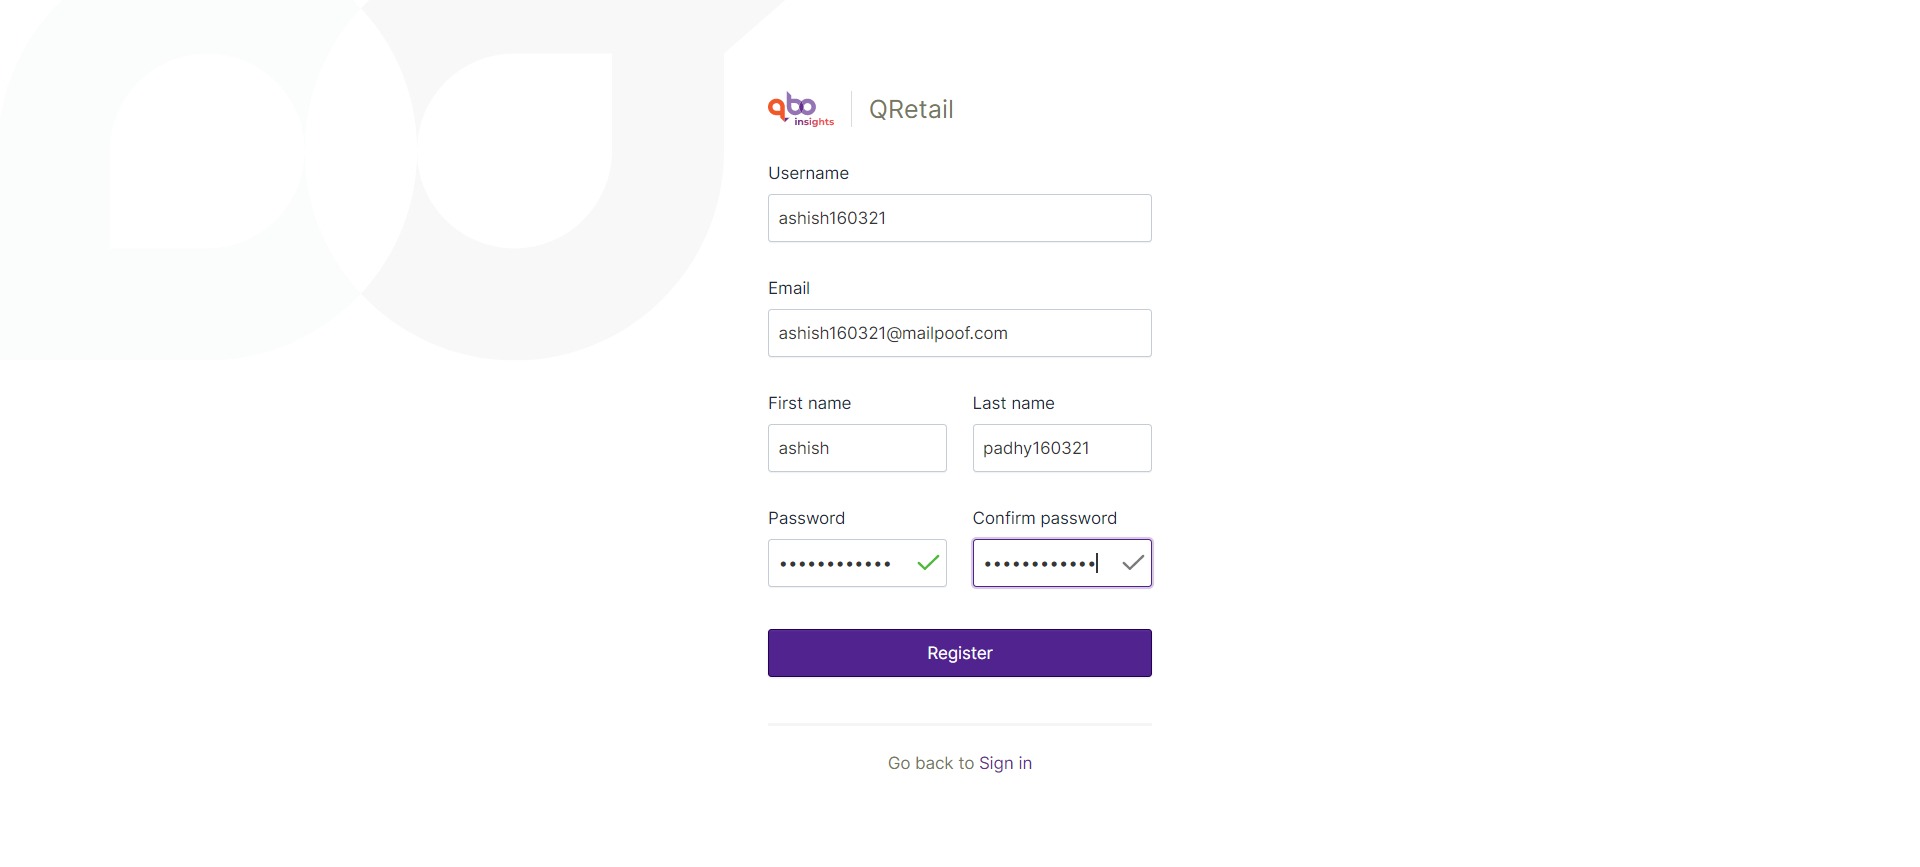
Registration page for users
Your users can register themselves to get access to Qbo and share their details.
View the information submitted by users requesting access in the Users and Roles section, Users tab, of Qbo. Click the ellipsis or kebab menu in the top right corner of the screen and select Signup application.
Click Accept or Decline for each application.

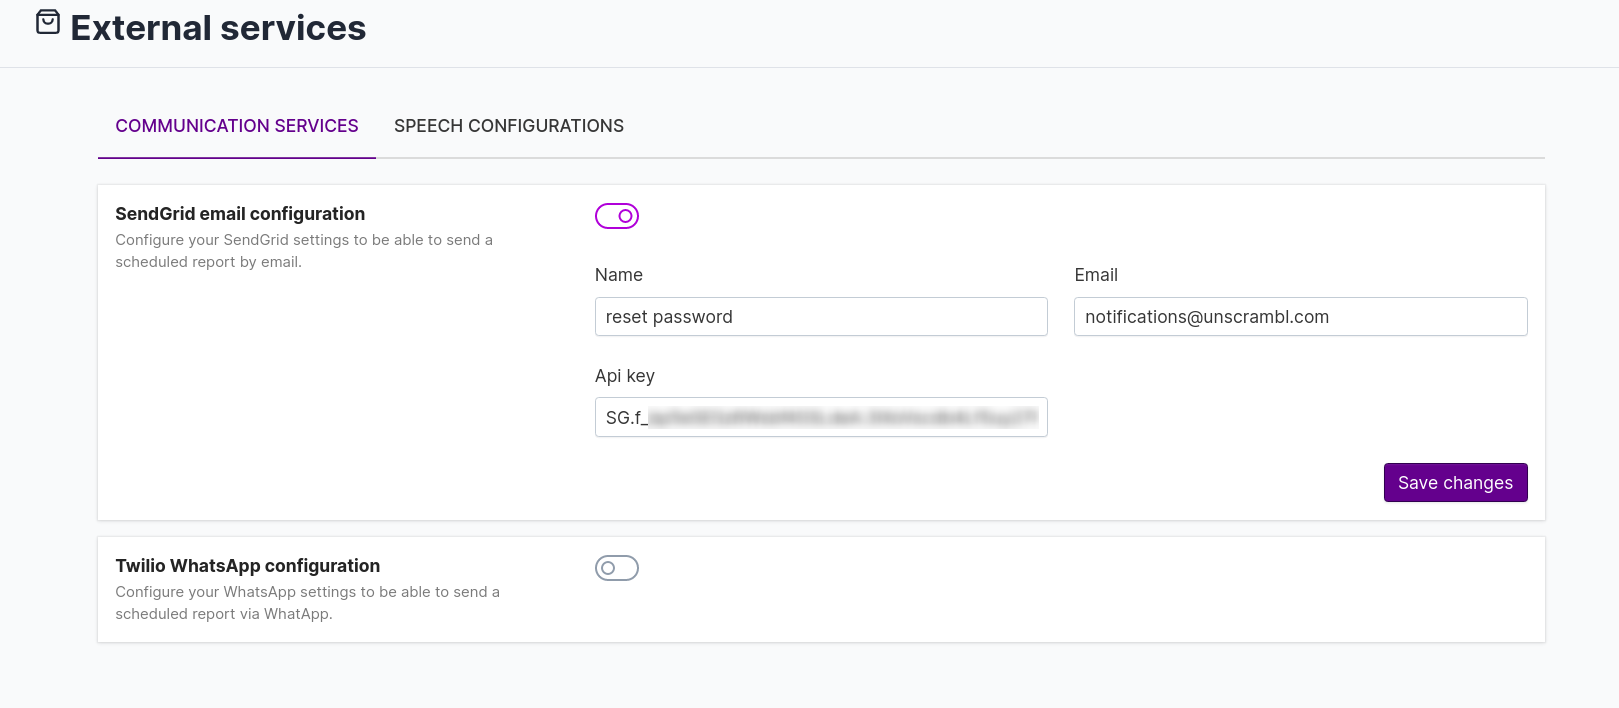
External services
External services allow Qbo to communicate with users using voice-enabled conversations, and to send reports using email or WhatsApp.
Click the Communication Services tab to configure Qbo to send reports using email or WhatsApp.
Click the Speech Configurations tab to configure Qbo for voice conversations with users.
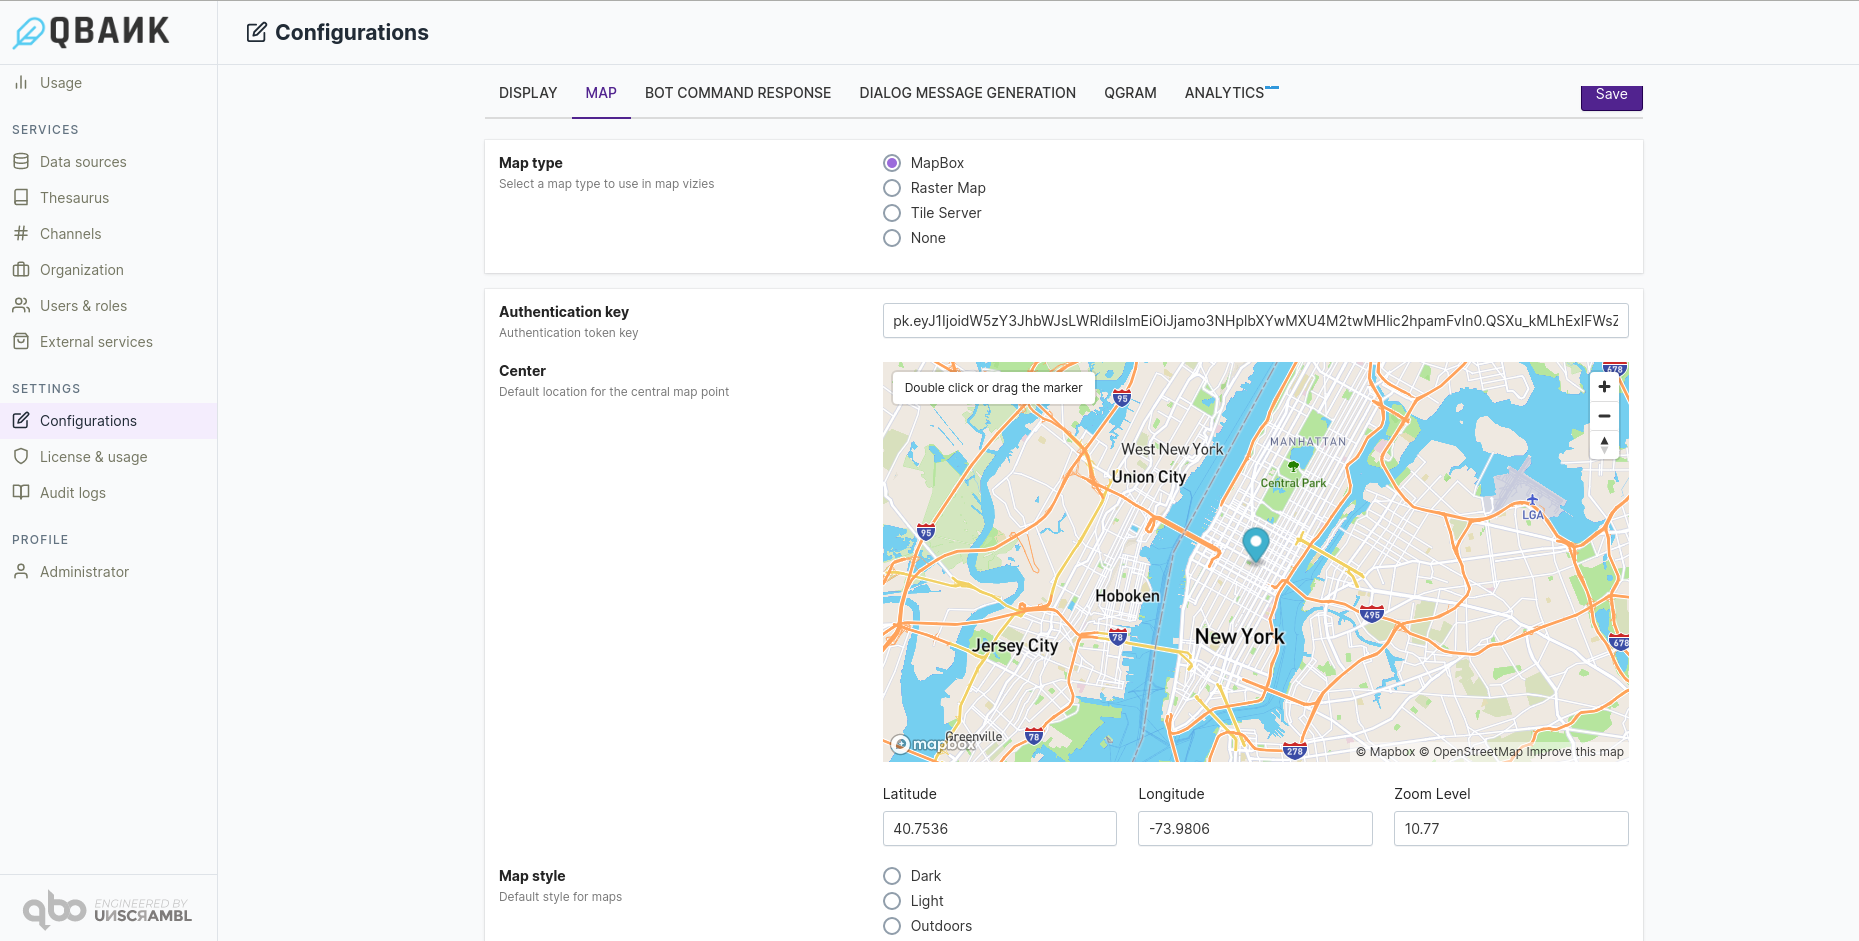
Configuration
You can change how charts and other visuals are displayed in the Configurations module. You can modify:
colors used
transparency
default currency
display locale.
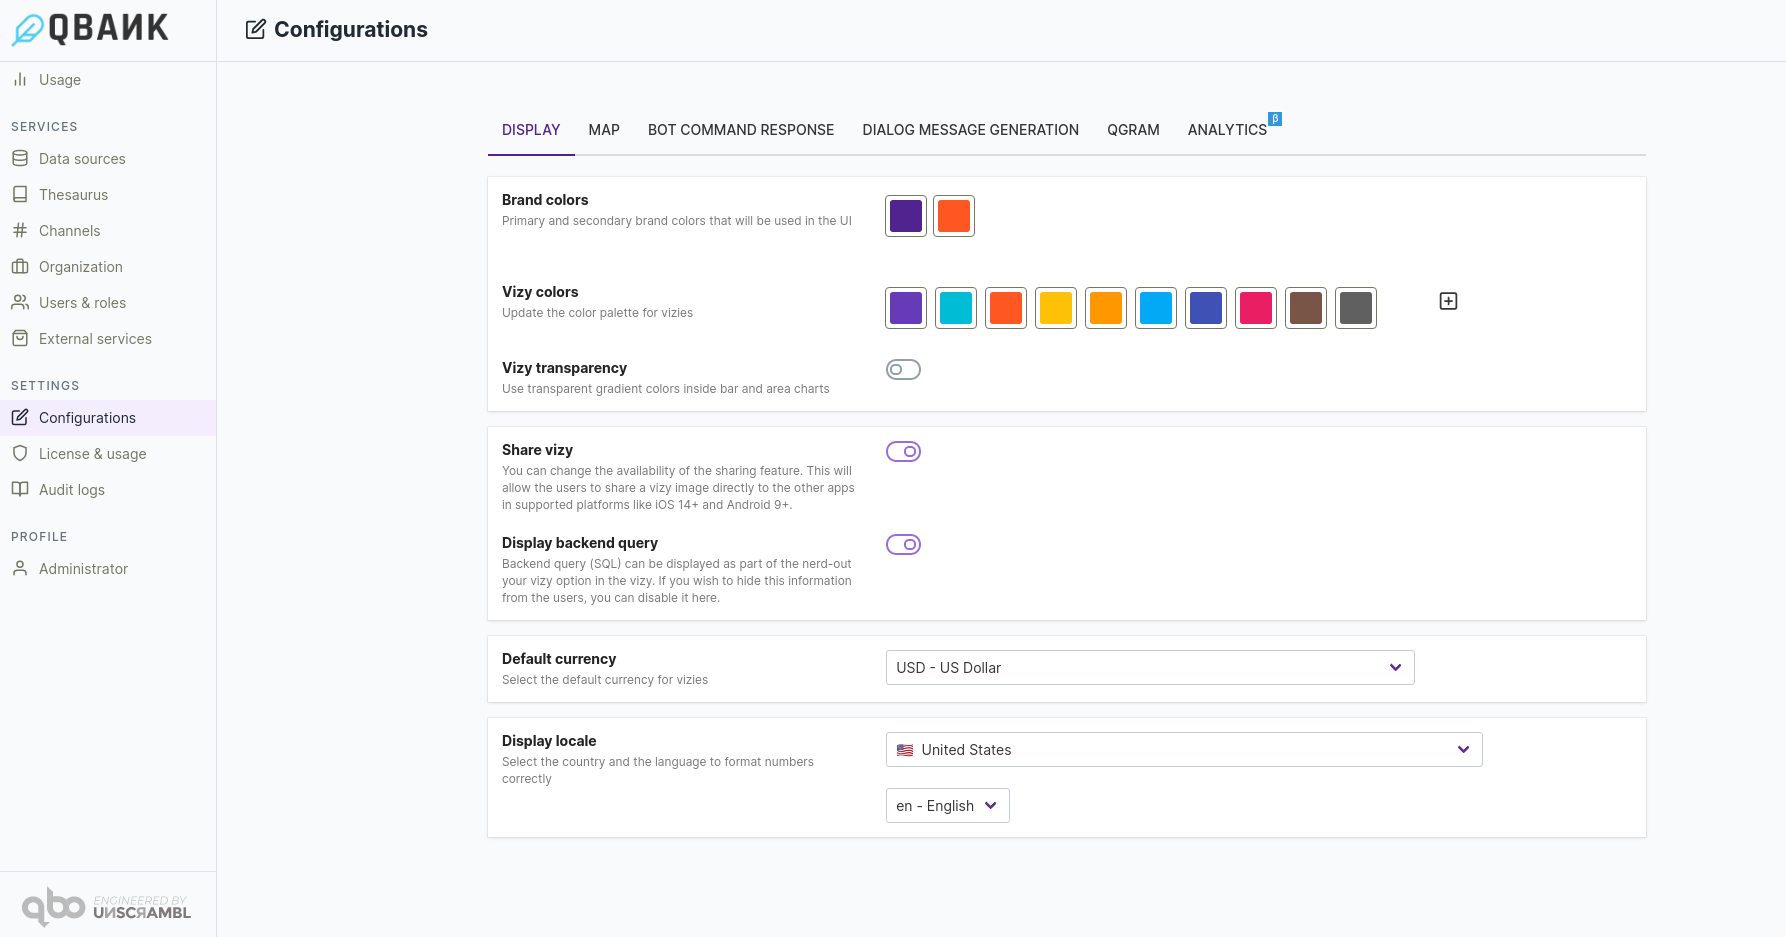
You can modify geographic visualizations on the Map Configurations tab.
Bot Command Response
Users can enter bot commands in conversational threads to complete tasks like linking a Microsoft Teams
account, asking for help, or choosing the data source they want to use. For example, if a user
doesn’t know how to start a conversation with Qbo, they can use the help bot command to find out how.
You can configure Qbo with new bot commands.
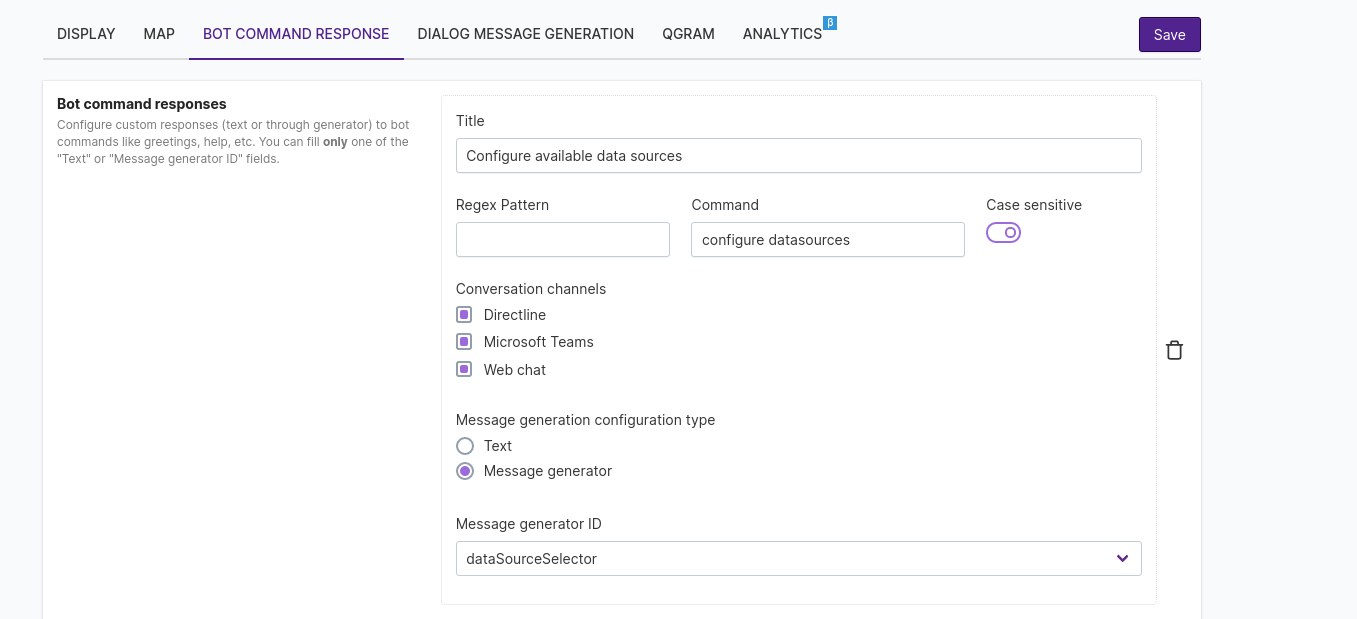
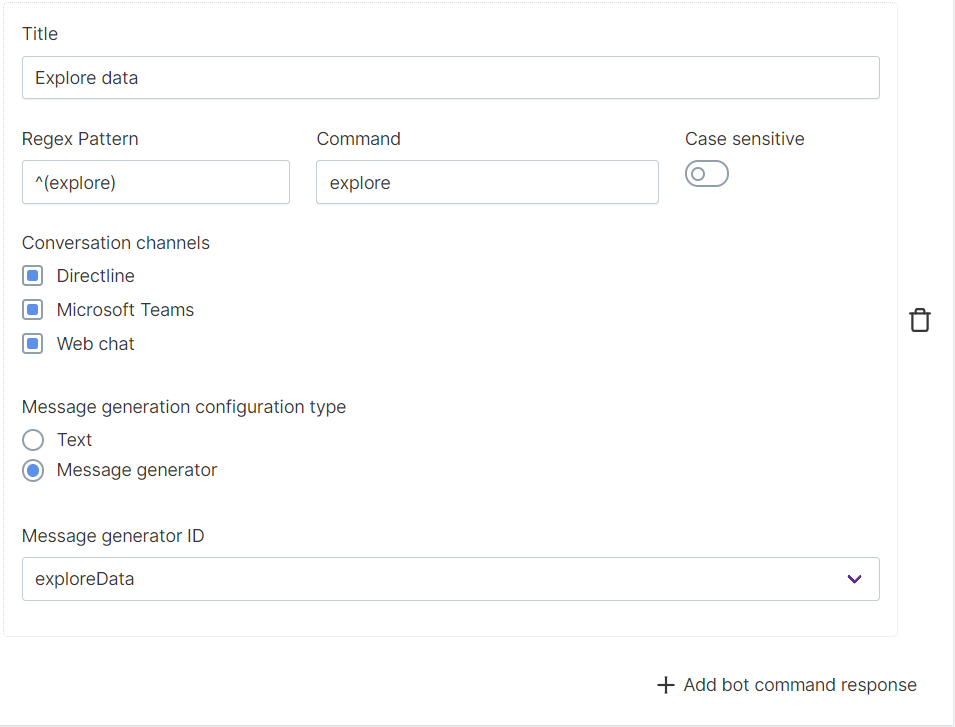
Title: A descriptive name for the bot command.
Regex Pattern: The pattern Qbo should use to recognize the bot command with different phrases. For example,
^(choose data source | select data source)$allows users to enterchoose data sourceorselect data sourcefor the command. This field is optional.Command: An NLP phrase for the bot command.
Case Sensitive: Enable this to differentiate between commands based on the case used. This field is optional.
Conversation channels: The channels this command will be enabled for. Select Directline and Web chat to enable it in the Qbo web application. Select Microsoft Teams to enable it in Teams conversations.
Message generation configuration type: The type of configuration you want to use for the bot’s response. Select Text to manually configure a custom response, or Message generator to choose from default response options.
Message generator ID: If you chose Message generator, select a message generator id from the list of response options.
Unteach Qbo
Qbo can learn new queries when users use the teach Qbo option. However, sometimes you’ll need to undo accidental or
undesirable queries. You can use the unteach qbo bot command for this.
Qbo will display custom queries defined by users in bold, with the linked canonical query listed beside each. Select one or more queries and click Unteach selected queries to remove them from Qbo and unlink them from associated canonical queries.
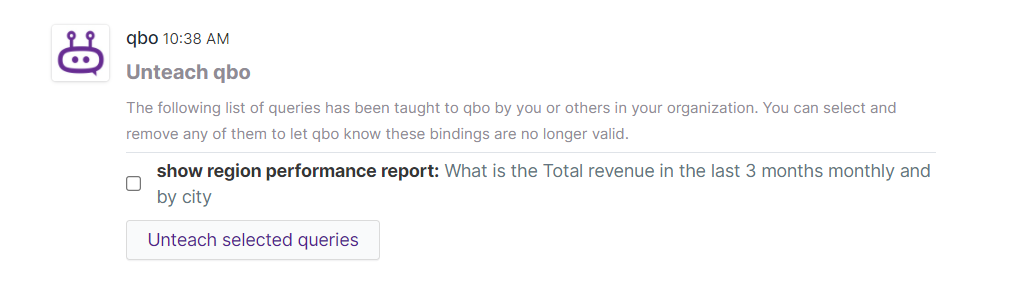
For example, in the screenshot above, show region performance report is the user-defined query, and What is the Total revenue in the last 3 months monthly and by city is the linked canonical query.
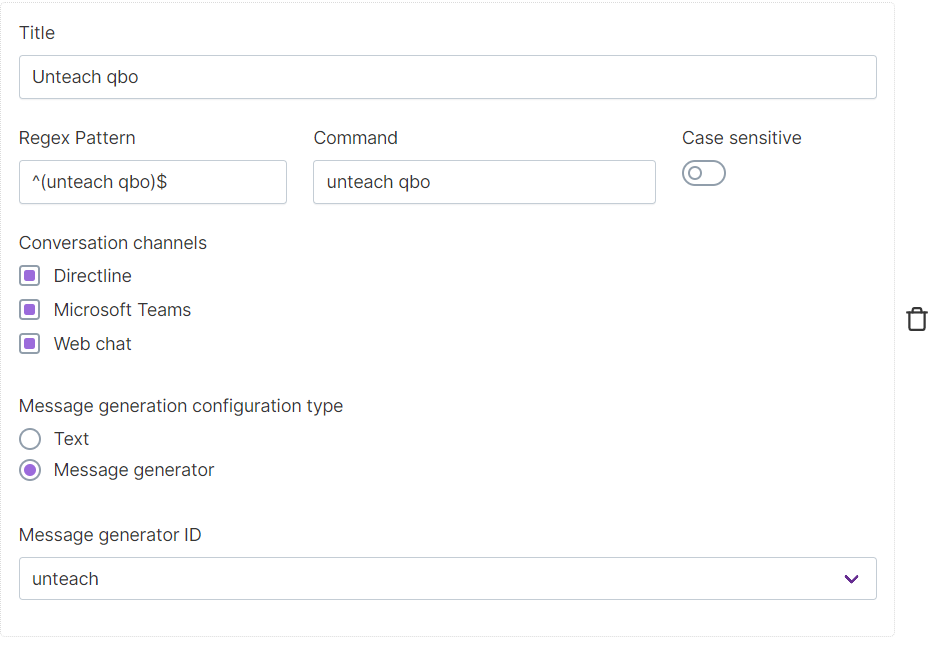
Configure the bot command, including alternative command phrasing, in the Bot Command Response section of the Qbo configuration module.
Explore Data
Users can understand Qbo’s underlying data model and data source configuration using the Explore data command. Qbo
will return a summary of the entities, aggregations, named filters, and relationships available. It will also provide
sample queries that the user could ask for each.

Click more… to view more entities.
Click an entity to view more information about the entity and the next action you can take to understand it.
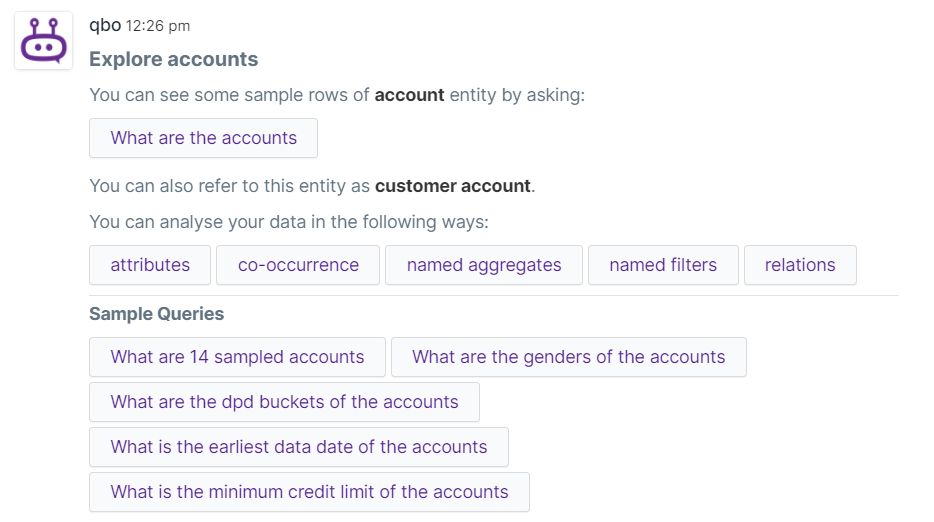
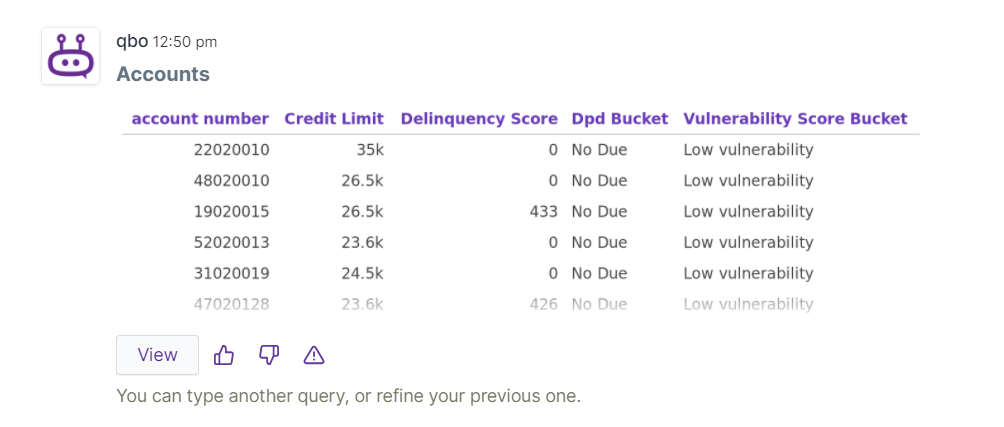
For example, on the Accounts entity, clicking What are the accounts causes Qbo to display some sample rows of data.
Common options are:
Attributes: attributes associated with the entity.

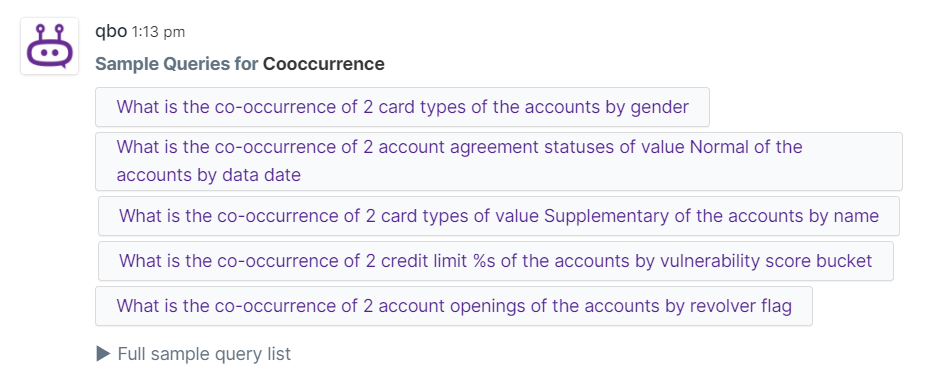
Co-occurrence: Sample co-occurrence queries - help in identifying values of a given attribute that frequently occur together in a defined group

Sample queries: A list of sample queries that can be asked about the entity.
Named aggregates: Any named aggregates that have been configured against the entity.

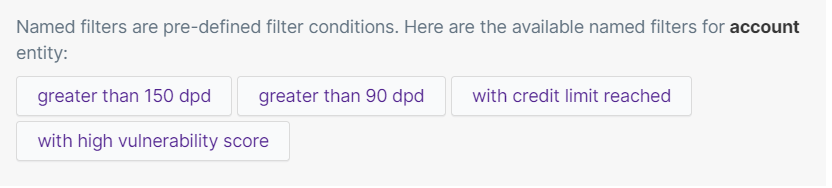
Named filters Any named filters that have been configured against the entity.
Relations: Query relationships between attributes.

Configure the bot command, including alternative command phrasing, in the Bot Command Response section of the Qbo configuration module.
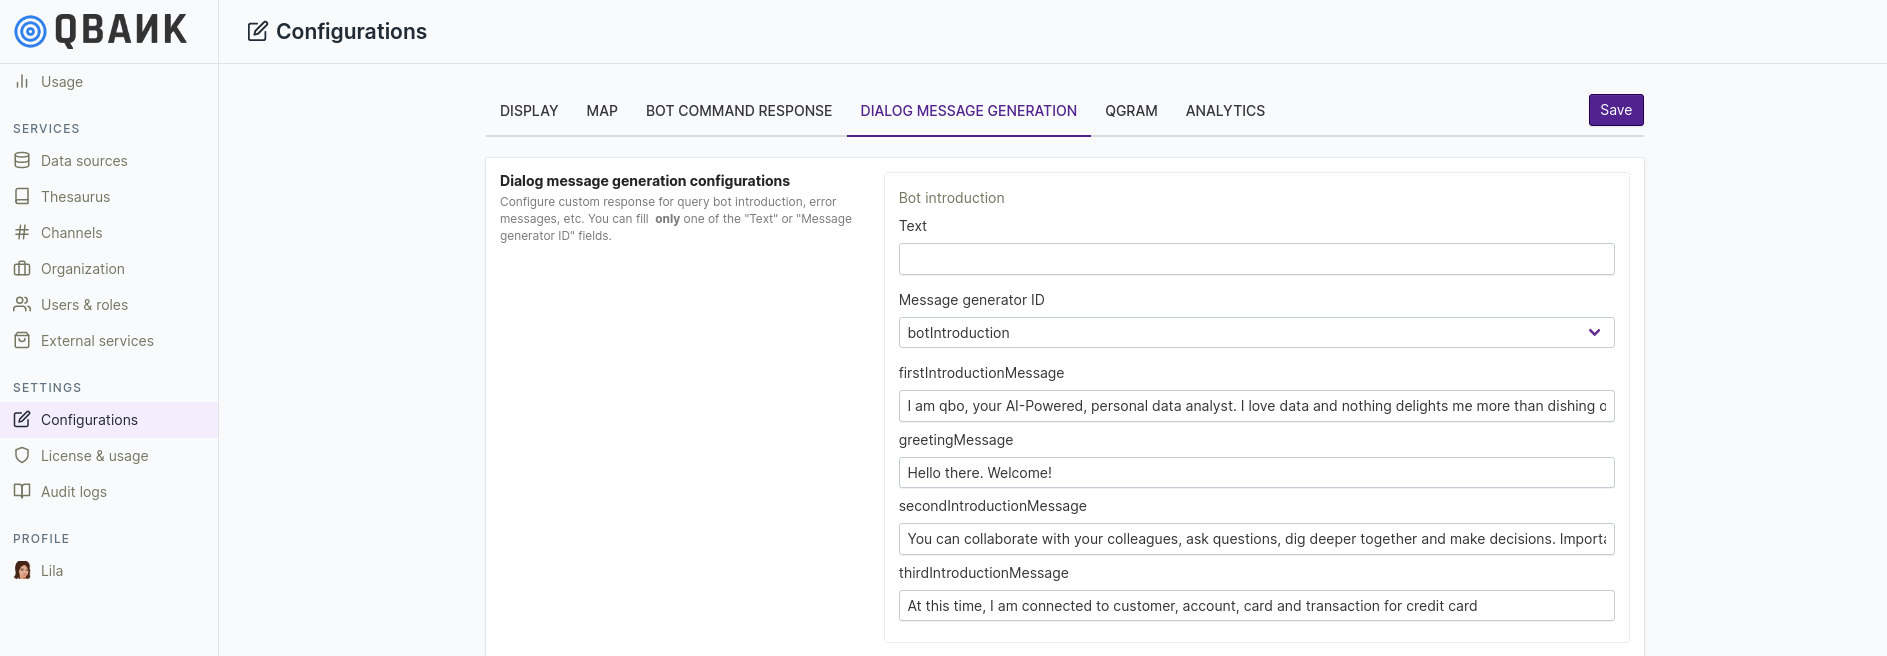
Dialog message generation
You can configure custom responses for the query bot, including introductions and error messages.
If you want to use an inbuilt message, select one from the Message generator ID field. If you want to write your own, enter it in the Text field. You must choose from one of these options; both cannot be filled.
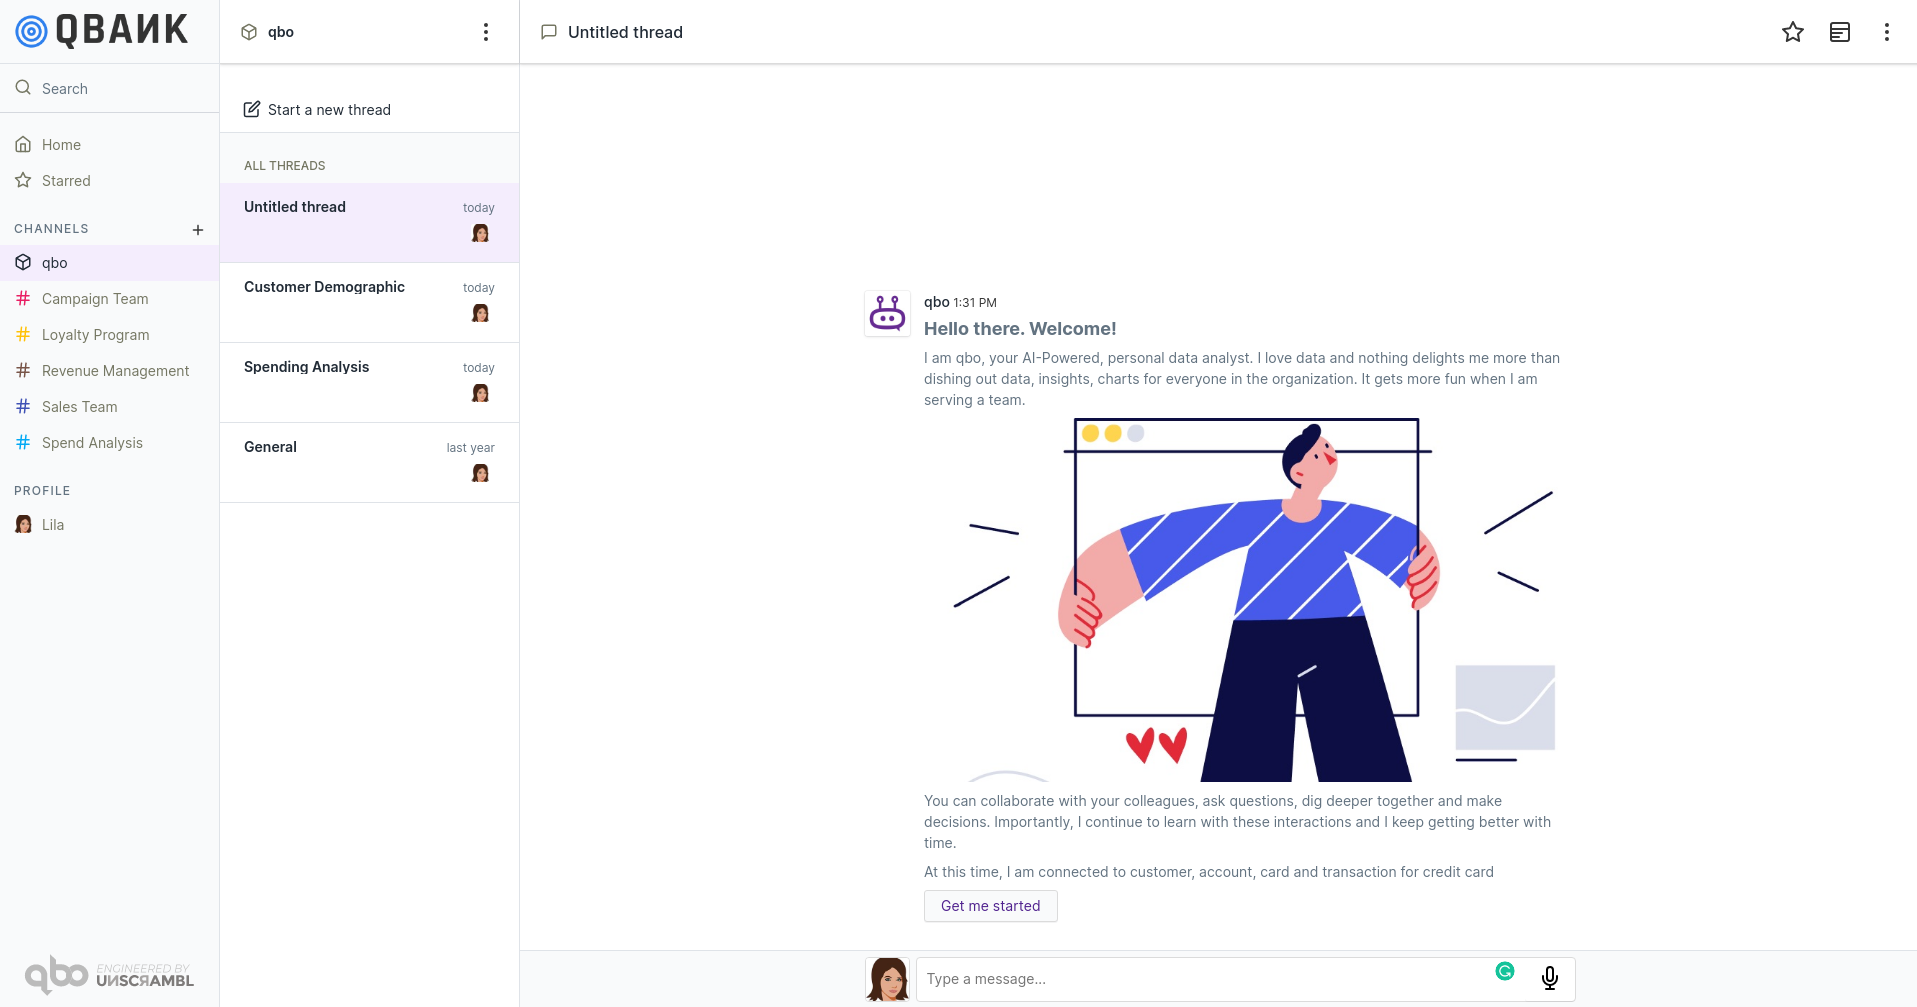
If you start a new thread, the bot introduction message will appear.
Qgram
Qbo can initiate conversations with users. This means that users do not have to supply the initial prompt. You can use the functionality - also known as machine initiated conversations - to deliver alerts, relevant insights, or messages.
Global count threshold: The total number of notifications that Qbo can send to users via qgrams.
- Maximum qgrams: The maximum number of notifications that Qbo can send to a single user via qgrams.
Enter a number and select a time period. For example, if you enter 100 and weekly, Qbo will limit qgrams to 100 per user per week.
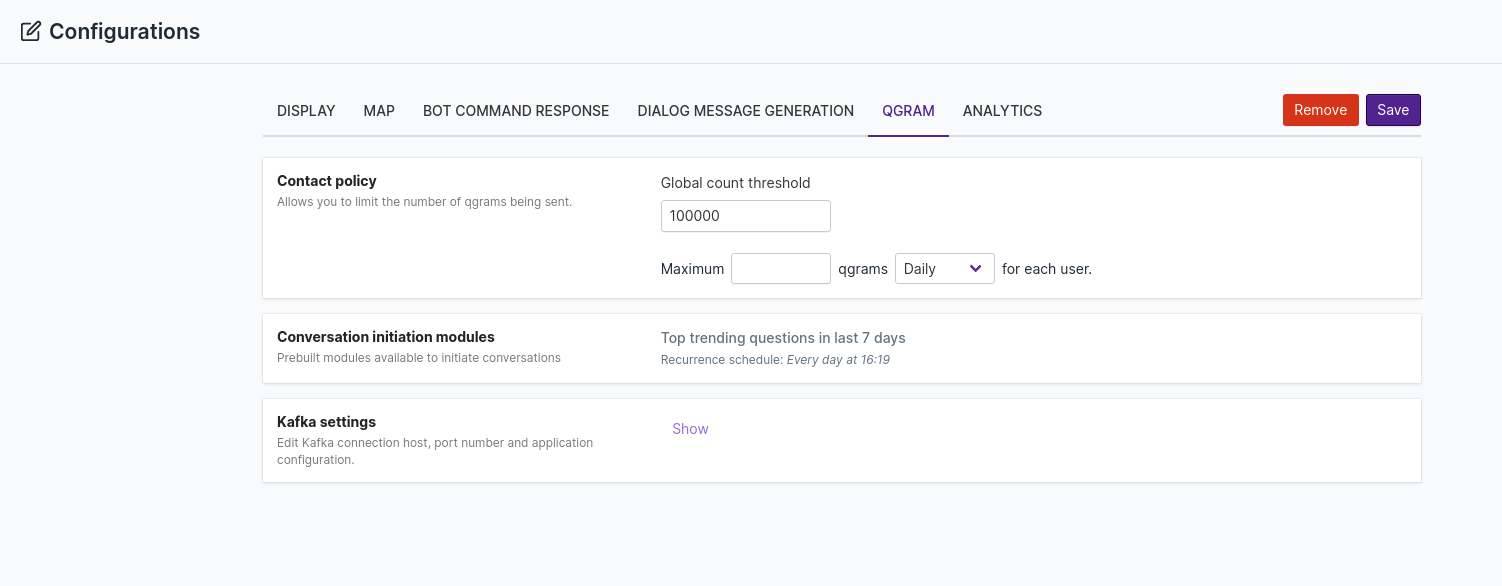
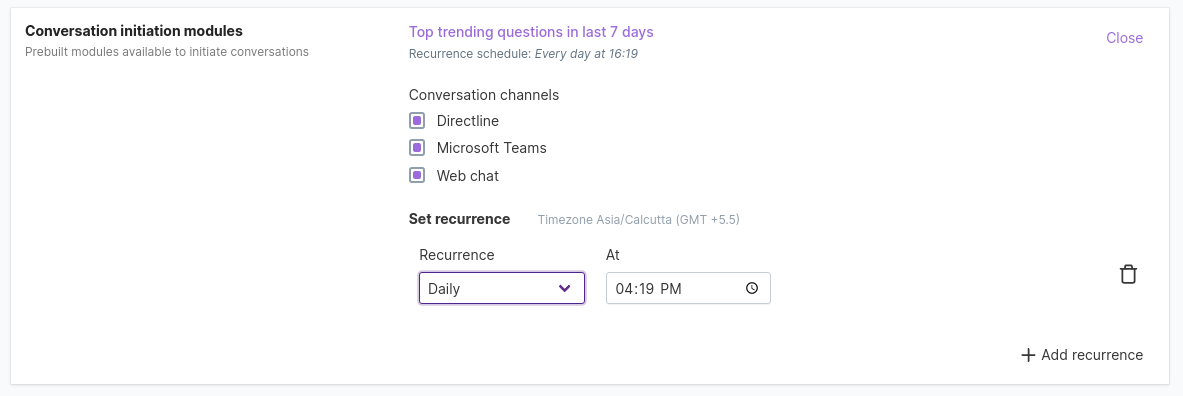
- Conversation initiation modules: Expand this section to configure & schedule prebuilt modules that can initiate
conversations with users. You can set a schedule - for example, running at the start of the day. You can also specify a channel through which the conversation is initiated. Qbo offers a prebuilt module that will send the top trending questions in the last 7 days to all users.
Note
These alerts are sent to all users in their General thread in the web UI, or in the personal chat in Microsoft Teams.
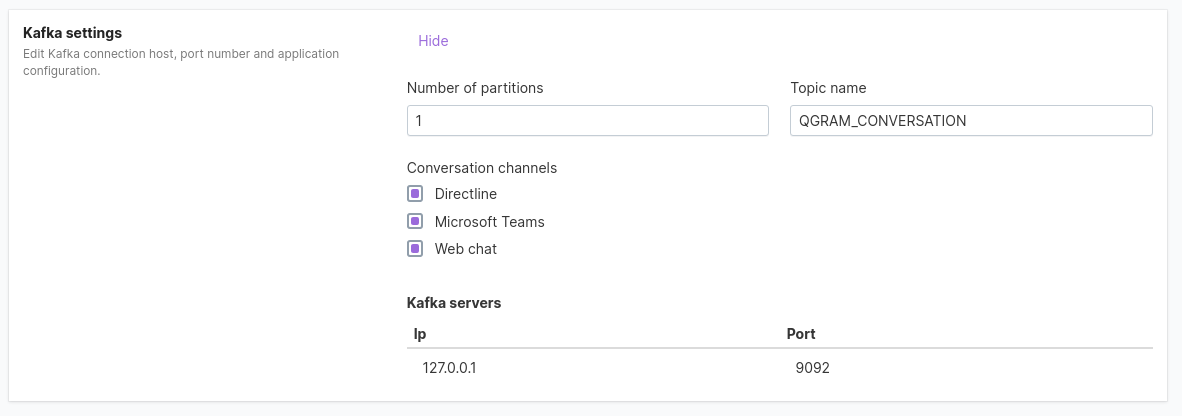
- Kafka settings: Send messages to users through a Kafka server. You need to specify at least an IP address and
port number for the Kafka server, plus the conversation channels you want it to use, the number of partitions to use, and a name for the topic. Messages will be sent to a user in their General thread in the web UI or in the personal chat in Microsoft Teams.
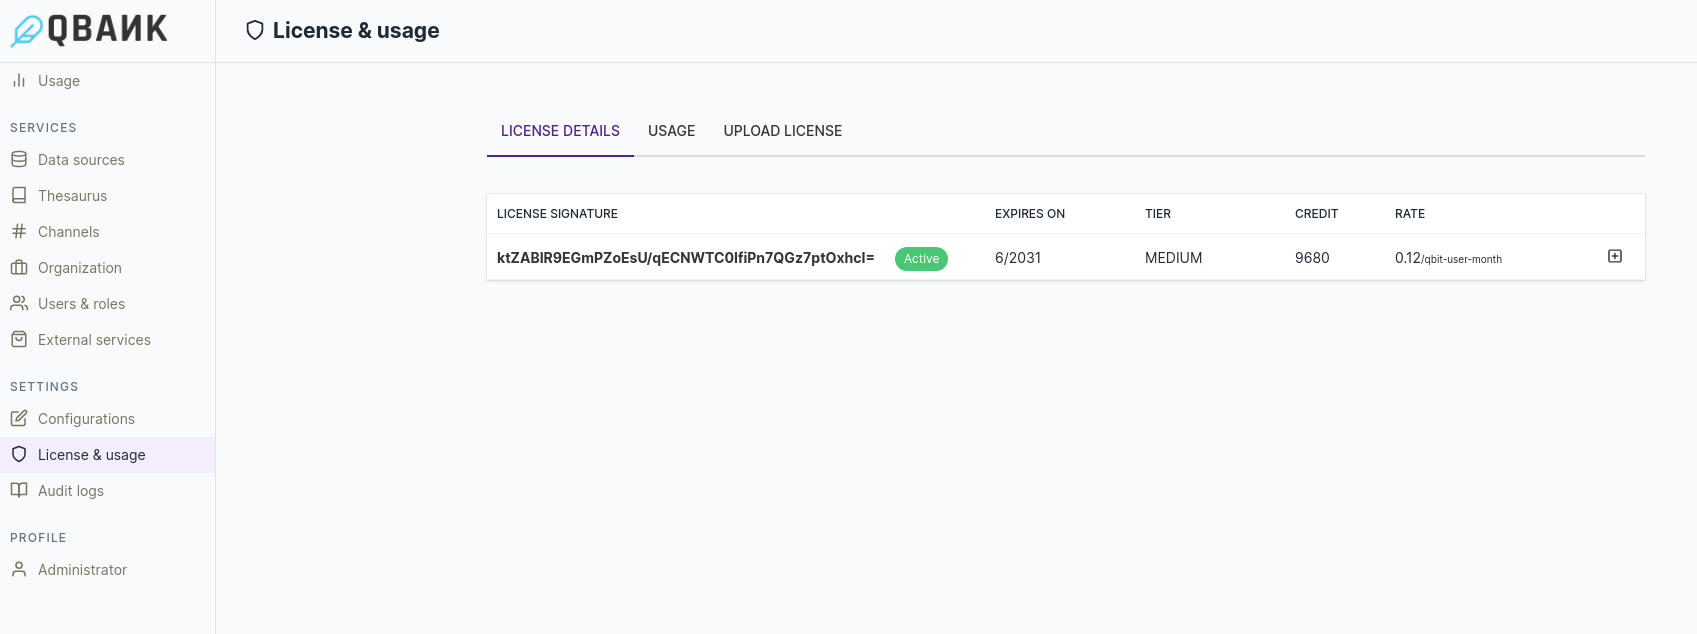
License management
In the license management module, you can track the current license or upload a new one. You can view details like the expiration date, the number of users (conversational) allowed, and the number of users with conversational permissions already configured in Qbo.