Collaboration using board


Board and it’s feature

Qbo supports the board functionality, which is used to save important query and their outputs for future reference. Each thread is associated with a single board.

Access the Board

In order to access a board, open a thread, and ask a query to QBO. On the answer, click the View Button button to expand the vizy and click on the + Add to Board. Alternatively, board can be accessed by clicking on the hamburgericon button and choosing the appropriate option.
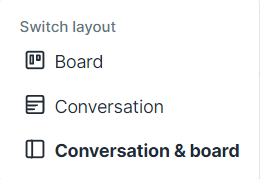
../../_images/switchlayout.png

Explore the board

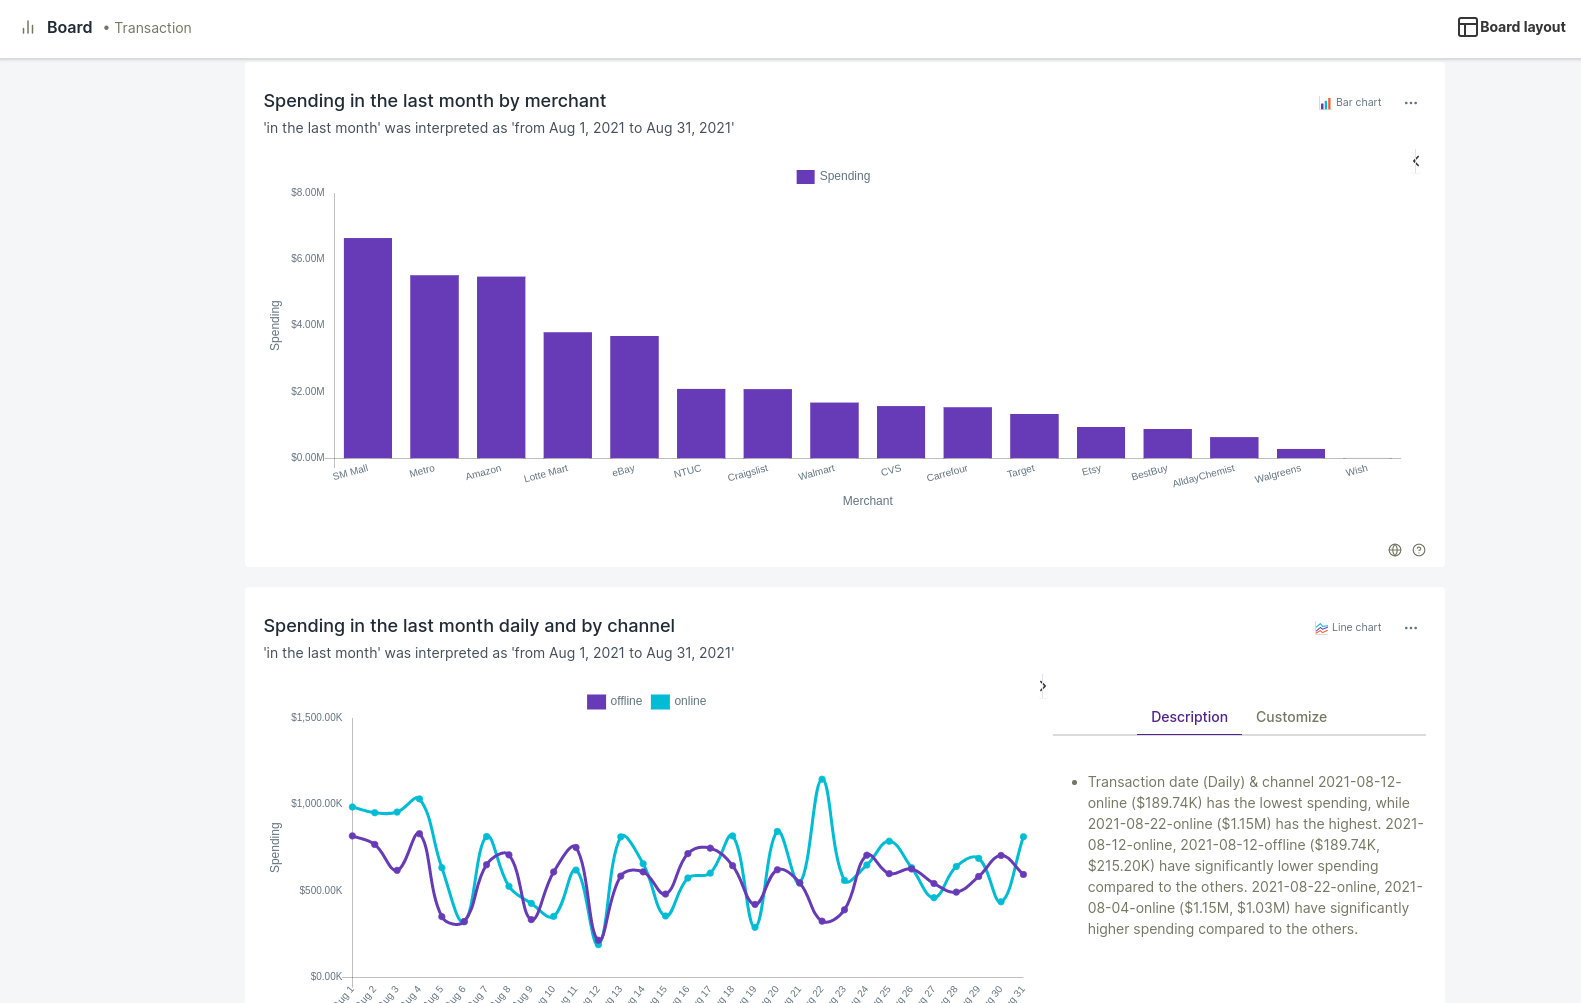
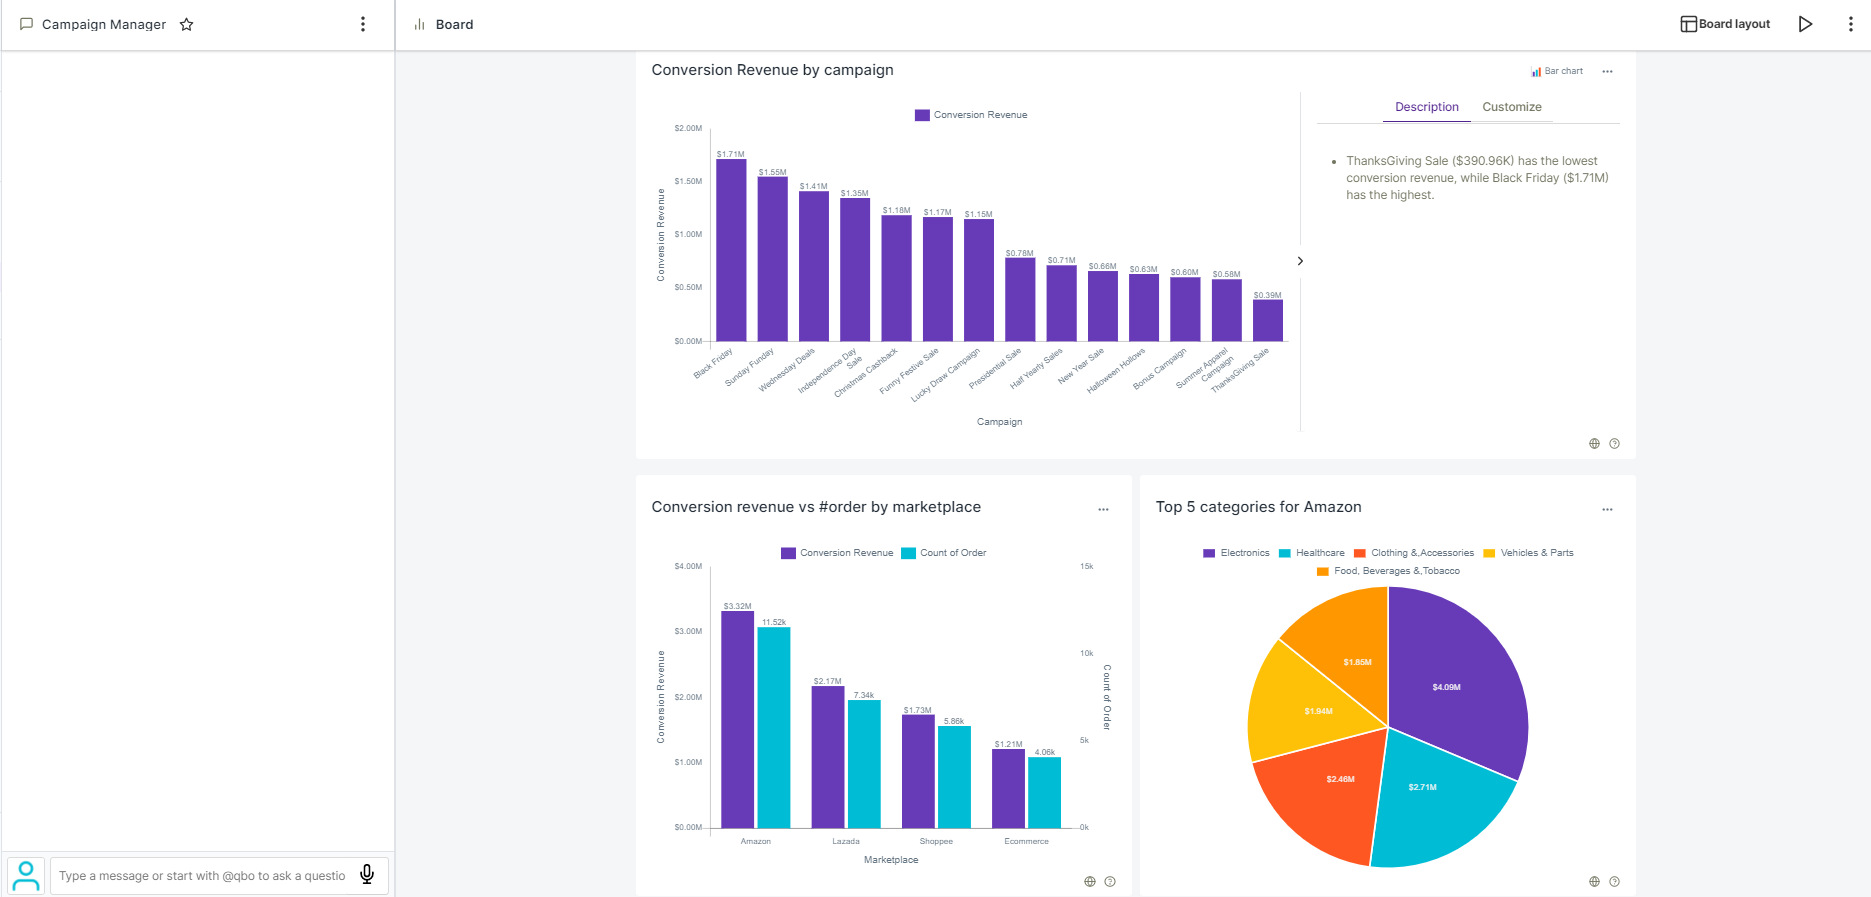
Board offers a lot of features that can be used on vizies. The following screenshot is the view of the board.
../../_images/conversationBoard.png

Board Options: The main options available which you can see on the top right corner are Board Option.

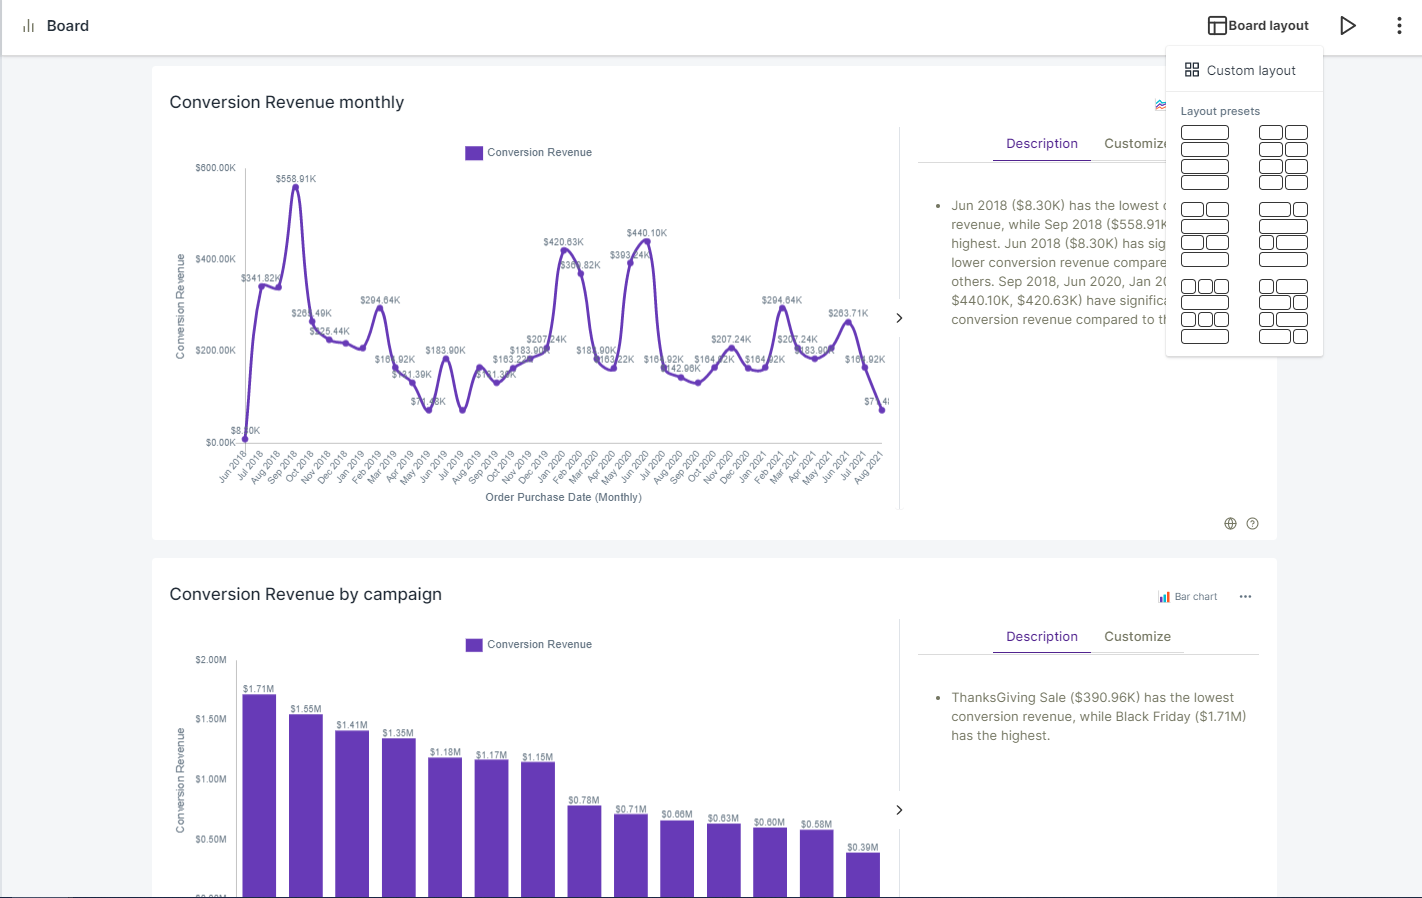
  • Layout Option: Select any “Layout Presets” or set up a Custom Layout.
    ../../_images/changeLayout.png

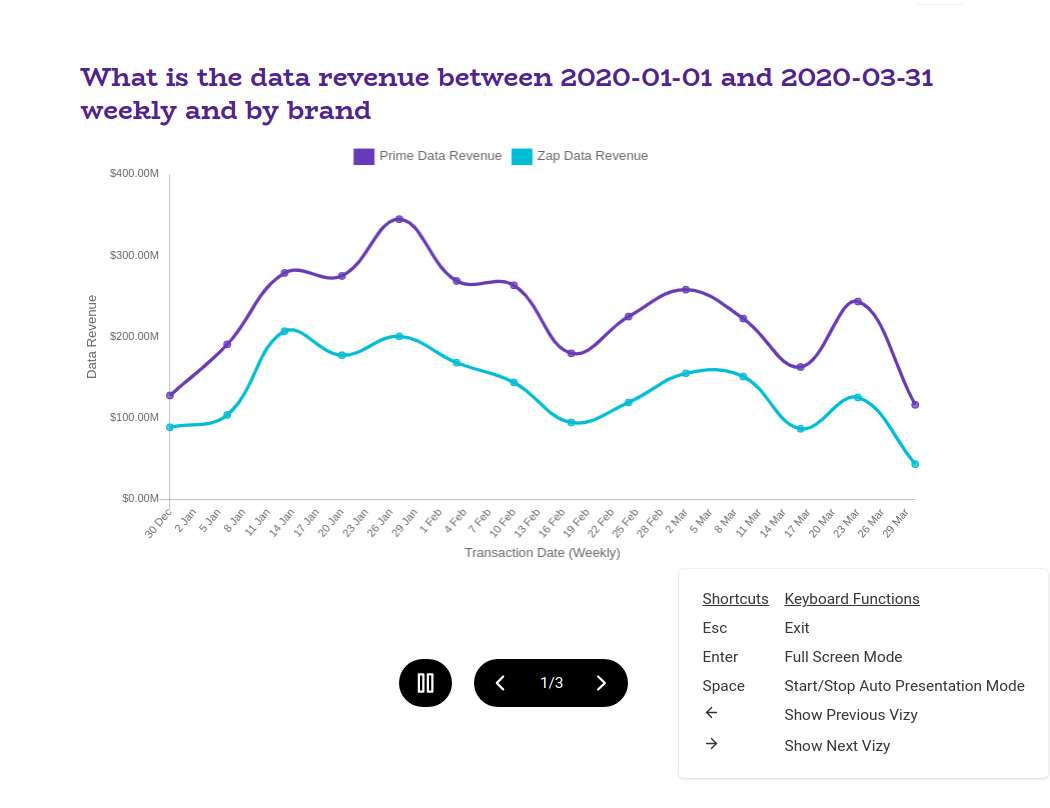
  • Presentation Option Presentation Mode: It will enable the presentation mode.
    ../../_images/presentationMode.jpg

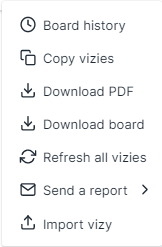
  • More Menu Option Click More: This button has the following options
    ../../_images/more_options.png

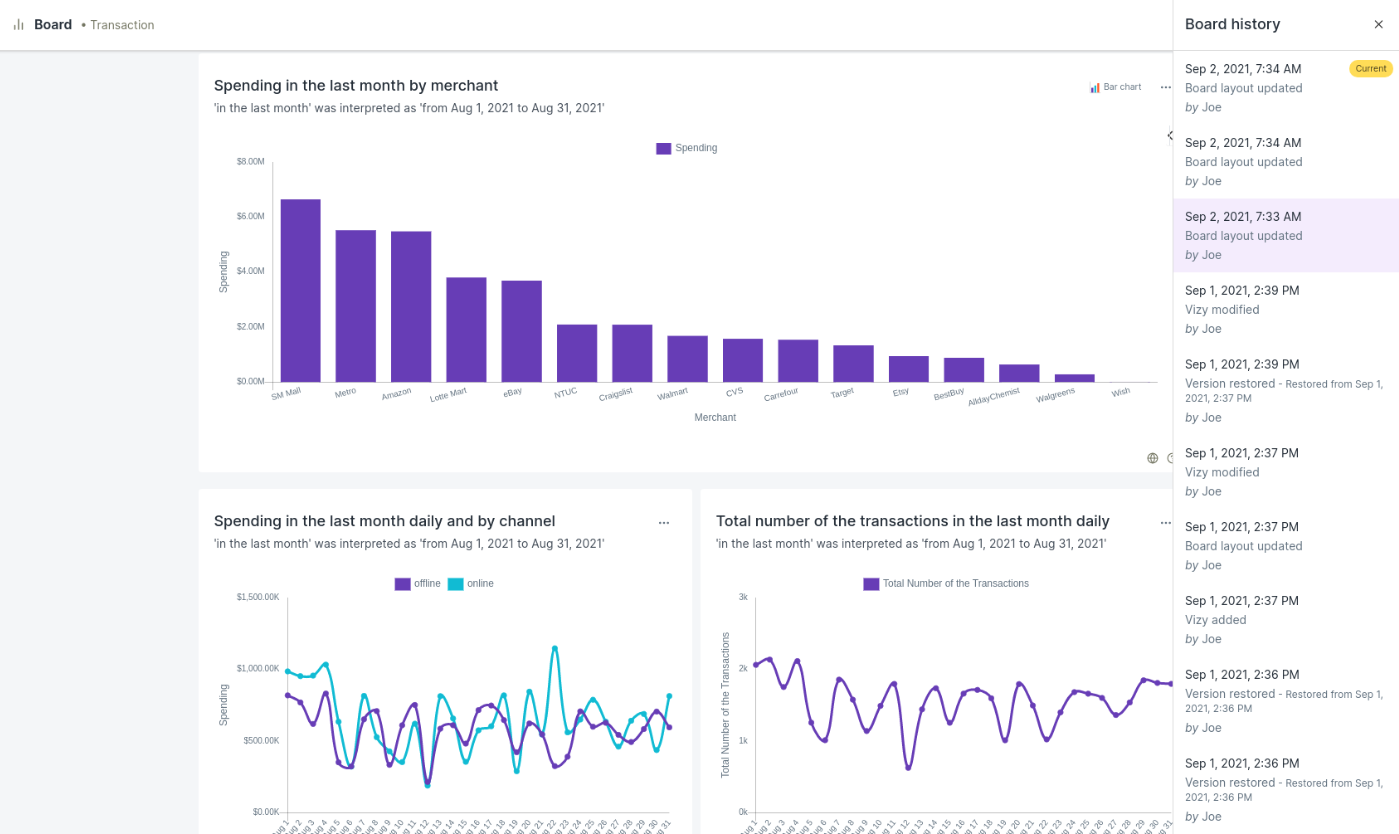
    Board History: The board history feature allows keeping track of version changes on the board. It stores the latest 10 operations performed on the board. All operations are stored with the timestamp and if older board state needs to restore then select the required version / timestamp from the board history to restore it back.

    ../../_images/board_history.png

In this example we are reverting a board to a state which was in its old state at 7:33 am

../../_images/restore_board.png

../../_images/board_after_restore.png

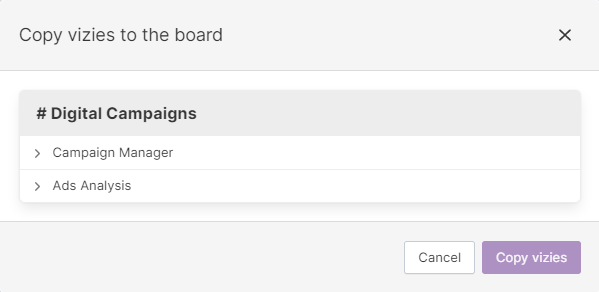
Copy vizies: It can be used to bring in vizies from the other boards of the threads.

../../_images/copy_vizy.png

Download PDF: It downloads the board in the PDF format.

Download board: It downloads the board in the .vizy format.

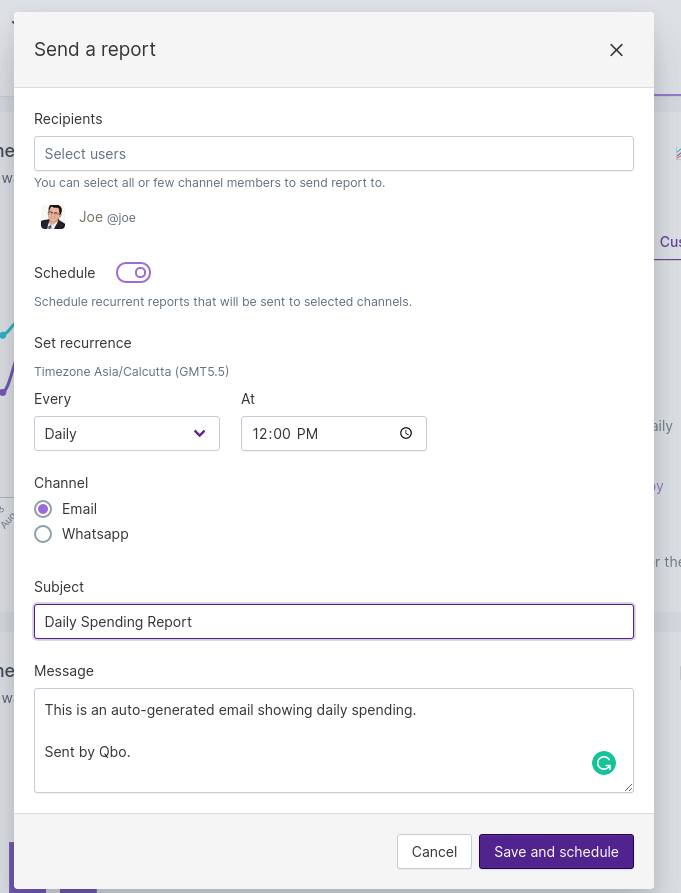
Send a report: If the administrator has enabled Communication Services users will get an option to send reports and schedule reports as well. Users can create new reports, schedule periodic reports and delete existing reports.

../../_images/report_options.png

Users can frame a report body, put a nice subject line and select users.

Import vizy : This option helps the user to import any vizy file

Explore vizies on Board

Once a vizy has been added to the board there are multiple options, a user can play with.
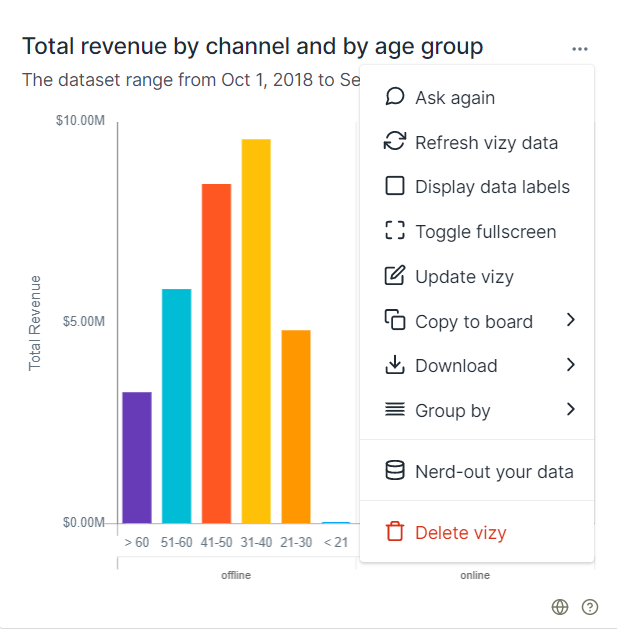
../../_images/vizyOptions.png
  • Change vizy type: The user can change the type of the vizulaization that has been selected for the Vizy, It is based on the number of variables in the output.

  • Ask again: Use this to ask the question to qbo, that will generate the same vizy output as it has on the board.

  • Refresh vizy data: Use this option to refresh a particular vizy.

  • Enable/Hide data labels: Enables/Disables the data labels on the data points for that particular vizy.

  • Toggle fullscreen: Use this option to toggle between fullscreen and normal view.

  • Update vizy: This option allows users to update title, subtitle and description of the vizy.

  • Show total: Use this option to view total in the visualizations for the comparison purposes (available if applicable).

  • Share: This option allows users to share the Vizy.

  • Copy to Board: Allows users to copy the vizy to other threads.

  • Sort: This option allows the user to sort the vizy output according to the legends available in it. With chart types like Bar Chart, Doughnut Chart, Horizontal Bar Chart, Pie Chart, Polar Area Chart, and Stacked Bar Chart, Sort gets enabled.
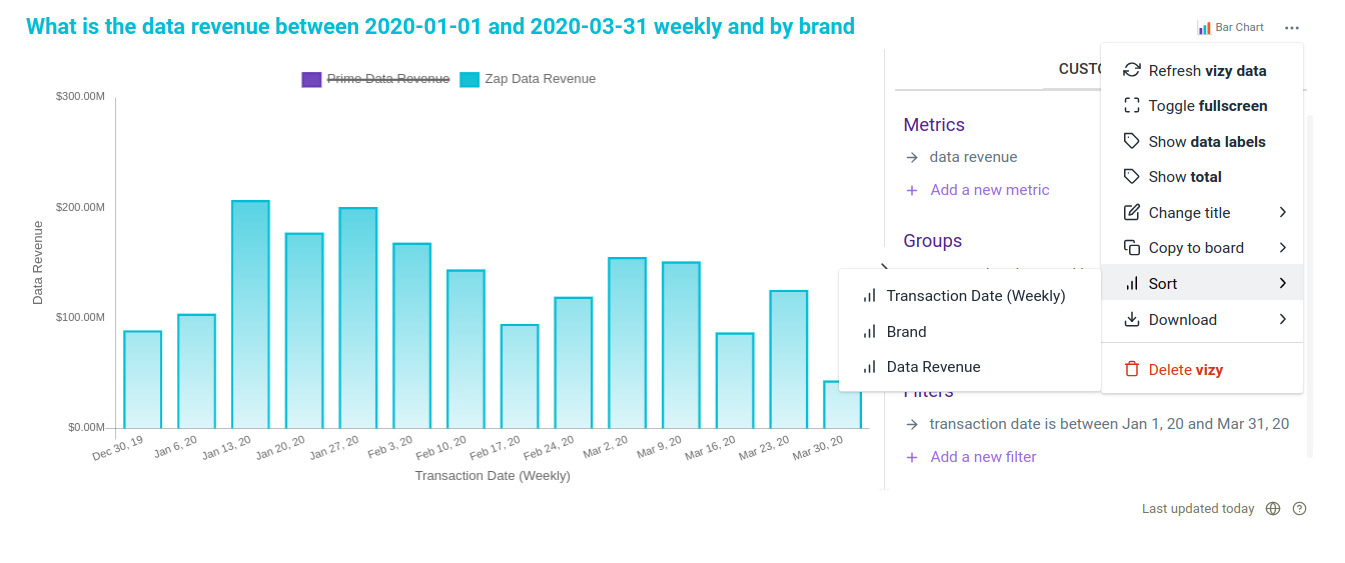
    ../../_images/sortOptions.jpg

  • Download: Allows users to download the vizy either as CSV (comma-separated value), as an Image, or as a PDF.

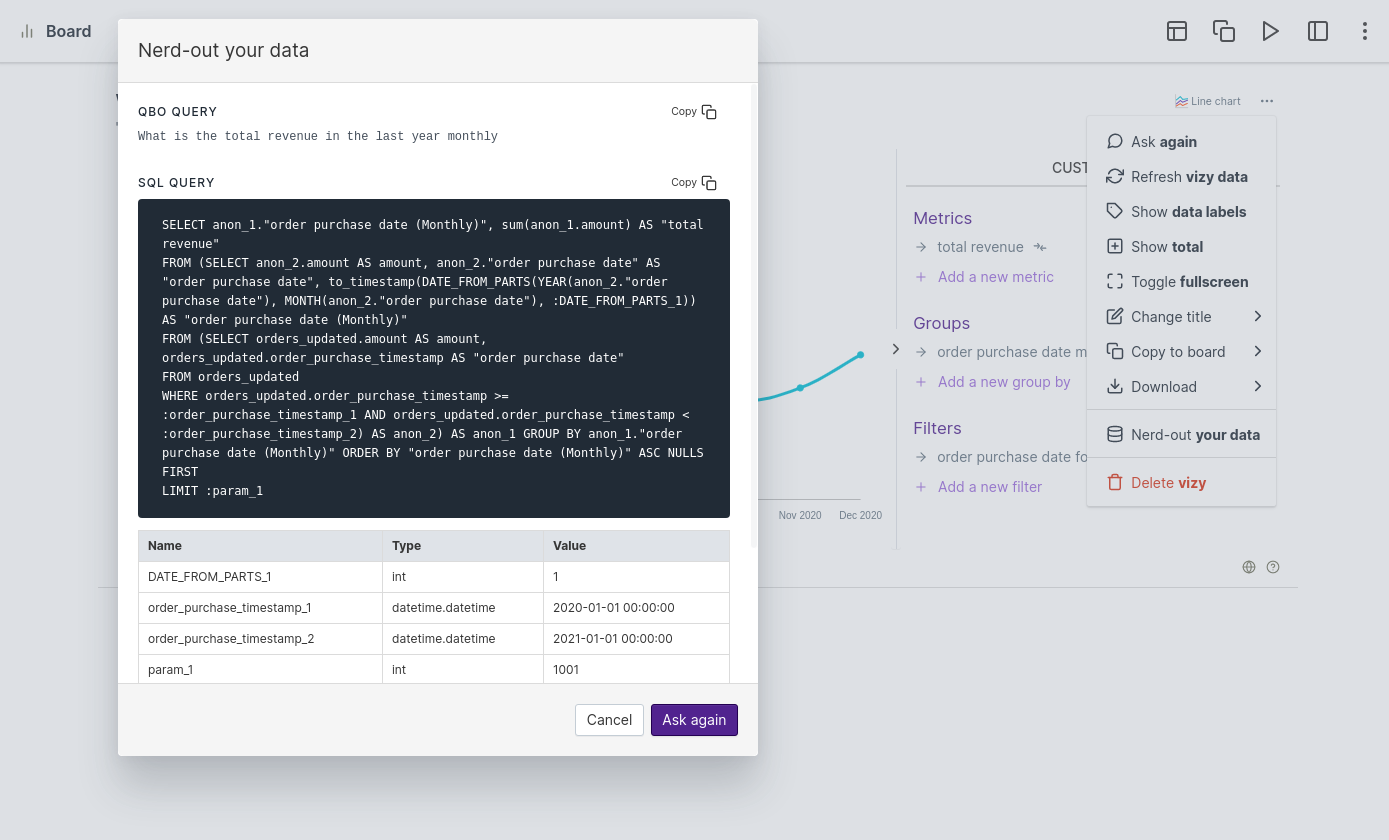
  • Nerd-out your data: Use this option to see various information about the vizy. Nerd-out query sections includes the following information.

    • Vizy completion status: It is only shown if the vizy has incomplete data

    • Qbo query: It is a canonical query of the present response and It can be either base query or customized query.

    • SQL query: Sql query generated by the Qbo for the present response.

    • Metadata

      • QueryBot: Name of the bot.

      • Executor: Name of the configured data source.

      • Entity: Name of the entity from which the response has been generated.

      • Time zone: Established timezone for the product.

      • Query tree: It is a base or original query before any customization.
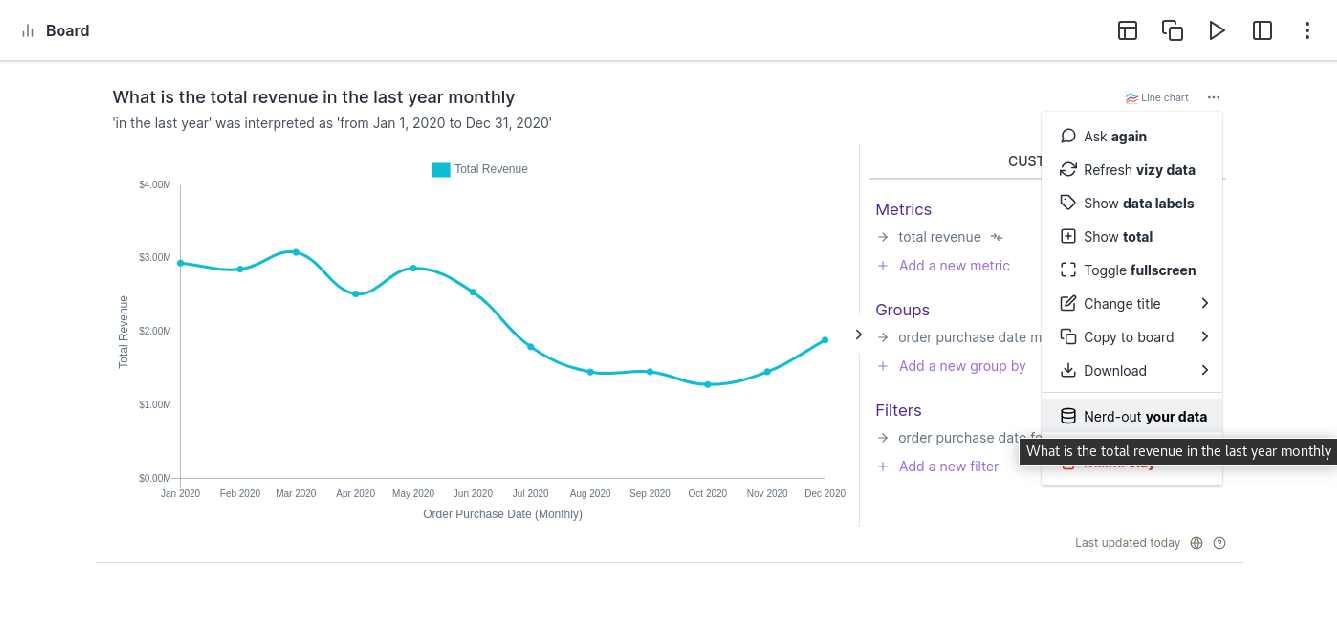
../../_images/nerd_out_your_data.png

../../_images/nerd_out_your_data_display.png

  • Delete Vizy: Deletes the vizy permanently from the Board.

With a vizy of Table chart, Table Options option gets enabled which allows the user to display or hide the rows and columns from the table.
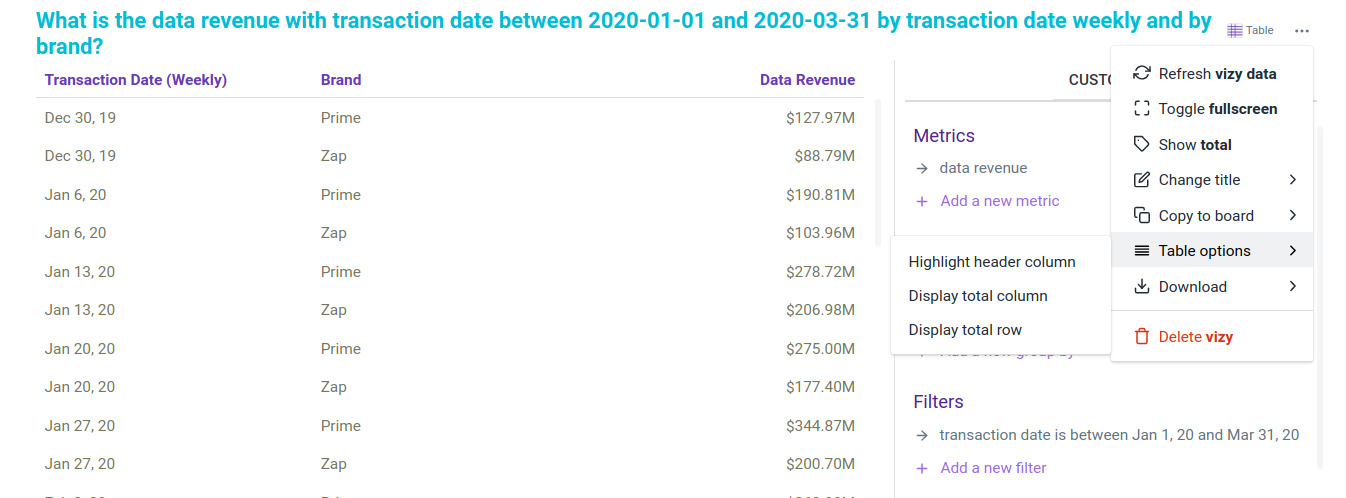
../../_images/tableOptions.jpg

Drill down and compare from charts


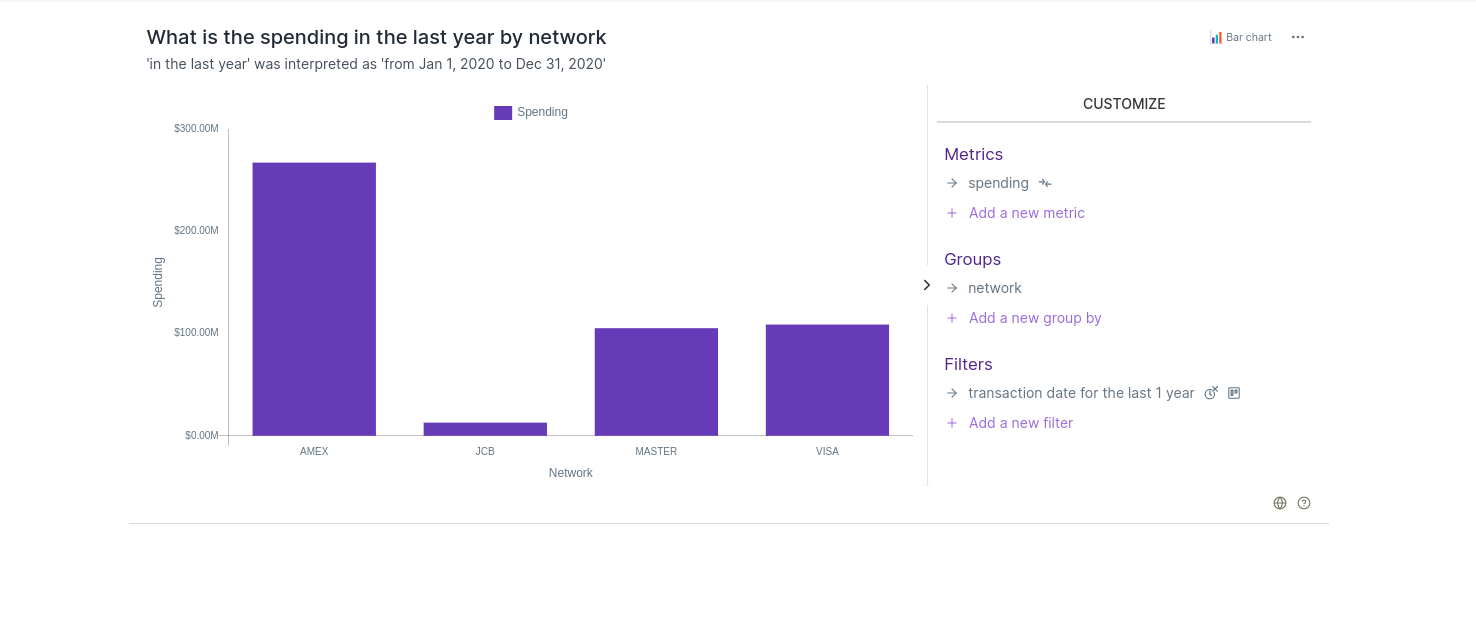
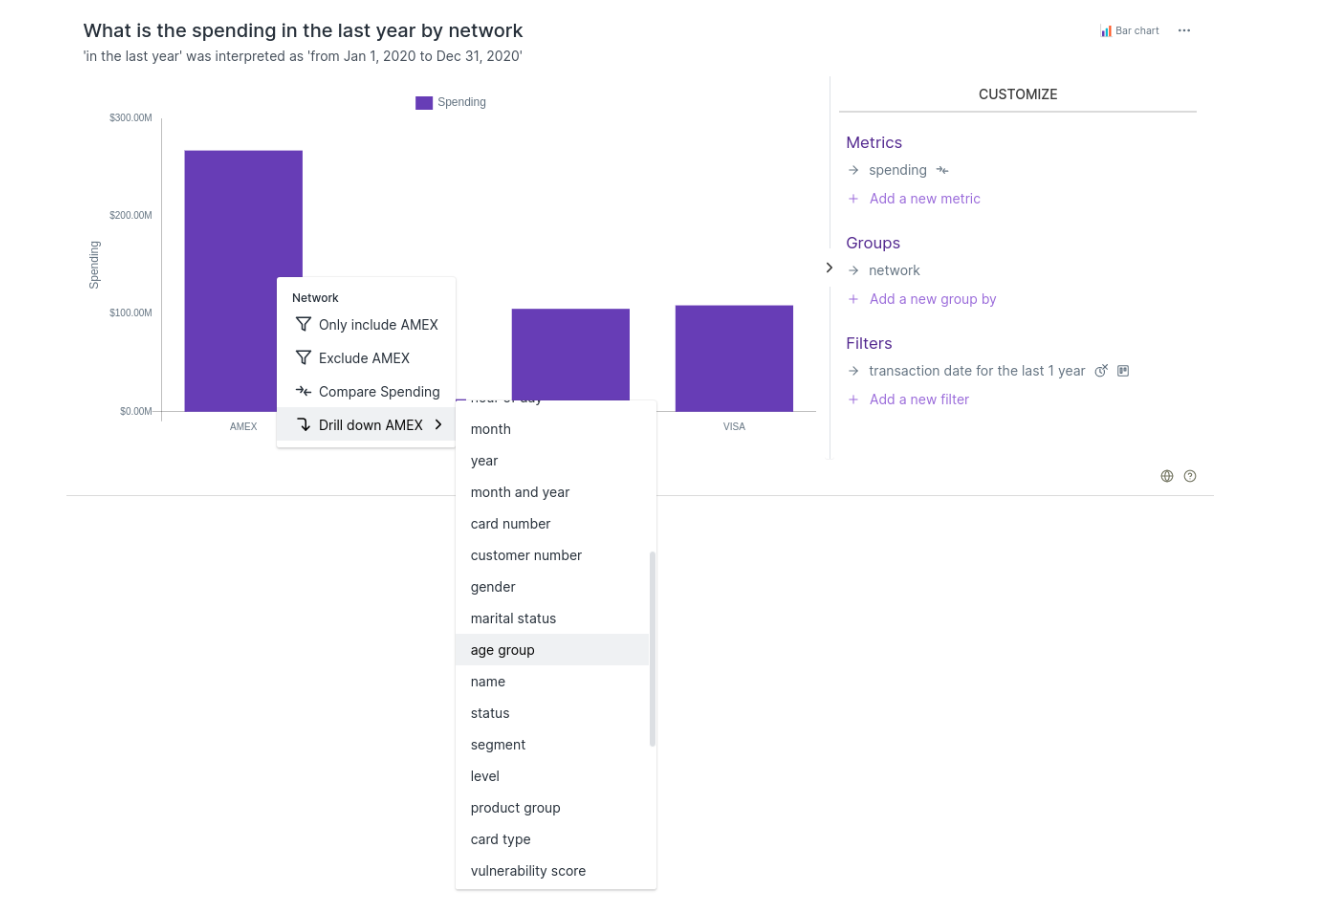
  • Drill down: Drill down can be performed on a vizy once it has been added to the board, right click on the vizy and pertinent options for drill down will show up.

Example: We can drill down in the following vizy of the Amex card and its transaction.
../../_images/Drill_down.png

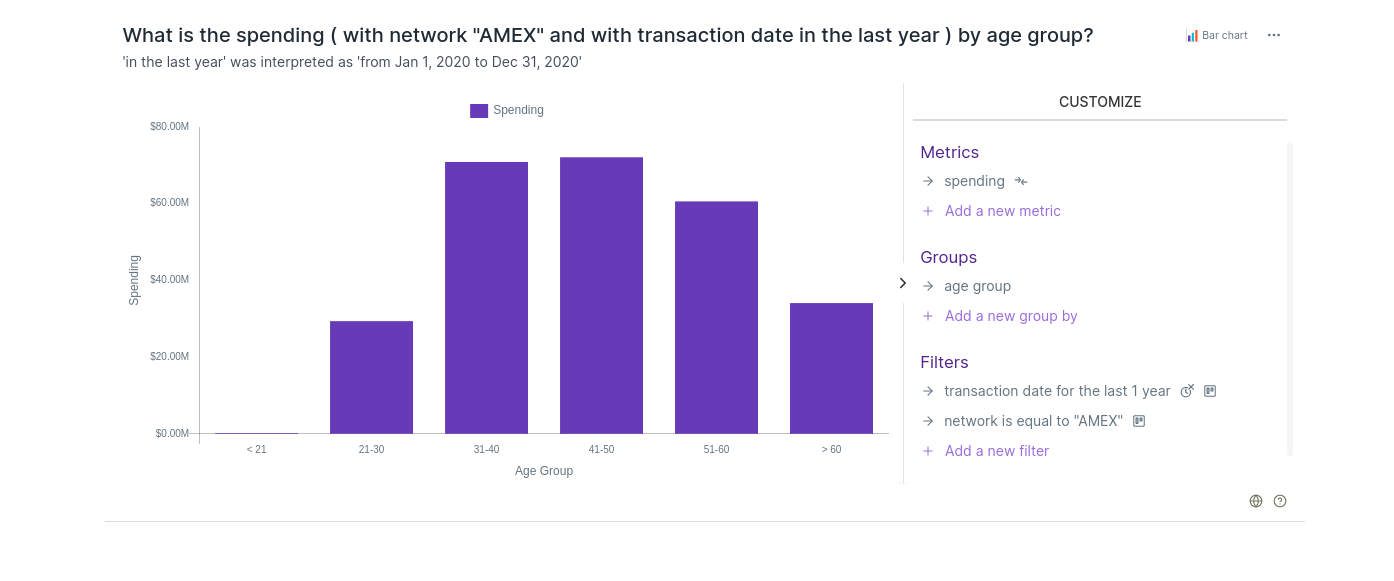
To analyse AMEX card spending by age group of users, keep the cursor over AMEX bar and right click and go on Drill down AMEX and select age group.
../../_images/Drill_down_amex.png

../../_images/Drill_down_result.png

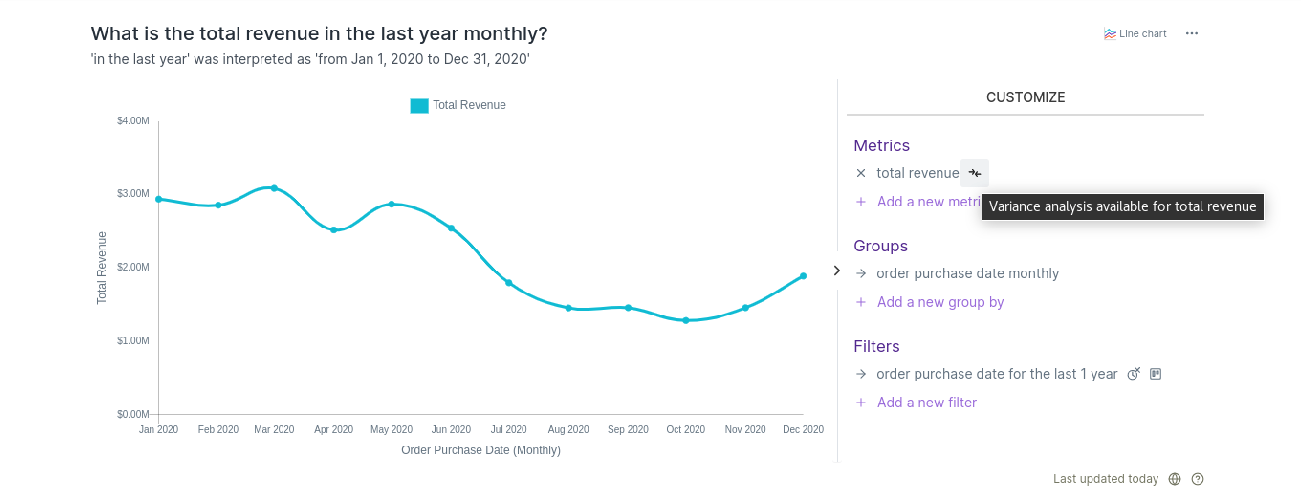
  • Compare Option Compare icon: Using this icon the user can run variance analysis for the corresponding metric.

../../_images/compareFromChart.png

Board filters

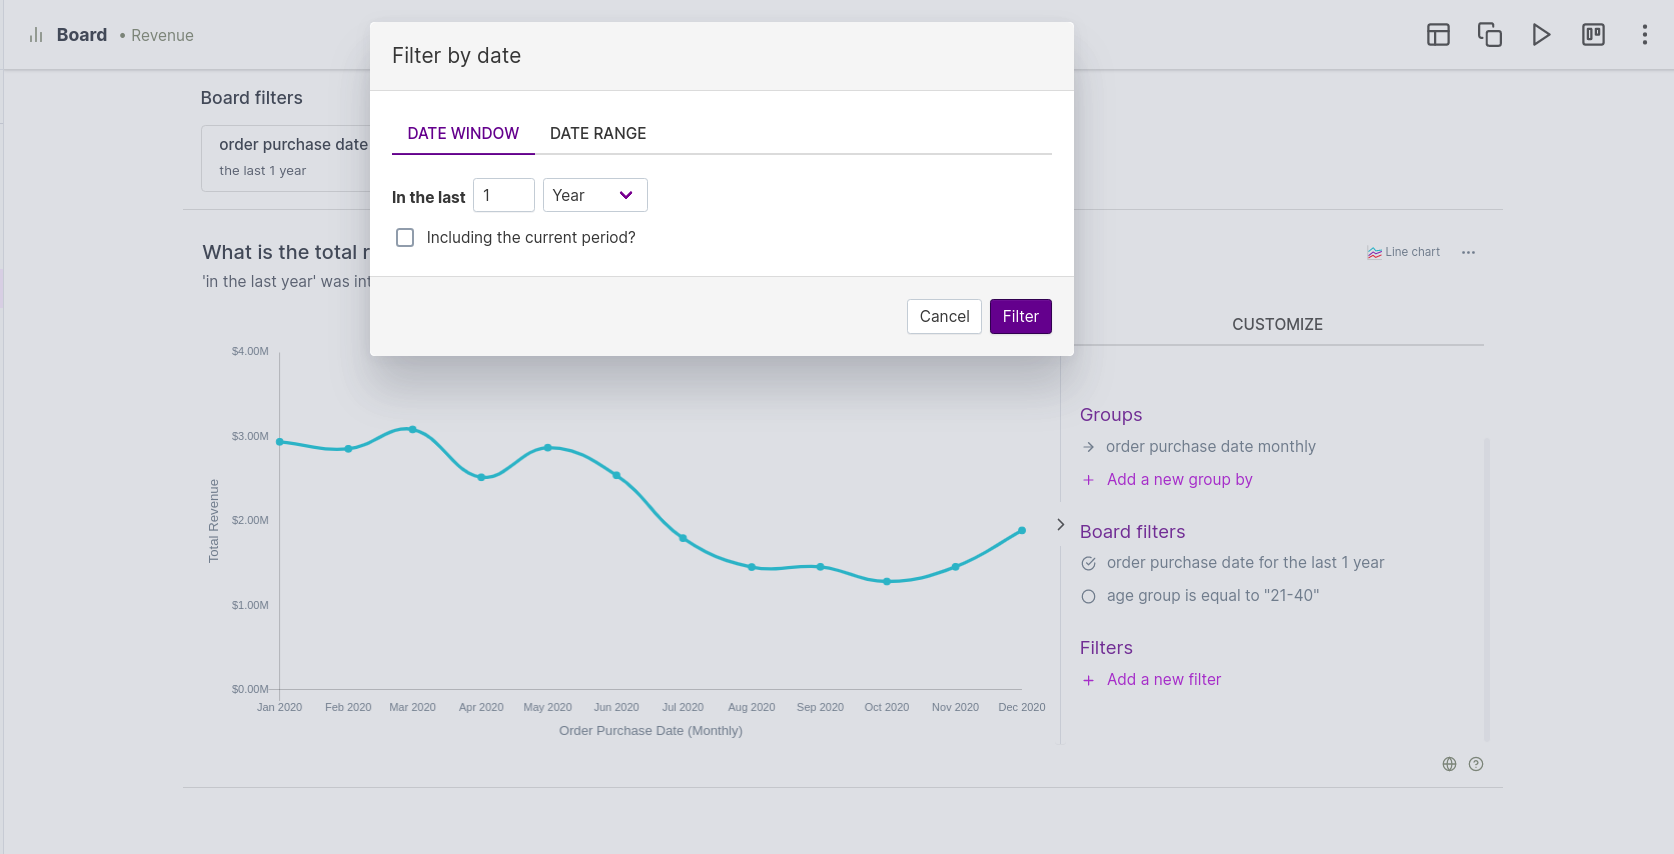
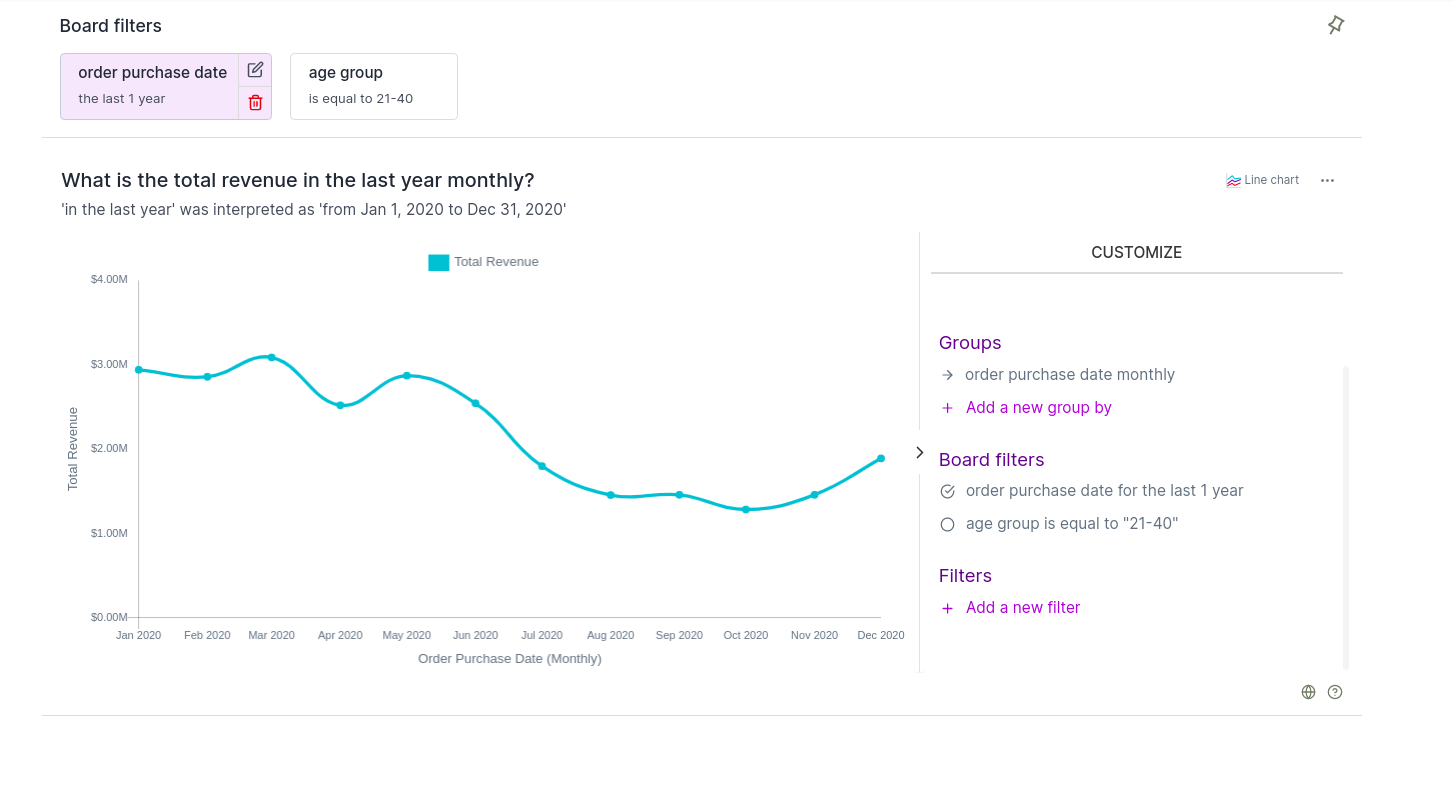
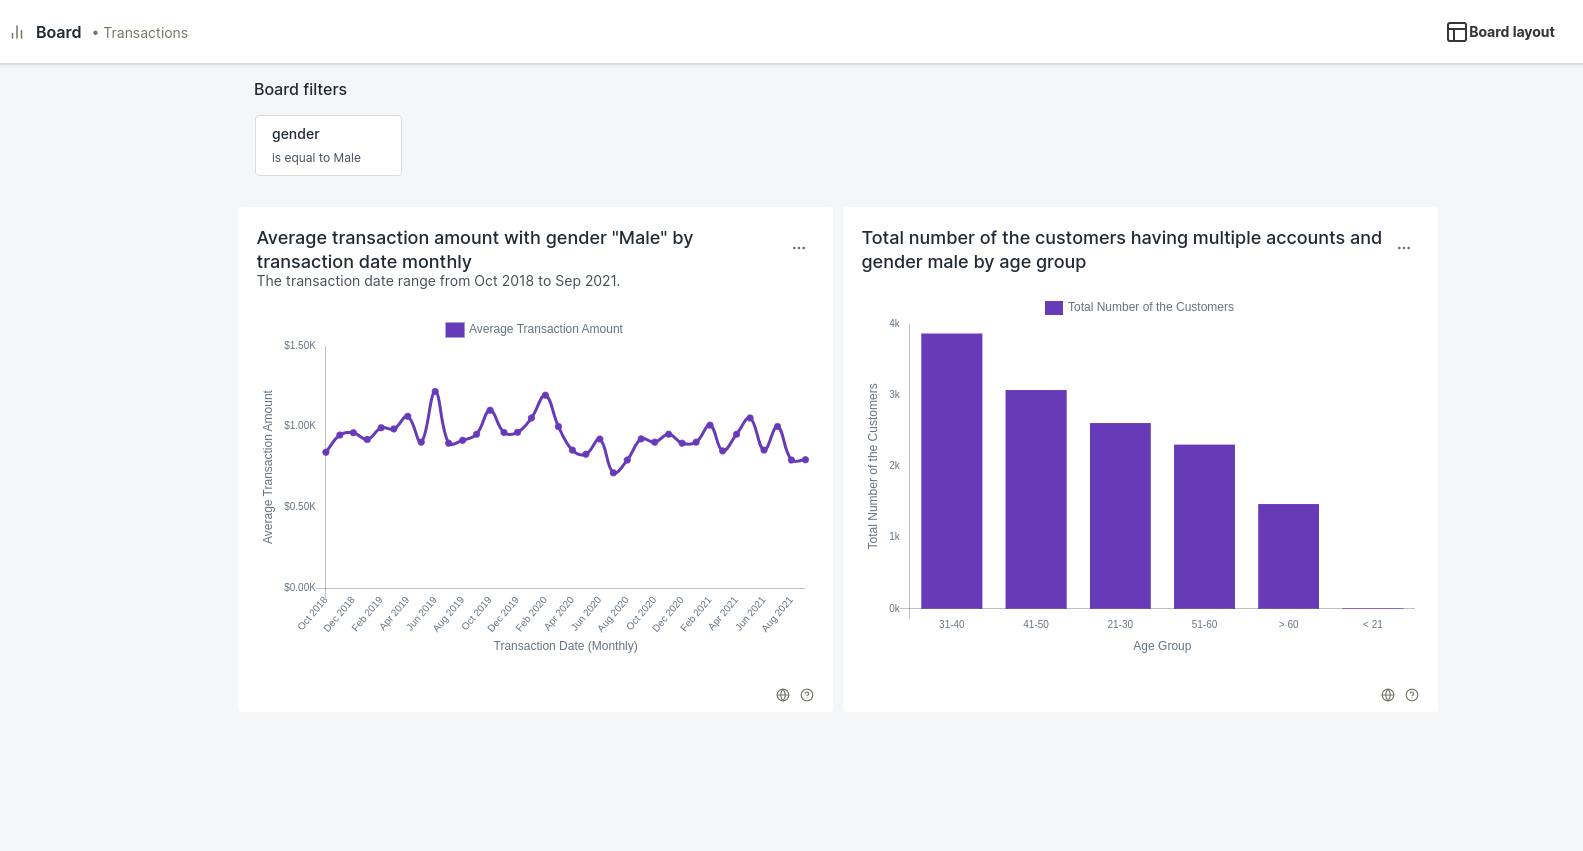
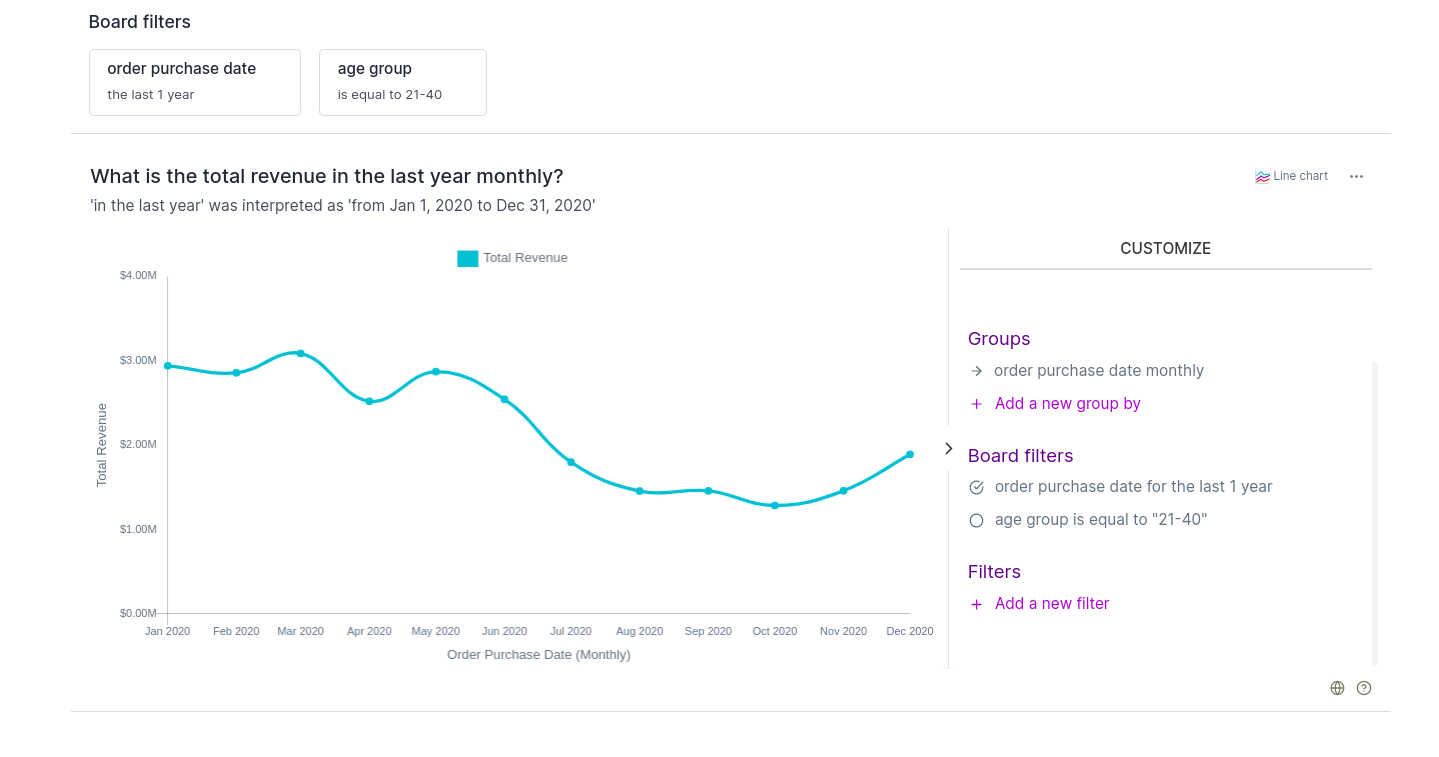
Any filter on a vizy can be converted as board filter and can be done by clicking the board icon next to a filter. This filter is now known as Board filters and is available to all vizies in the board. All board filters will be listed at the top of the board.
../../_images/boardFilter-icon.png

../../_images/boardFilters.png

It is possible to edit or remove board filters, however updating the board filter affects all the vizies in the board that uses it.

../../_images/boardFilter-edit.png

../../_images/boardFilter-delete.png

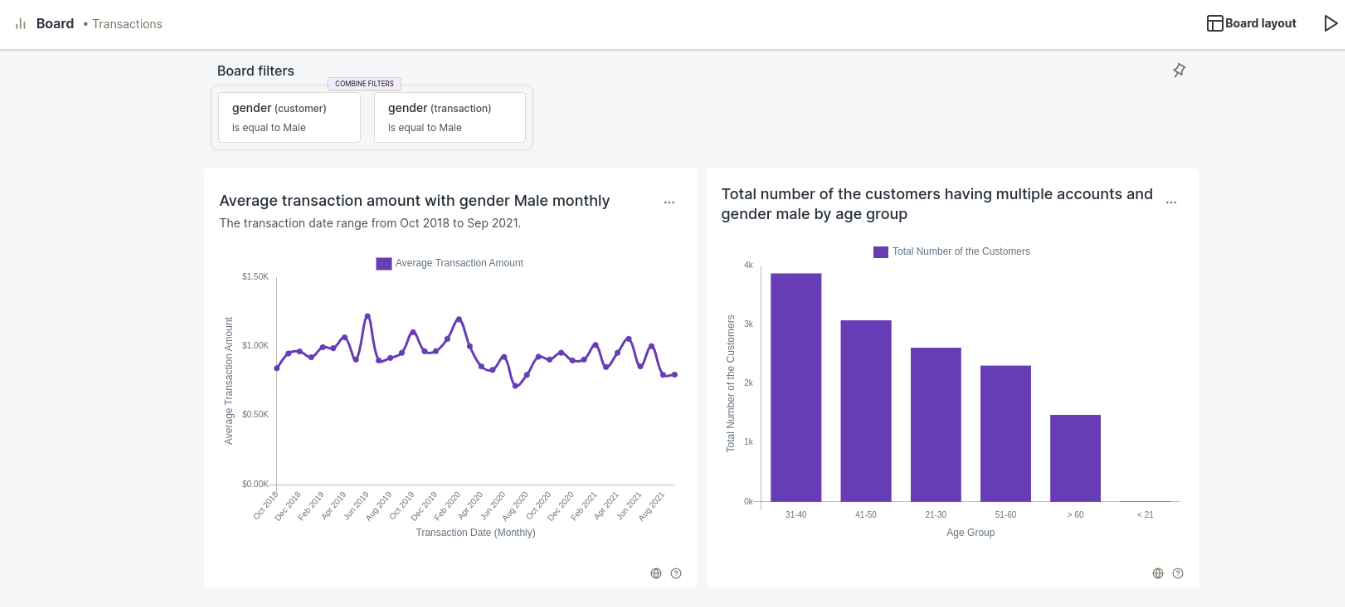
Combine filter: Board filters on same attributes of different entities can be combined to form a single board filter.

../../_images/combine_filter_example.png

Keep the cursor on board filter and if attributes of different entities are matching then option to combine filters will appear.

../../_images/combine_board_filter.png

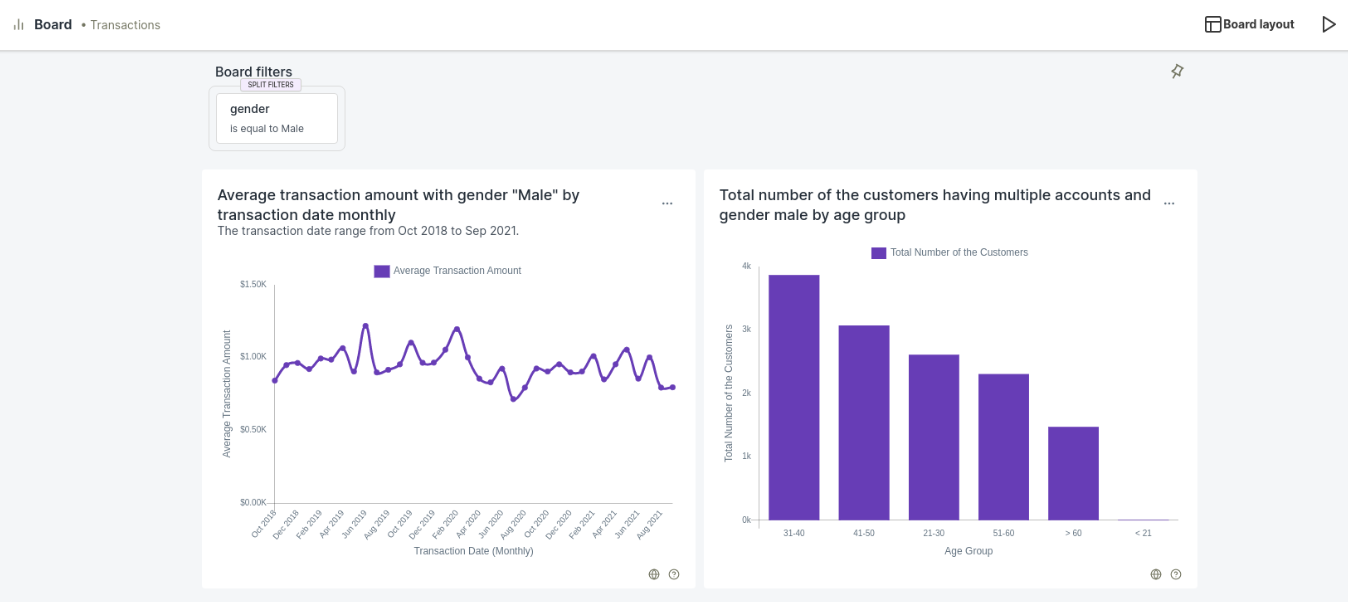
Split filters: Combined board filter can also be divided into an separate entity level board filter.
../../_images/split_board_filter.png

Collaboration and Share Options

Channels

A channel is a place where a team or an individual can create threads that allows them to interact with Qbo (the bot) to work towards a common goal. Channel can be a project, activity, or topic and can be set to either private or public, based on the channel author’s need.

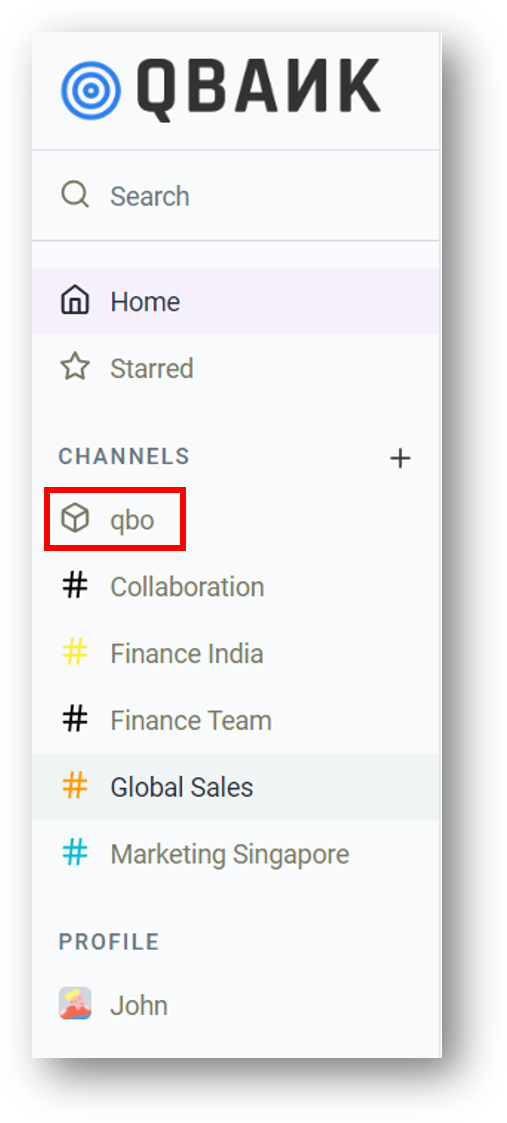
Qbo is the default channel that gets created with the installation of the Qbo insights. The Qbo channel allows the user to have private conversations with Qbo (the bot), where the user can ask queries, get results, and create boards. Multiple threads can be created or deleted in this channel (as in any other channel).

../../_images/qboChannel.png

Channels Options

Qbo insights allows user to create a custom channel as per the user’s preferences. All the custom channels get listed below CHANNELS in the left pane. These custom channels are easy to recognize as they appear with a hashtag beside its name.

  • Create Channel: There are two approaches to create a custom channel.

  1. CHANNELS > Browse channels > Create a new channel

  2. Click Icon Plus > Create a new channel

../../_images/channels.png

  1. Enter the Name and Description for the channel in the respective fields. Note that Name is a mandatory field.

  2. Click the button below Channel privacy to set the privacy of the channel as either Public or Private. By default the privacy of the channel is set to Private.

  3. Click the color box below Hashtag Color to change the color of the hashtag. By default the hashtag color is set to Black.

  4. Click the Members field to add users to the new channel and to create collaboration with Qbo (the bot). The newly added users appear below Members field. By default, the user with which you are creating a new channel is the member of that channel. If you wish to delete a particular member, click the name and it will get deleted.

  5. Click Save to create a new channel.

  6. Click Cancel to discard channel creation.

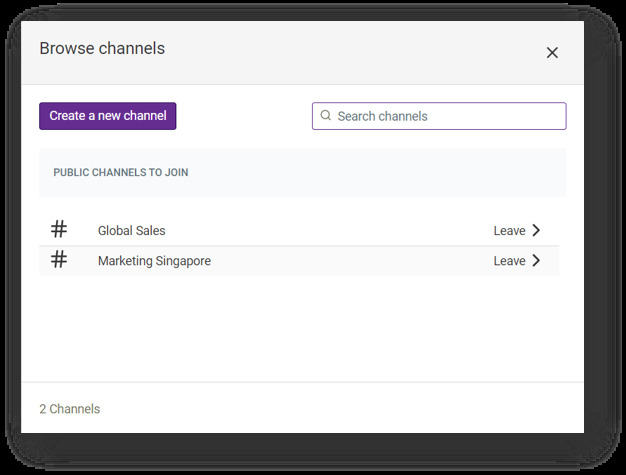
Browse channels: It allows user to search for other public channels and join it. The user also gets an option to leave a particular public channel.

../../_images/browseChannelsOptions.jpg

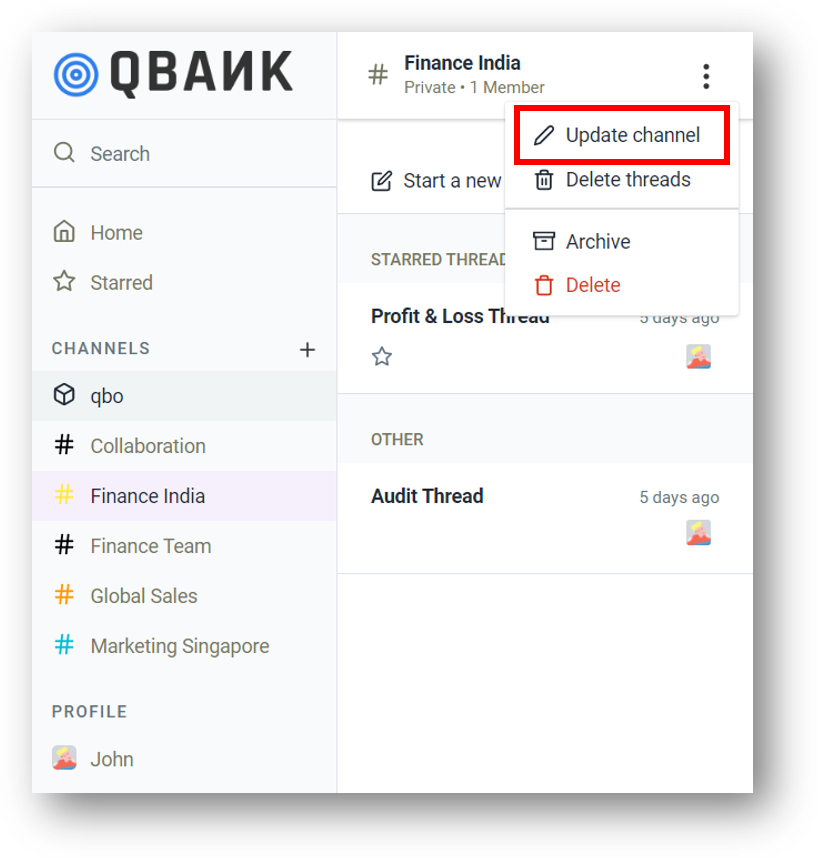
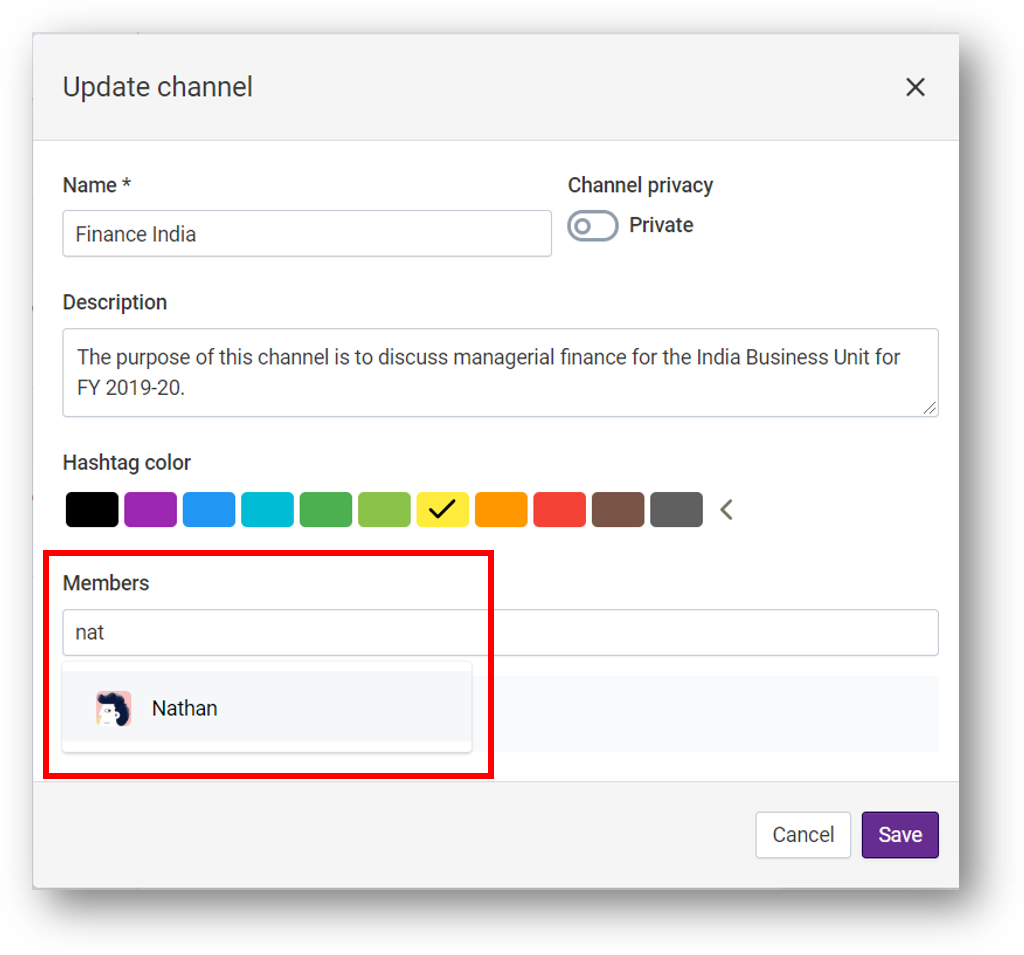
Add/Delete users: An User can add multiple users to an existing custom channel under Members field to create a collaboration between the users and the Qbo (the bot). Users can be added while creating a new channel too. To add users to an existing channel:

  1. Select a channel from the left pane.

  2. Click Icon Vertical > Update channel.

../../_images/addMemberUpdateChannel.png

  1. In the Update channel dialog box, click the Members field and type the user name to select a user you wish to add.

../../_images/addMembers.png
  1. Click Save.


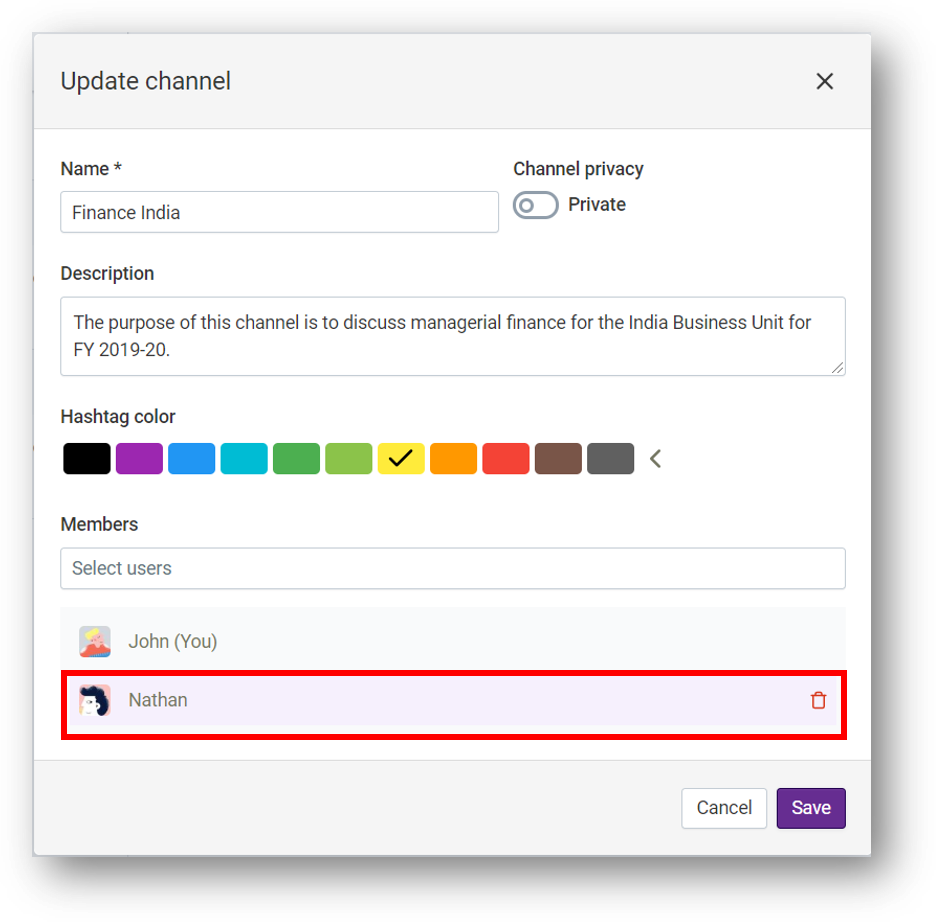
Delete users:

  1. Select a channel from the left pane.

  2. Click Icon Vertical > Update channel.

../../_images/addMemberUpdateChannel.png

  1. In the Update channel dialog box under Members field, hover over the mouse on the user name and click to delete that user.

../../_images/deleteMember.png

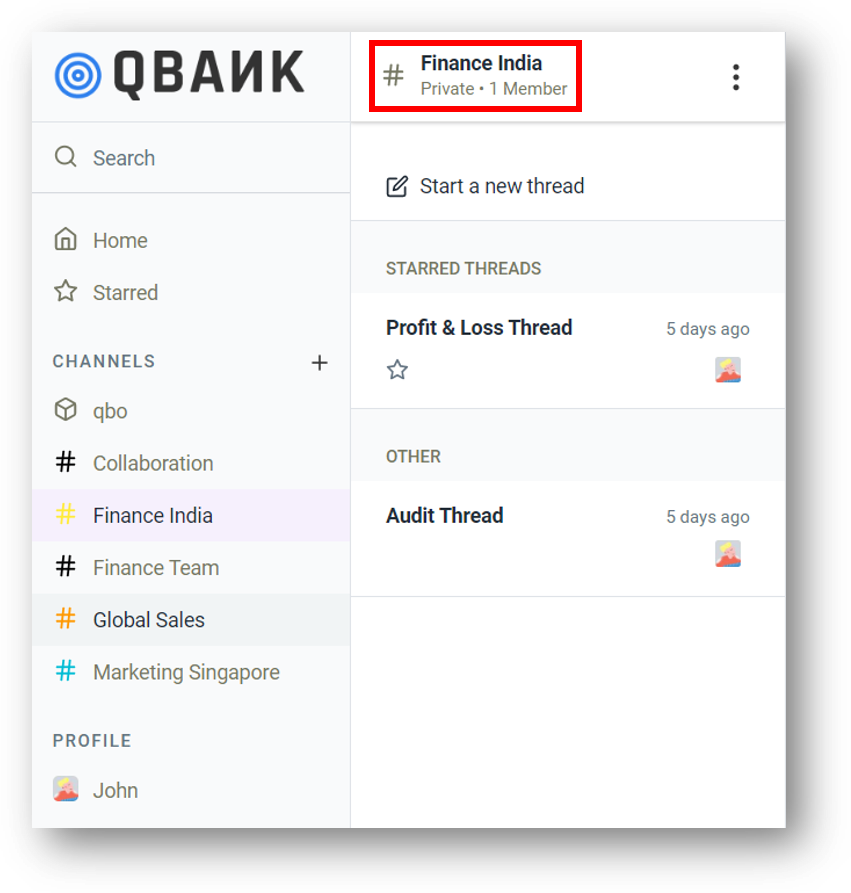
  1. Click Save.

../../_images/deleteMemberUpdate.png

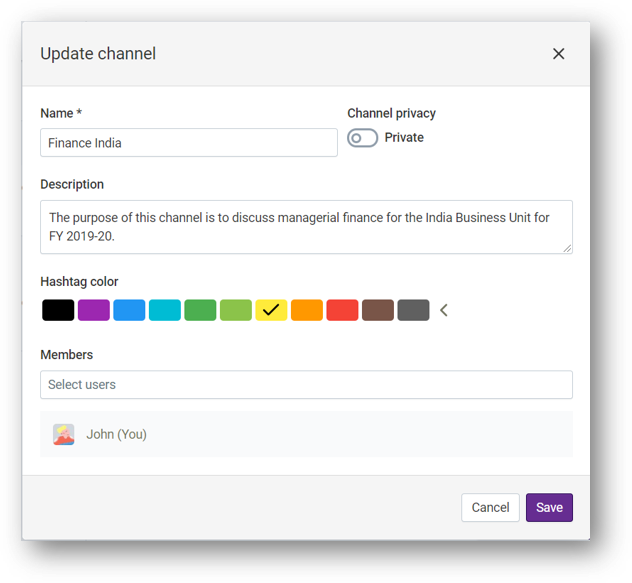
Update Channel: A channel can be updated with the following steps.

  1. Click Icon Vertical > Update channel.

../../_images/addMemberUpdateChannel.png

  1. In the Update channel dialog box, edit the fields such as:

  1. Name

  2. Description

  3. Channel privacy

  4. Hashtag color

  5. Add or delete users from Members field.

../../_images/channelUpdate.png

  1. Click Save.


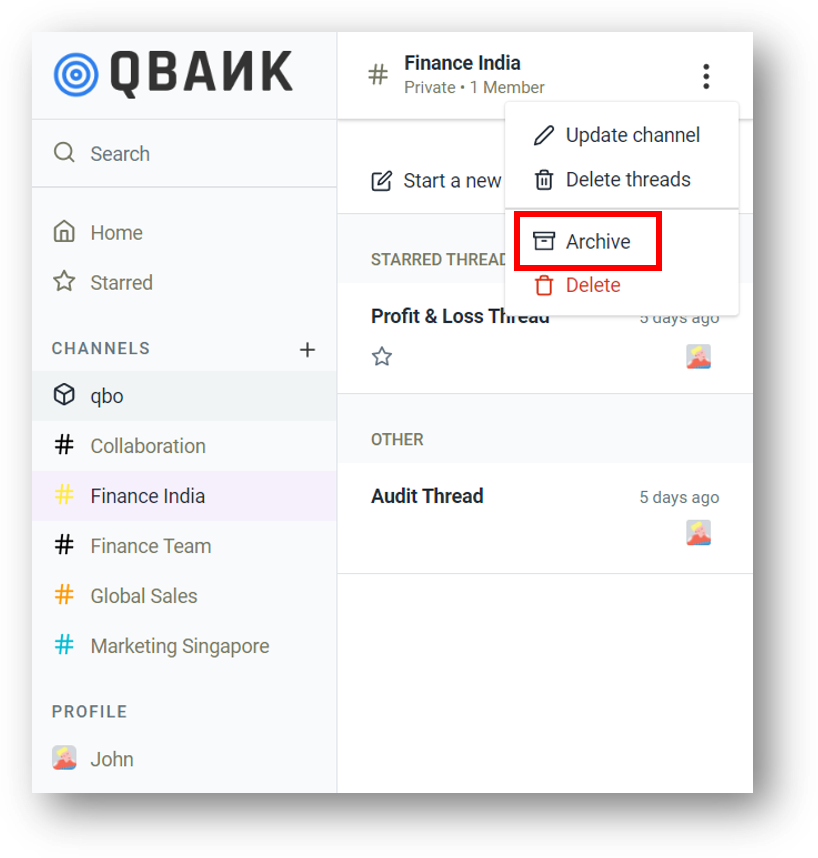
Archive/Un-archive: To archive a custom channel, follow the steps below.

  1. Click Icon Vertical > Archive.

../../_images/archiveChannel.png

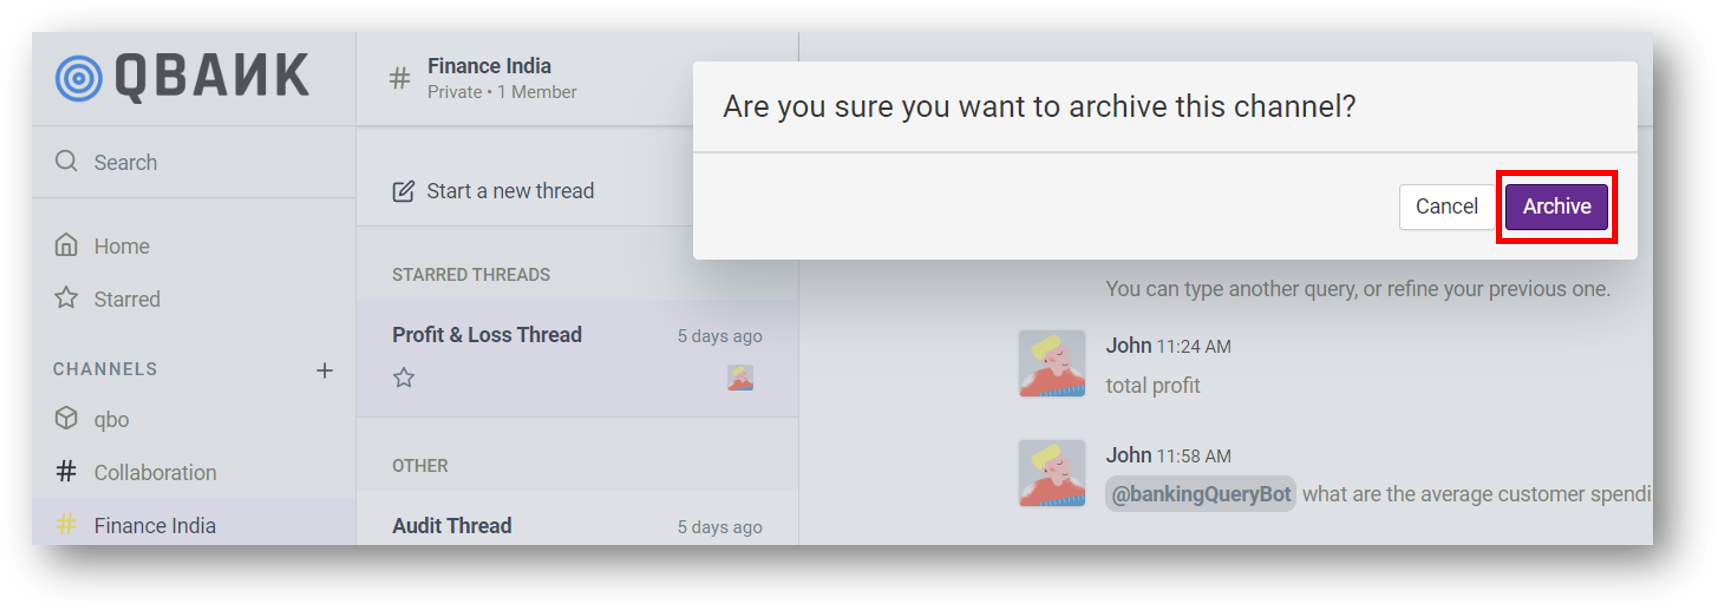
  1. Click Archive button to confirm Are you sure you want to archive this channel? message box.

../../_images/archiveMessage.png

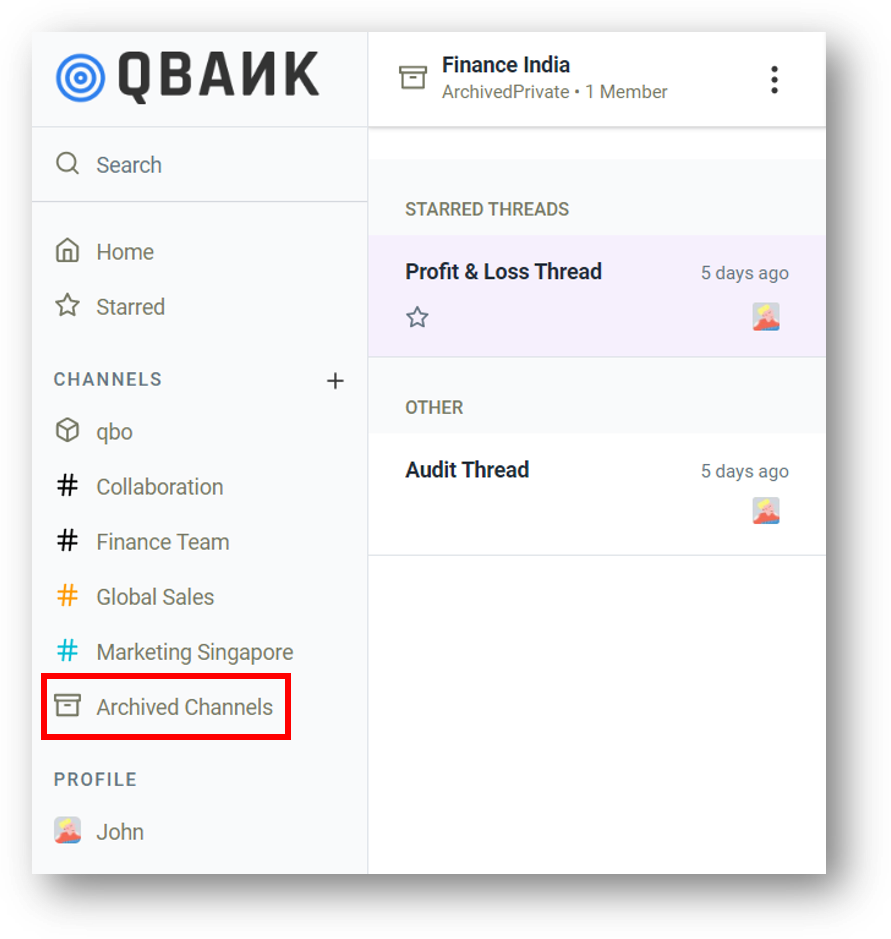
Result - Archived channels folder gets created in the left pane.

../../_images/archivedFolder.png

  1. Click Archived channels folder to view archived channels.

../../_images/archivedChannel.png

To un-archive a channel:

  1. Click the channel name under Archived channels.

  2. Click Icon Vertical > Un-archive.

../../_images/unarchiveChannel.png

Result The channel will re-appear under the CHANNELS list.

../../_images/channelReappear.png

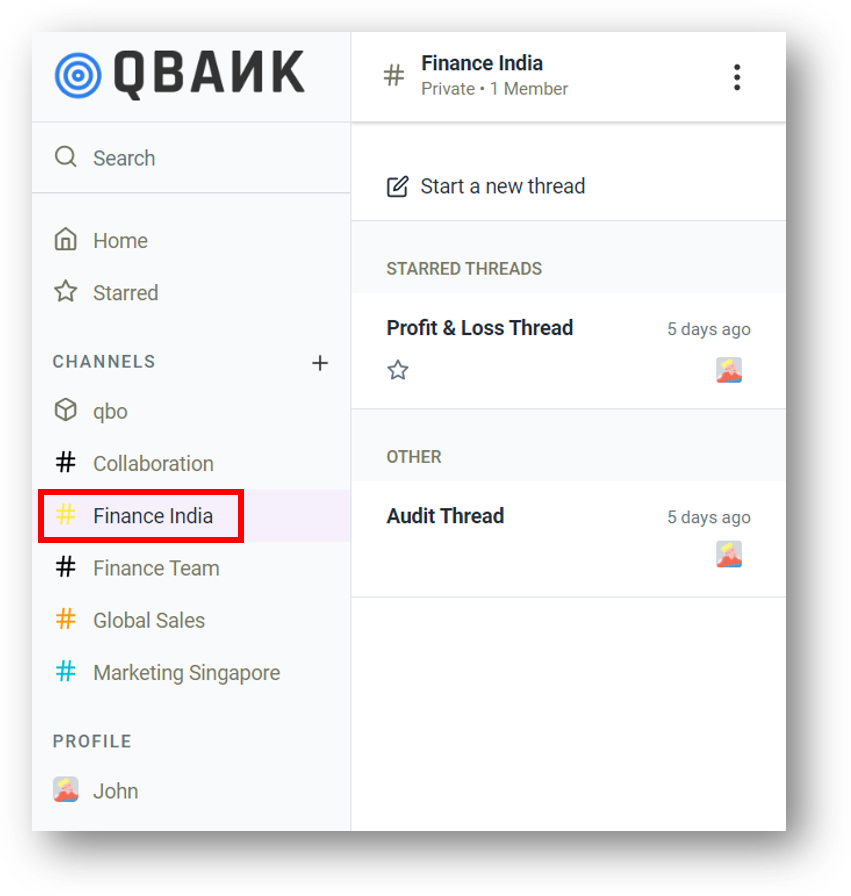
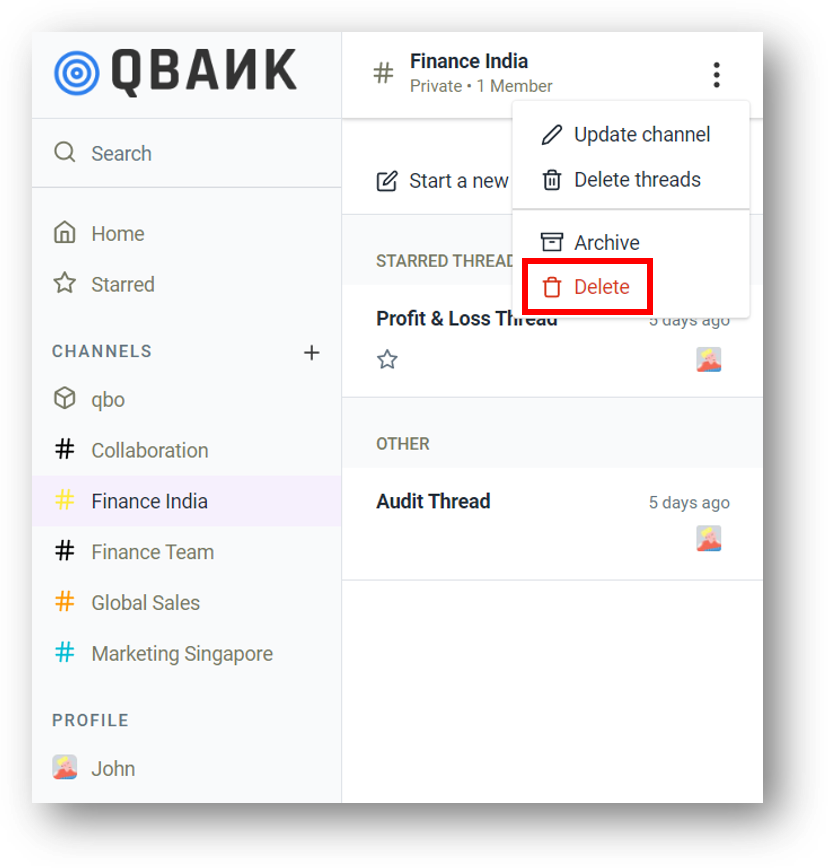
Delete: To delete a channel follow the steps below.

  1. Click Icon Vertical > Delete.

../../_images/deleteChannel.png

  1. Click Delete button to confirm Are you sure you want to delete this channel? message box.

../../_images/deleteChannelMessage.png

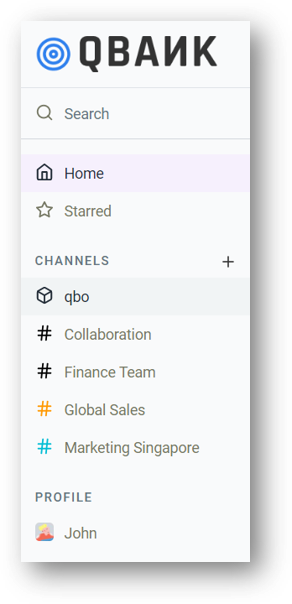
Result The channel gets deleted permanently.

../../_images/deletedChannel.png