Product settings
Once the one time setup has been completed, the admin user can now access the settings section of the product.
There are 7 different modules in the settings section, which deal with various aspects of the product.
The configuration and management of data sources is discussed in the corresponding section of this guide.
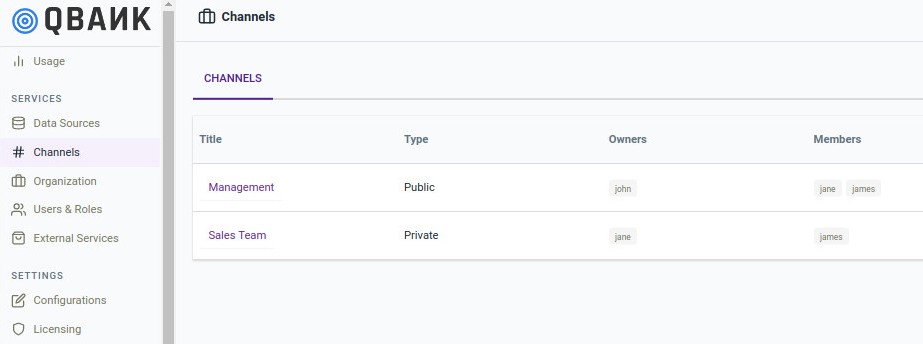
Channels
A channel is a place where a team or an individual can create threads that allows them to interact with qbo (the bot) to work towards a common goal. Channel can be a project, activity, or topic. It can be set to either private or public, based on the channel author’s need.
Note
All the channels created by the users will be visible in the admin panel section.
To know more about the channels section visit here.
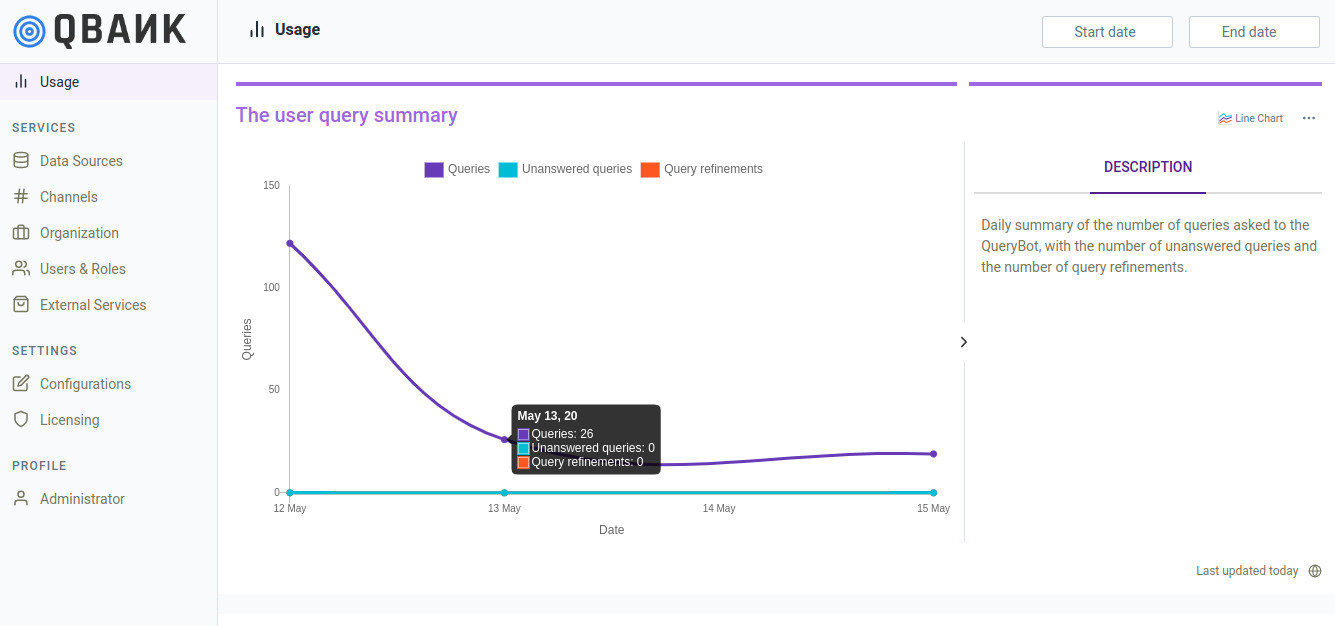
Usage metrics
The usage metrics module provides access to various metrics related to the usage of the product. This, as shown in the figure below, contains metrics like the trend of number of distinct users by day, number of sessions by day, etc. Furthermore, an administrator can also specify the duration for which they want to see these metrics.
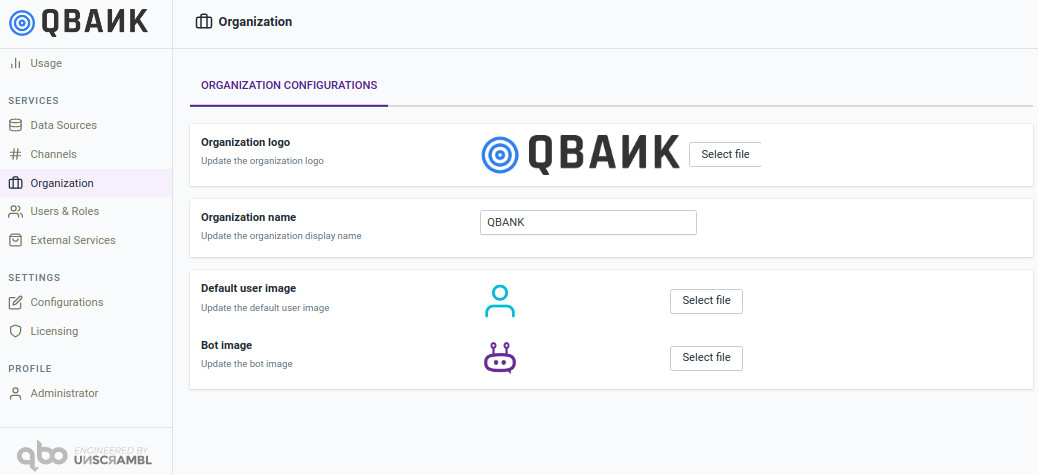
Organizational settings
The organization settings module allows one to manage the organization logo, the organization name and other organization-wide aspects like the bot image and the default user image.
User & Role management
The user and role management module provides extensive capabilities for managing adding, deleting, managing the users and roles.
The admin user and the Administrator role cannot be modified, nor can be deleted.
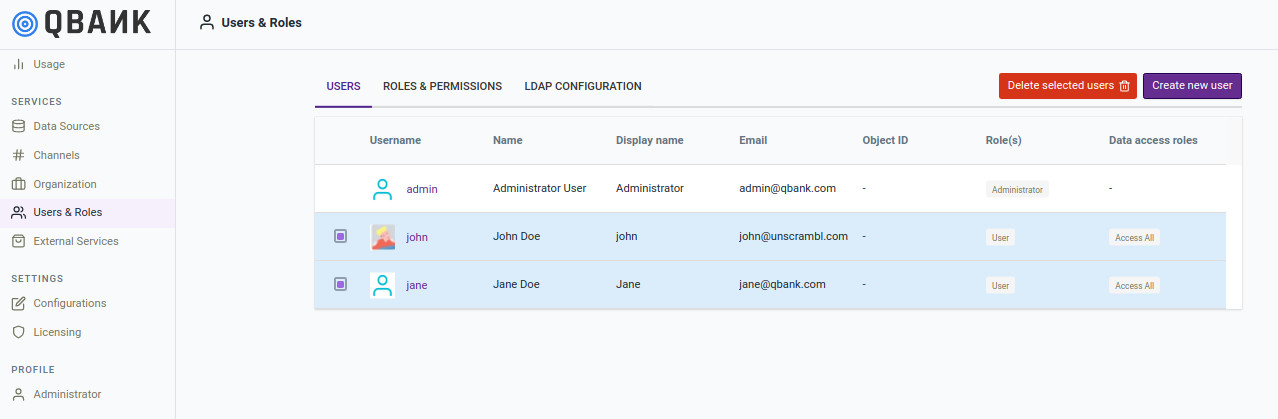
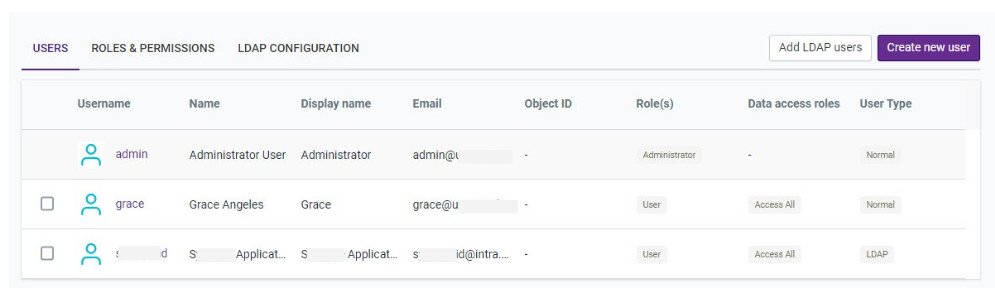
The user management interface as shown below shows a list of users configured in the product and various attributes corresponding
to such users.

Users
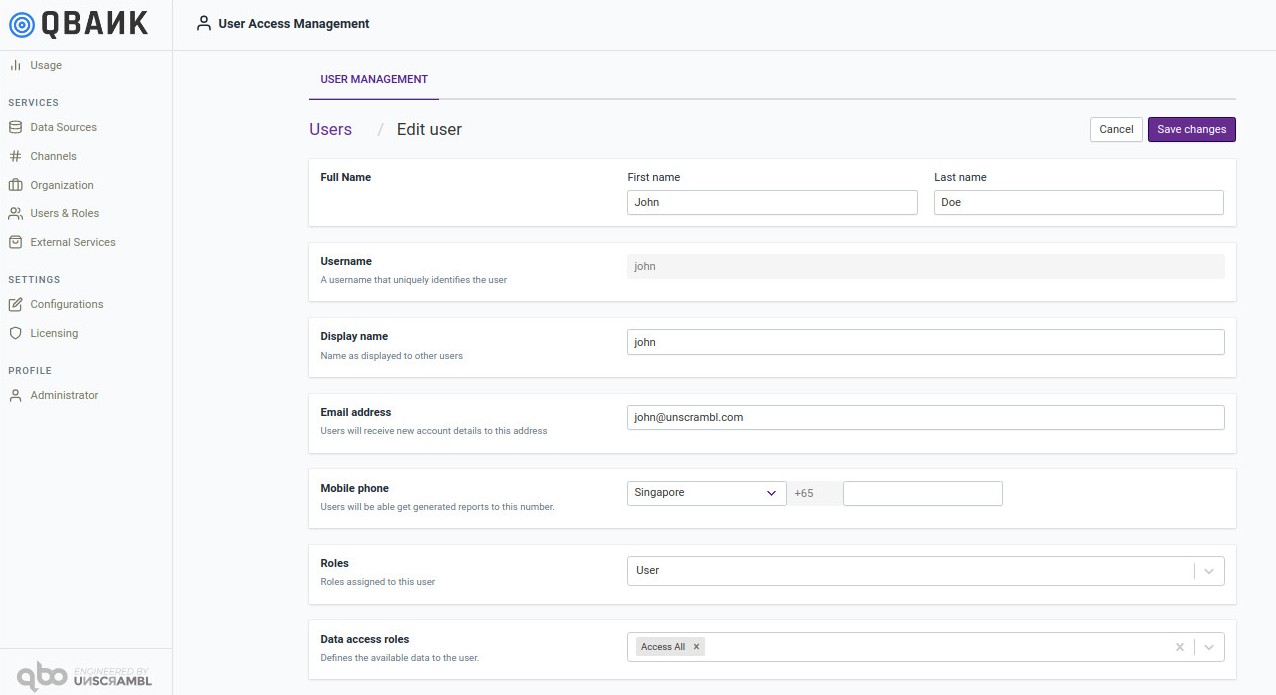
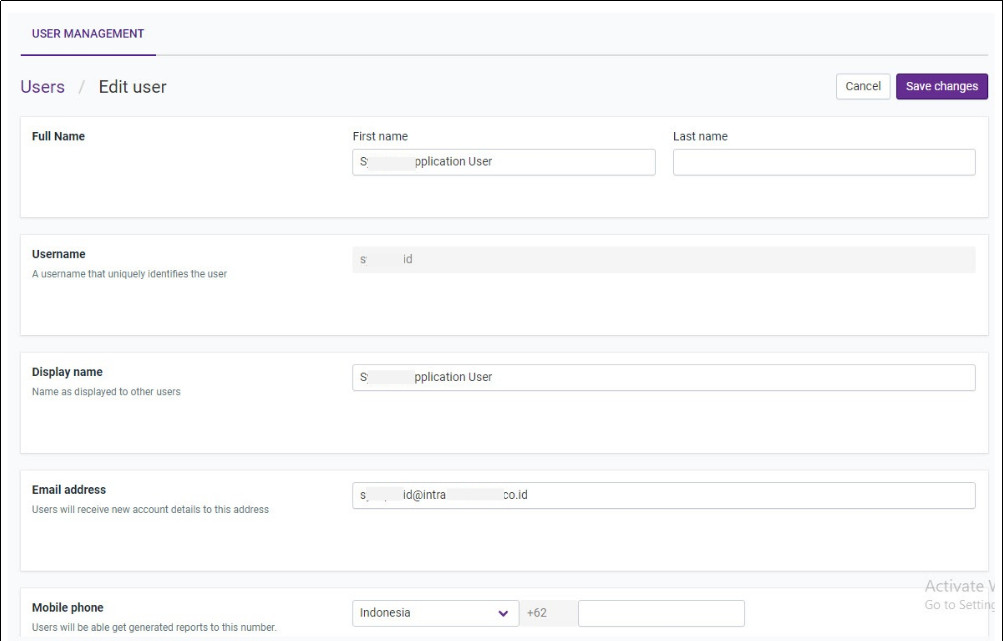
By clicking on the username in the user list above, one can browse to the page where one can edit user related information and also reset the password.
To delete a user or a group of users, one can select users by clicking on the checkbox located towards the right of the user list. The clicking the Delete Selected Users button results is removal of the users.
Forgot Password
If a user forgets their password, they can use the Forgot password? link to get an email containing the reset password
instructions that are sent to the registered user’s email address. As a pre-requisite to enable Forgot password
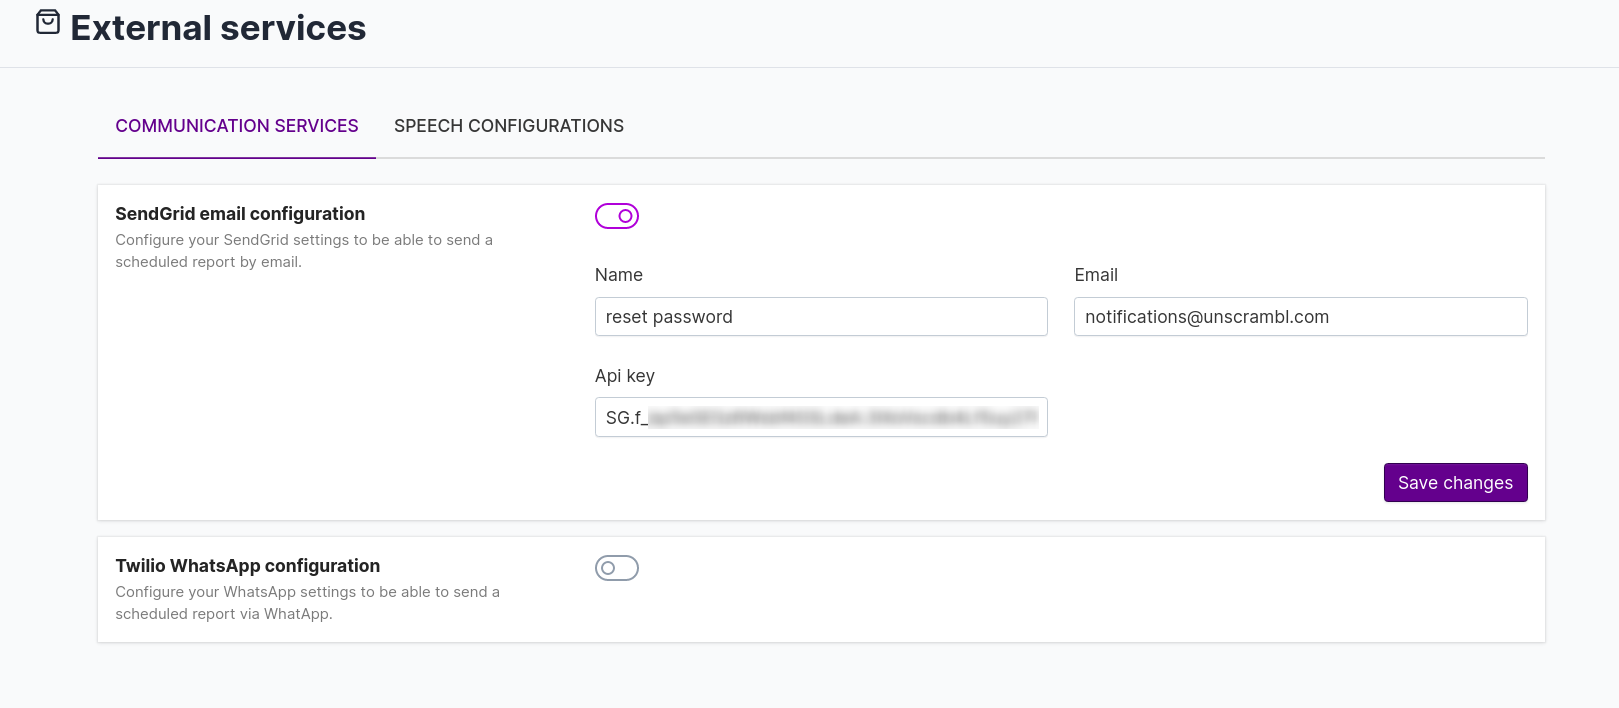
feature the reset password configuration and send grid configuration should configure before. Also, the user
email should be mapped with the username. To allow these services, you should add resetPasswordConfiguration code in
chai.json and also configure SendGrid email configuration which is present under the External services section.
"resetPasswordConfiguration": {
    "expiredResetPasswordLinkCleanupPeriodInDays": 1,
    "resetPasswordLinkExpirationWindowInMinutes": 30,
    "resetPasswordMailTemplateConfiguration": {
         "resetPasswordLinkExpirationWindowInMinutesParameterName": "minutes",
         "resetPasswordLinkParameterName": "activationLink",
         "templateId": "d-038c9bdc5a3949a39f55d622e2f7a945",
         "userDisplayNameParameterName": "name"
     }
  }
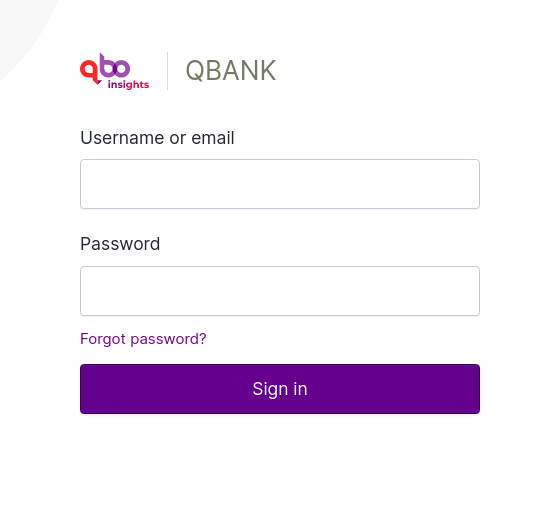
After the above configurations, you will see the Forgot password? option on your login screen.
Note
The following must be configured in order to allow Forgot password services:
User email should be present and mapped with the username.
resetPasswordConfiguration should be configured in chai.json.
SendGrid email configuration should be present.
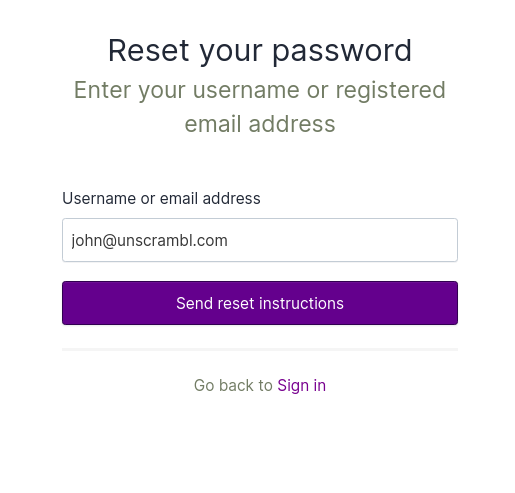
When the Forgot password? option is selected, the Reset your password screen appears, enter your Username or
email address and click on the Sent reset instructions button to reset your password.
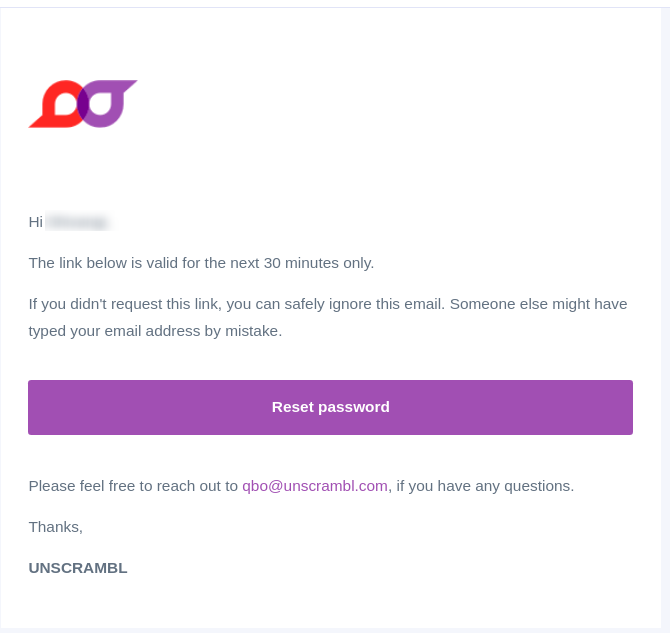
It will send an email to your registered email Id, open the email and click on the Reset password button.
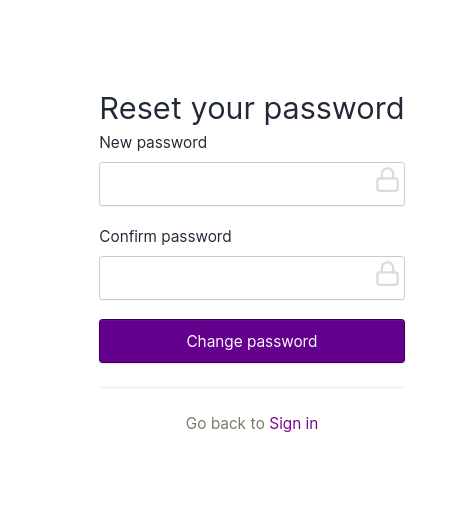
Reset your password page will appear, enter your new password in the text field, re-enter your password to confirm
it and then click on the Change password button.
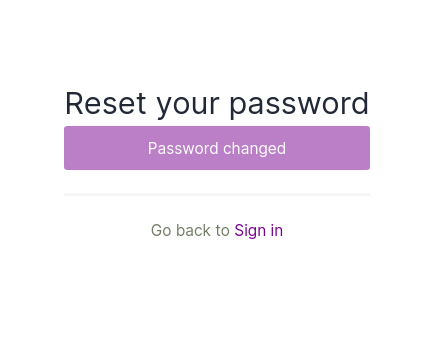
Password changed page will appear, click on Sign in option, login screen will appear, try to login with new
password.
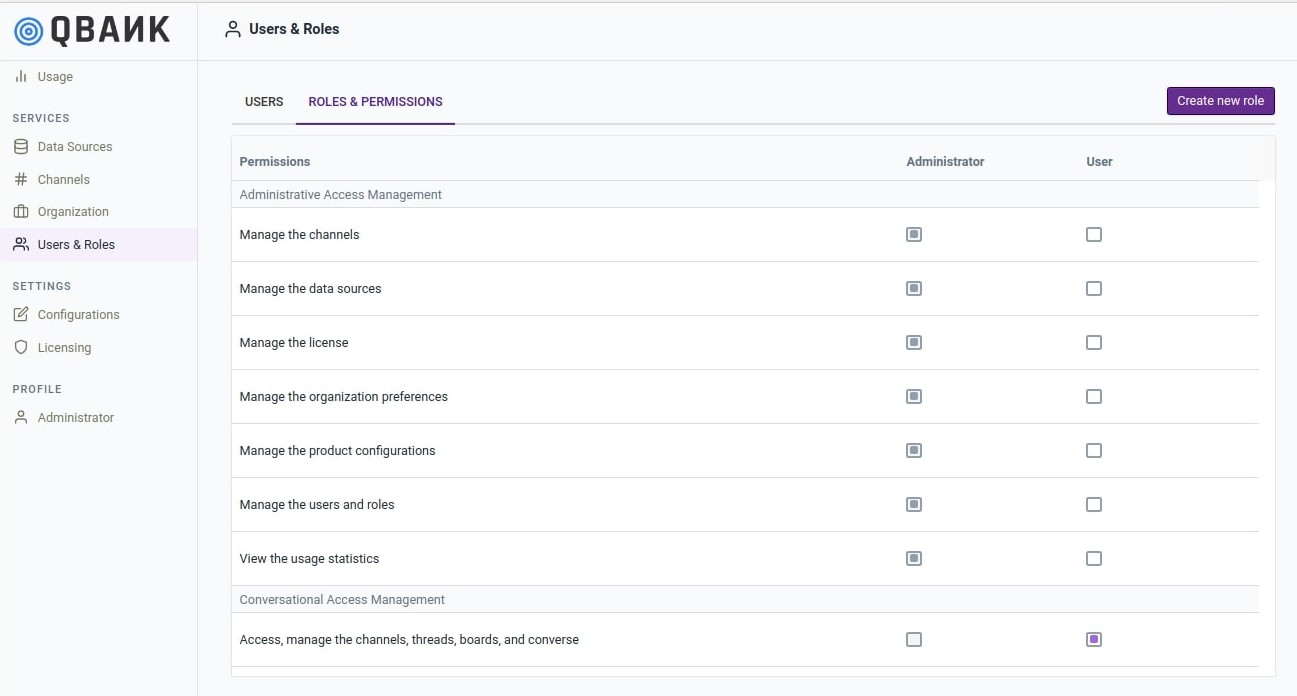
Roles & Permissions
The roles tab list down the currently configured roles and a subsequent sections lists down the permissions associated with each role.
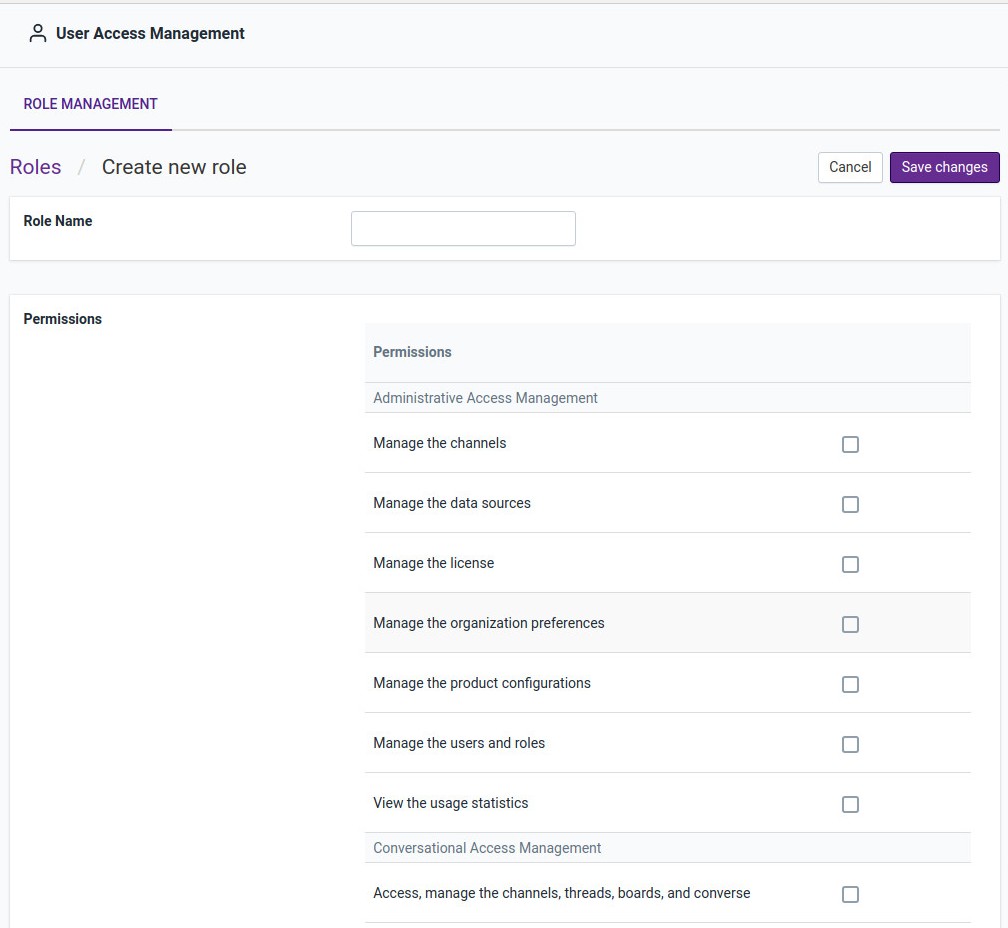
One can create a new role by clicking the Create new role button. In the resulting page, one can create a new role and assign permission to the role being created.
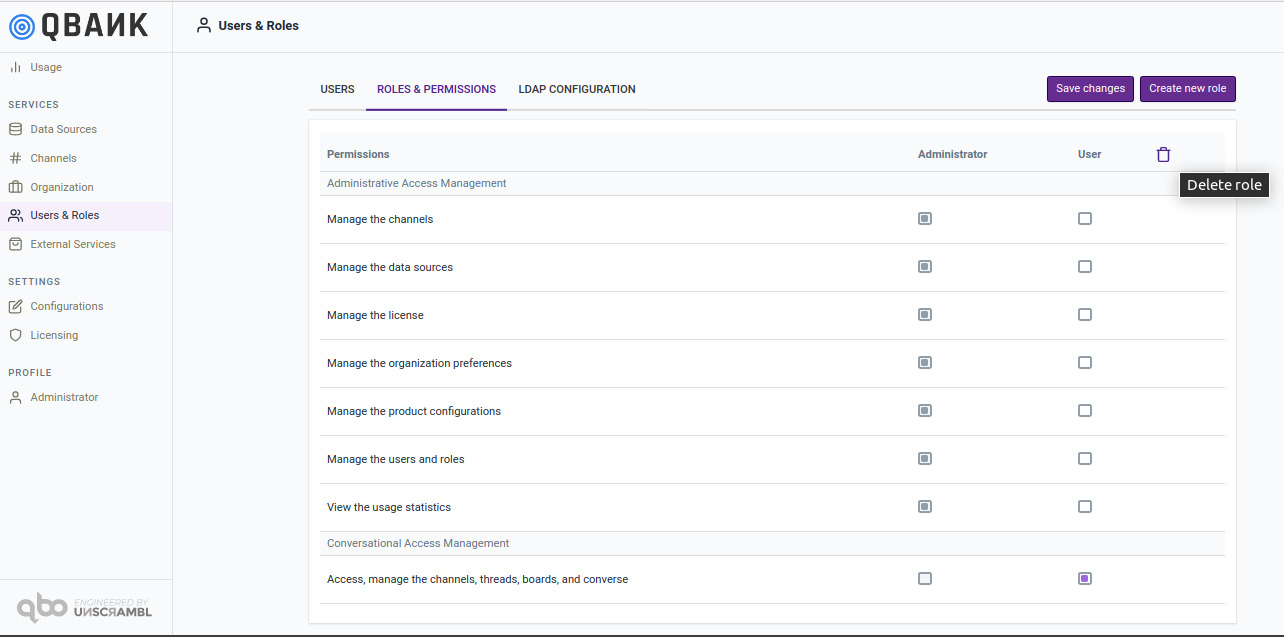
A role can be deleted by selecting the role and clicking on the Delete Selected Roles button that appears. Please note that in order to be deleted a role must not be assigned to any user.
LDAP configurations
When a client has an LDAP server, qbo administrator can add users from this server to qbo. After that users can use their own LDAP username and passwords to sign in to qbo. There are two protocols supported in the qbo that is Active Directory and Open LDAP. Let’s see each one of them.
Active Directory: Let’s see the configurations in details.
Server settings
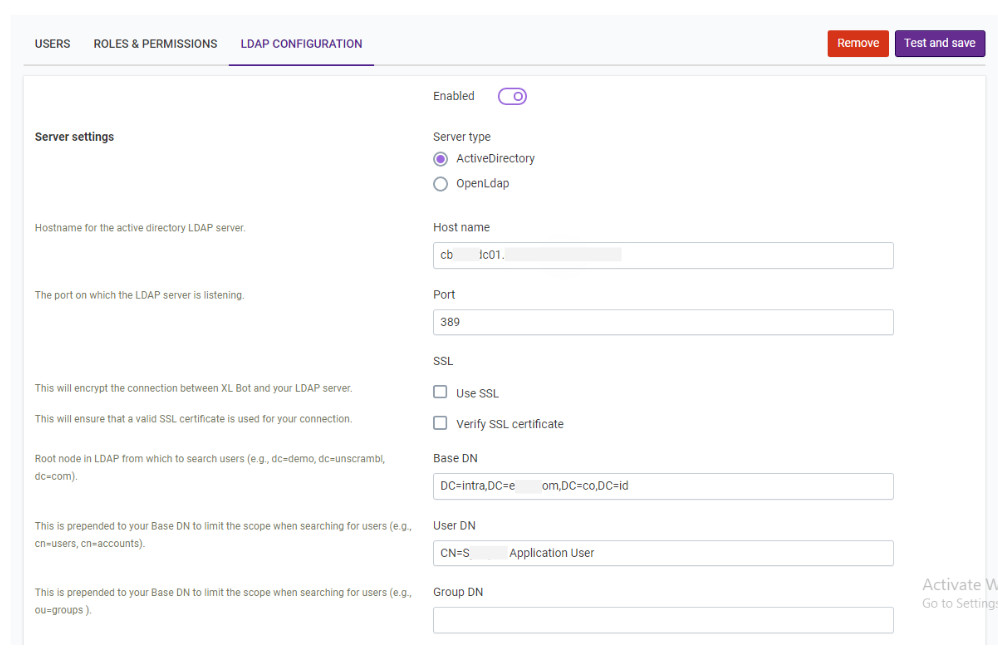
Server type:                    LDAP server type (ActiveDirectory).
Hostname:                       Host address of the LDAP server.
Port:                           Port of the LDAP server.
Use SSL:                        If the server uses a secure connection.
Verify SSL certificate:         If the server’s certificate is trusted by an authority (true) or self-signed
                                (false).
Base DN:                        Base directory of the LDAP server.
User DN:                        A name that includes an object's entire path to the root of the LDAP namespace.
Group DN:                       Currently unused.
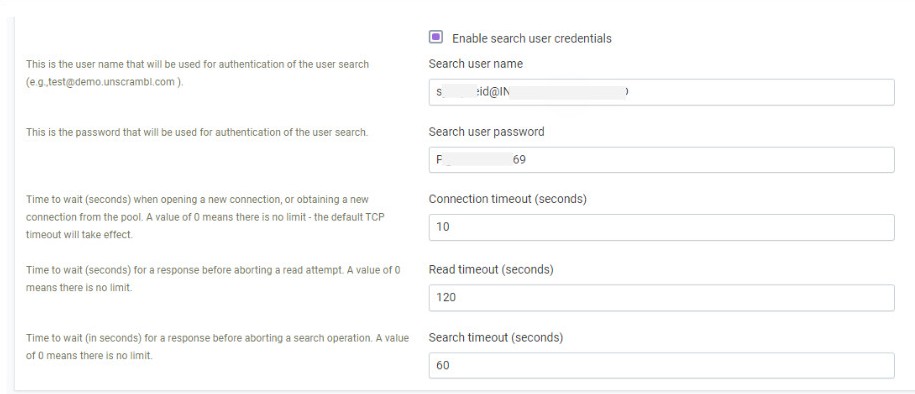
Enable search user credentials: This is used when we send search queries to the LDAP server. Some server
                                allows anonymous search requests (this can be left unchecked in those cases).
Search user name:               This is the user name that will be used for authentication of the user search
Search user password:           This is the password that will be used for authentication of the user search.
Connection timeout (seconds):   Timeout when connecting to the LDAP server.
Read timeout (seconds):         Timeout when waiting for an answer from the LDAP server.
Search timeout (seconds):       Timeout when waiting for search query from the LDAP server.
User schema

User schema is for how a user is represented by the LDAP server in some organization.

User object class:                user
Username attribute:               sAMAccountName
Username RDN attribute:           dn
User first name attribute:        givenName
User last name attribute:         sn
User display name attribute:      displayName
User email attribute:             userPrincipalName
User unique identifier attribute: sAMAccountName
For example John user in some organization Active Directory LDAP server.
{
"users": [
    {
    "dn": "CN=John Doe,OU=Vendor,DC=intra,DC=yourcompany,DC=co,DC=id",
    "userPrincipalName": "SCRAM.JohnS@intra.yourcompany.co.id",
    "sAMAccountName": "SCRAM.JohnS",
    "mail": "SCRAM.JohnS@ab.co.id",
    "whenCreated": "20190422113605.0Z",
    "pwdLastSet": "132305589928005513",
    "userAccountControl": "512",
    "sn": "Doe",
    "givenName": "John",
    "cn": "John Doe",
    "displayName": "scram.John Doe"
    }
    ],
    "groups": [

    ],
    "other": [

    ]
    }","time":"2020-06-01T05: 48: 44.336Z","v":0} Full result {"users":[{"dn":"CN=JohnDoe,
    OU=Vendor,
    DC=intra,
    DC=yourcompany,
    DC=co,
    DC=id","userPrincipalName":"SCRAM.JohnS@intra.yourcompany.co.id","sAMAccountName":"SCRAM.JohnS","mail":"SCRAM.JohnS@ab.co.id",
    "whenCreated":"20190422113605.0Z","pwdLastSet":"132305589928005513","userAccountControl":"512","sn":"Doe",
    "givenName":"John","cn":"JohnDoe","displayName":"scram.JohnDoe"}],"groups":[],"other":[]}
}
Now we can add LDAP user to the qbo by searching and update user details.
Search LDAP User
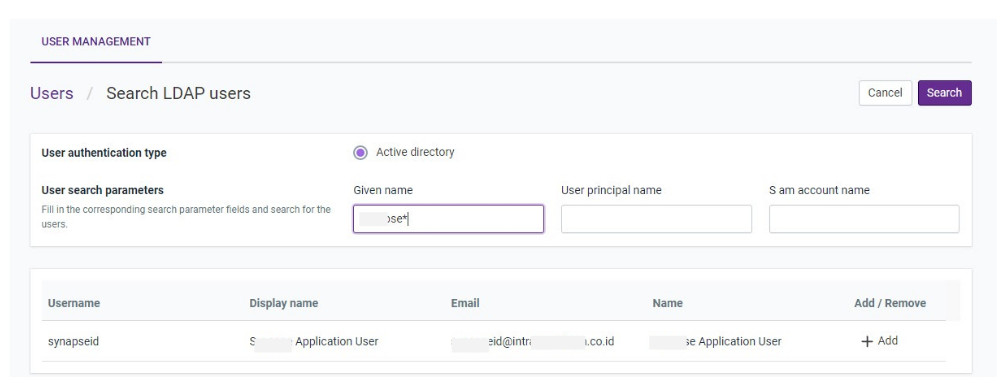
Add LDAP user to the qbo
Edit LDAP (user) added
Open LDAP: Let’s see the configurations in details.
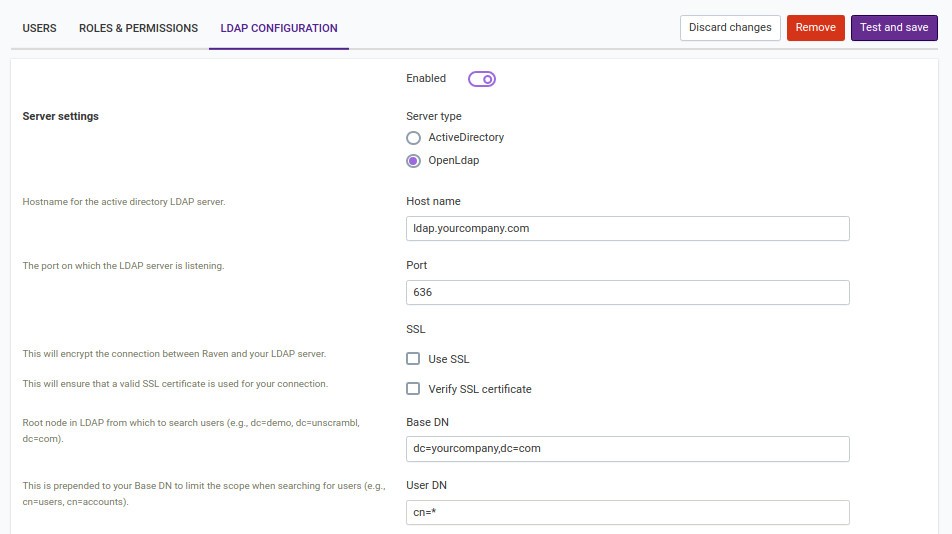
Server settings
Server type:                    LDAP server type (Open LDAP).
Hostname:                       Host address of the LDAP server.
Port:                           Port of the LDAP server.
Use SSL:                        If the server uses a secure connection.
Verify SSL certificate:         If the server’s certificate is trusted by an authority (true) or self-signed
                                (false).
Base DN:                        Base directory of the LDAP server.
User DN:                        UserDN.
Group DN:                       Currently unused.
Enable search user credentials: This is used when we send search queries to the LDAP server. Some server
                                allows anonymous search requests (this can be left unchecked in those cases).
Connection timeout (seconds):   Timeout when connecting to the LDAP server.
Read timeout (seconds):         Timeout when waiting for an answer from the LDAP server.
Search timeout (seconds):       Timeout when waiting for search query from the LDAP server.
User schema
User schema is for how a user is represented by the LDAP server in some organization.

User object class:                inetOrgPerson
Username attribute:               uid
Username RDN attribute:           dn
User first name attribute:        givenName
User last name attribute:         sn
User display name attribute:      displayName
User email attribute:             mail
User unique identifier attribute: uid
For example John user in some organization LDAP server.
{
"dn": "cn=John Doe,ou=People,dc=yourcompany,dc=com",
"controls": [],
"cn": "John Doe",
"givenName": "John",
"gidNumber": "500",
"sn": "Doe",
"objectClass": [
    "inetOrgPerson",
    "posixAccount",
    "top",
    "sambaSamAccount"
],
"uid": "john",
"uidNumber": "10009",
"homeDirectory": "/gemenon/home/john",
"loginShell": "/bin/bash",
"mobile": "+1 (222) 213 1234",
"sambaSID": "S-2-6-31-1383322941-1231234567-1345676223-1998",
"displayName": "John Doe",
"sambaAcctFlags": "[U]",
"mail": "john@yourcompany.com",
"title": "Software Developer"
}
Similar to Active Directory we can add LDAP user to the qbo by searching and update user details.
OAuth configurations
OAuth “Open Authorization” can be added to allow users to login with OAuth services like Active Directory (it is not necessary to create a user for qbo, nor is it necessary to
remember any username/password for qbo). OAuth is an authentication protocol that does not share password information, but uses authorization tokens to demonstrate
user-qbo identity instead. Currently qbo only supports Active Directory.
Client ID and Client secret are needed in order to configure OAuth, so you must register your application first on the Azure portal to get corresponding client ID
and client secret.
Click to know more about OAuth.
Let’s see the registration steps in detail.
Register an application
Before your application can authenticate Active Directory users, you must register your application and get the corresponding client ID and client secret.
Navigate to the Microsoft identity platform for developers in the Azure portal - App registrations page. You can login using either a personal Microsoft Account or a Work Account.
Select New registration.

When the Register an application page appears, enter your application’s registration information:
In the Name section, enter a meaningful application name that will be displayed to users of the app (for example: qbo).
In the Supported account types section, select
Accounts in any organizational directory and personal Microsoft accounts.
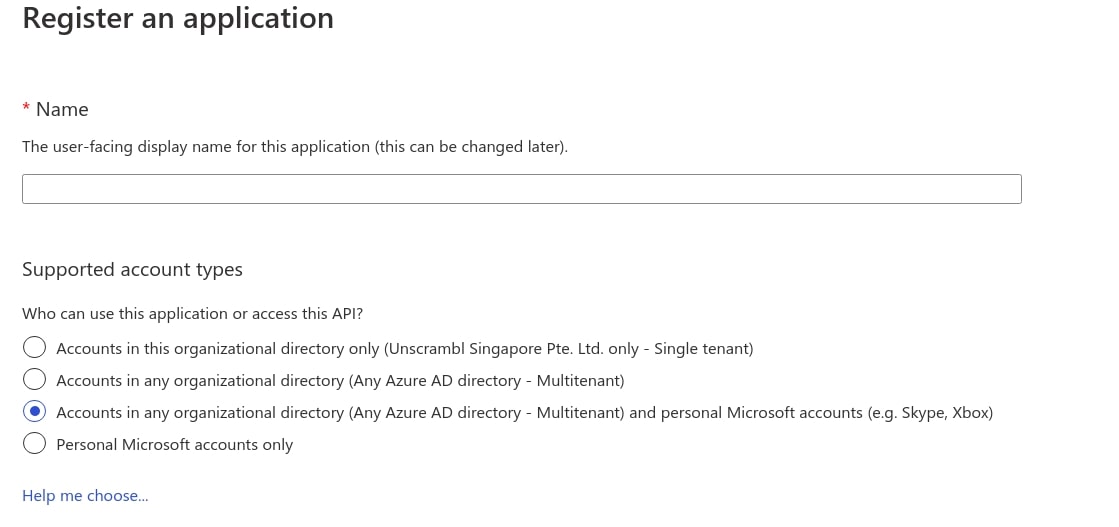
Select Register to create the application.
On the app Overview page, copy the
Application (client) IDvalue . You can use it as theclient idduring OAuth configuration.
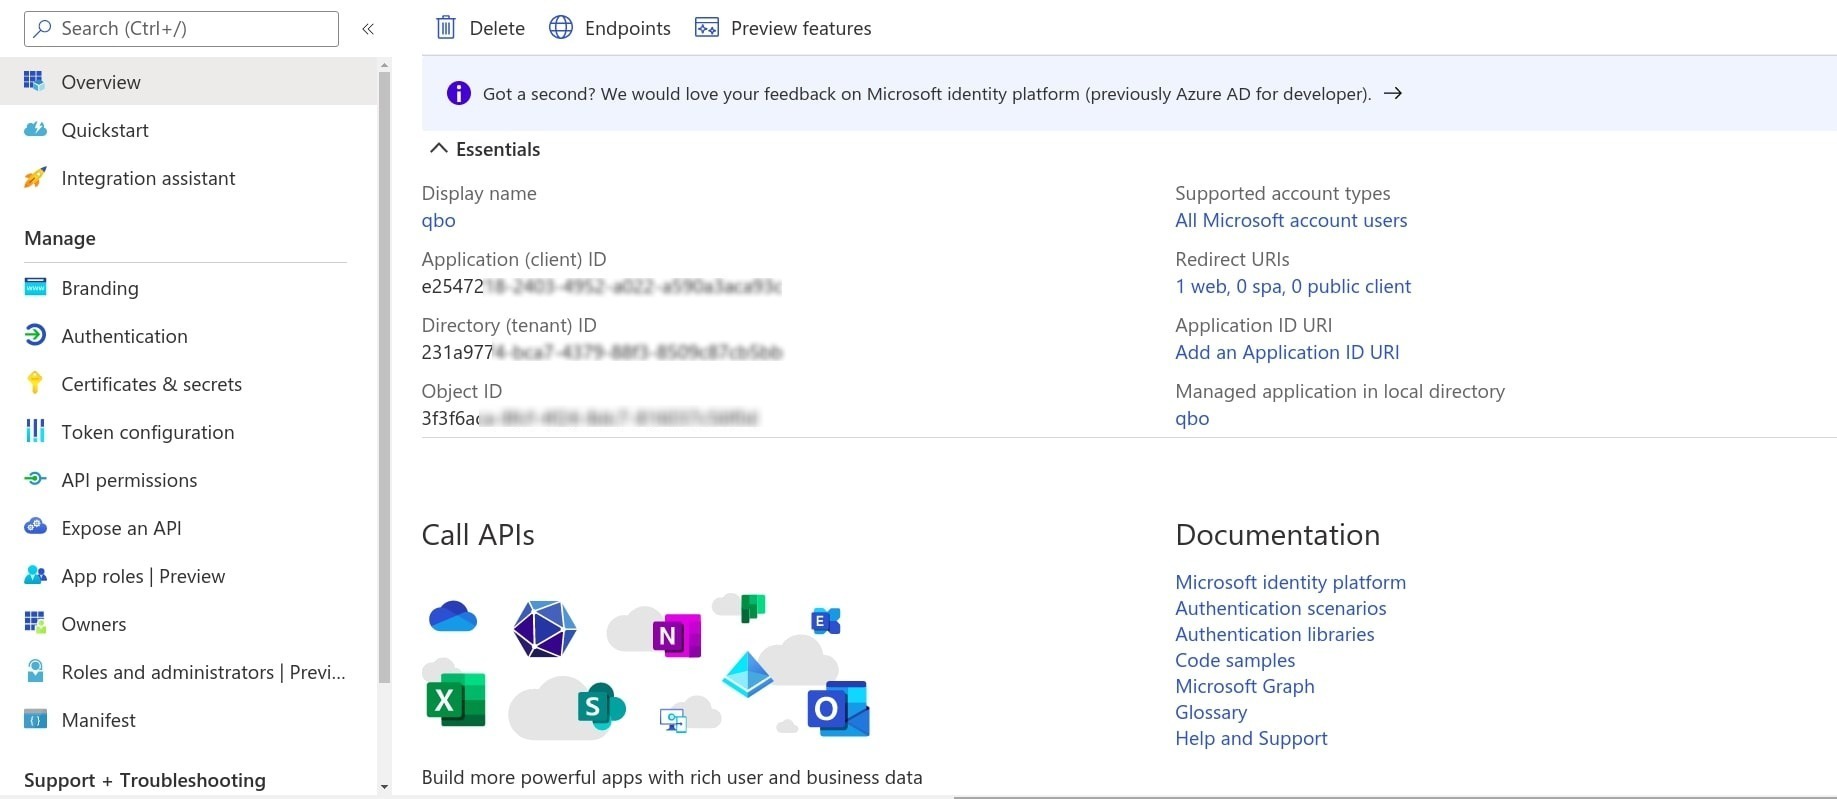
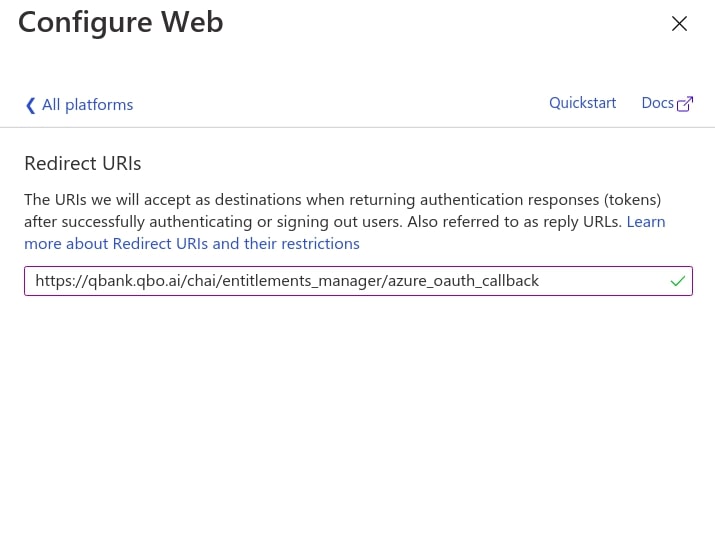
Select the Authentication under Manage. Click on the Add a platform button and then select Web applications , then you should see the Redirect URIs page.
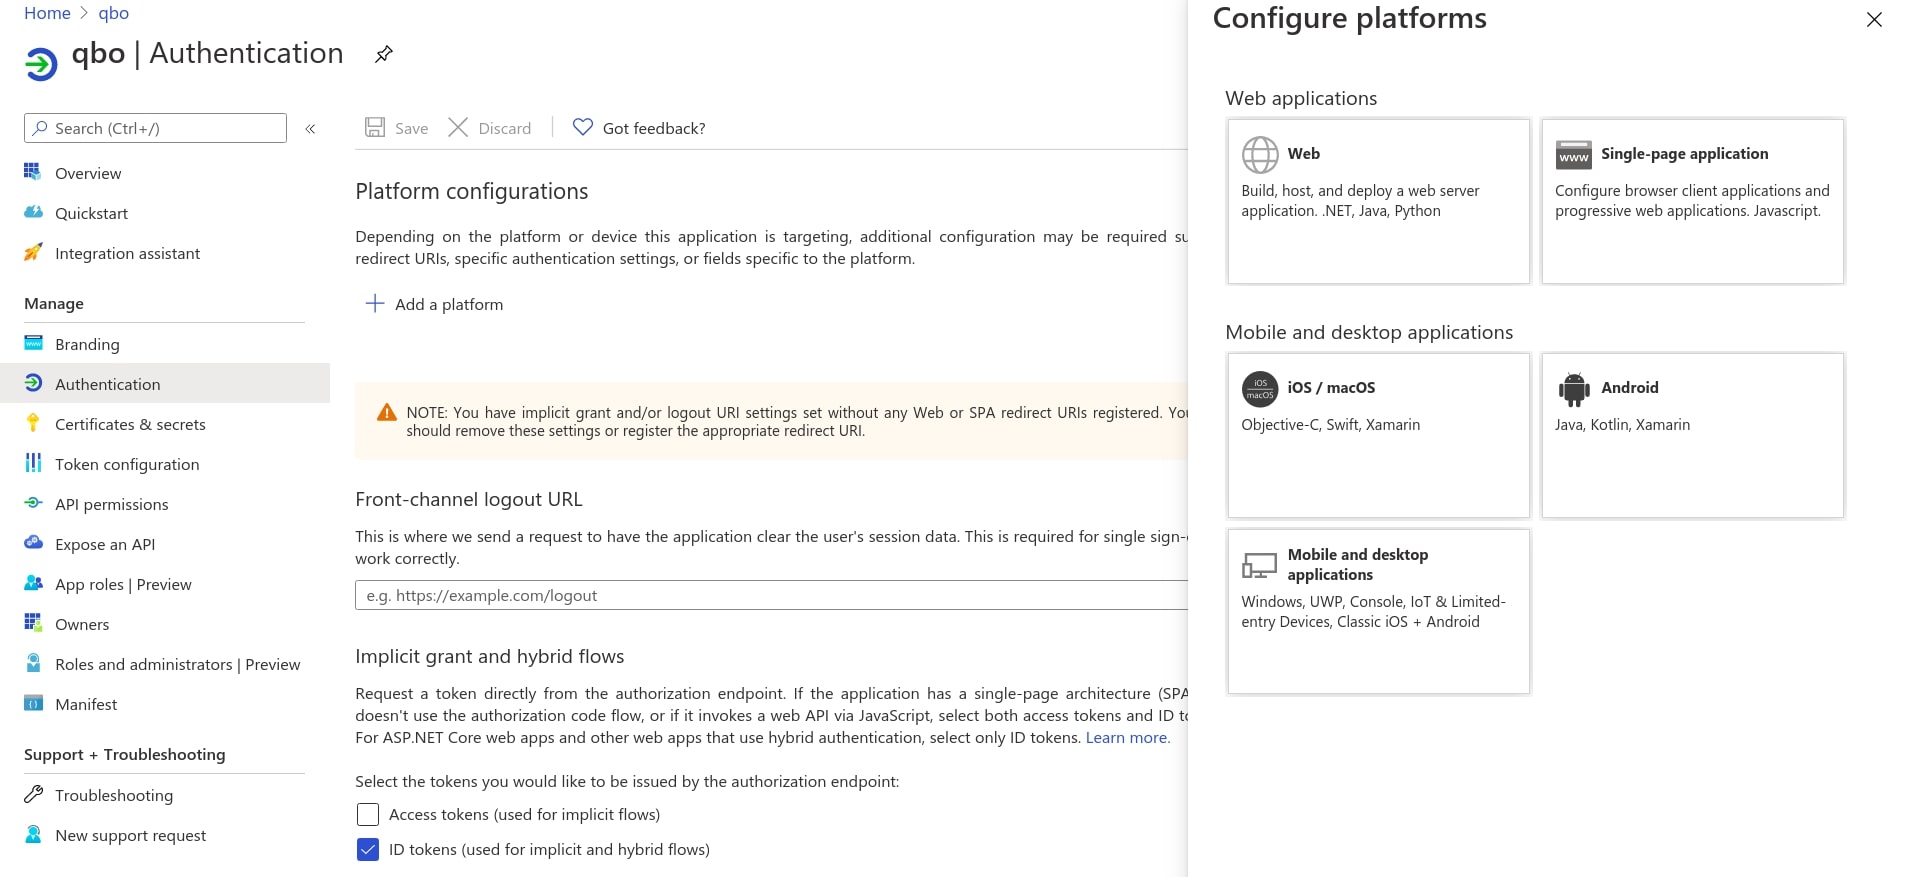
For web applications, provide the base URL of your application. For example,
http://localhost:3154/chaiorhttps://qbank.qbi.ai/chaimight be the URL for a web application.Add
entitlements_manager/azure_oauth_callbackin your base URL. For example,https://qbank.qbo.ai/chai/entitlements_manager/azure_oauth_callbackand click on Configure button.
Note
The redirect URI must begin with the scheme https. There are some exceptions for localhost redirect URIs.
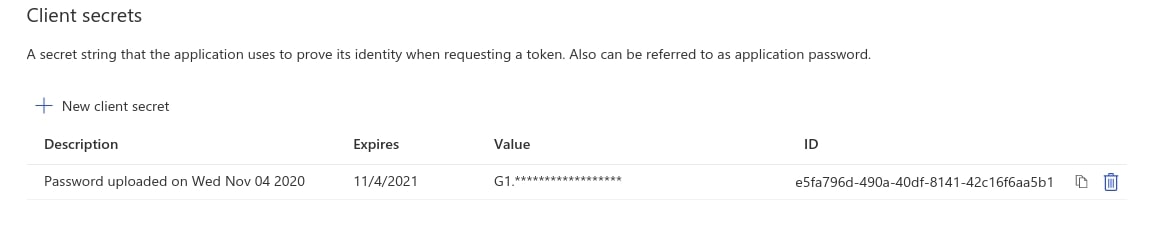
7. For web applications, select Certificates & secrets under Manage. Select the New client secret button. Enter a value in Description (for example: NewSecret), select any option for Expires and choose Add.
Copy the
Application (client) secretvalue. While configuring OAuth, you can use it as theclient secret.
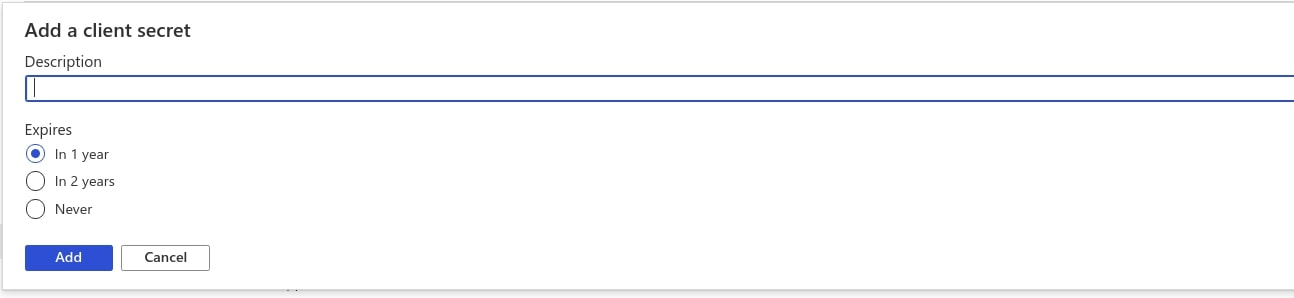
Note
Quickly copy the client secret value, you won’t get this again next time you visit this screen.
Configuration in qbo
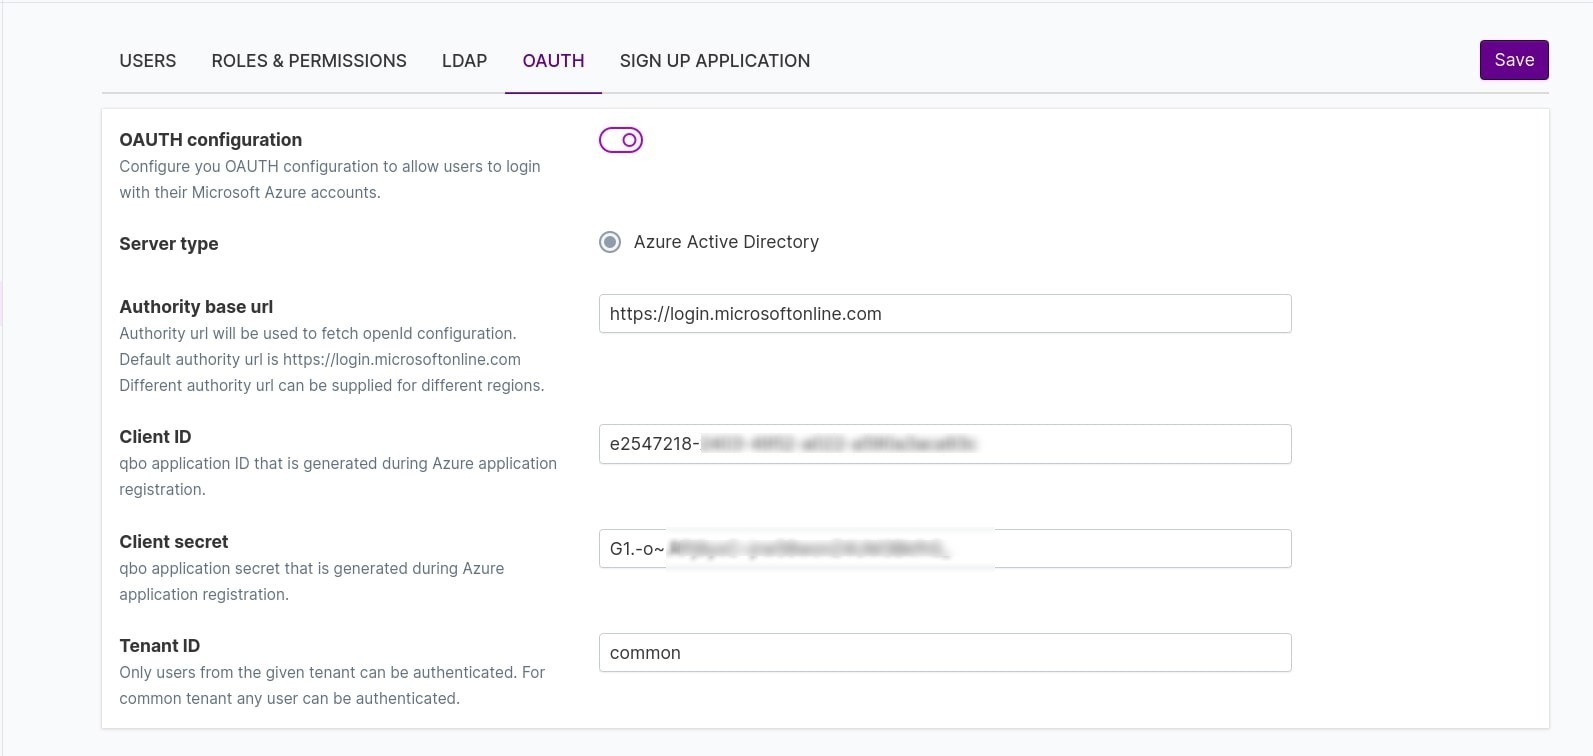
Authority base url: For Azure, authority base URL should be https://login.microsoftonline.com.
Client ID: The application (client) ID that the Azure portal (during registration) assigned your app.
Client secret: The application (client) secret that you created in the app registration portal for your app.
Tenant ID: The tenant value in the path of the request can be used to control who can sign into the application.
To ensure that your application supports both personal accounts and Azure work accounts,
qbo suggest that to use Common as the tenant authentication.
Login page: Users will now see the Sign in with Microsoft button on their login screens.
You can connect to qbo by clicking the Sign in with Microsoft button.
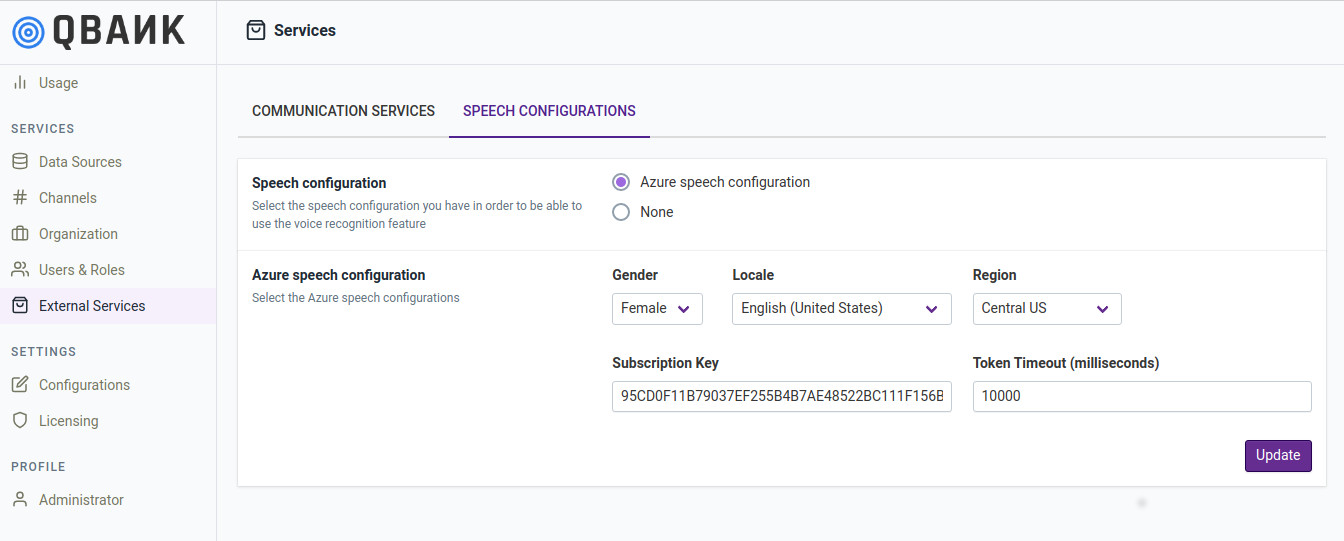
External services
External services settings enable communication from qbo. This has a pair of settings which enables the user to send reports from qbo to the user present in qbo instance and turn on voice-enabled conversations.
The Communication Services module allows configuring settings for sending reports via Email or WhatsApp.

The Speech Configurations module allows configuring settings for enabling voice based communication with qbo.
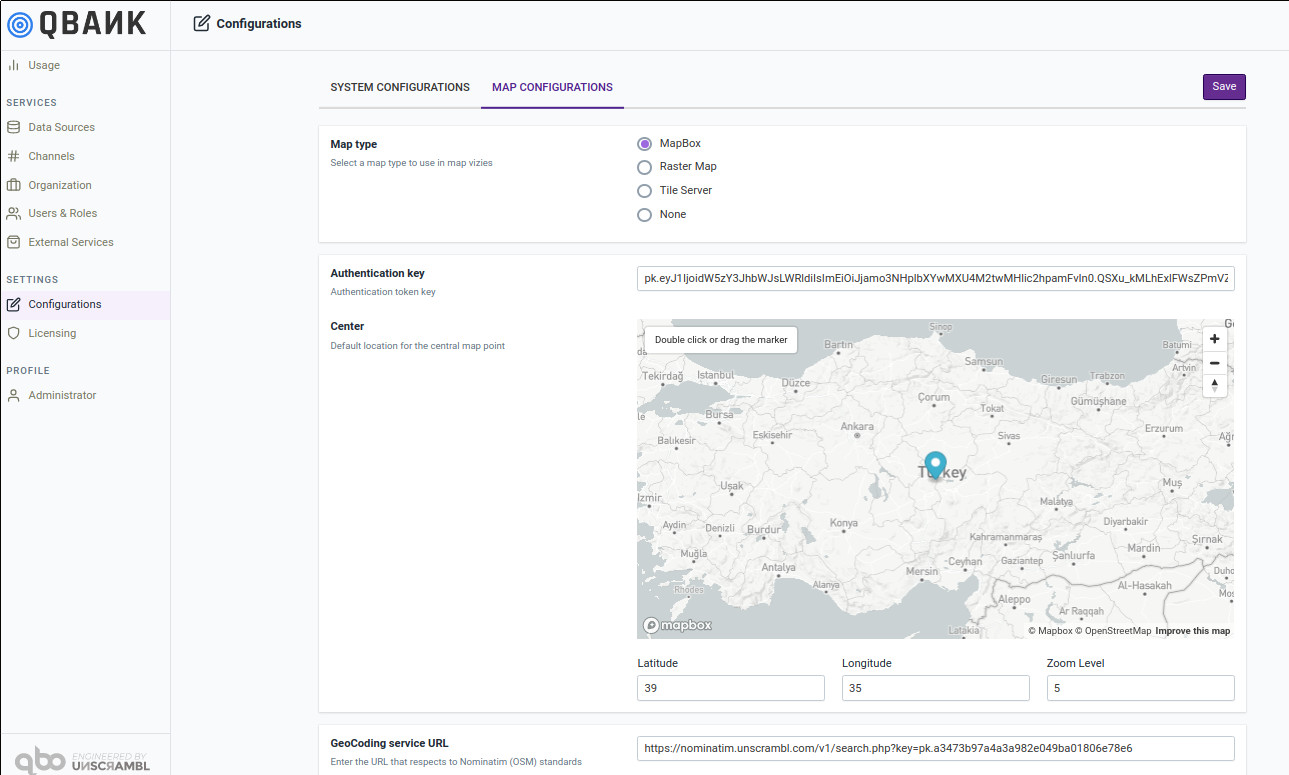
Configurations
The configurations module allows for setting up the vizy colors, vizy transparency, default currency and display locale.

This module also includes support for configuring the map related configurations that will be used by the vizy generation framework.
Qgram
Also known as machine initiated conversations, is the ability of qbo insights to initiate a conversation with a user without being prompted by the user. This is used to deliver an alert, a relevant insight and/or a message to the user without the need for a prompt from the user.
Contact policy: The Global count threshold will specify the total number of notifications to be sent to users via qgrams in total. Administrators can also set notification limits per day/week/month by specifying the maximum threshold and the daily/weekly/monthly field.
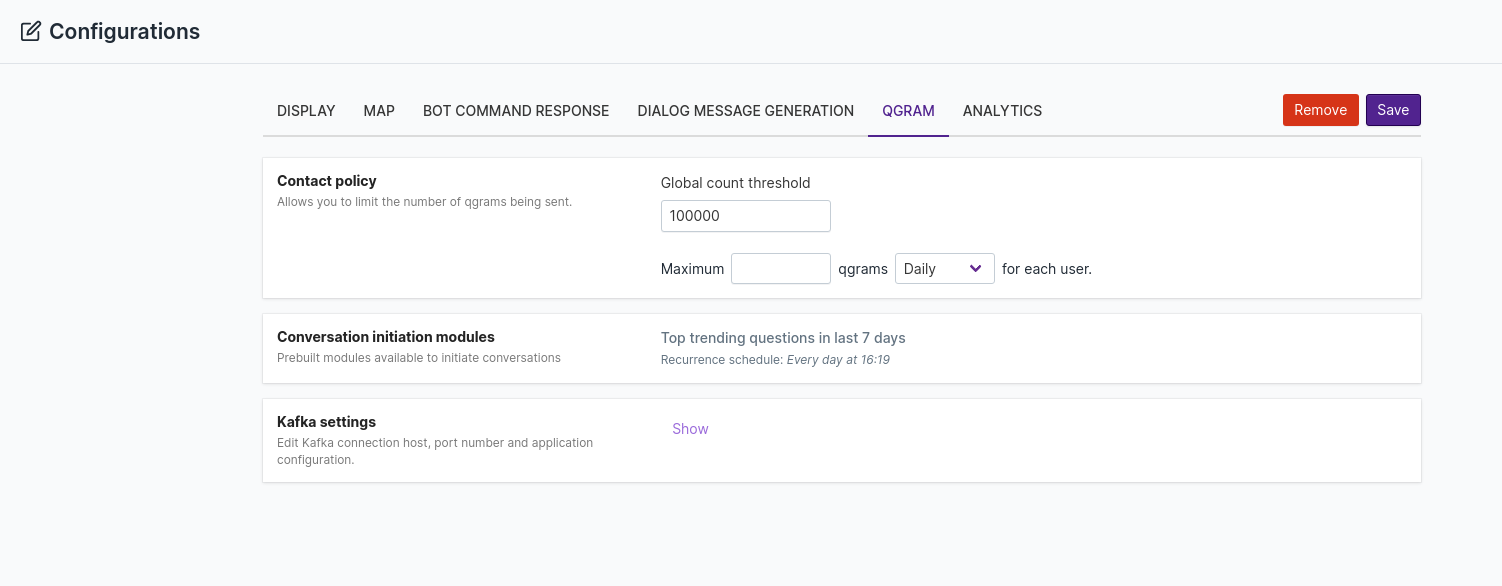
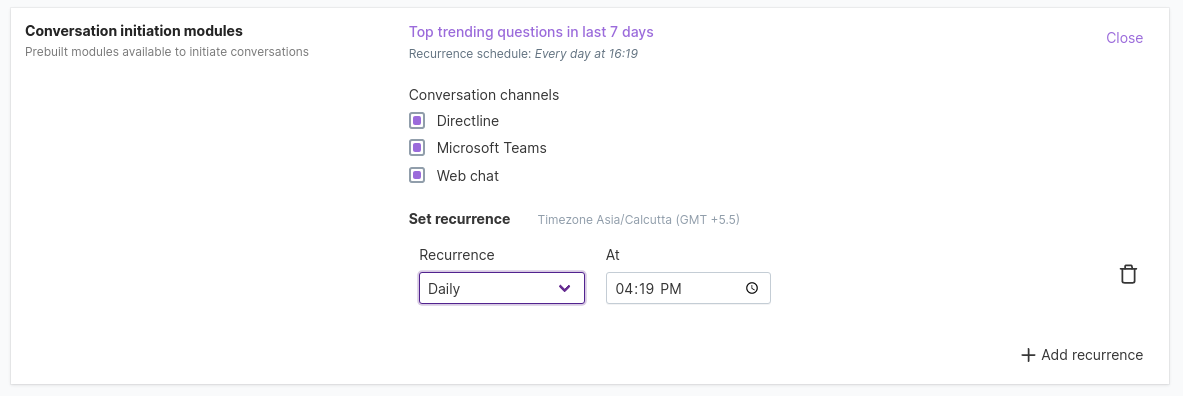
Conversation initiation modules: In the section conversation initiation module, admin users can configure & schedule prebuilt modules to users of qbo. Administrators can set preferences for the schedule (e.g. setting the recurrence daily, weekly or monthly) and also set which channels these alerts need to be sent to. In this version of qbo, there is a prebuilt module that will send the top trending questions in the last 7 days to all users.
Note
These alerts are sent to all users in their General thread in the web UI or in the personal chat in Microsoft Teams.
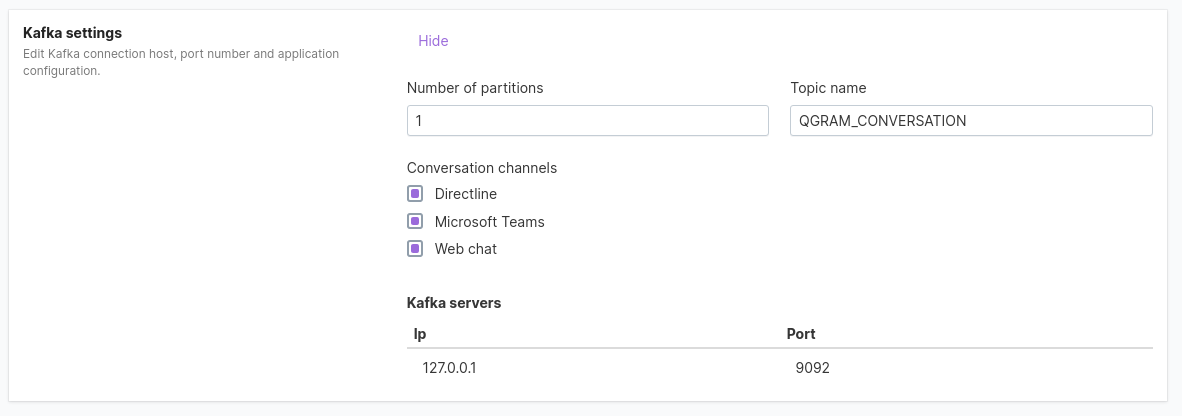
Kafka settings: In the Kafka settings, to send a message through kafka number of partitions, topic name, conversation channels,
kafka server ip and port should be specified.
This message will be sent to a user in their General thread in the web UI or in the personal chat in Microsoft Teams.
Dialog message generation
It allows to configure custom response for query bot introduction, error messages, etc.
You can fill only one of the Text or Message generator ID fields.
Let’s see one example of the bot introduction message.
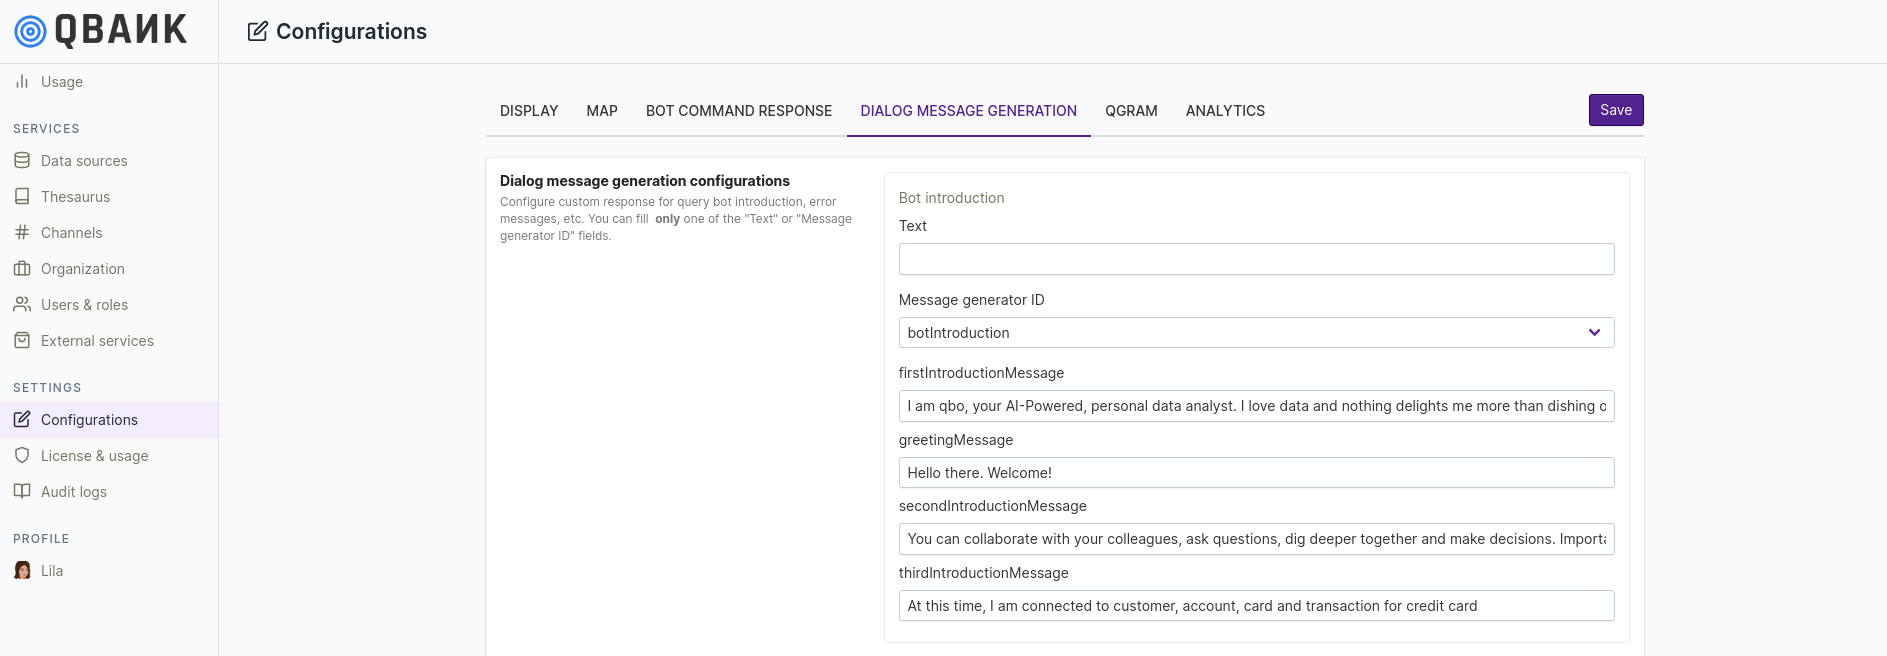
If you start a new thread, bot introduction message will appear.

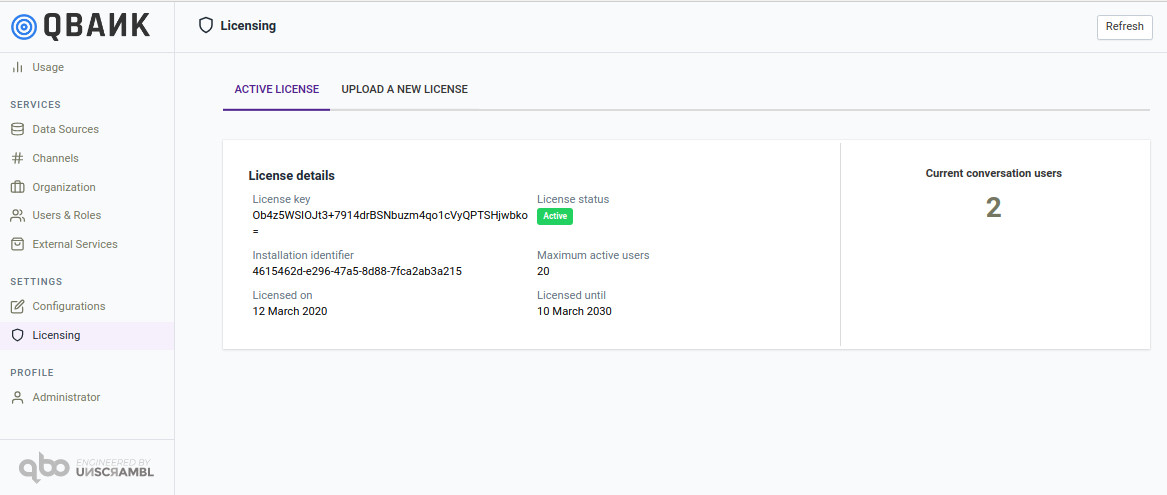
License management
The license management module enables tracking of the existing license as well as upload of a new license. Here the administrator can track the expiration date of the license, the number of users (conversational) allowed by the license and the number of users with conversational permissions already configured in the product.