Additional Options for Events
This section describes additional options for events that were not covered in the previous 3 sections.
Event Description
Audience
A number of options are available when selecting audience conditions for an event. For better understanding of these options, we will explore different use-cases.
Raw Audience Condition
A raw audience condition is a customized audience condition. There may be a need to create this if the user cannot find the condition they need in the lists provided.
USE-CASE: Create a raw condition based on customer’s nationality
Audience must be customers who are of Singaporean nationality.
Summary of Steps:
From the Audience Criteria pop-up, click add raw condition.
Select an attribute/aggregation to filter by.
Set value of attribute/aggregation in condition.
From the Audience Criteria pop-up seen in the image below, click Add Raw Condition.
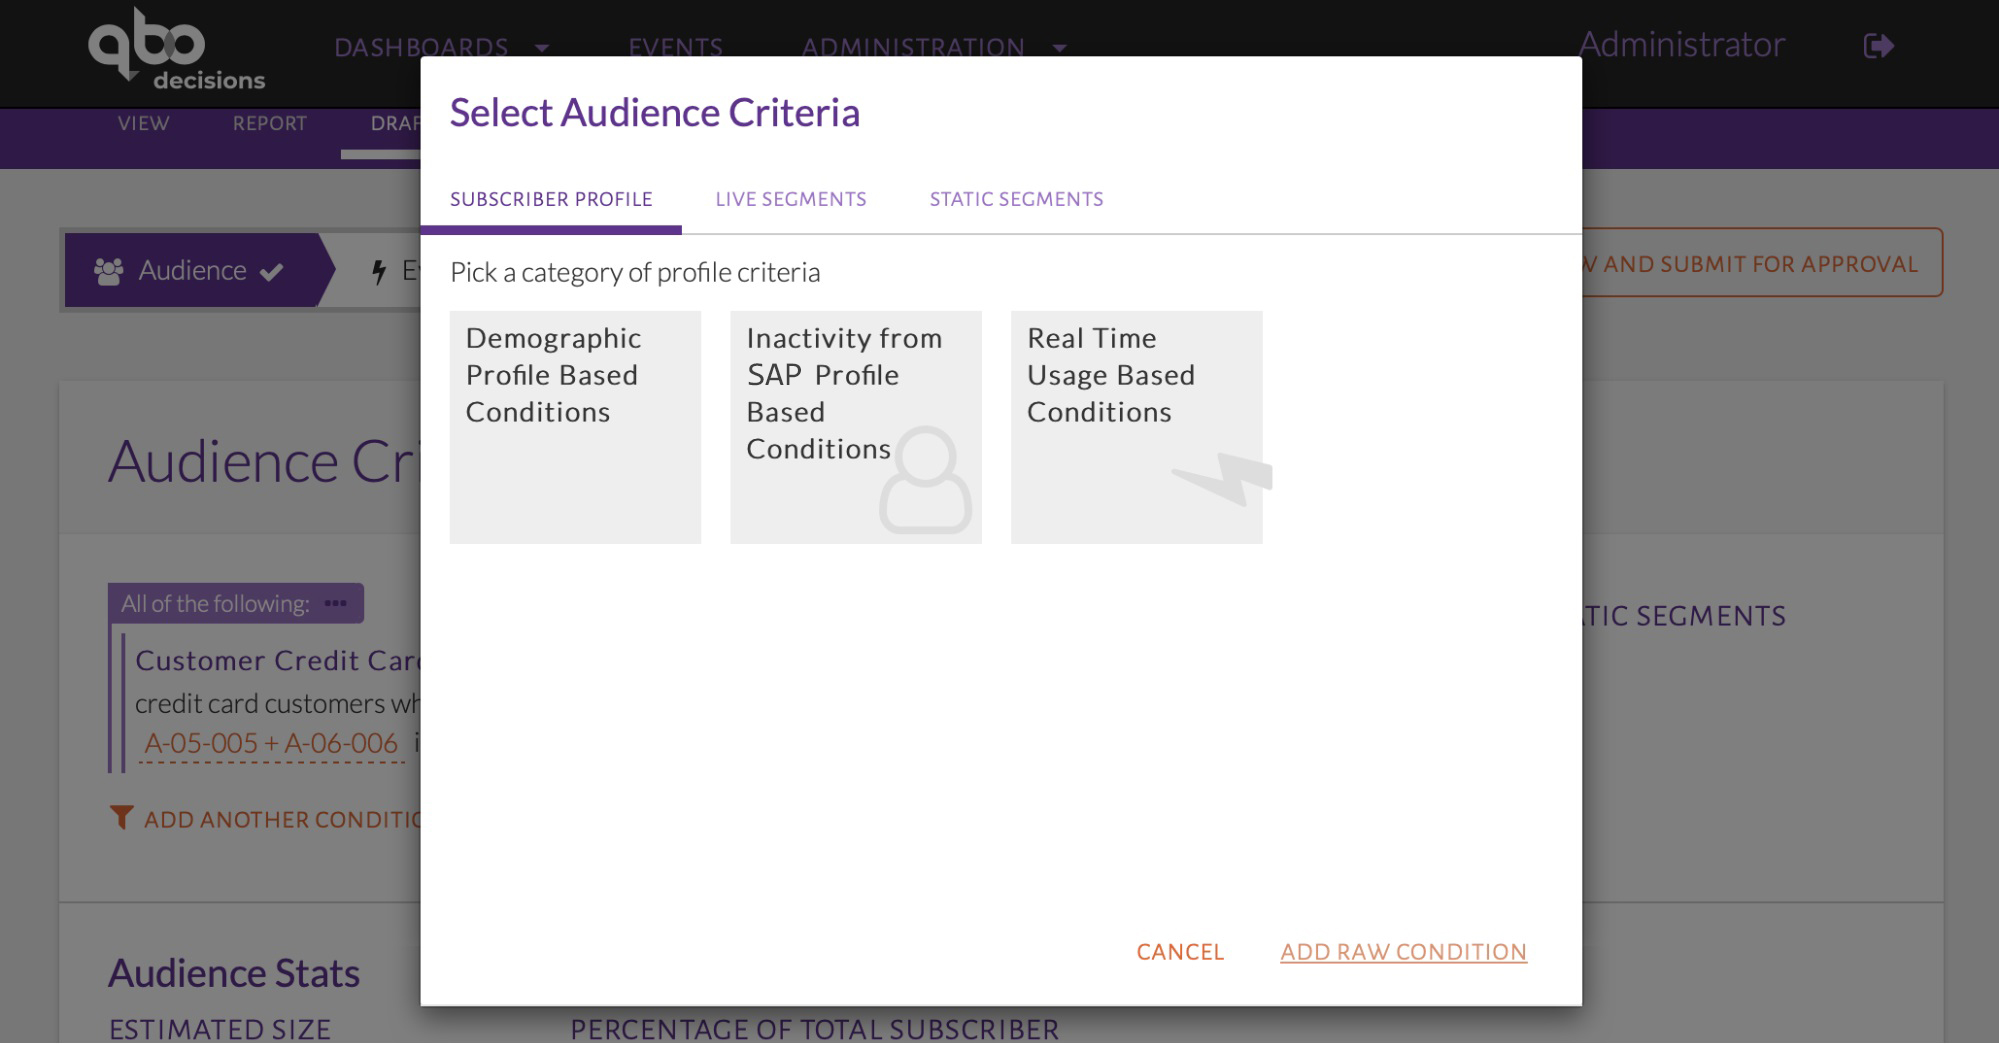
Add Raw Condition
A blank audience condition will appear, as seen in the image below. Click on Select attribute or aggregation to display a list of attributes or aggregations which the user can select from. Once an attribute or aggregate is selected, the user can specify its value.
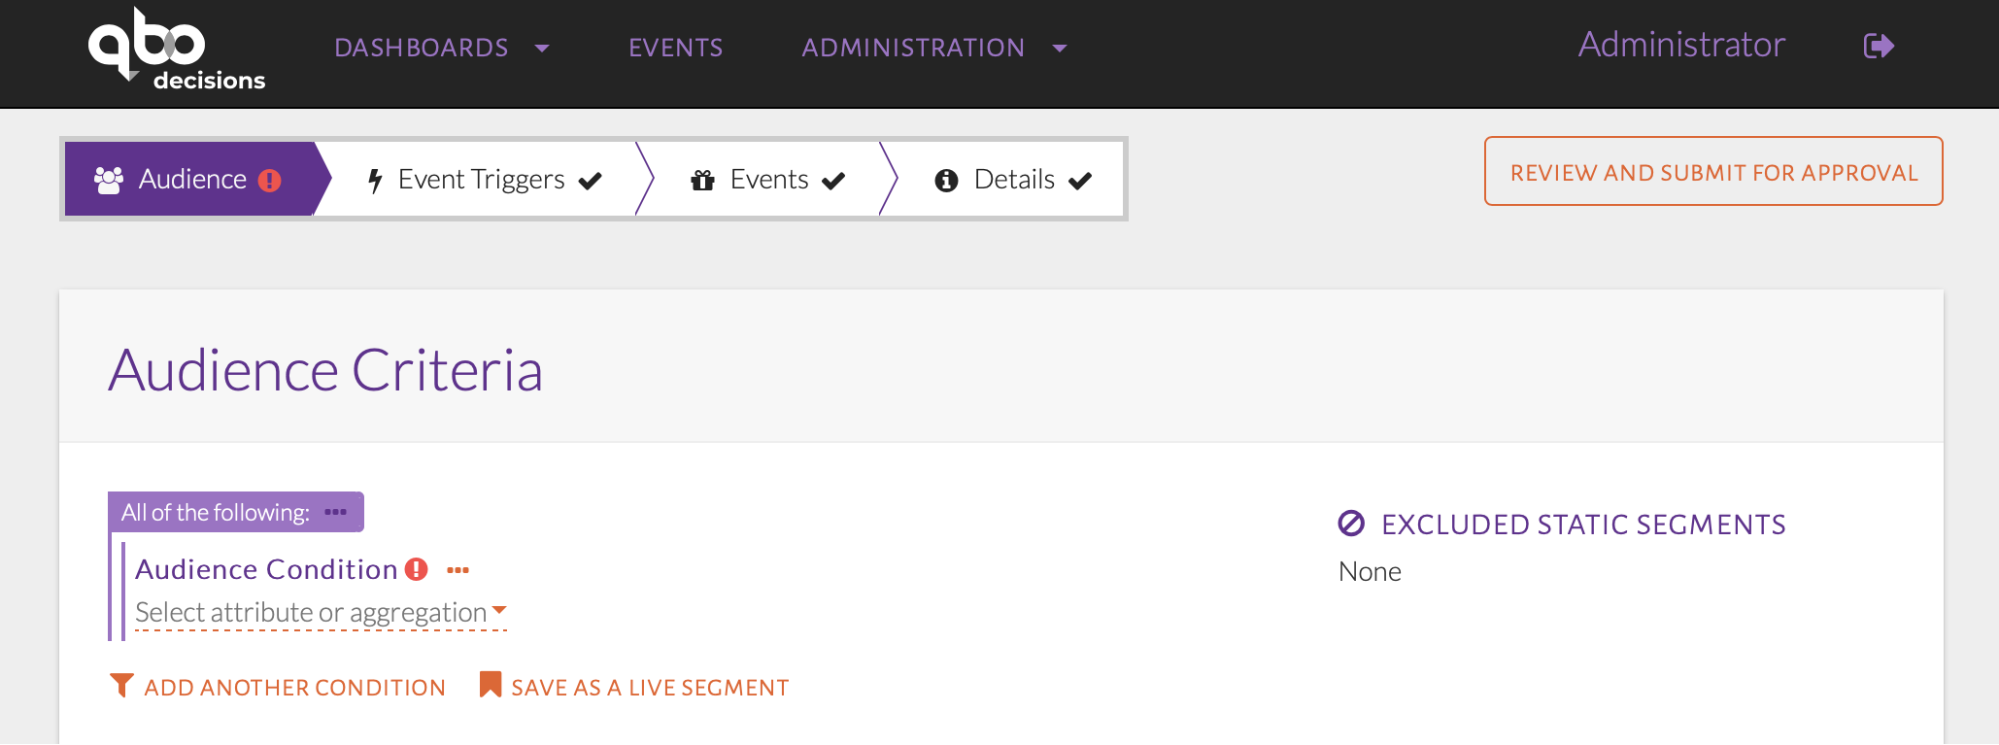
Raw audience condition
The list displayed is seen in the image below. Select the nationality code attribute.
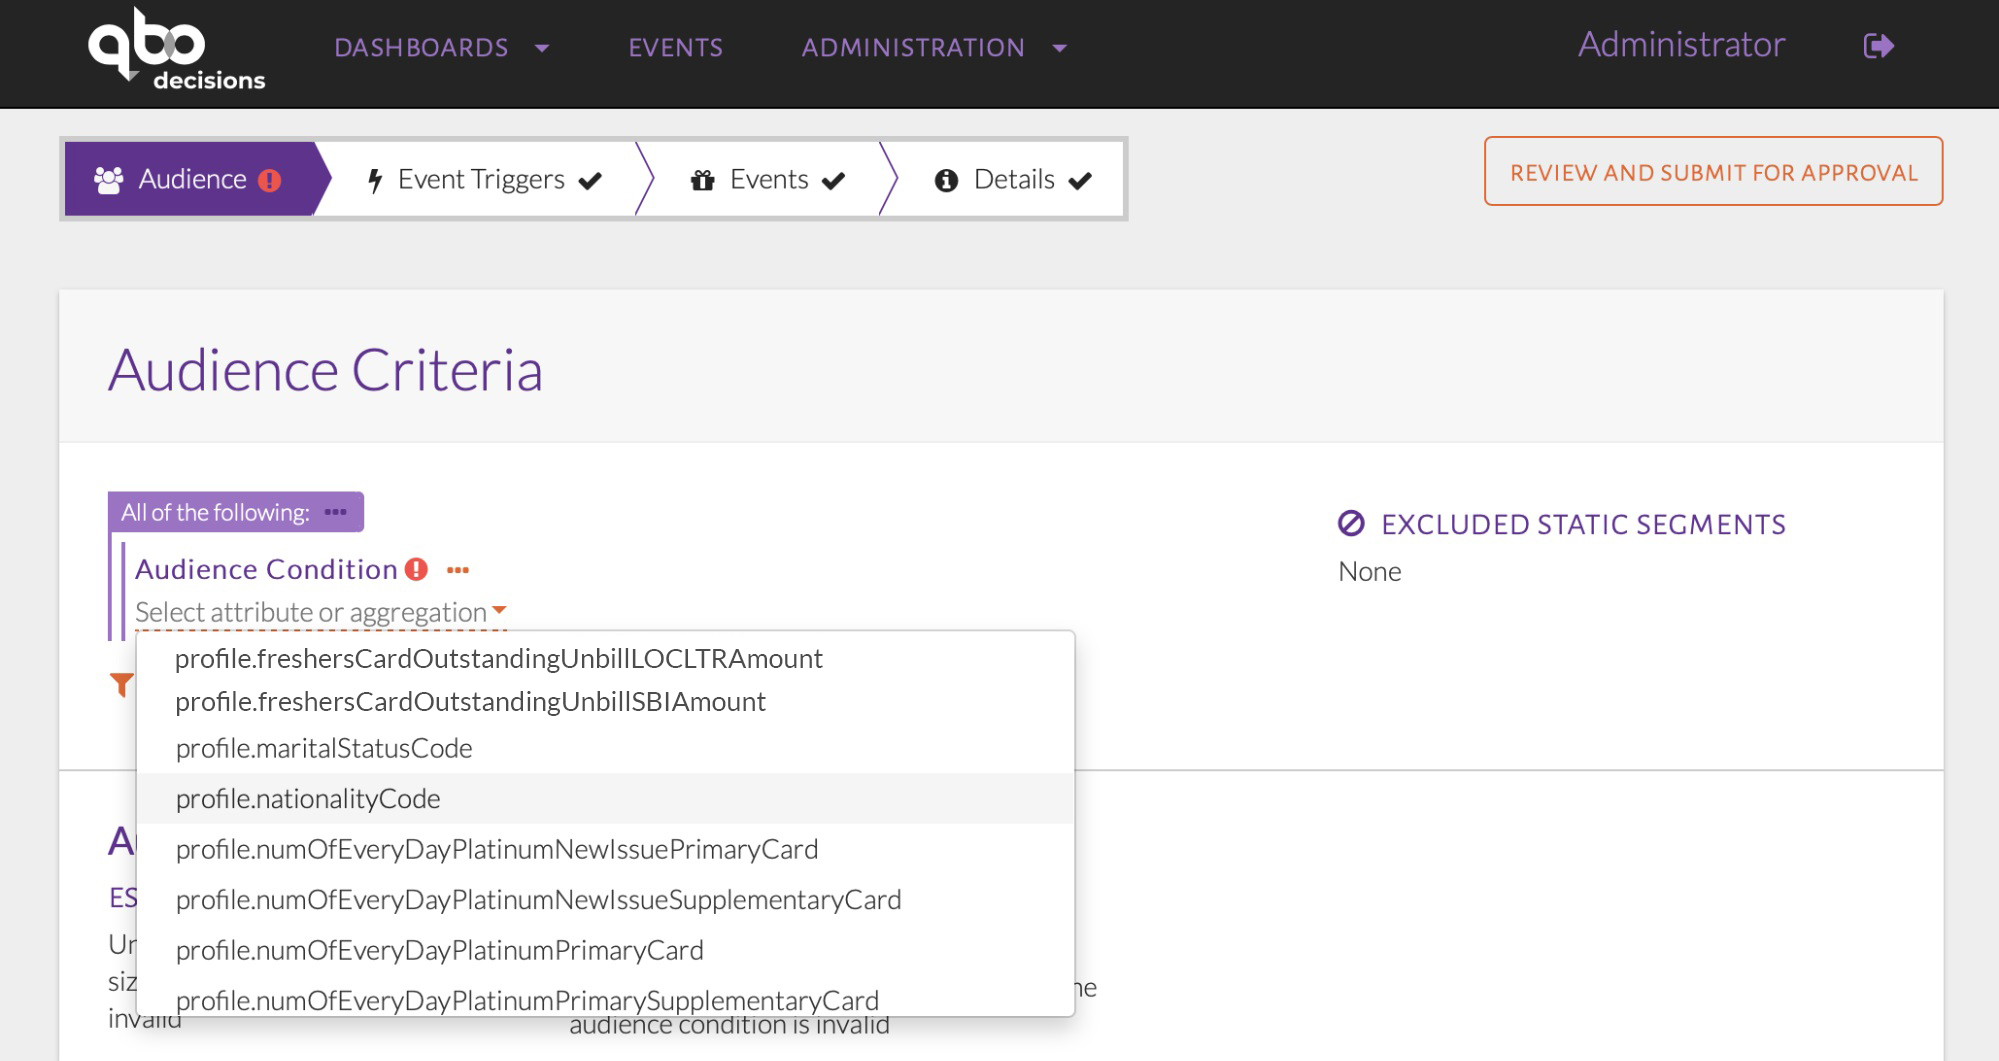
Selecting an attribute or aggregation
The selected attribute will be displayed, as seen in the image above. The user will then need to select the operator, which is ‘equal to’ in this example.
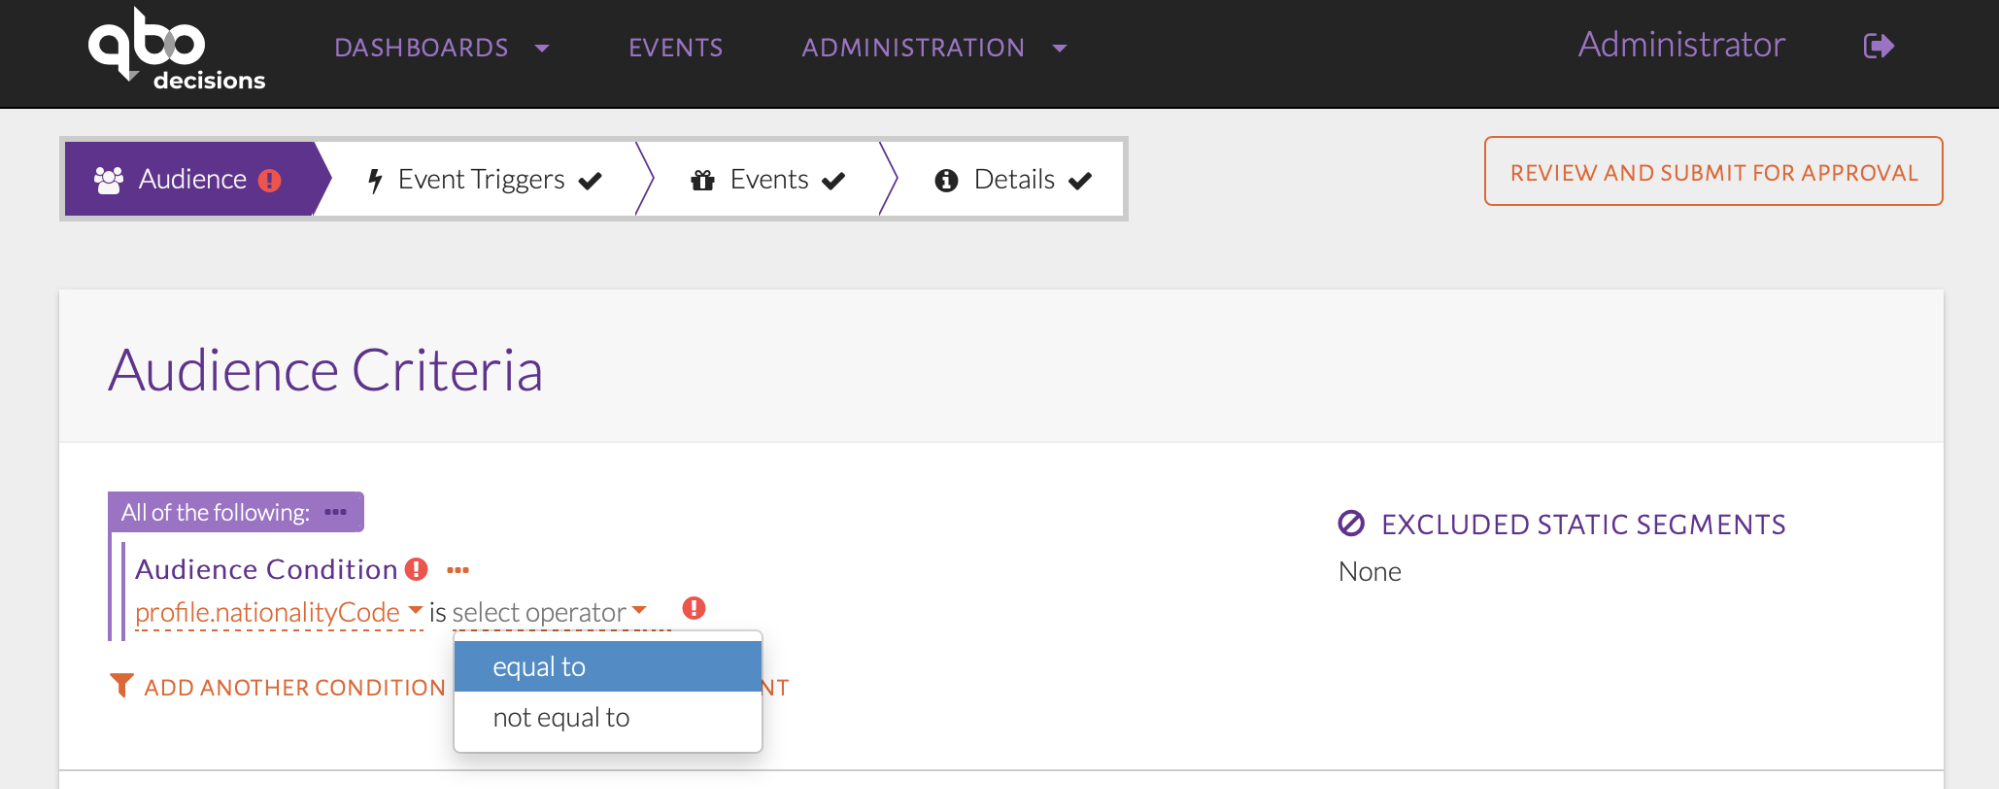
Selecting an operator
The operator will be displayed, as seen in the image above. Specify the code representing Singapore in the space provided after the operator. As a string is expected, add double quotes to the code “SGP” as shown in the image below.
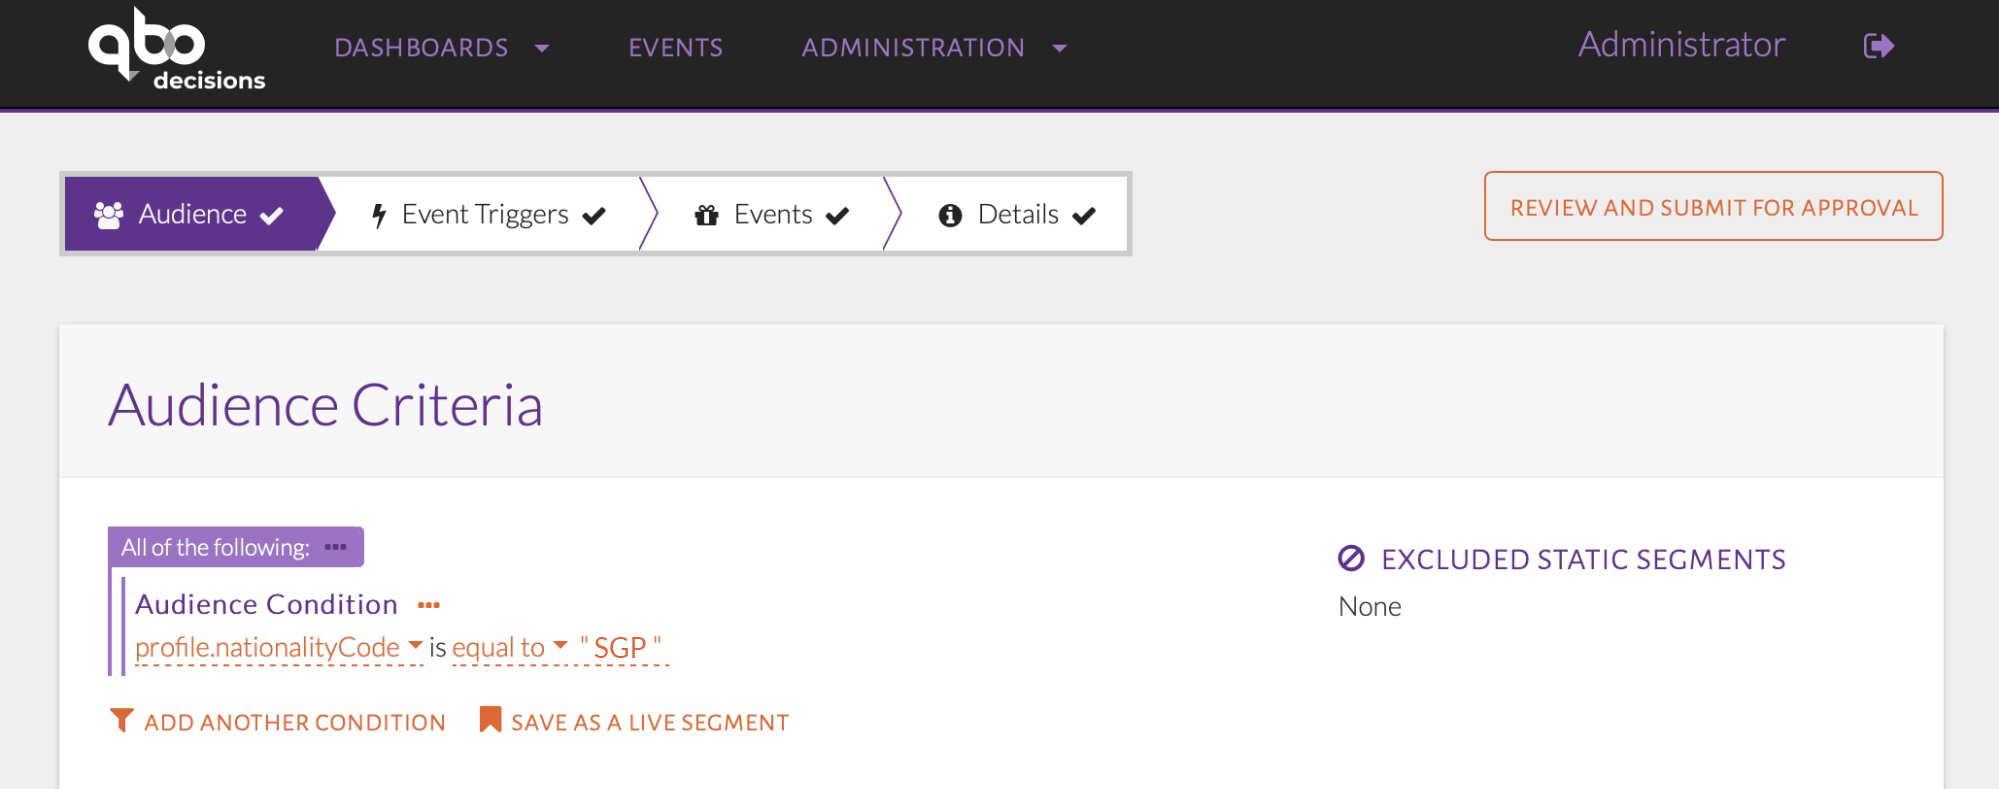
Type in nationality code in double quotes
Condition Groups
Individual audience conditions can be combined using condition groups. For the condition group All of the following, a customer must satisfy all of the statements under the condition group to be qualified as part of the audience. For the condition group Any of the following, a customer can satisfy at least one of the statements under the condition group to be qualified as part of the audience.
USE-CASE: Using an “All of the following” Condition Group
For this example, the audience includes Married customers that have spent at least NT $1,000 in the last 1 month.
Summary of Steps:
Add multiple conditions. By default, they fall under the All of the following condition group.
Alternatively, click the ellipses (…) to add a condition within a condition group.
The condition group All of the following should be used. It is the default condition group, so simply check all conditions and specify their values, as seen in the 2 images below.
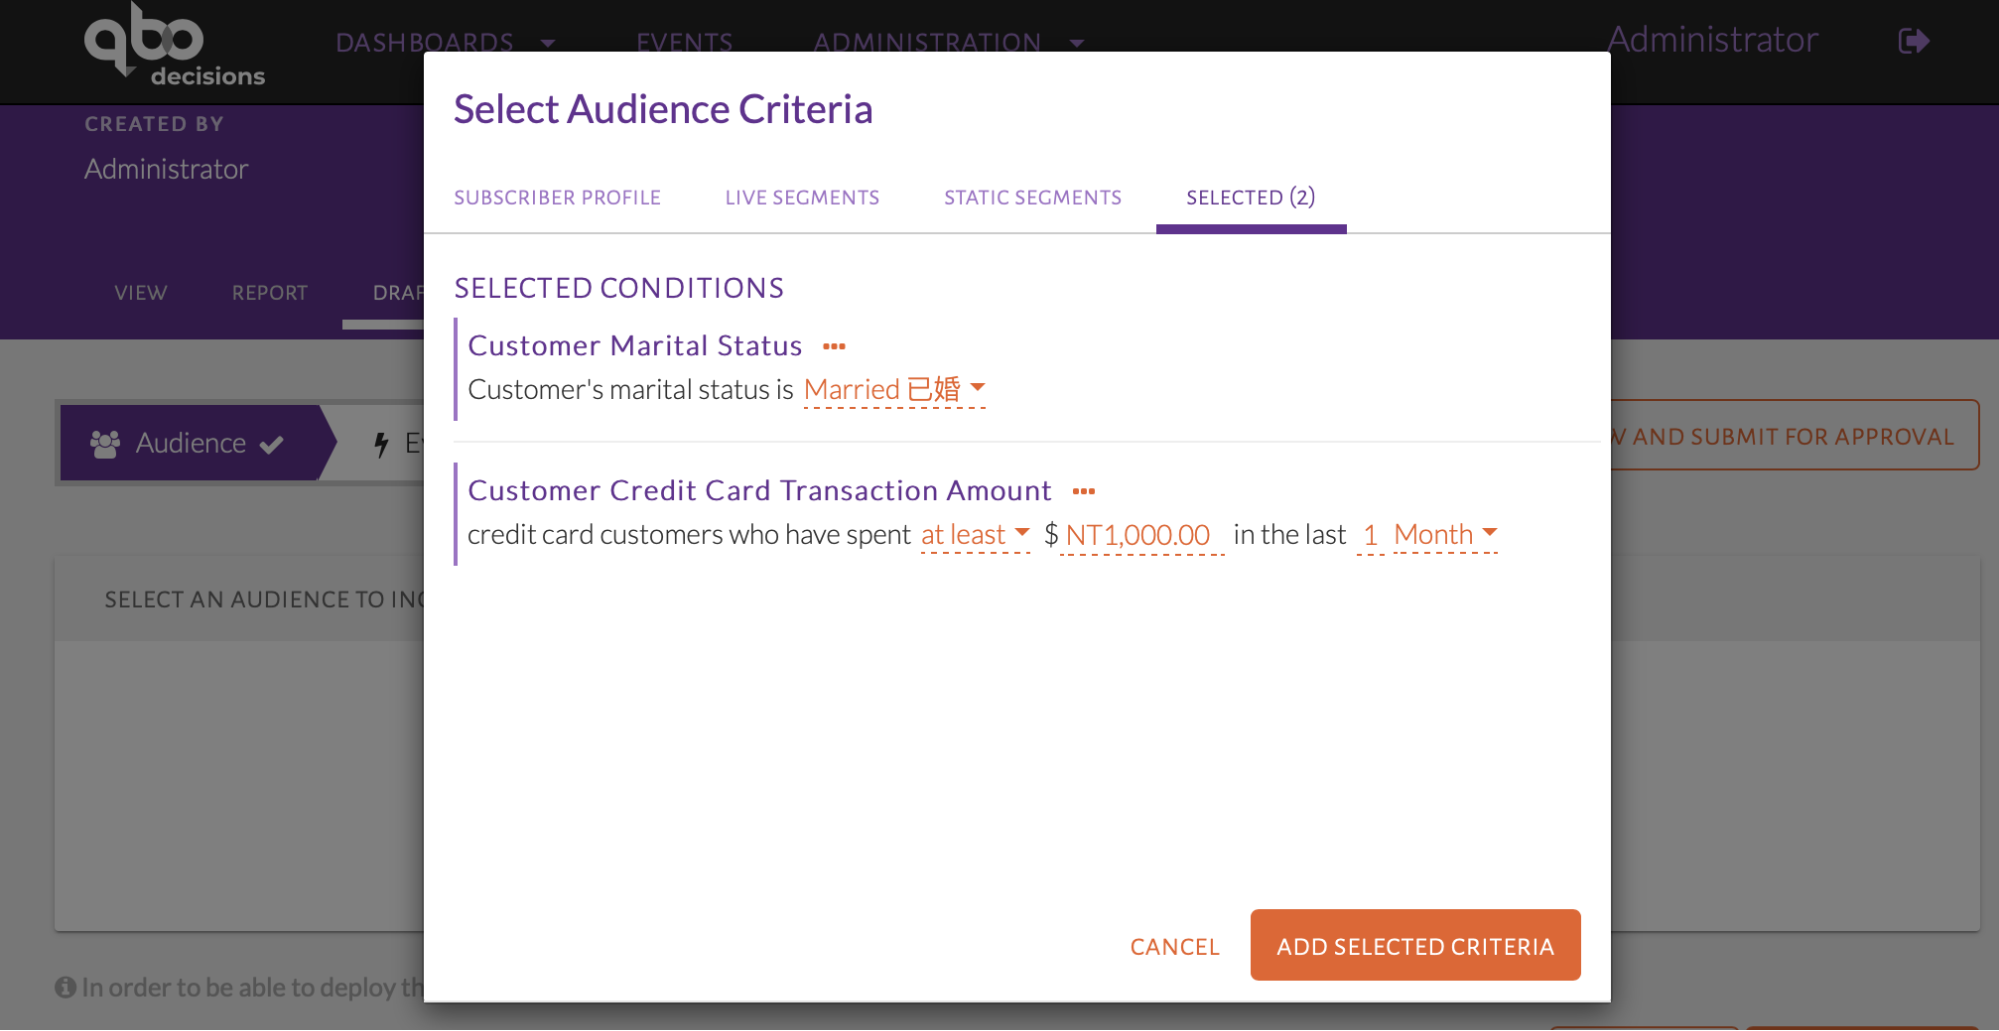
Select multiple conditions
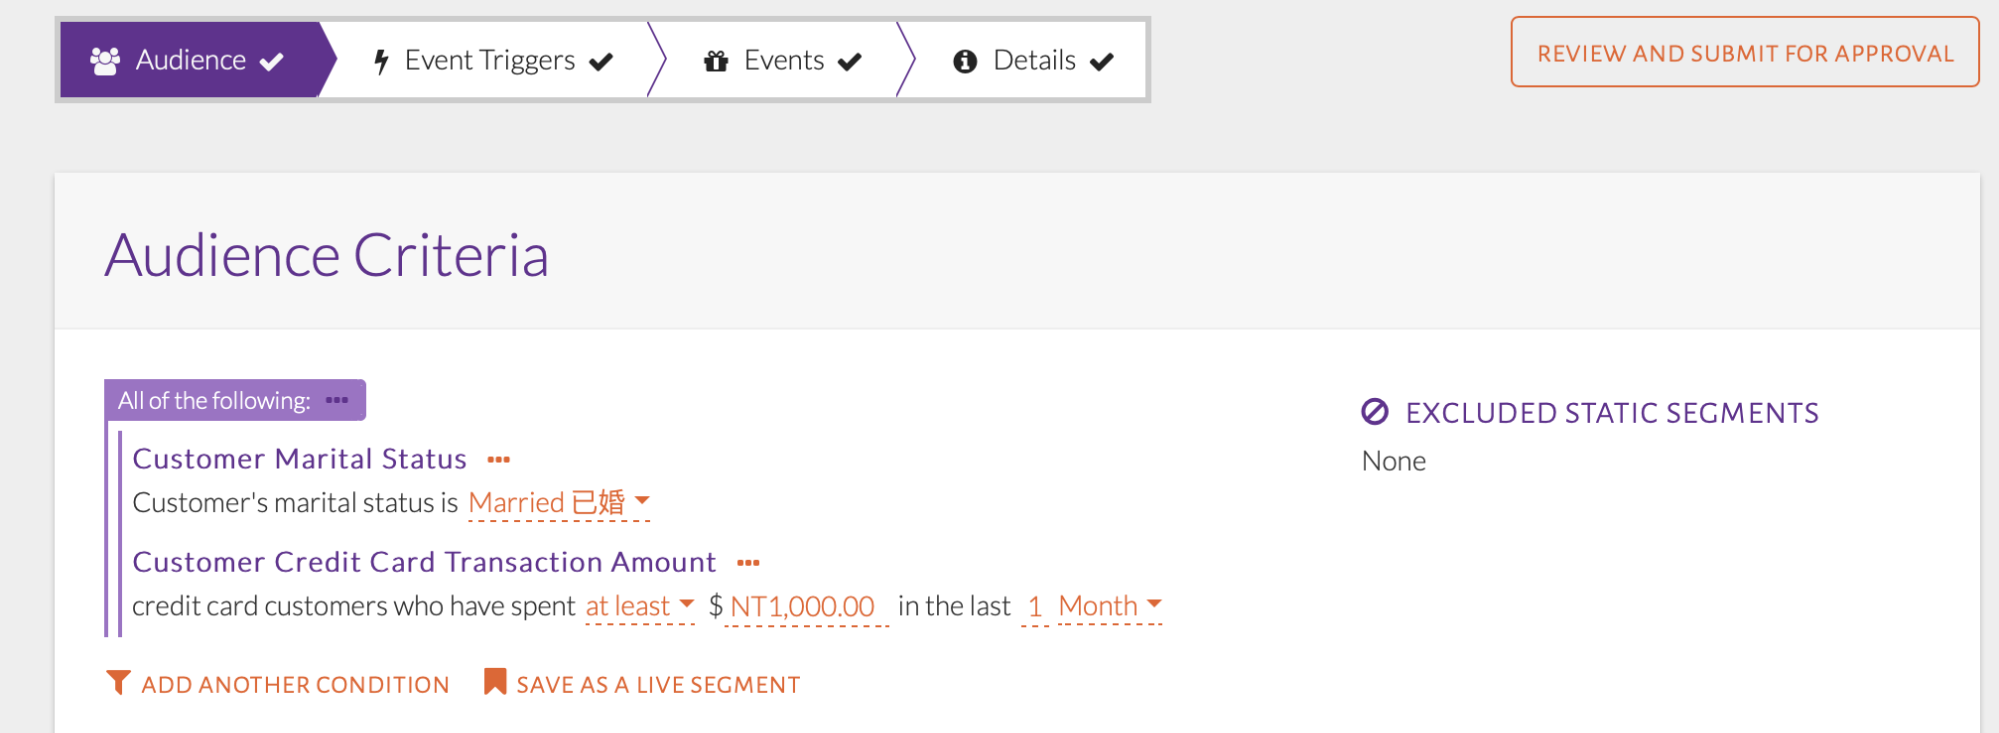
Default condition group is All of the Following
Alternatively, the user can begin by adding one condition and clicking the ellipsis (…) button on the condition group, as seen in the image below. This allows the user to add another condition within that group, remove the condition group, or convert it to Any of the following.

Adding, removing or converting condition group
The added condition will automatically fall under the original condition group, which is All of the following.
USE-CASE: Using an “Any of the following” Condition Group
For this example, the audience should be customers who have spent at least NT $1,000 in the last month or have transacted 10-15 times within the last month.
Summary of Steps:
Add a condition.
Convert default condition group All of the following to Any of the following.
Click ellipses (…) to add a condition within the condition group.
The condition group Any of the following should be used. Start by adding one condition as seen in the image below, which selects customers who have spent at least NT $1,000 in the last 1 month.

One audience condition added
Click the ellipses (…) button on the condition group, as seen in the image below. Select ANY to convert it to Any of the following.

Click ANY to convert condition group
Once converted, click the ellipses again as seen in the image below. Select Add another condition to add an individual condition to the condition group.

Converted condition group to Any of the following
The added condition can be seen in the image below. It will automatically fall under the original condition group, which is Any of the following.
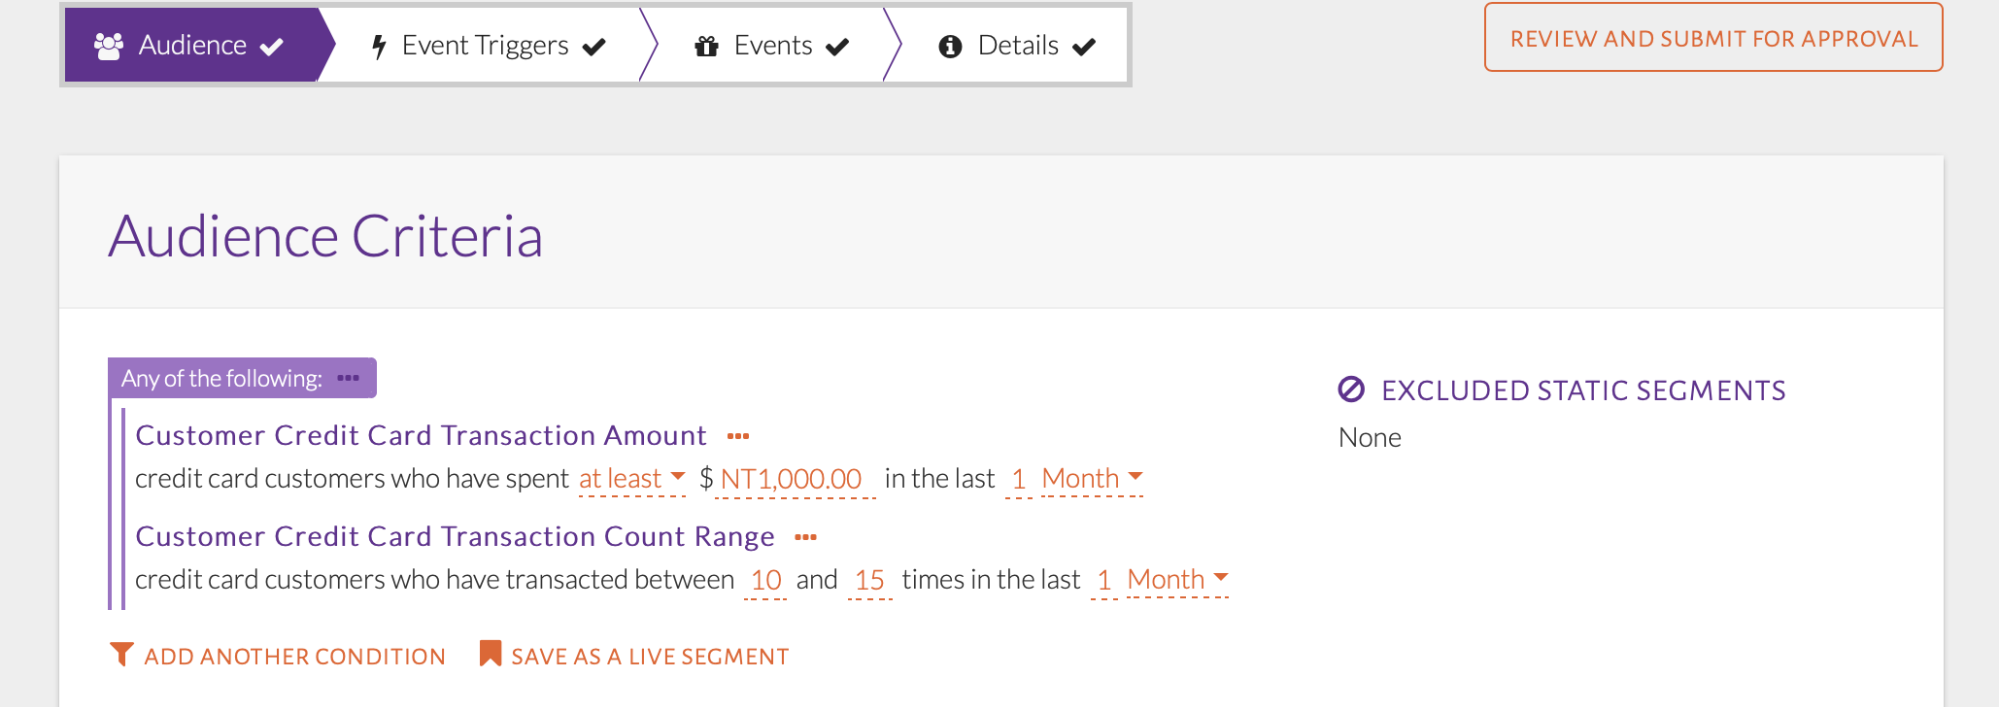
Condition added to Any of the following condition group
USE-CASE: Using Nested Condition Groups
For this example, the audience should be customers who are Married & have spent at least NT $1,000 in the last month or have transacted 10-15 times in the last month.
Summary of Steps:
Add multiple conditions. By default, they fall under the All of the following condition group.
Click the ellipses (…) beside the group condition.
Click ANY to convert to Any of the following condition group.
Click the ellipses (…) on the new condition group to add a condition within the group.
A combination of condition groups must be used, which is called a nested condition group. The final conditions should be set up as seen in the image below. They can be read as “customers who are married AND have spent at least NT $1,000 in the last 1 month or have transacted 10-15 times in the last 1 month.”
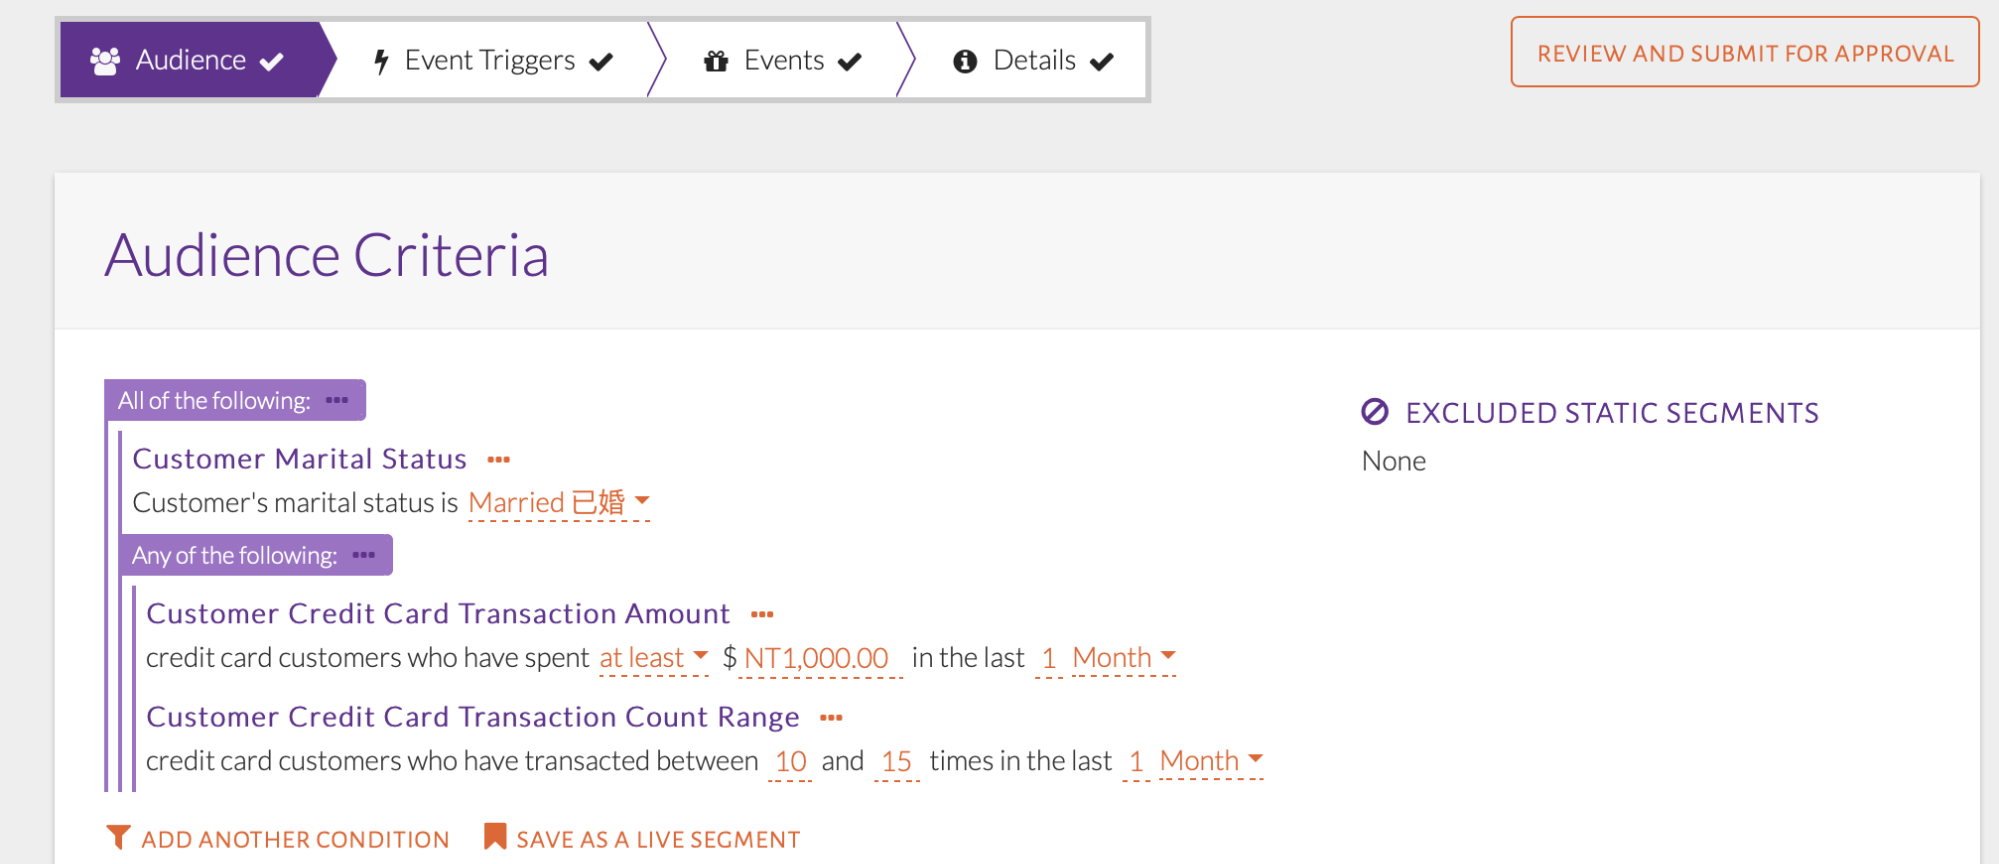
Set up nested condition groups
Recall the previous audience condition setup which included Married customers with at least $1,000 spent in the last 1 month. Set up those conditions. Click the ellipsis button beside an individual condition to see options that convert it into an ANY condition group or remove the individual condition, as seen in the image below. Alter the condition to ANY.
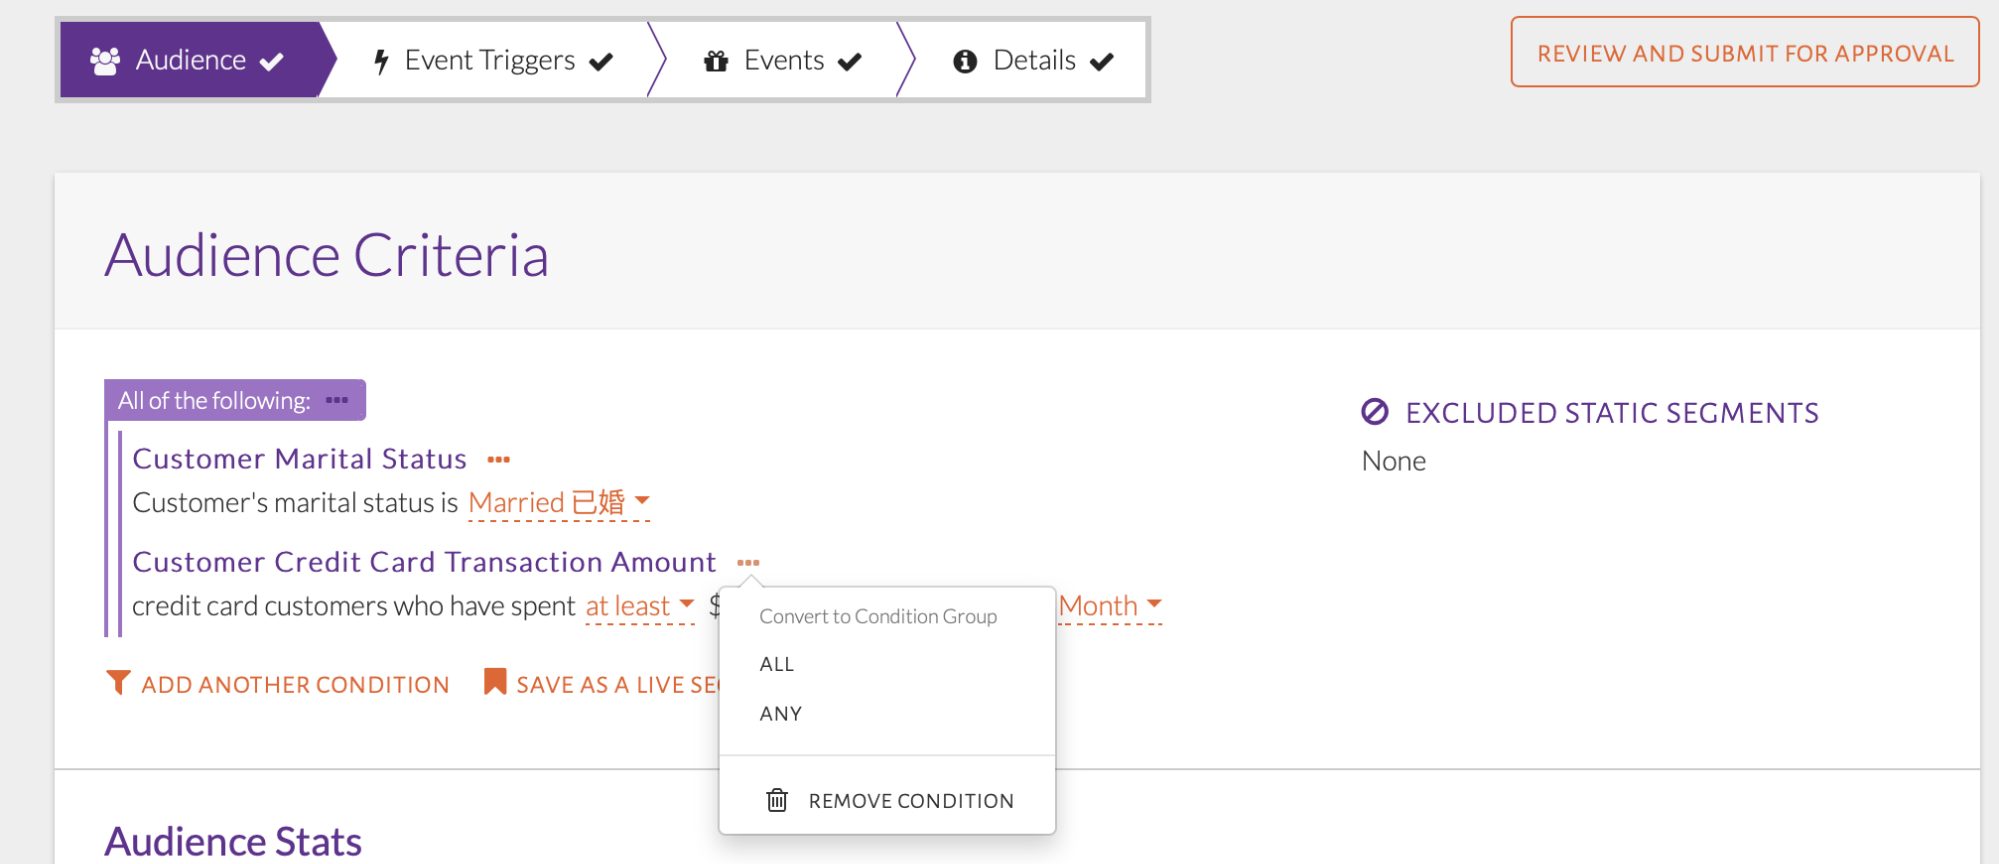
Set up a combination of condition groups
The resulting condition is shown in the image below. Use the ellipsis icon near the ANY condition to add a new condition. This is where we will add the condition on transaction count in the past month.
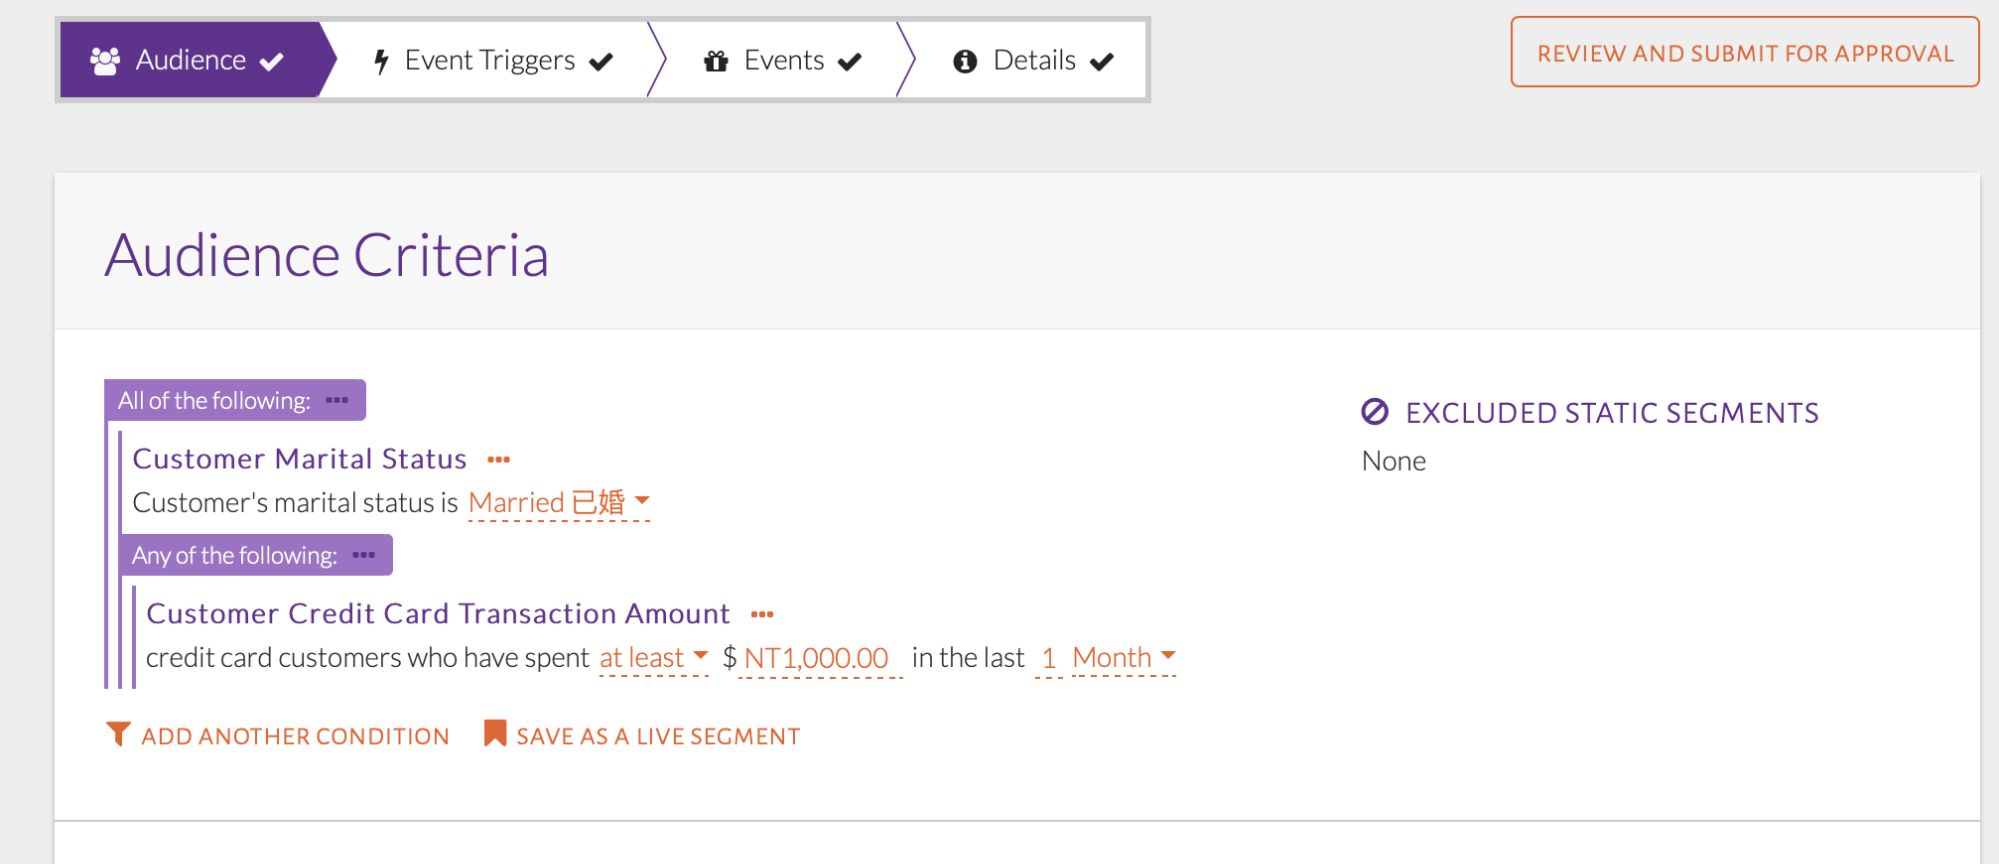
Condition type changed to ANY
Clicking the ellipsis button on the new condition group will show the options available, as seen in the image below. Flatten Group will undo the conversion, turning it back into an individual condition. Remove Condition will remove the whole condition group. Add Another Condition will add a condition to the condition group, select this option.
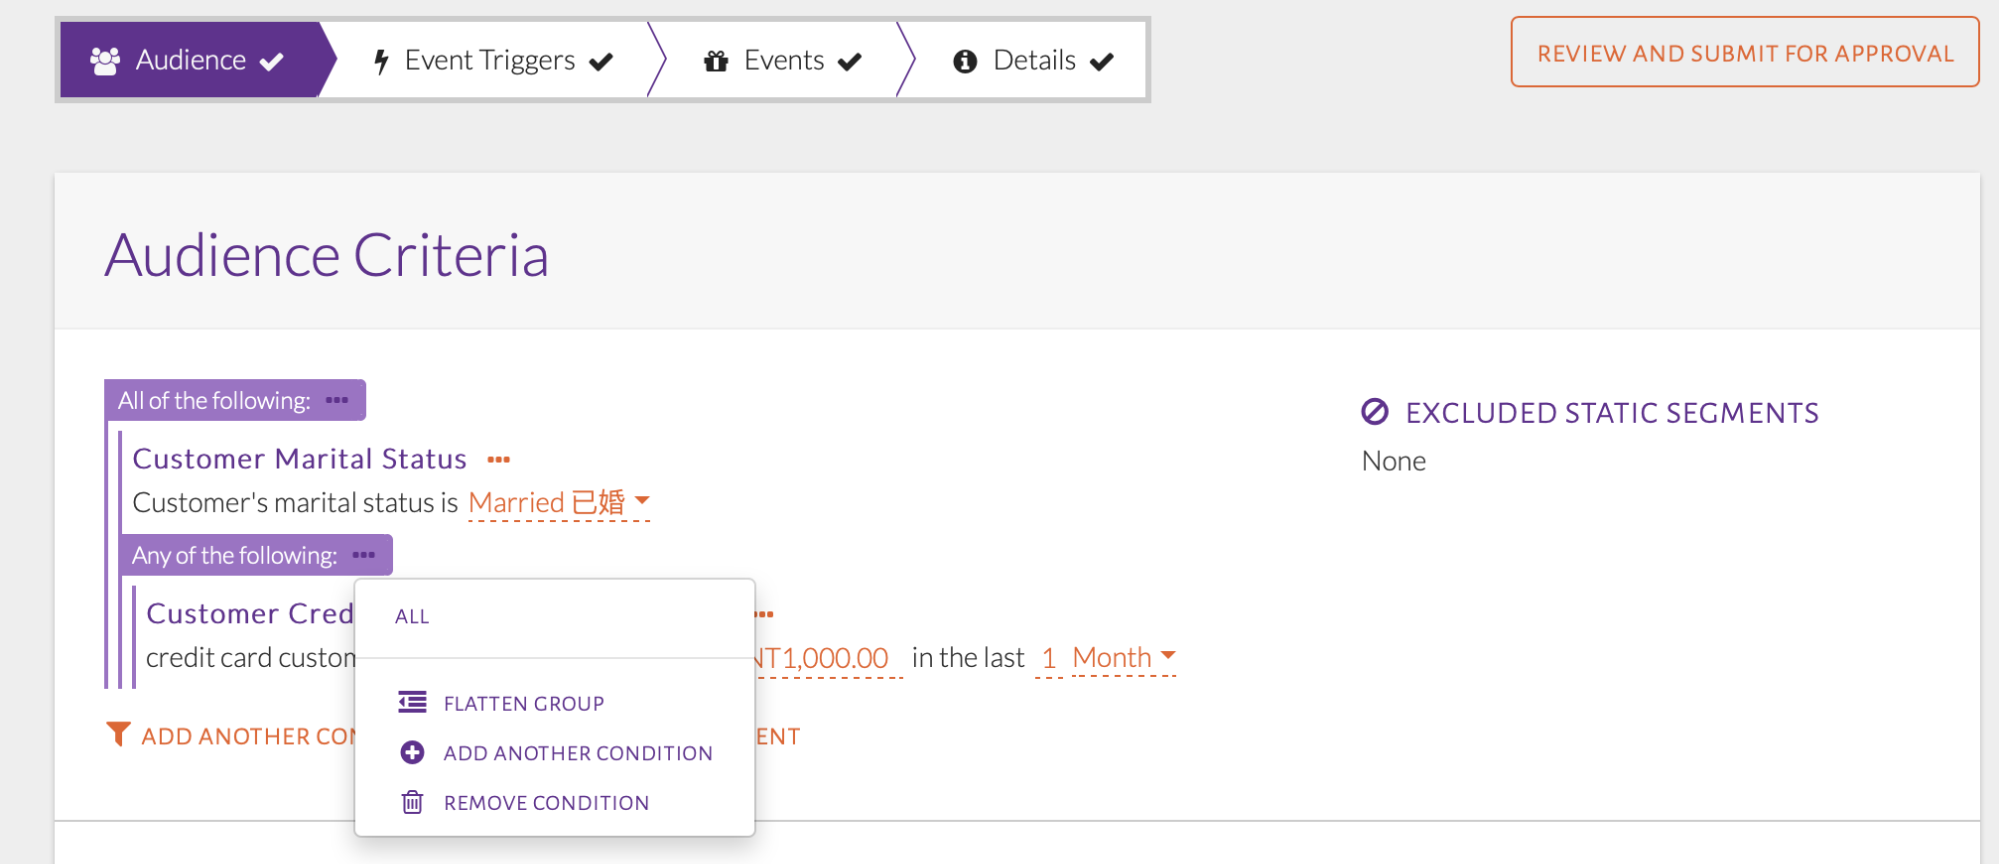
Adding the last condition to the ANY group
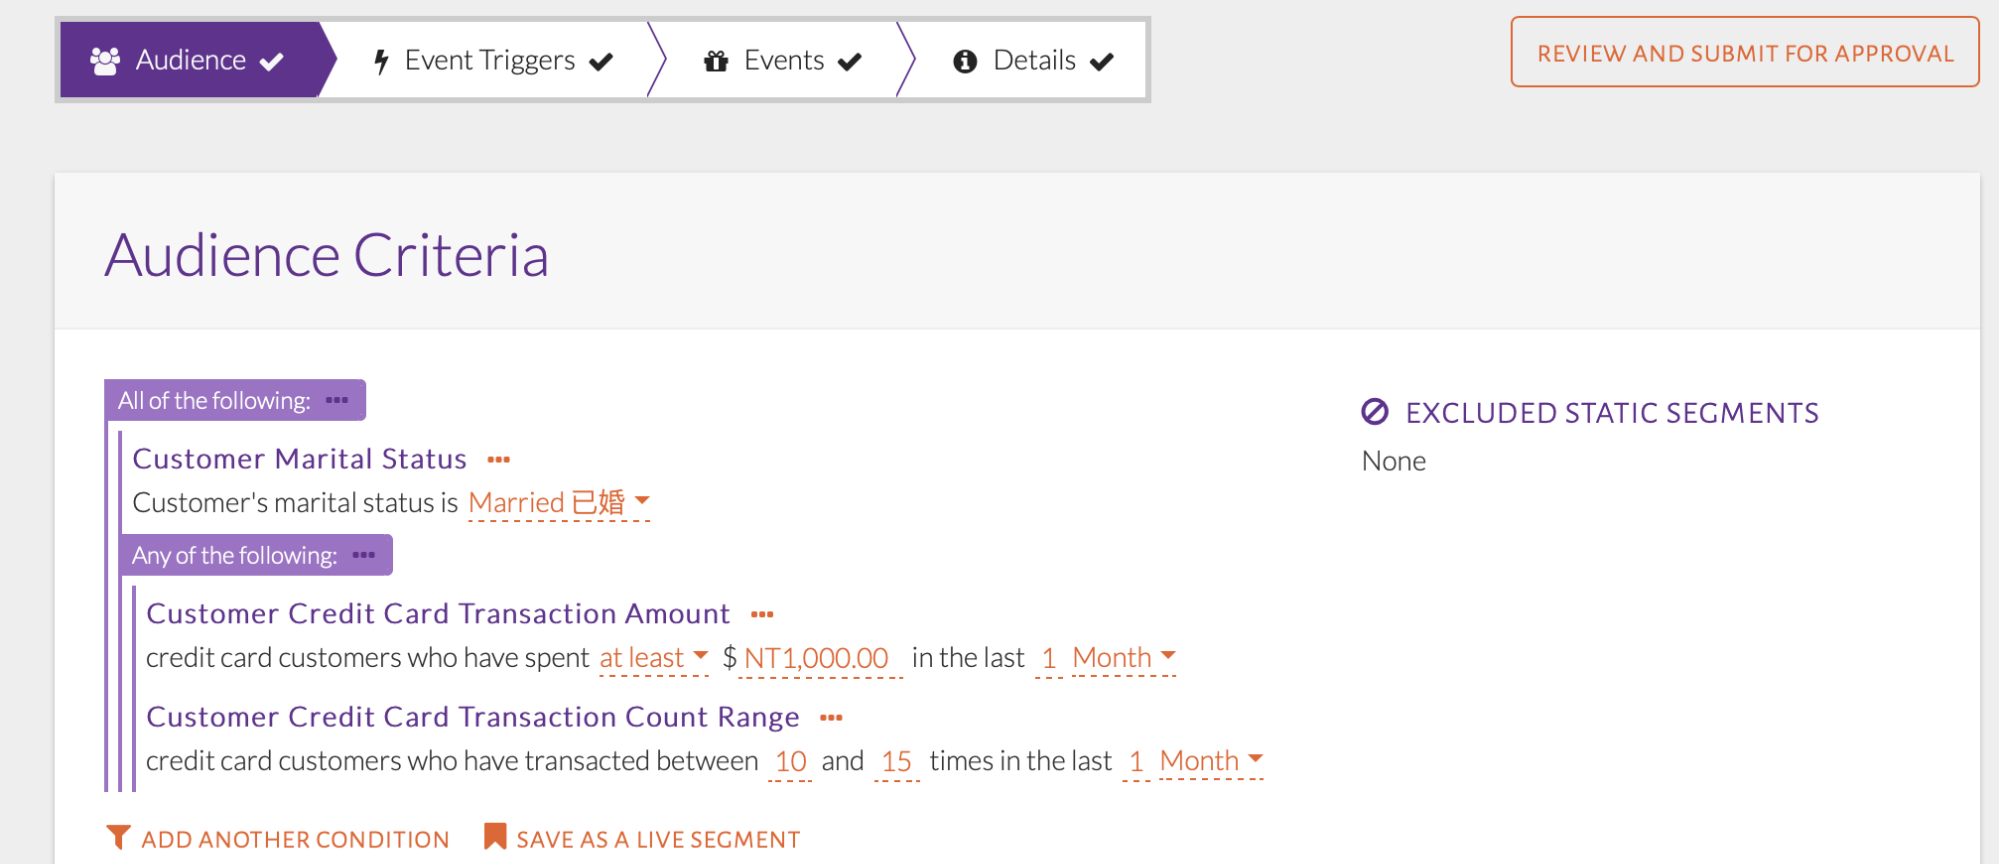
Nested condition groups
The added condition, as seen in the image above, will automatically fall under the Any of the following group due to the correct ellipsis option being used.
Live Segments
After setting up audience conditions, they can be saved for future use using a live segment. The customers in a live segment will be a changing set, based on the audience conditions.
USE-CASE: Saving Audience Conditions into a Live Segment
Save audience conditions that select customers who have transacted at least once with the merchant category A-04-004 (LinePay) in the last 3 months and have a customer status of Active.
Summary of Steps:
Click Save as Live Segment.
Enter name for live segment and press OK.
The audience conditions will be set up as seen in the image below. Click Save as a Live Segment.
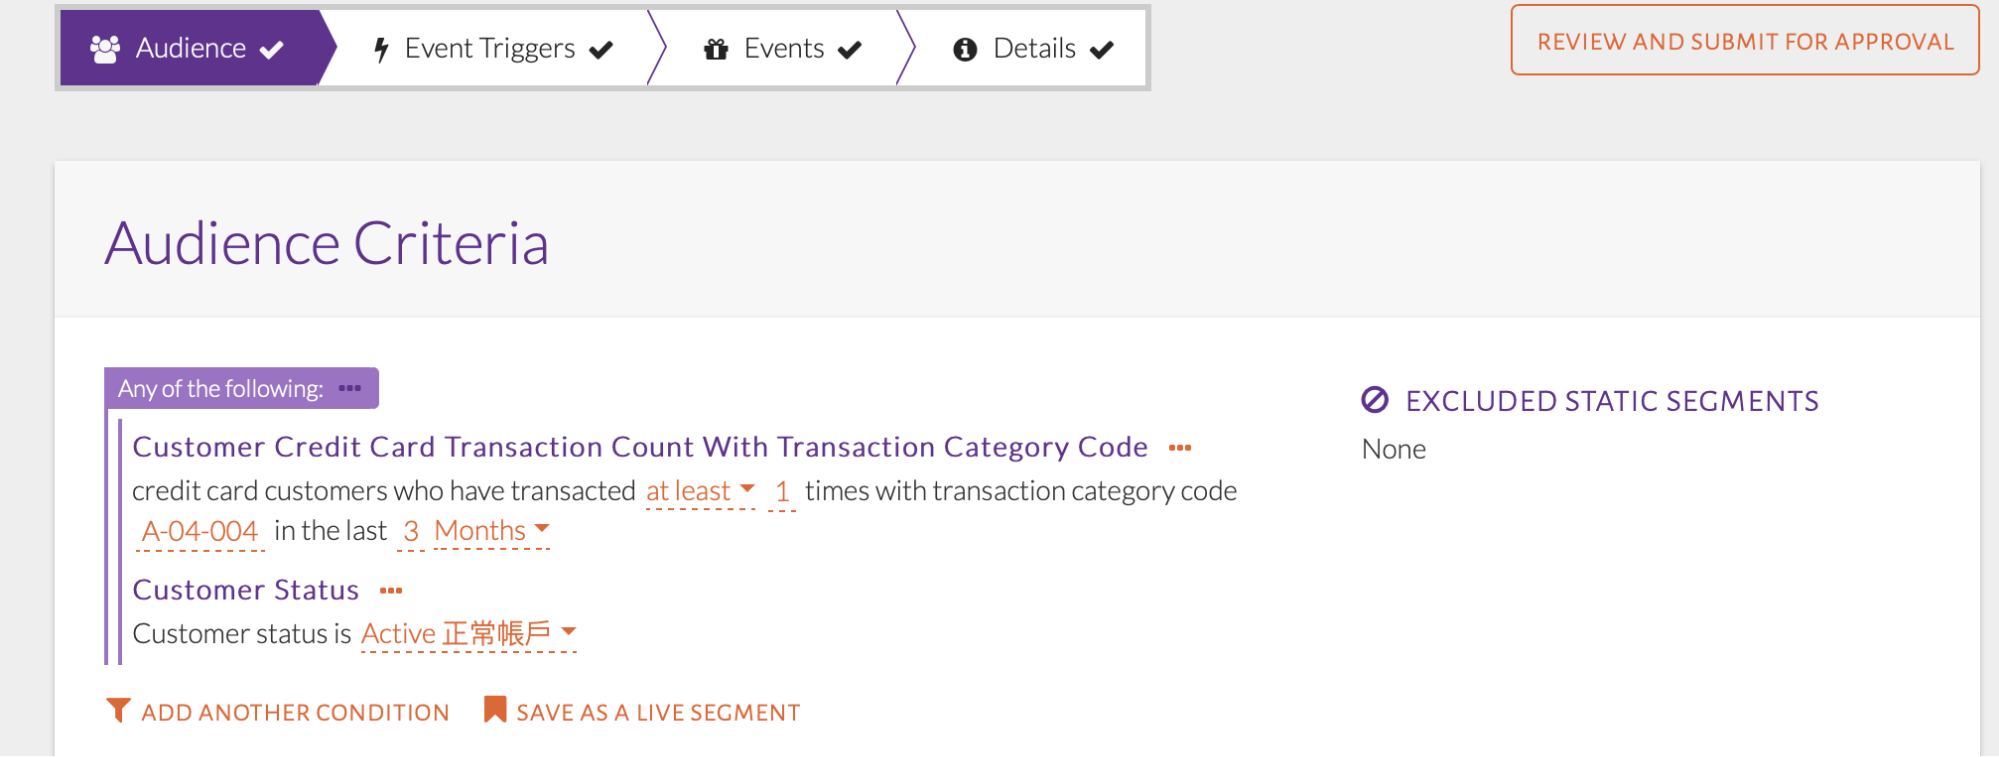
Audience Conditions
Enter a name for the live segment, as seen in the image below.
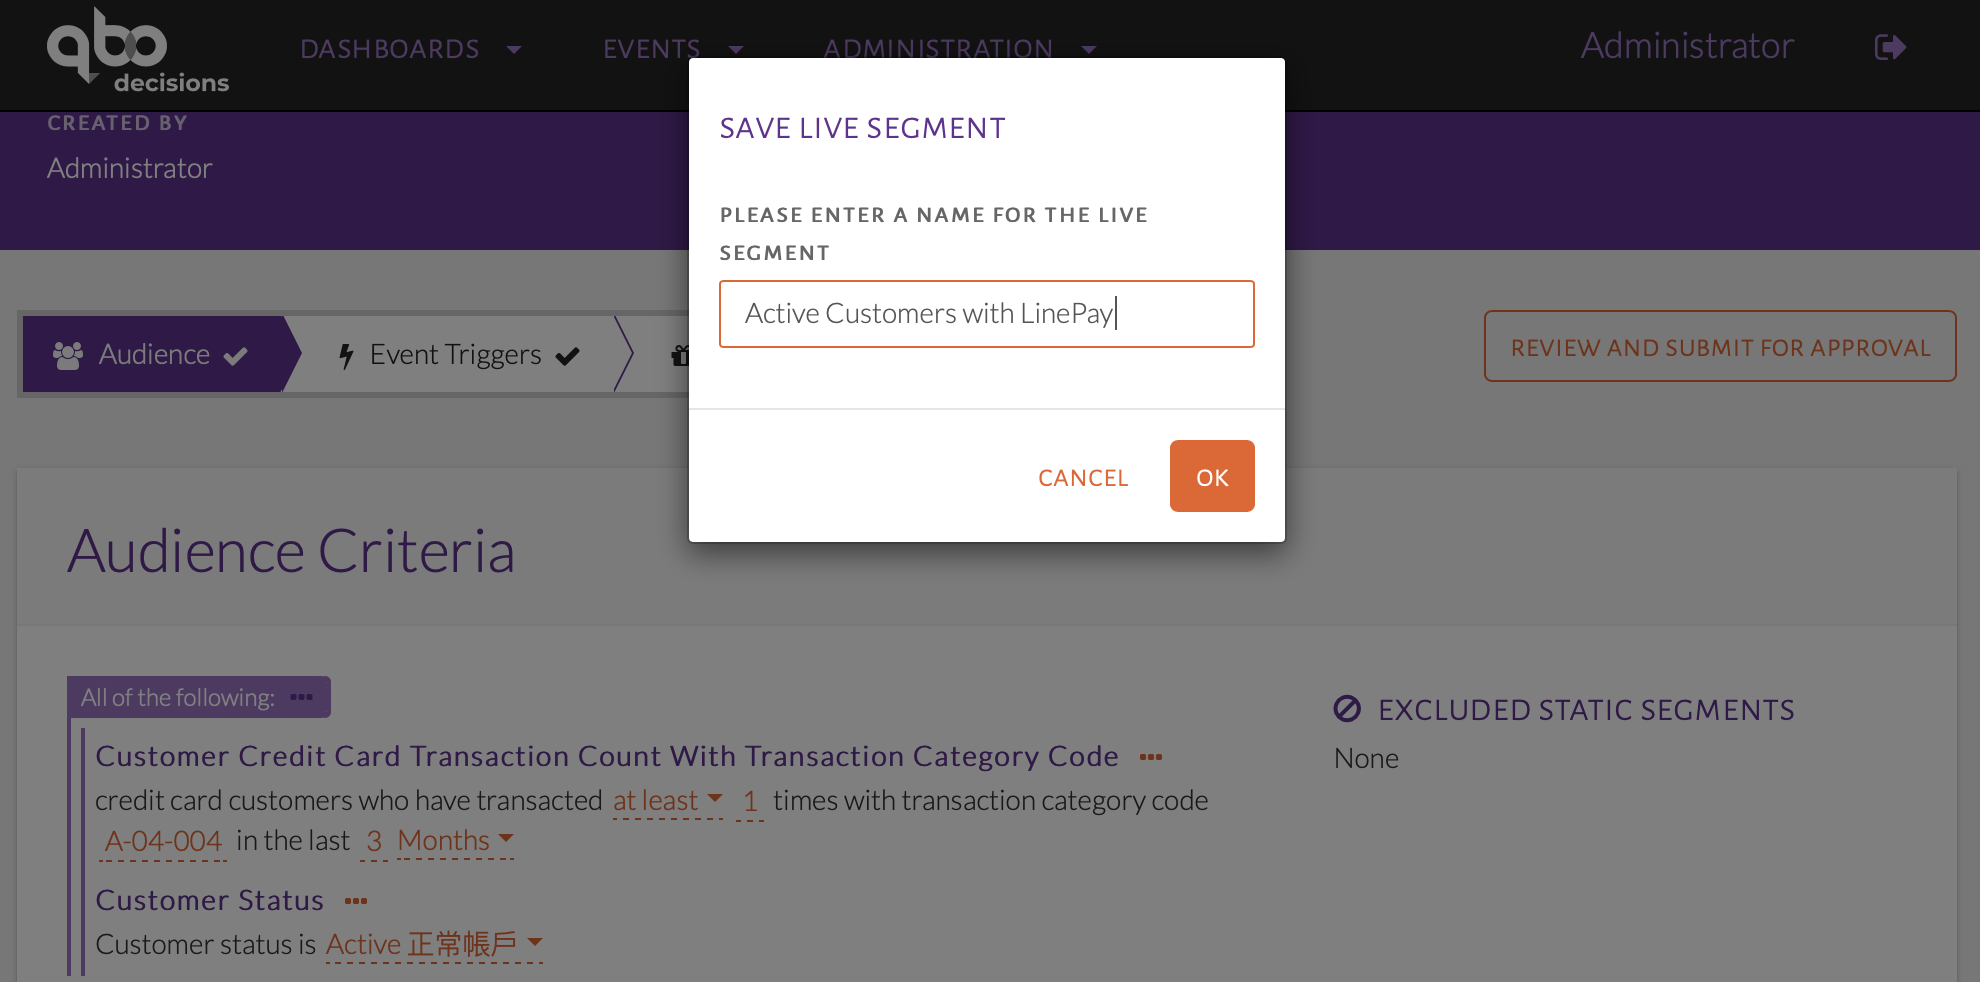
Name of live segment
The live segment will now be displayed as seen in the image below. Customers will be added and removed from this as they transact and if their status changes.

Live segment shown in audience conditions
This segment can now be used in other events and by other users.
USE-CASE: Using Live Segment as Audience Conditions
Use the live segment “Active Customers with LinePay” as the audience for the event.
Summary of Steps:
From the Audience Criteria pop-up, click the Live Segment tab.
Select name of live segment and click Add Selected Criteria.
Now, these audience conditions can be used when creating a new event. When selecting the audience conditions in a new event, go to the Live Segment tab, as seen in the image below. All the live segments created will be shown here.
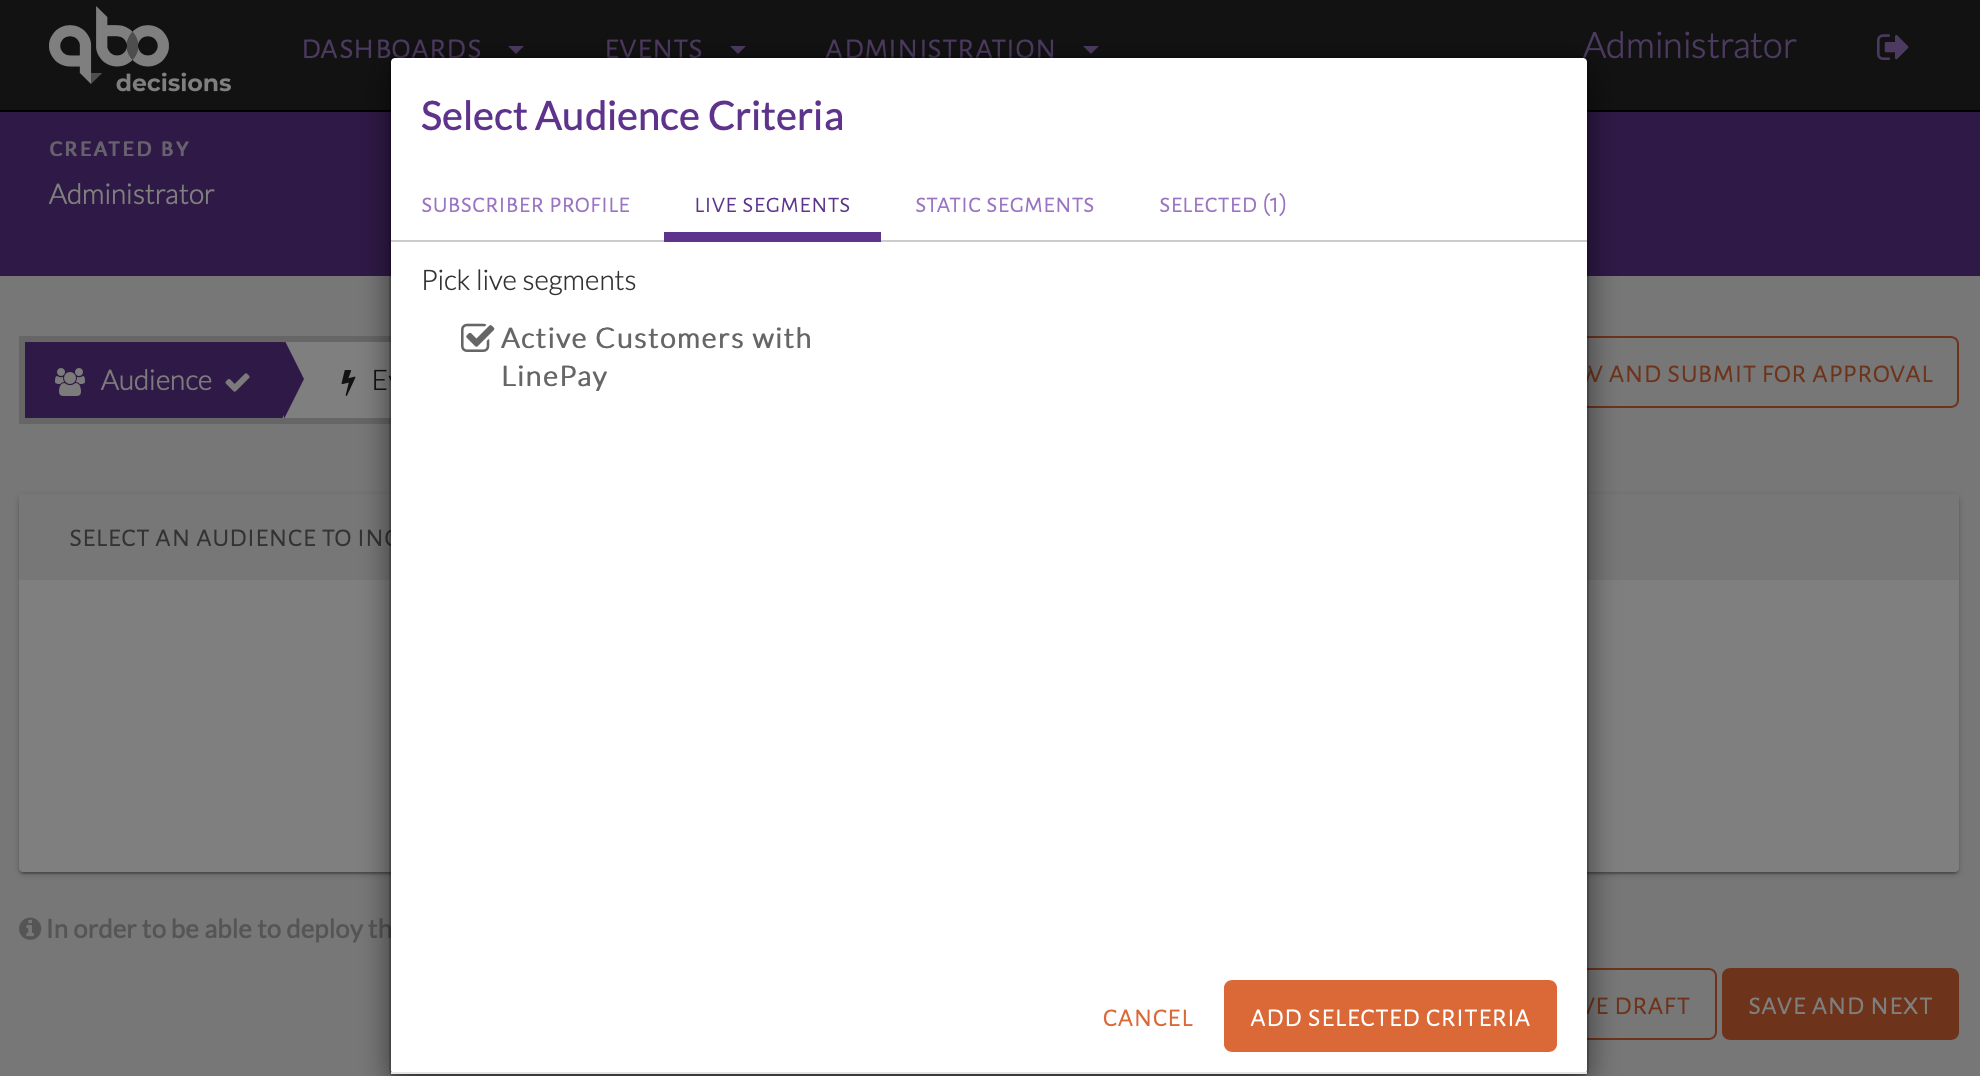
List of live segments in Live segments tab
On the Selected tab, the live segment can be seen as in the image below. Clicking the ellipses button beside it will allow the user to remove the condition or show conditions.
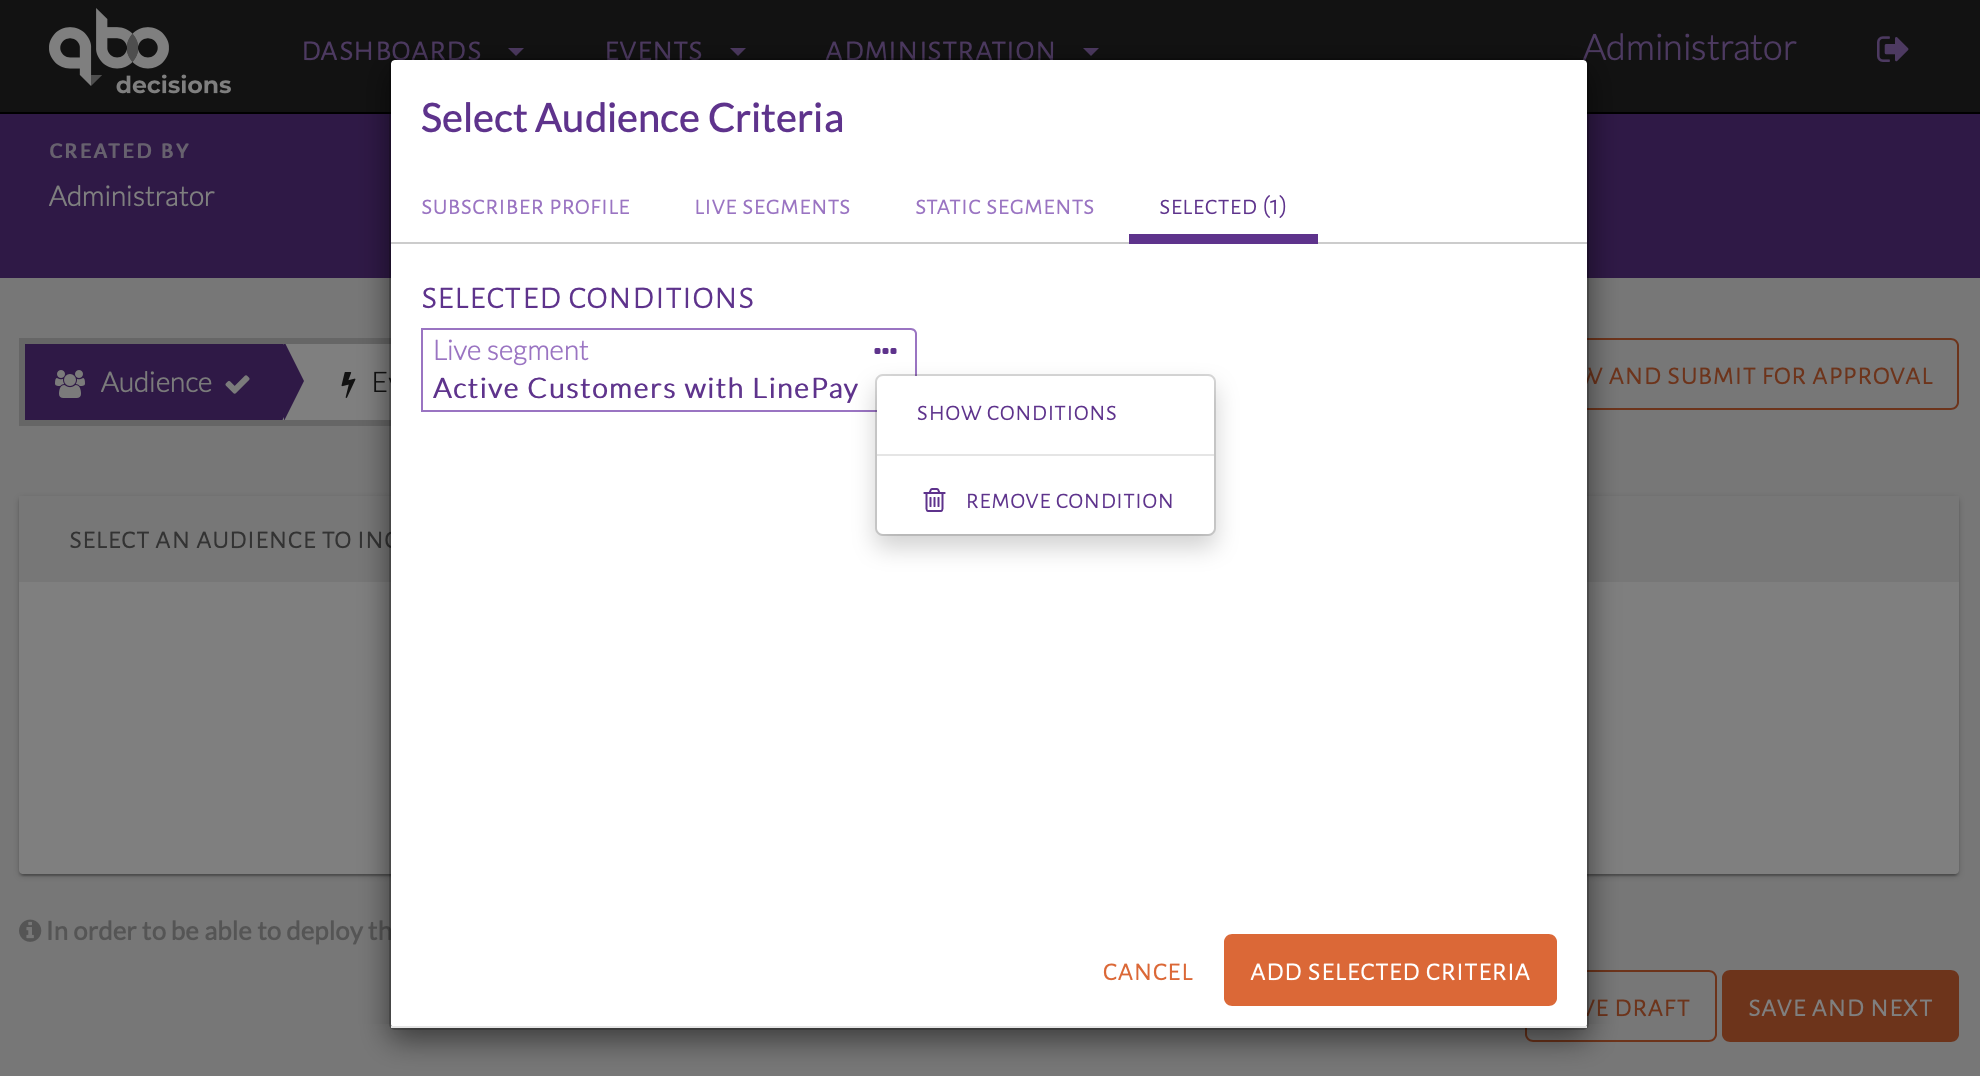
Show conditions or remove condition
Clicking Show Conditions will display the original conditions of the live segment, as seen in the image below.
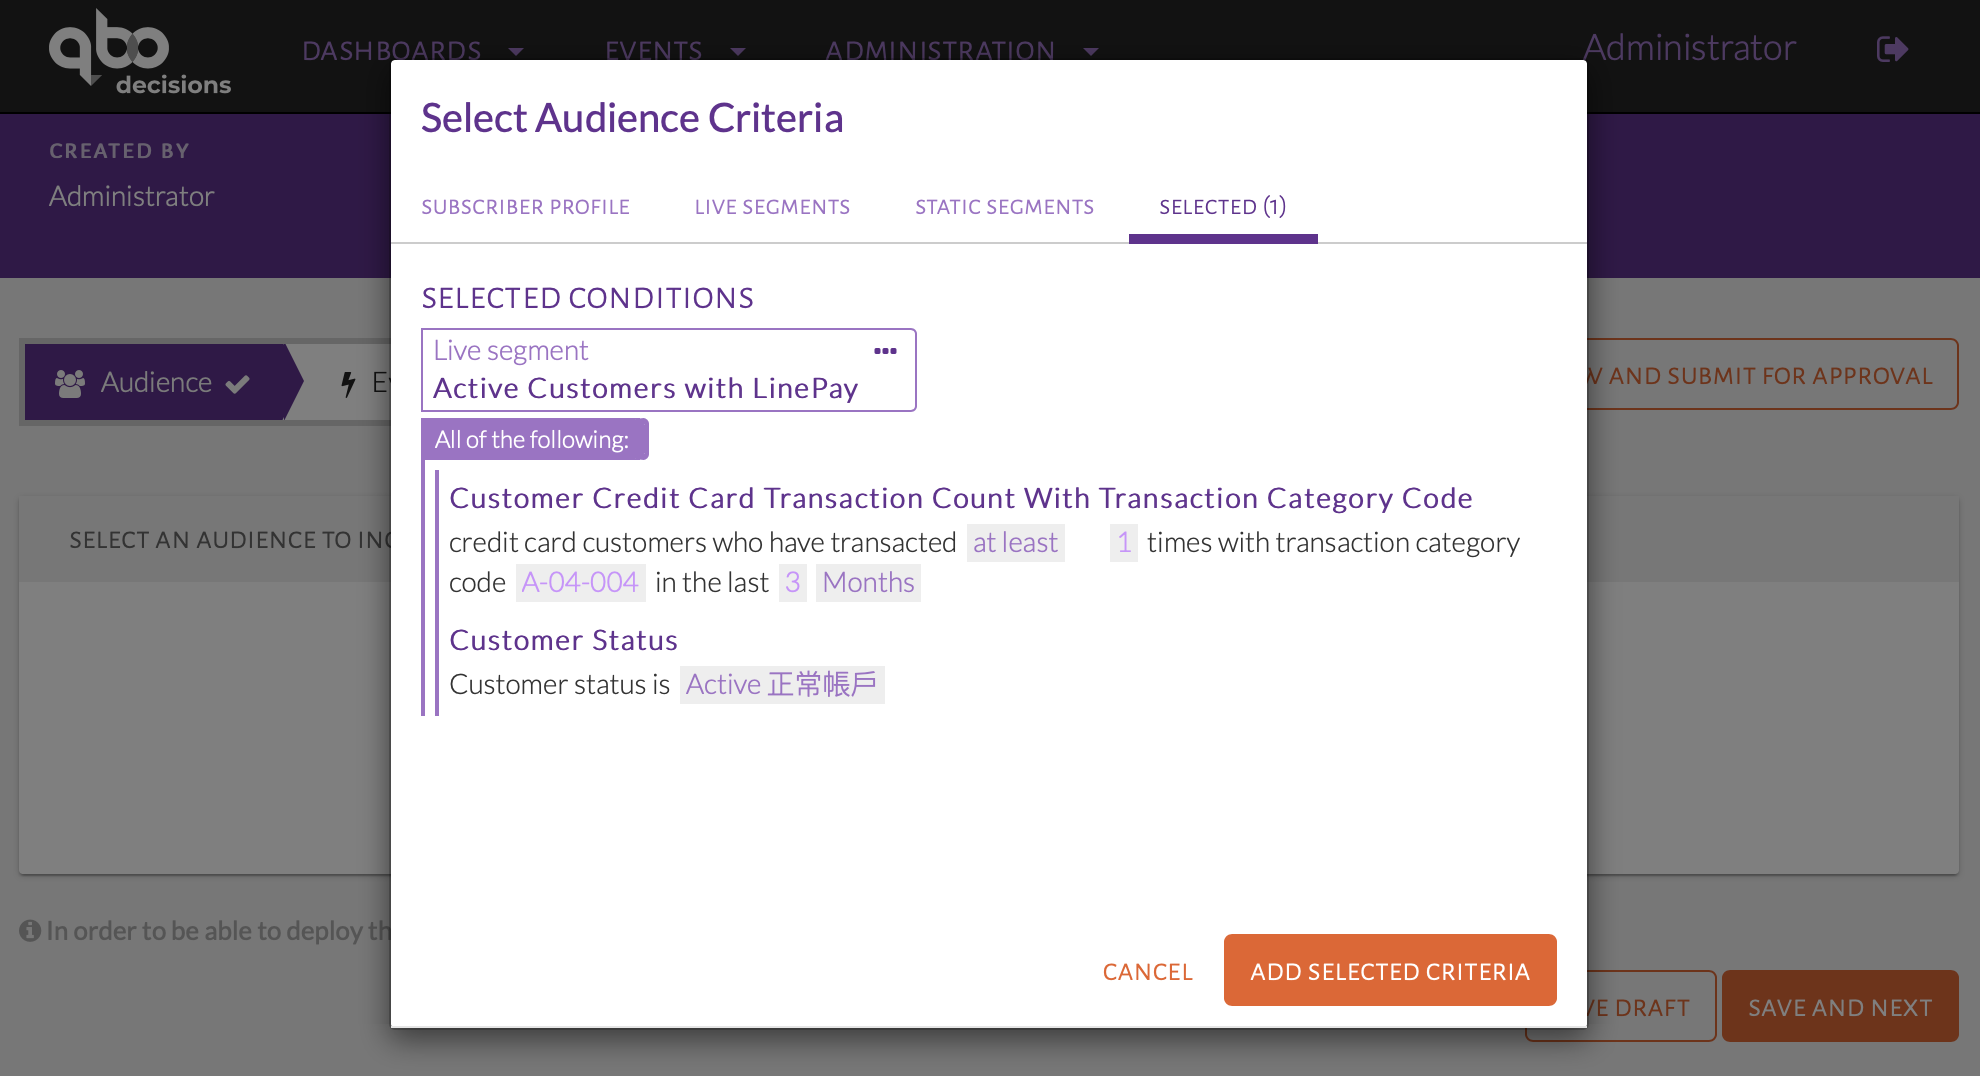
Show original conditions for a live segment
When a live segment is selected, clicking the ellipses button on the live segment will show similar options, as seen in the image below. Show Conditions will show the original conditions of the live segment.
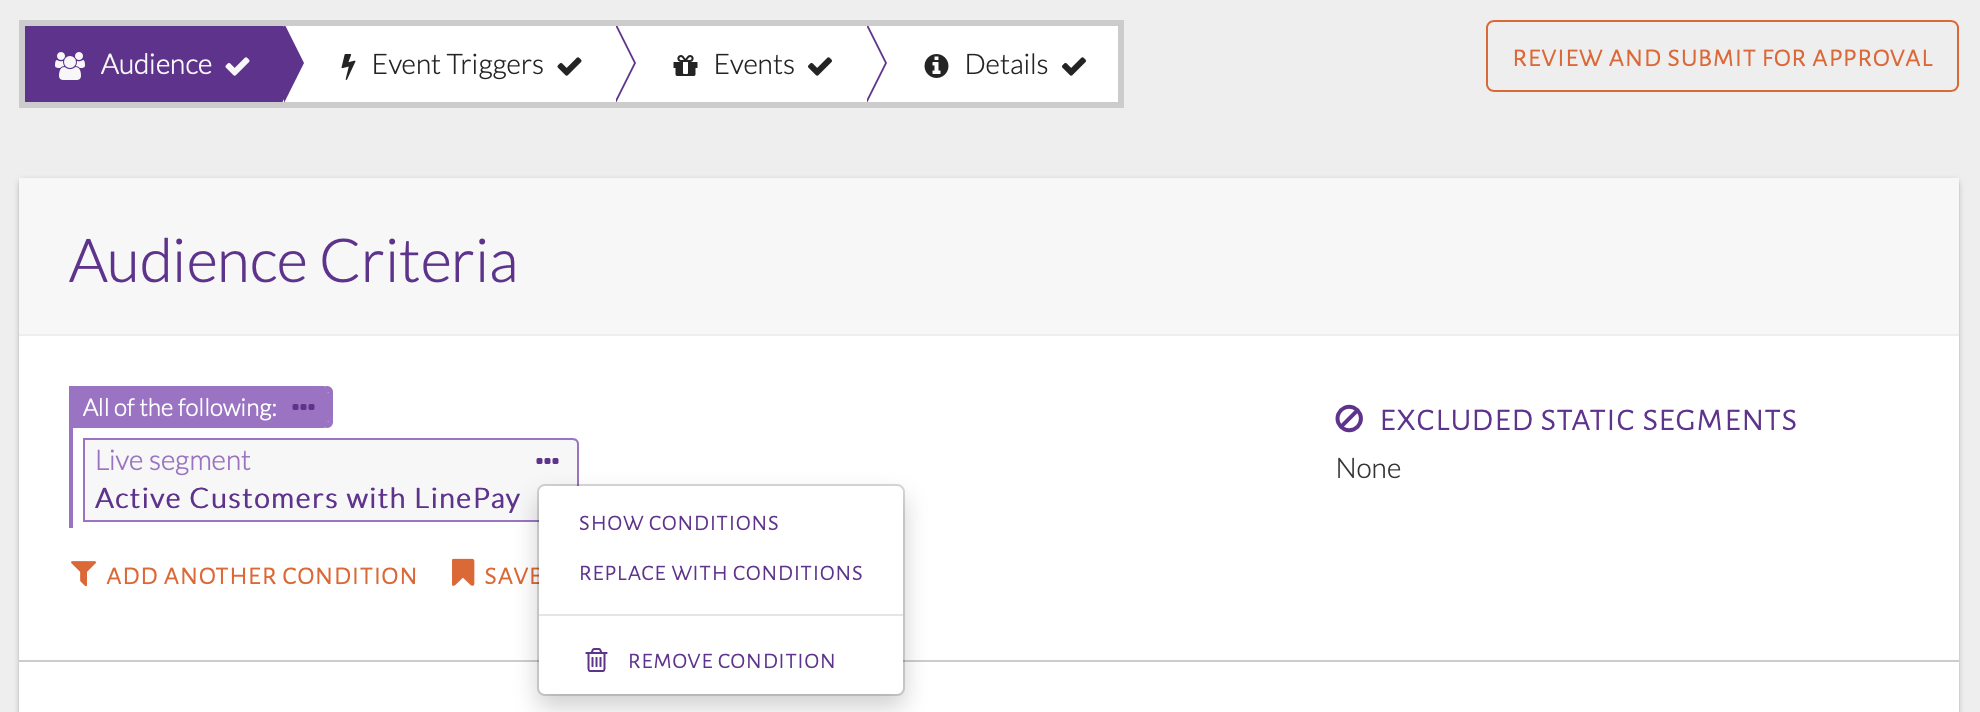
Options for a live segment
Selecting Replace with Conditions will display the live segment with its original conditions and allow the user to edit their values, as seen in the image below.
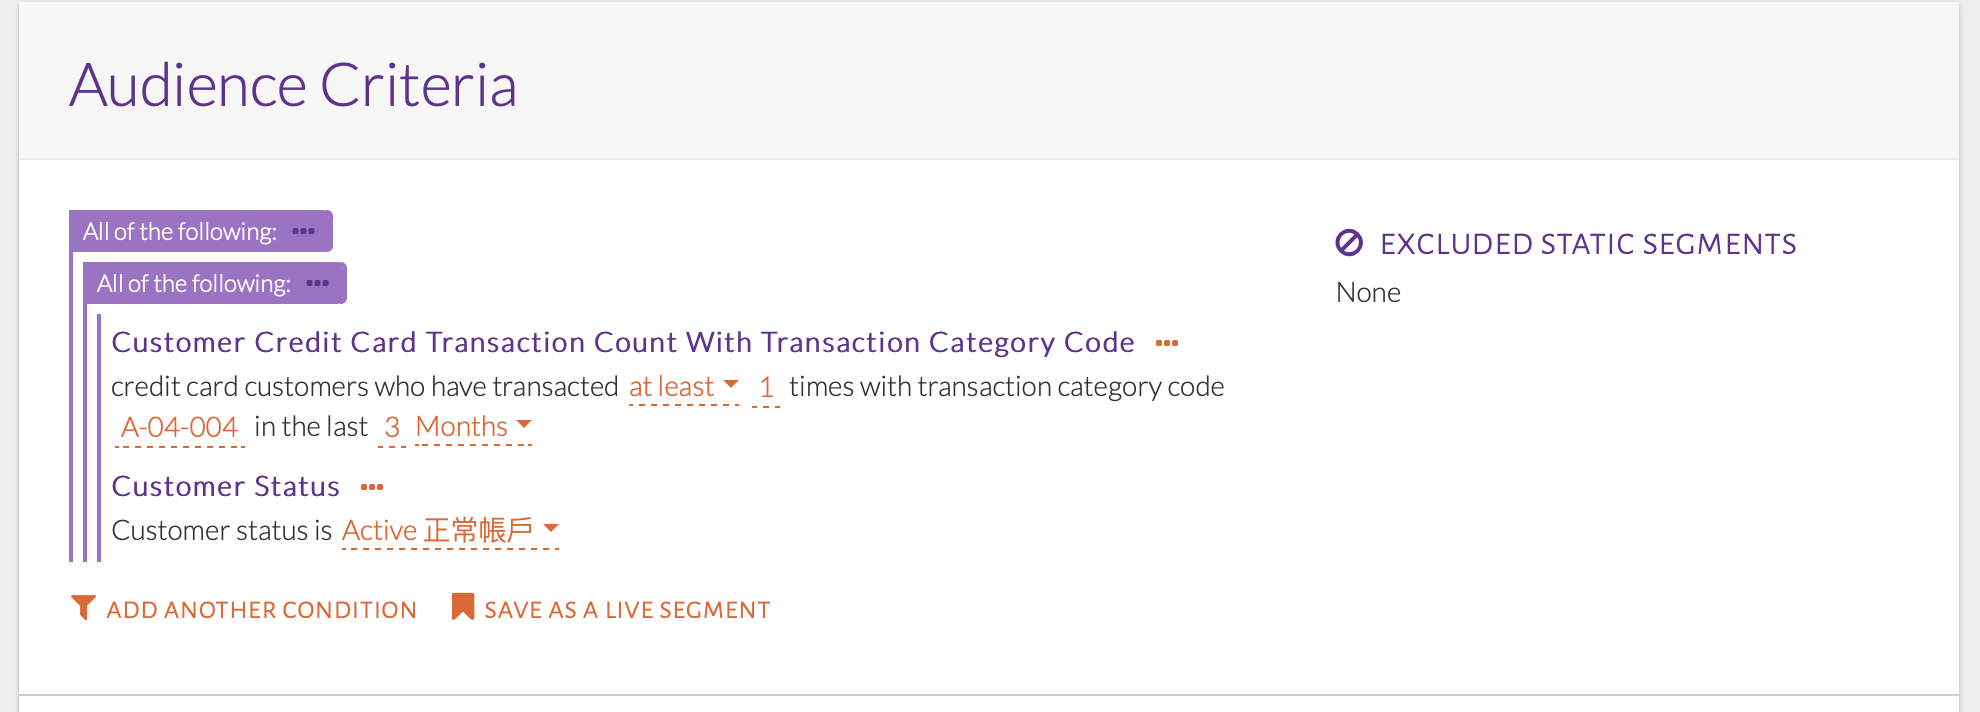
Replace live segment with original conditions
Static Segments
A static segment is a saved set of customers. It is different from a live segment in the sense that a live segment saves audience conditions, which are the basis of selecting customers as part of that segment. A static segment, on the other hand, saves specific customers. These specific customers can be chosen through the events step of configuration. Once a customer is saved in a static segment, they will always be part of that static segment until explicitly removed by the user, unlike with live segments.
USE-CASE: Saving a Static Segment using a event
Save customers who receive an event into a static segment. The event audience is customers who have transacted at least once with the merchant category A-04-004 (LinePay) in the last 3 months and have a customer status of Active. The trigger is when a single transaction of more than NT $500 in the LinePay category.
Summary of Steps:
Set up the audience, trigger and event.
In Events, check Add/remove the subscriber from static segments after sending the event.
Select or create a static segment to add these customers into.
The set up is shown in the 3 images below.

Audience conditions
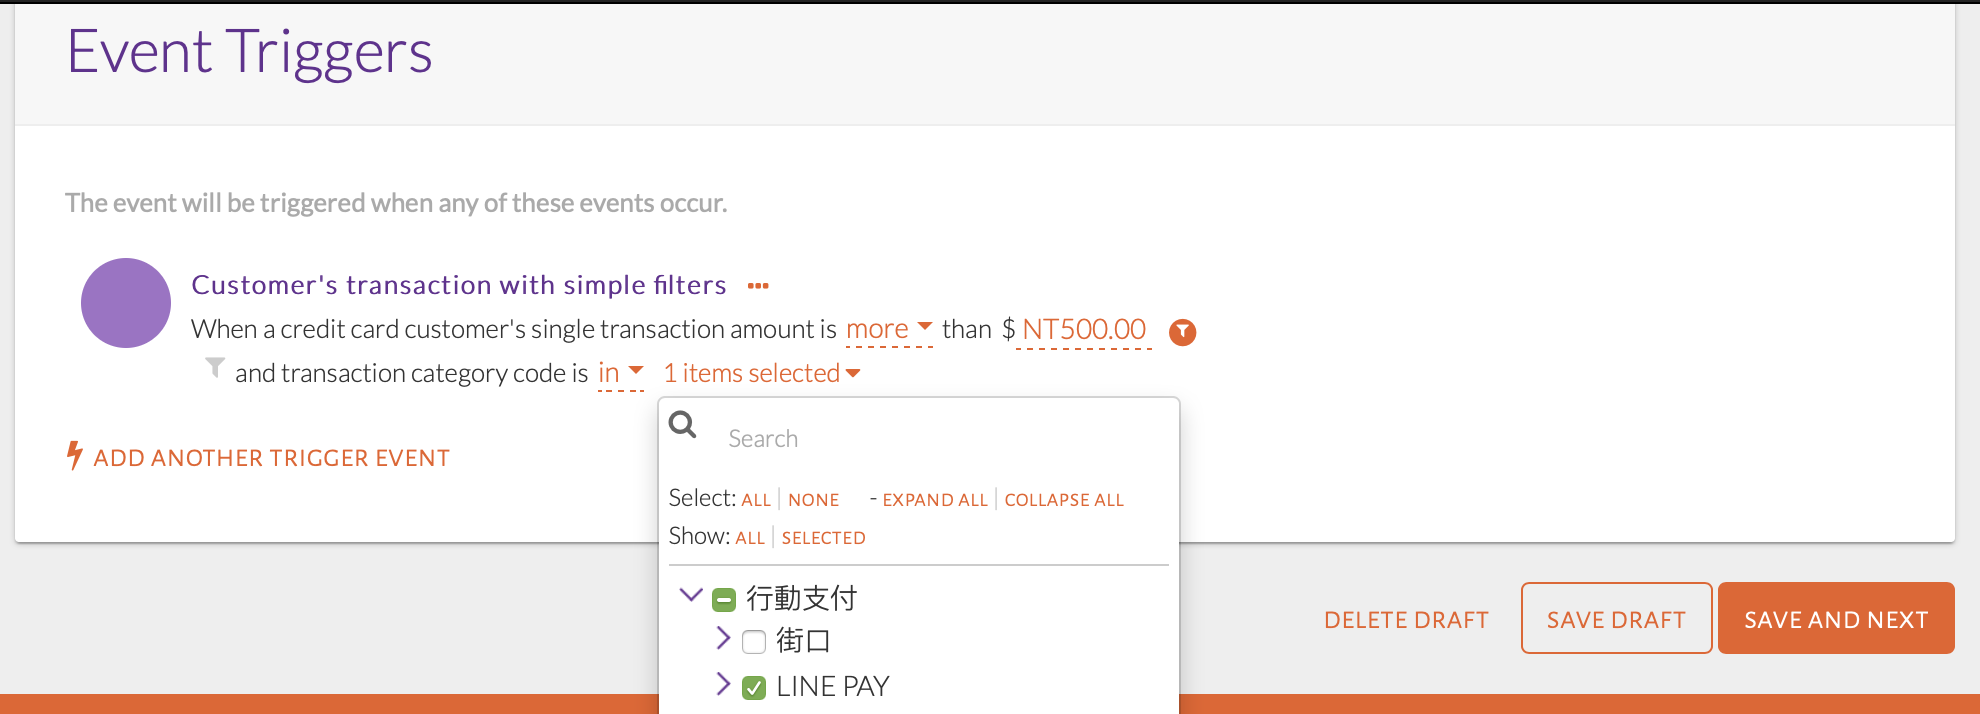
Trigger conditions
In the image below, the trigger configured is a single transaction of more than NT $500 in the LinePay category. This selection can be done quite easily through the tree selection criteria under the Mobile payment top category.
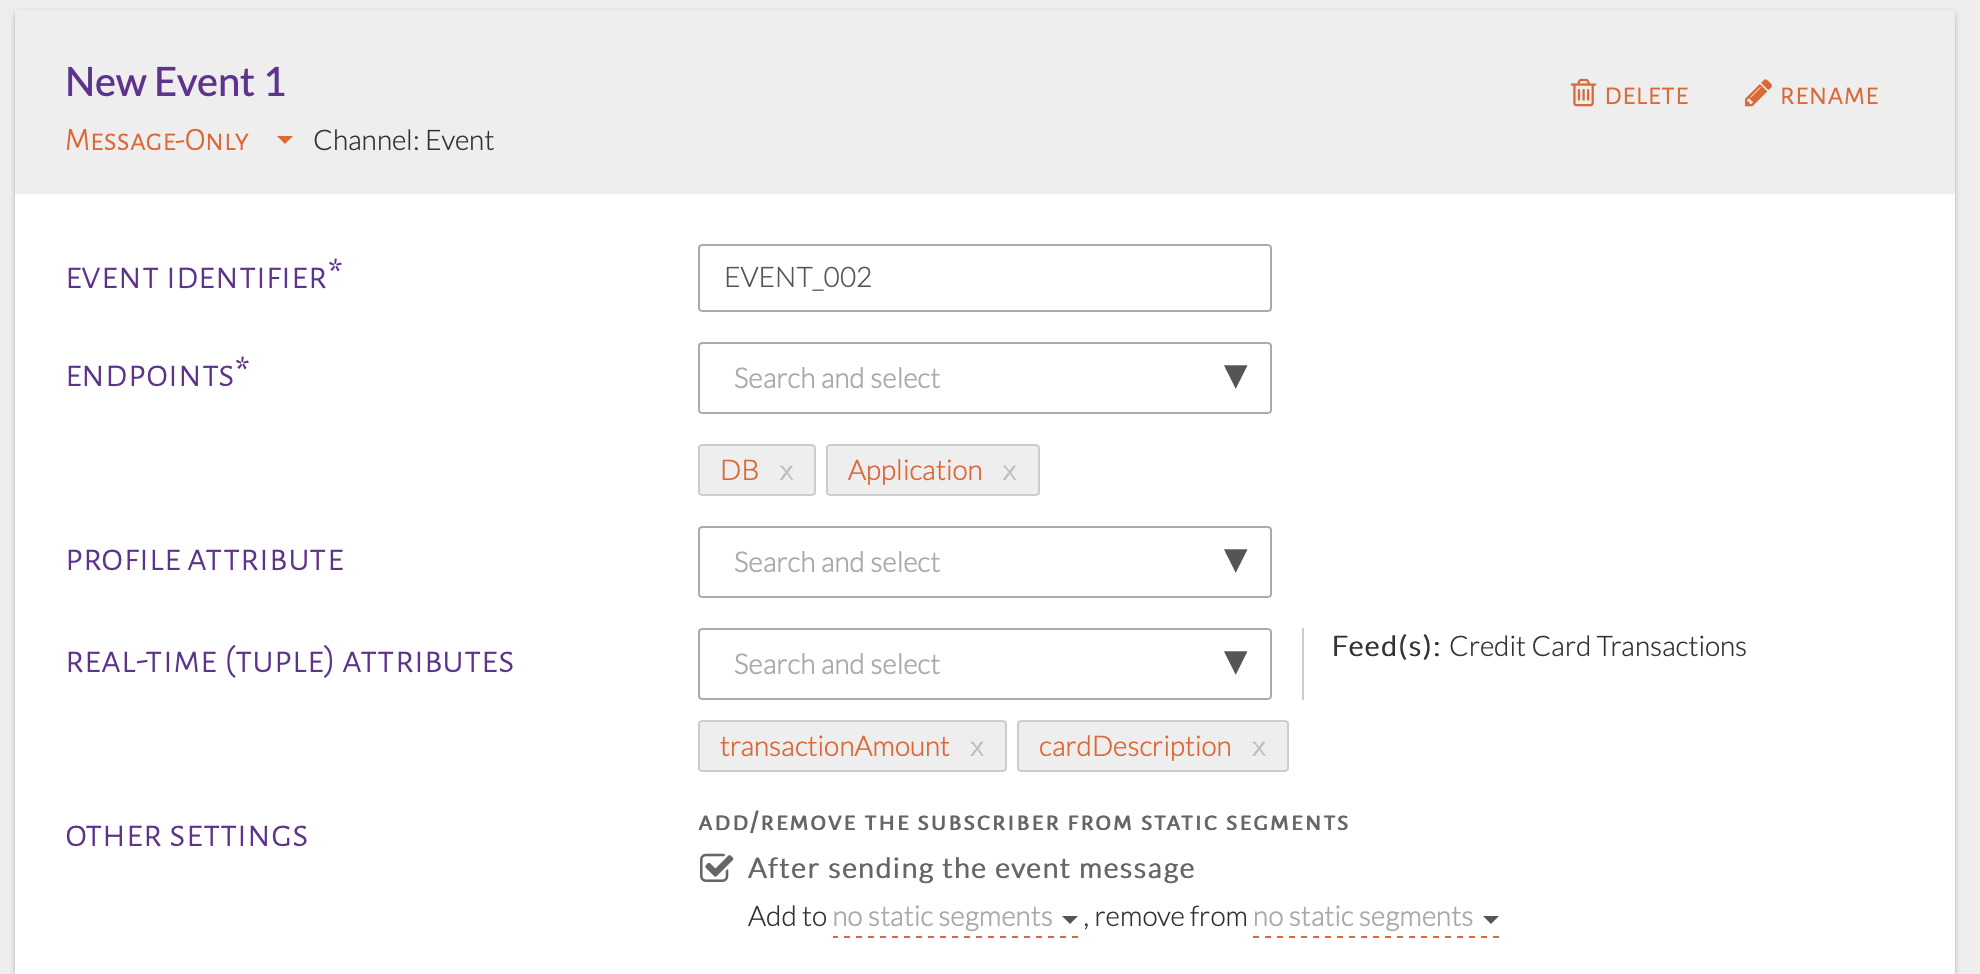
Event
When setting up the event, there is an option to Add/Remove the subscriber from static segments after sending the event. Checking this box will provide the option to add the customer to a segment and/or remove from the segment. Both these are required to be static segments. This feature allows the user to keep track of the customers that triggered an event separately, by adding them to a new segment. It also allows to keep track of all the customers who have not triggered an event yet, by removing them from the current segment. This is seen in the image below. This option is available for all the types of events.
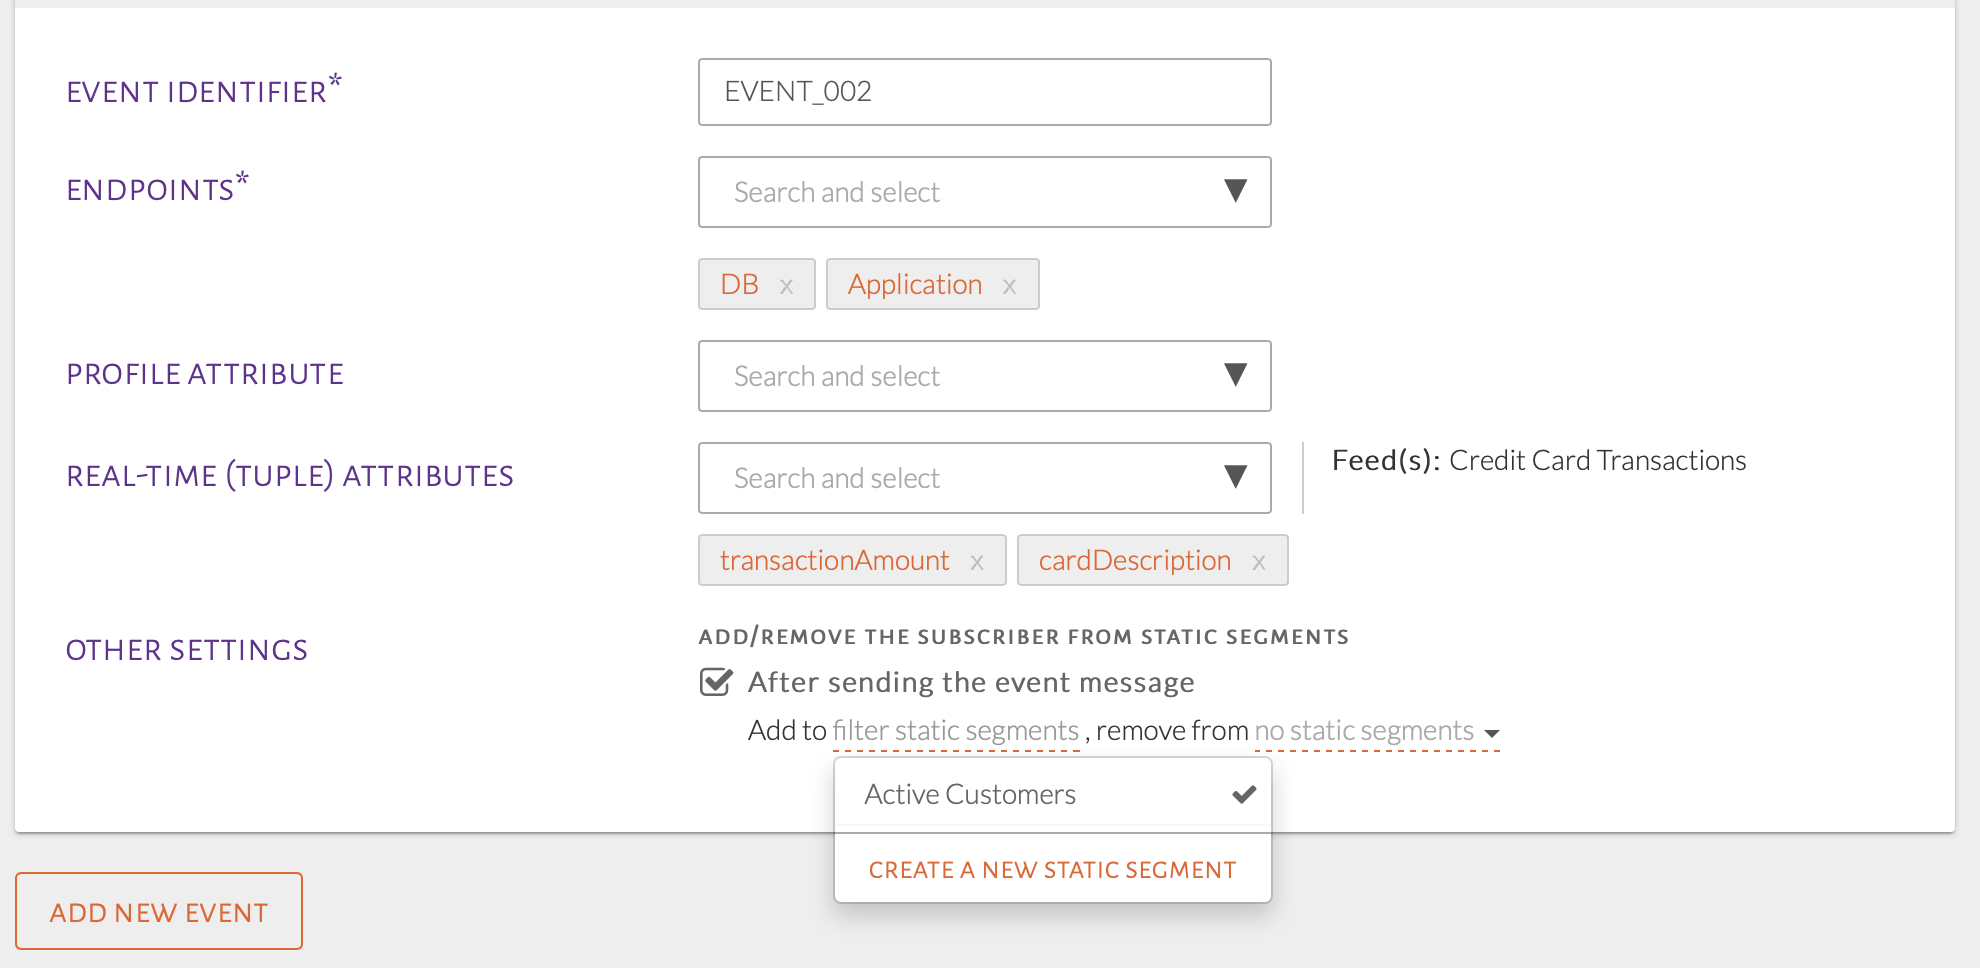
Add or remove subscriber from static segment
One or more static segments can be used to add the subscribers to, as seen in the image below. In this example, we choose to add the subscribers to Active Customers. This is a segment created by selecting the Create a New Static Segment option. A Name and Description needs to be added to create a segment.
One or more static segments can be chosen to remove the subscribers, in the same way. In this example, we do not remove the subscribers from any static segment, as seen in the image below.
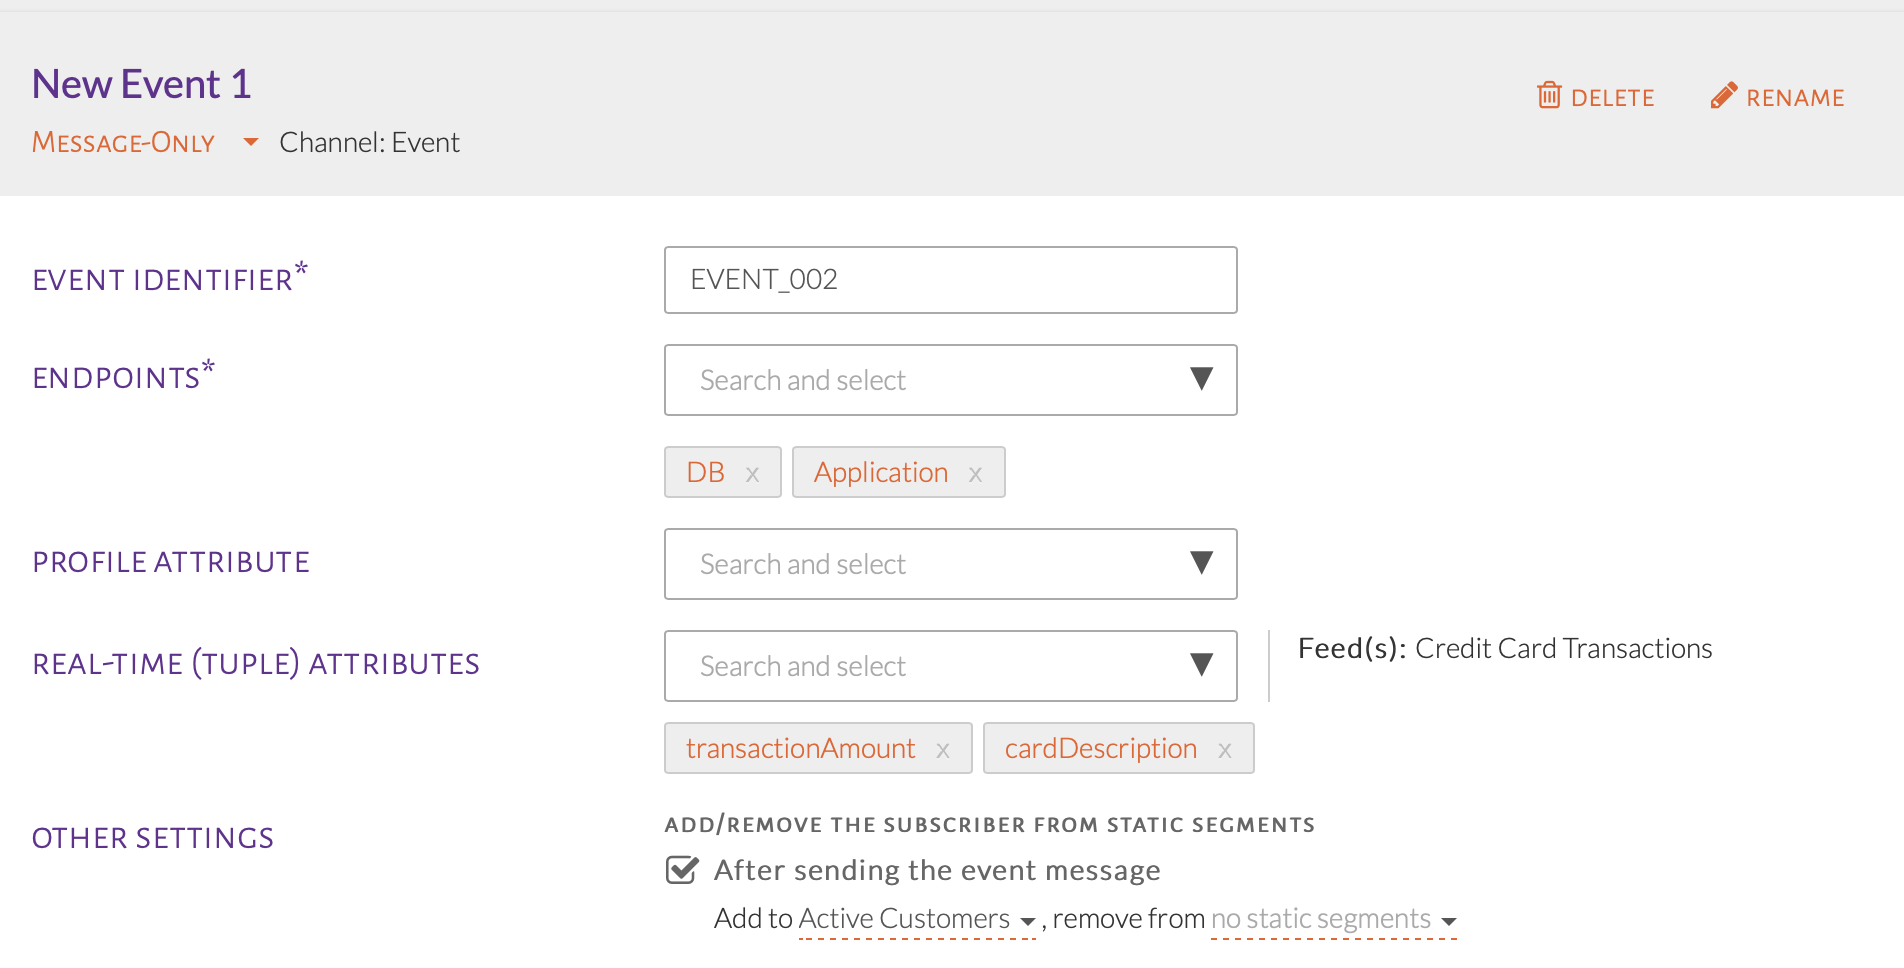
Add to a static segment
USE-CASE: Static Segment as Audience in an Event
Use saved customers from a previous event “Active Customers” as audience of a new event by using a static segment.
Summary of Steps:
From the Audience Criteria pop-up, click the Static Segment tab.
Select name of static segment and click Add Selected Criteria.
This can be done by selecting the static segment as our audience condition. When selecting conditions, click the Static Segments tab, as seen in the image below.
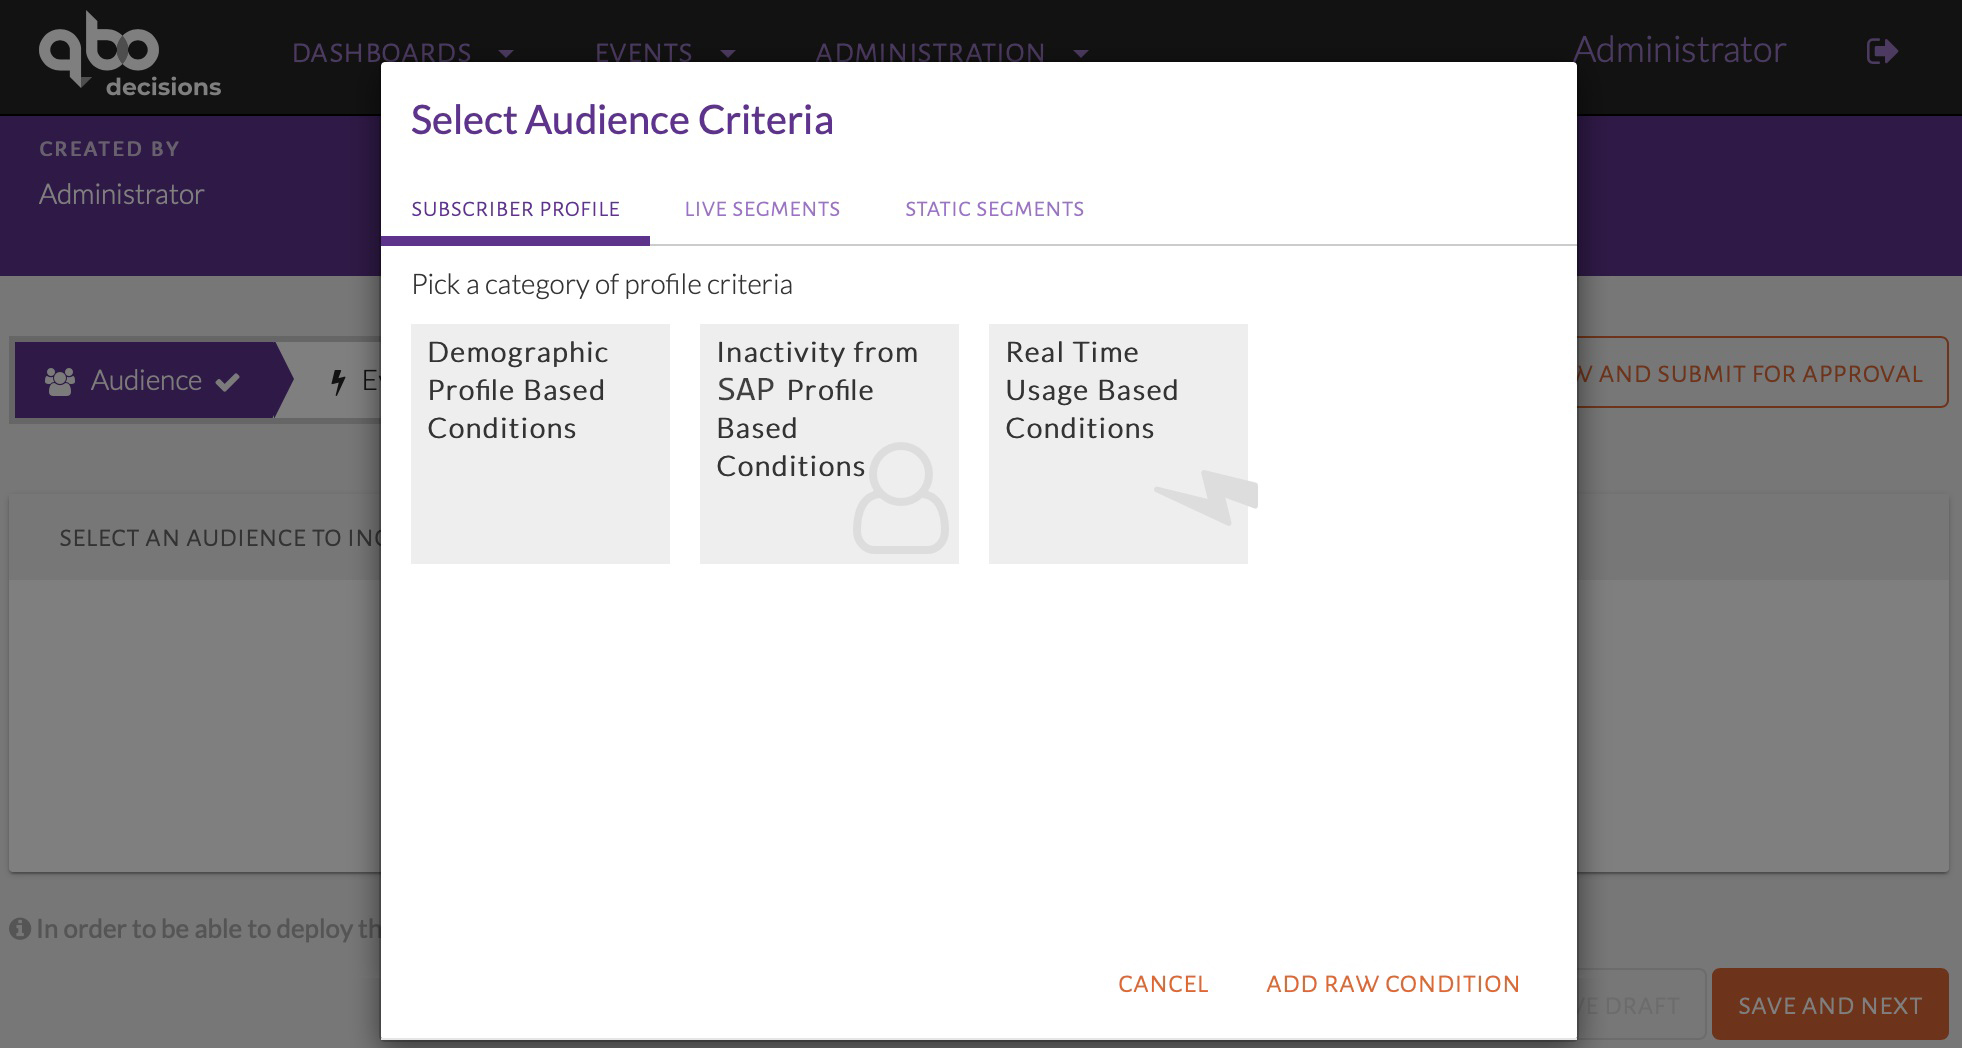
Click the static segments tab in audience conditions
The saved static segments will be shown, as seen in the image below. Select Active Customers then click Add Selected Criteria.
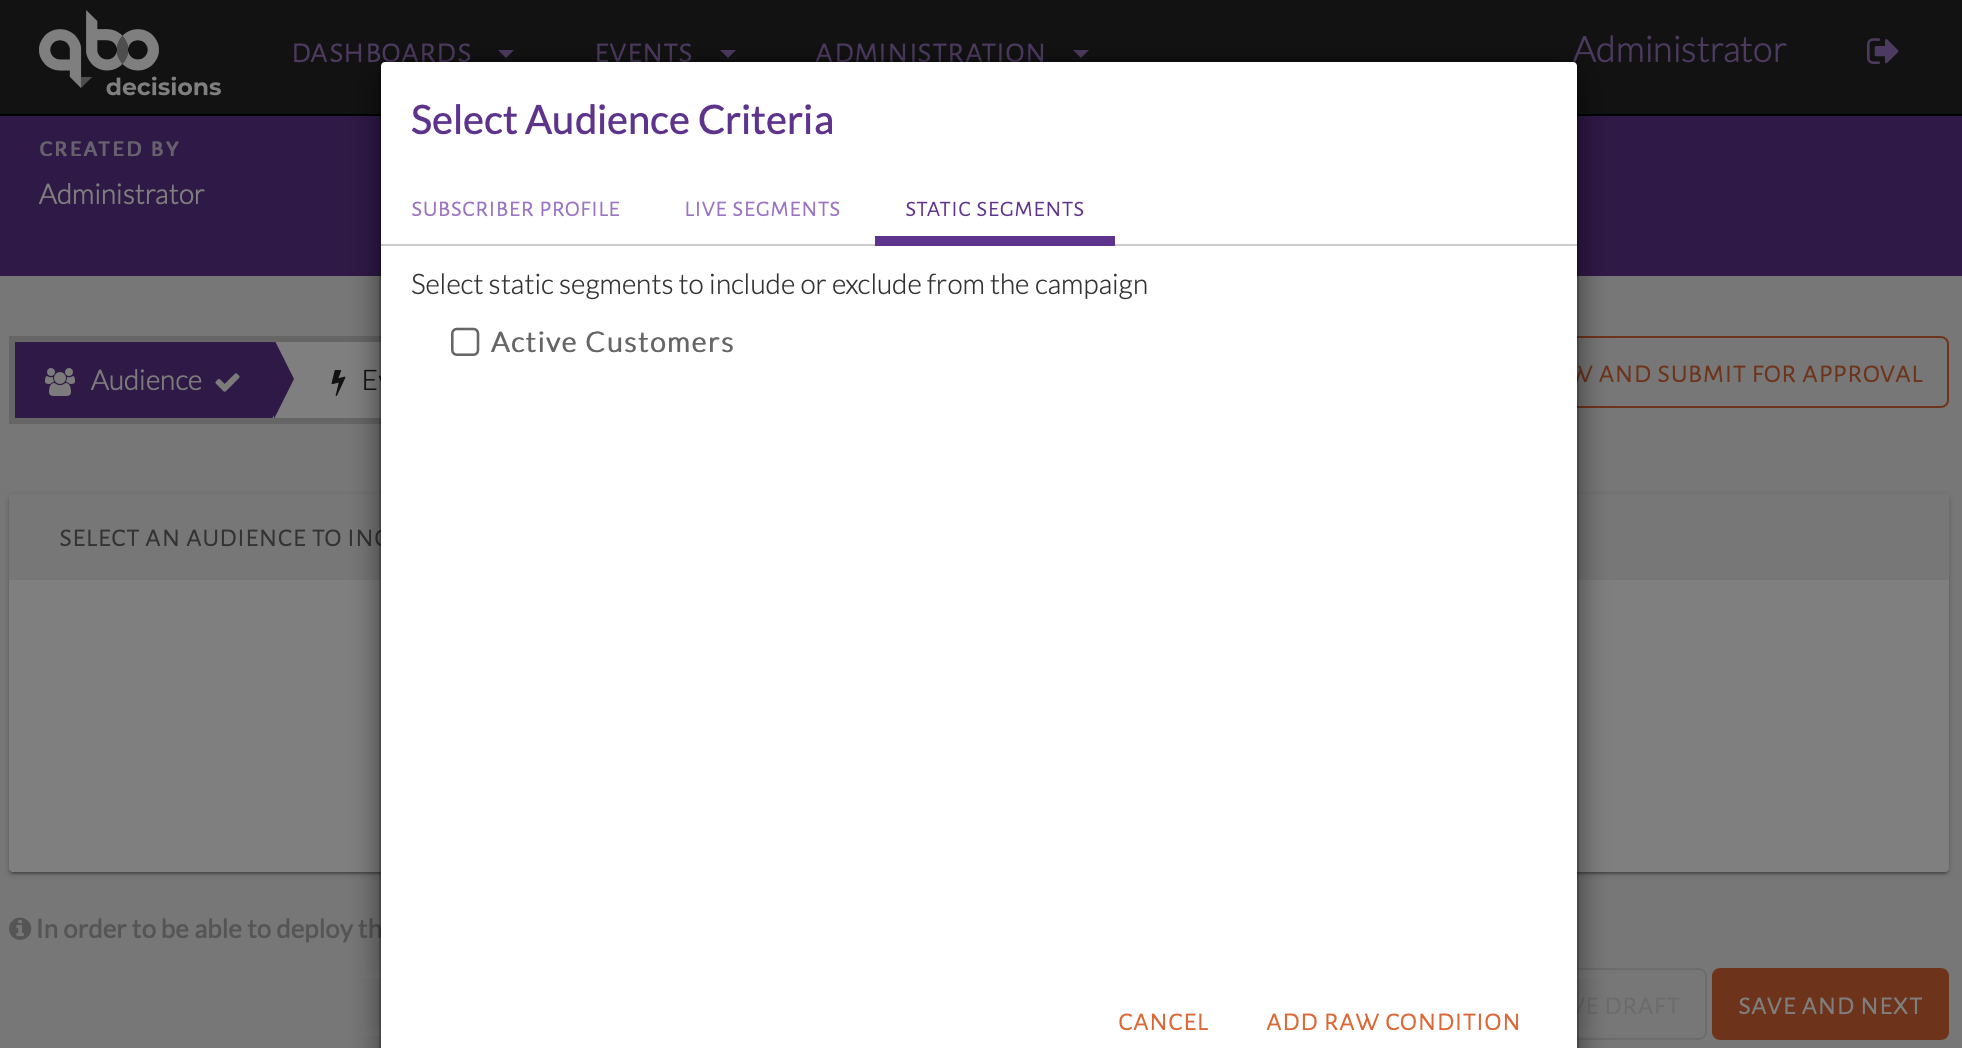
List of all static segments displayed
USE-CASE: View all Static Segments
Summary of Steps:
Click Administration in the top navigation bar.
Select Settings.
Go to Static Segments tab.
To view all static segments that are available for use, click Administration in the top navigation bar. Under this, select Settings as seen in the image below.

Go to Settings
A page will be displayed as seen in the image below. Select the Static Segments tab.

Select the Static segments tab
A page will be displayed as seen in the image below. The static segments can be seen along with a description for each. The segment size is also shown, which is the number of customers in each static segment. Similarly, all Live Segments can be viewed in its respective tab. Both of these tabs show all segments configured by any user as they are usable by any user.

List of all static segments
Adding Charts to an Event
To better breakdown and understand the audience of an event, charts based on different metrics can be added.
USE-CASE: Display Metrics of Marital Status and Occupation Type Code
Summary of Steps:
In the Audience Criteria page, click Add Charts.
Choose the category of the metric.
Check one or more metrics and click Add Selected Metric.
Set up audience conditions as seen in the image below. Click Add Charts button below the Audience Stats.
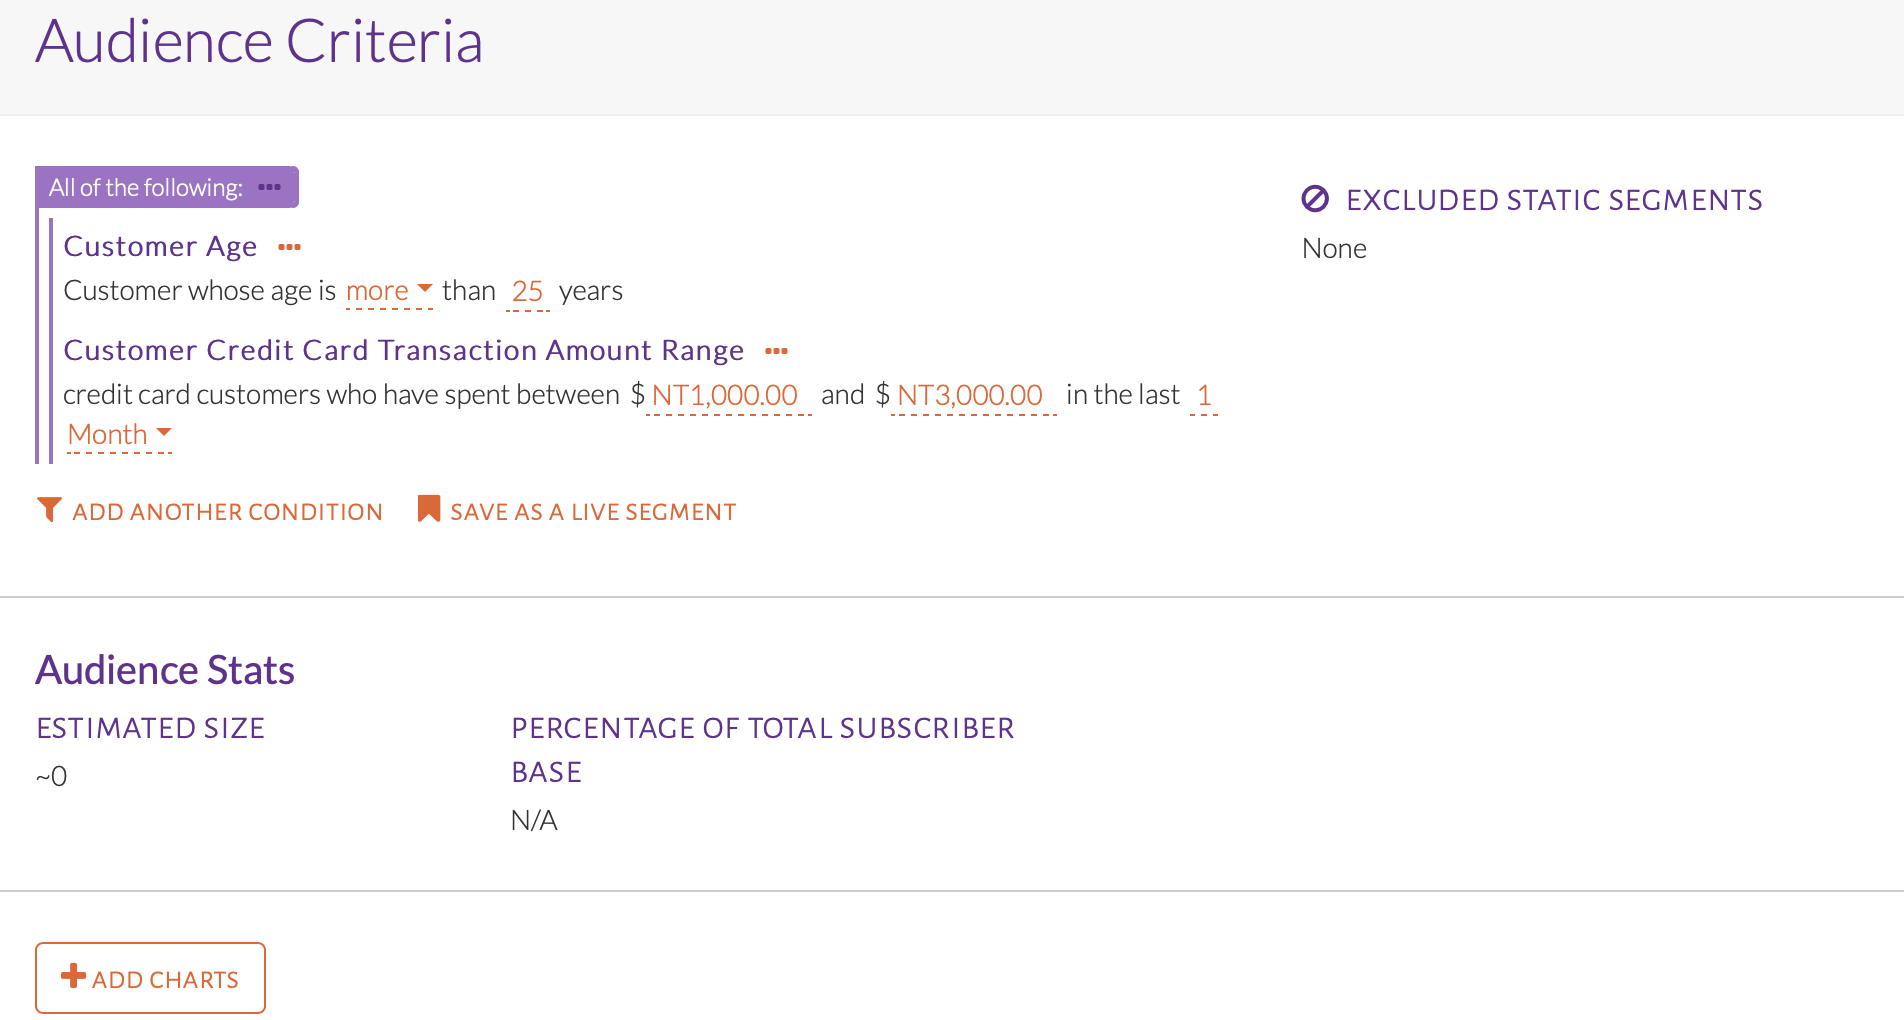
Adding a chart
A pop-up will be displayed as seen in the image below where different metrics for the chart can be selected.
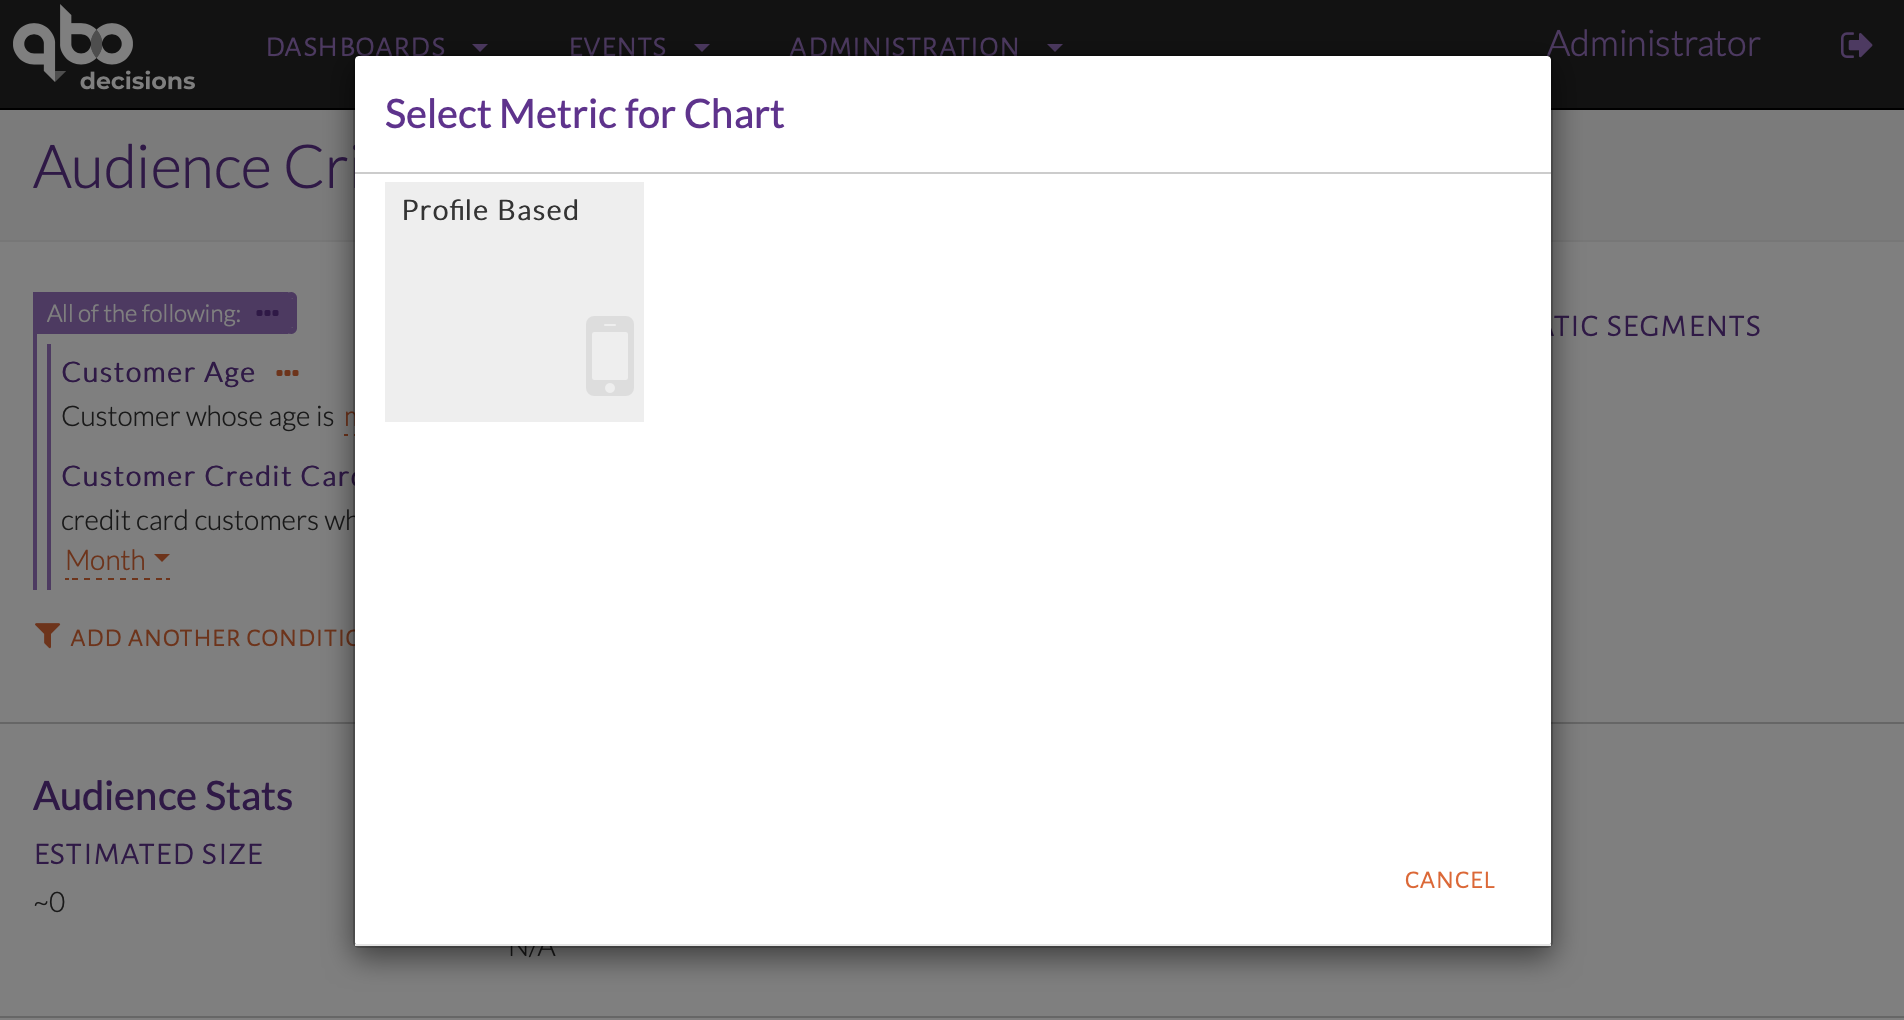
Selecting metrics for charts
In the Profile Based metrics, select Gender & Segment as seen in the image below.
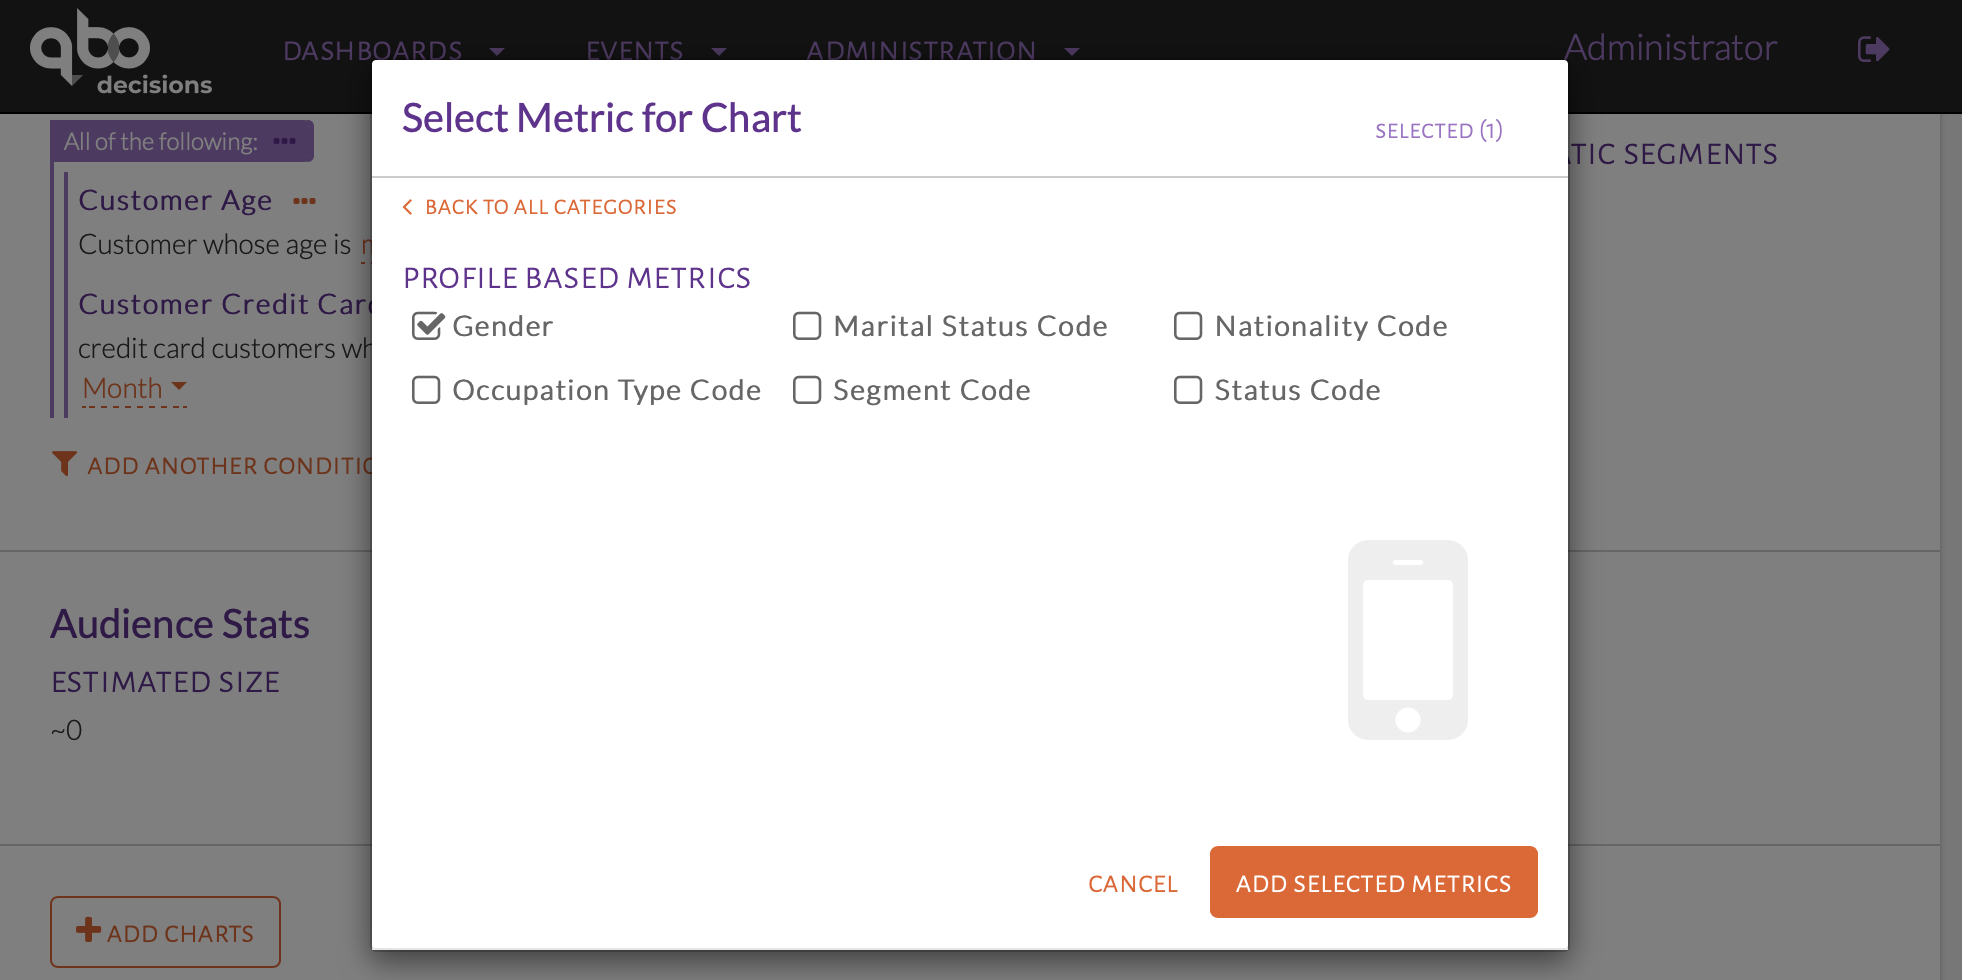
Choosing Profile Based metrics
The selected metrics can be viewed on the Selected tab. To remove a metric, click the - button beside it. Click Add selected metrics to proceed. The metrics selected produce graphs as shown in the image below.
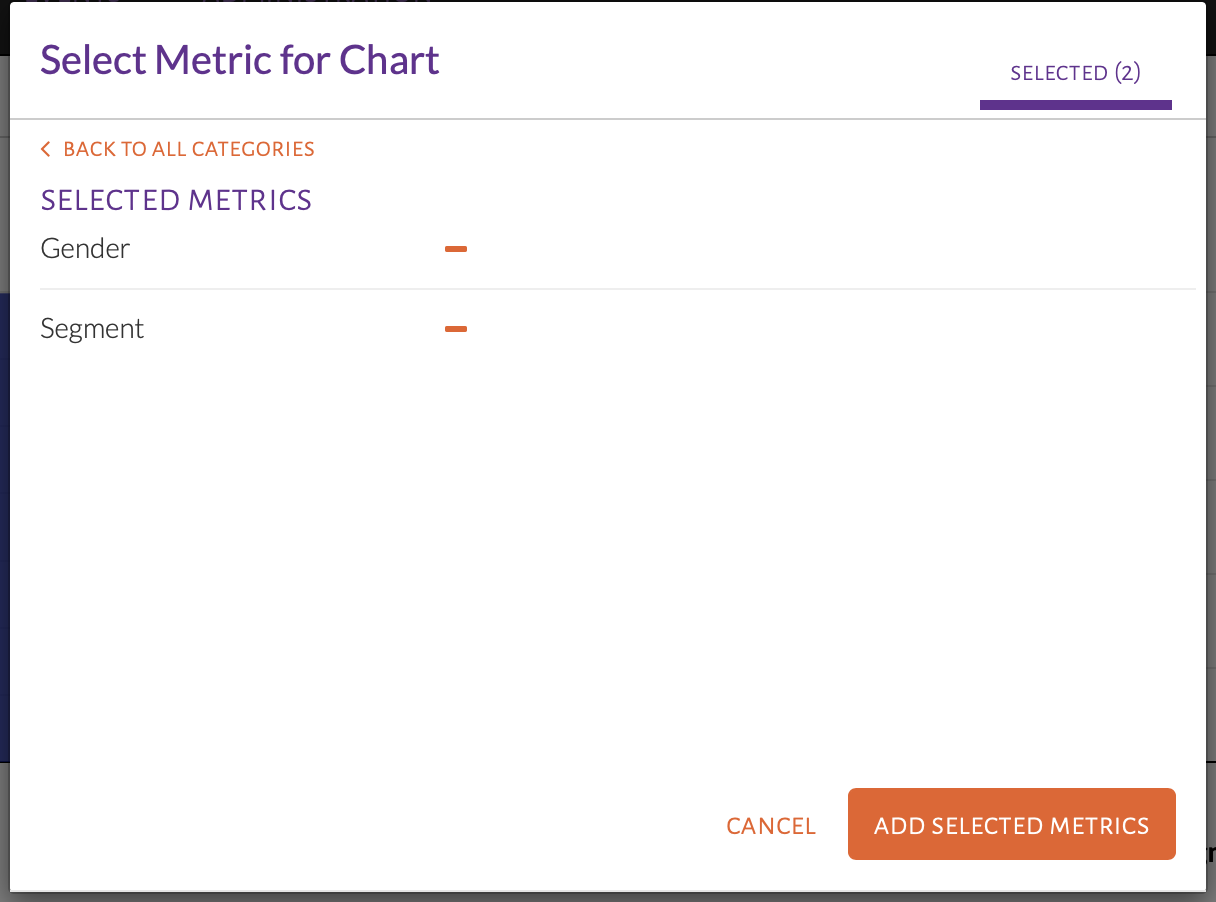
Remove selected metrics
The metrics selected produce graphs as shown in the image below.
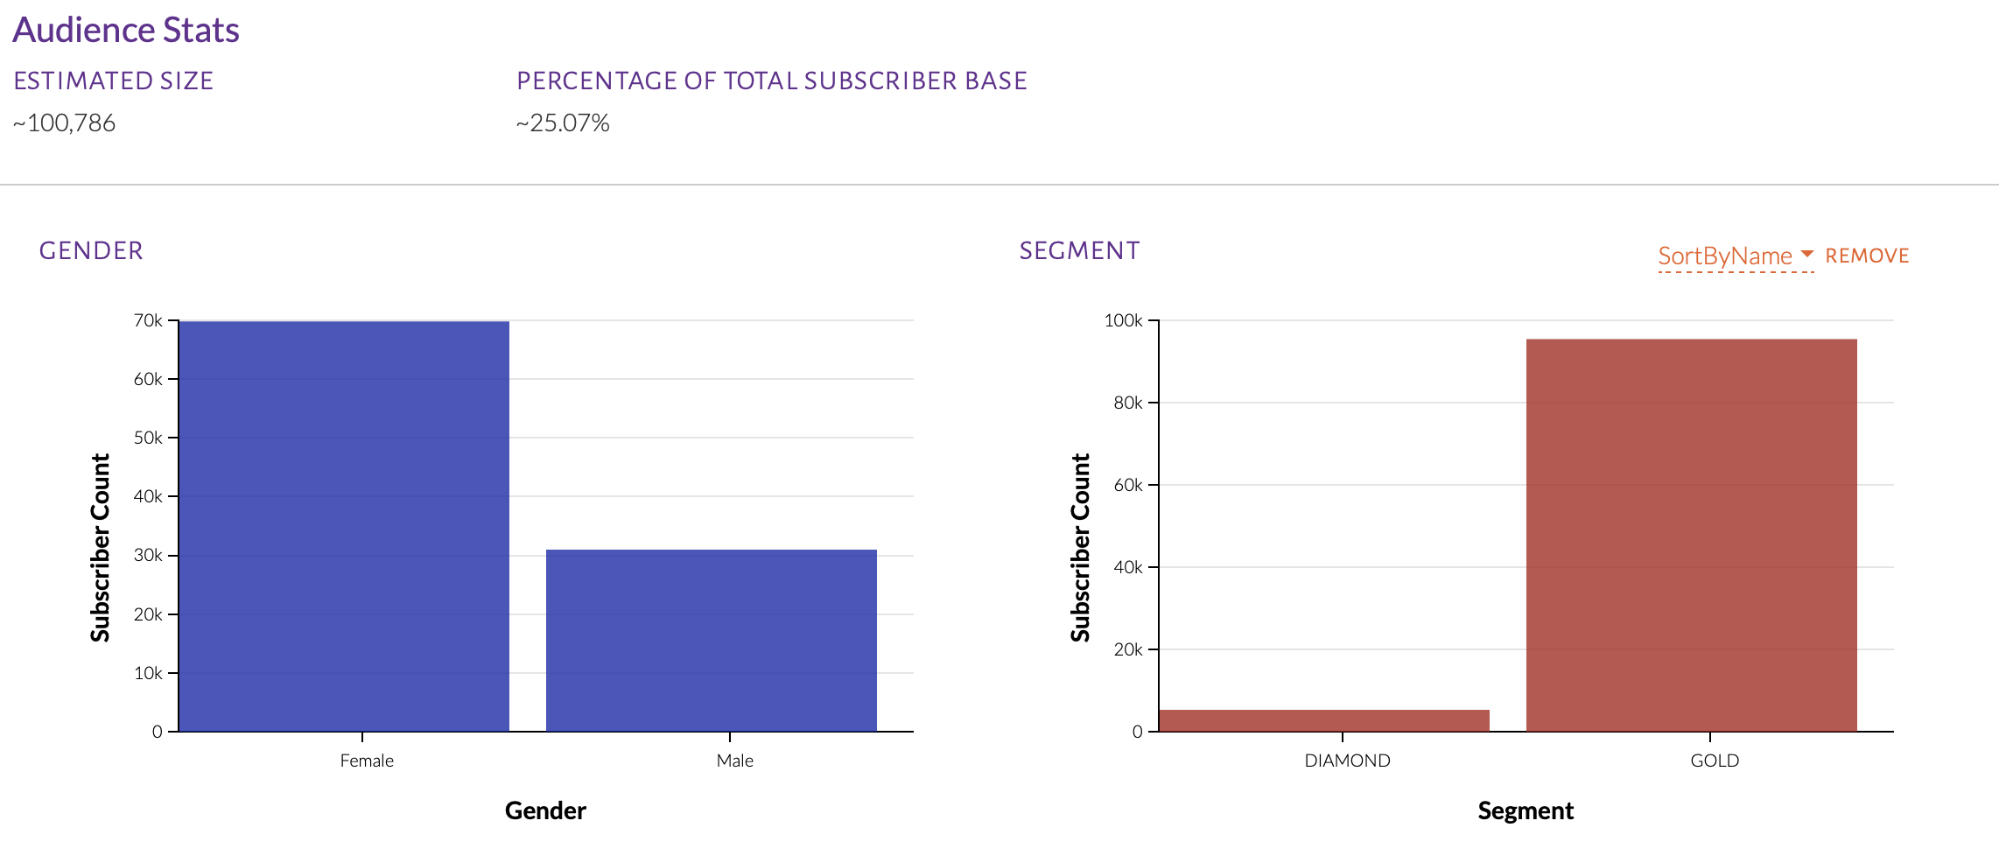
Audience metric charts
These charts can be reordered by hovering over the top right corner of each, as in the image below.

Chart options
Non-categorical charts have options to alter the time window and clicking the + and - buttons allows an increase or decrease the number of bars in the chart. This allows for a change in the range of each bin, as seen in the image below.
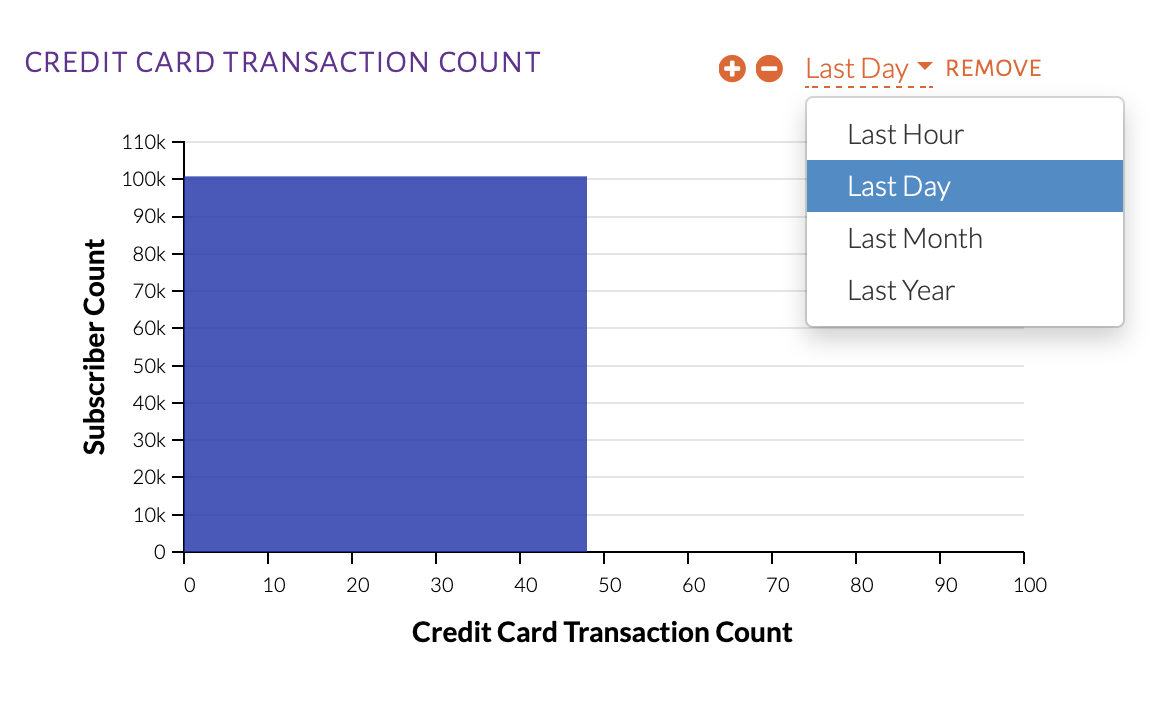
Chart options
Triggers
A number of options are available when selecting trigger conditions for an event. For better understanding of these options, we will explore different use-cases.
Multiple Trigger Conditions
An event can have more than one trigger condition. If more than one trigger is used, a customer can satisfy at least one to be qualified. This is similar to the Any of the following condition group.
Raw Trigger Condition
A raw trigger condition is a customized trigger condition. There may be a need to create a raw condition if the condition required cannot be found in the lists provided.
USE-CASE: Trigger is when a Freshers card is used to transact abroad
Summary of Steps:
From the Trigger Events pop-up, click Add Raw Trigger.
Select the Feed Name for the trigger to monitor.
Select an attribute/aggregation to filter by.
Set values of the chosen attribute/aggregation in condition.
Click the ellipses (…) on the condition group to add another condition.
From the Trigger Events pop-up seen in the image below, click Add Raw Condition.
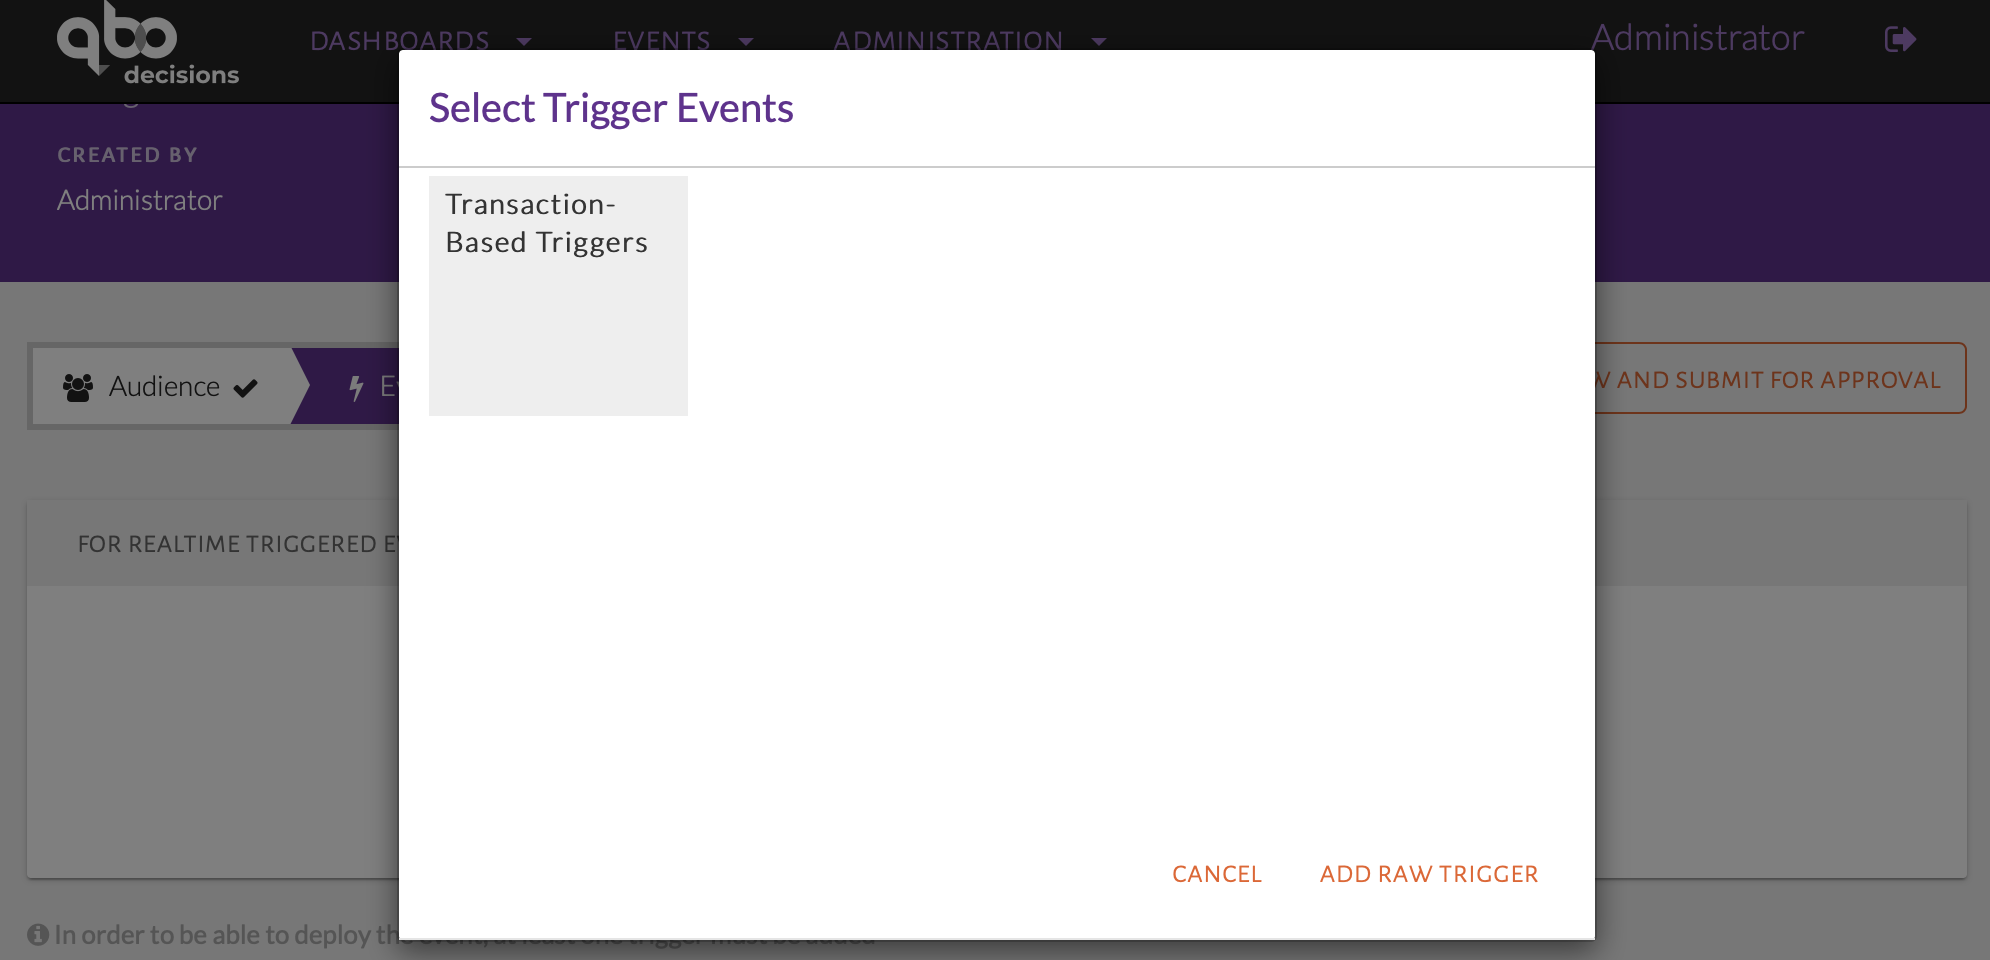
Add Raw Trigger Condition
The raw trigger will be displayed as in the image below where the user can select either a Feed Name or a Data Model for the trigger to filter by. A Feed is an organized set of attributes or aggregates. A Data Model is an abstract model that can be applied to different feeds.
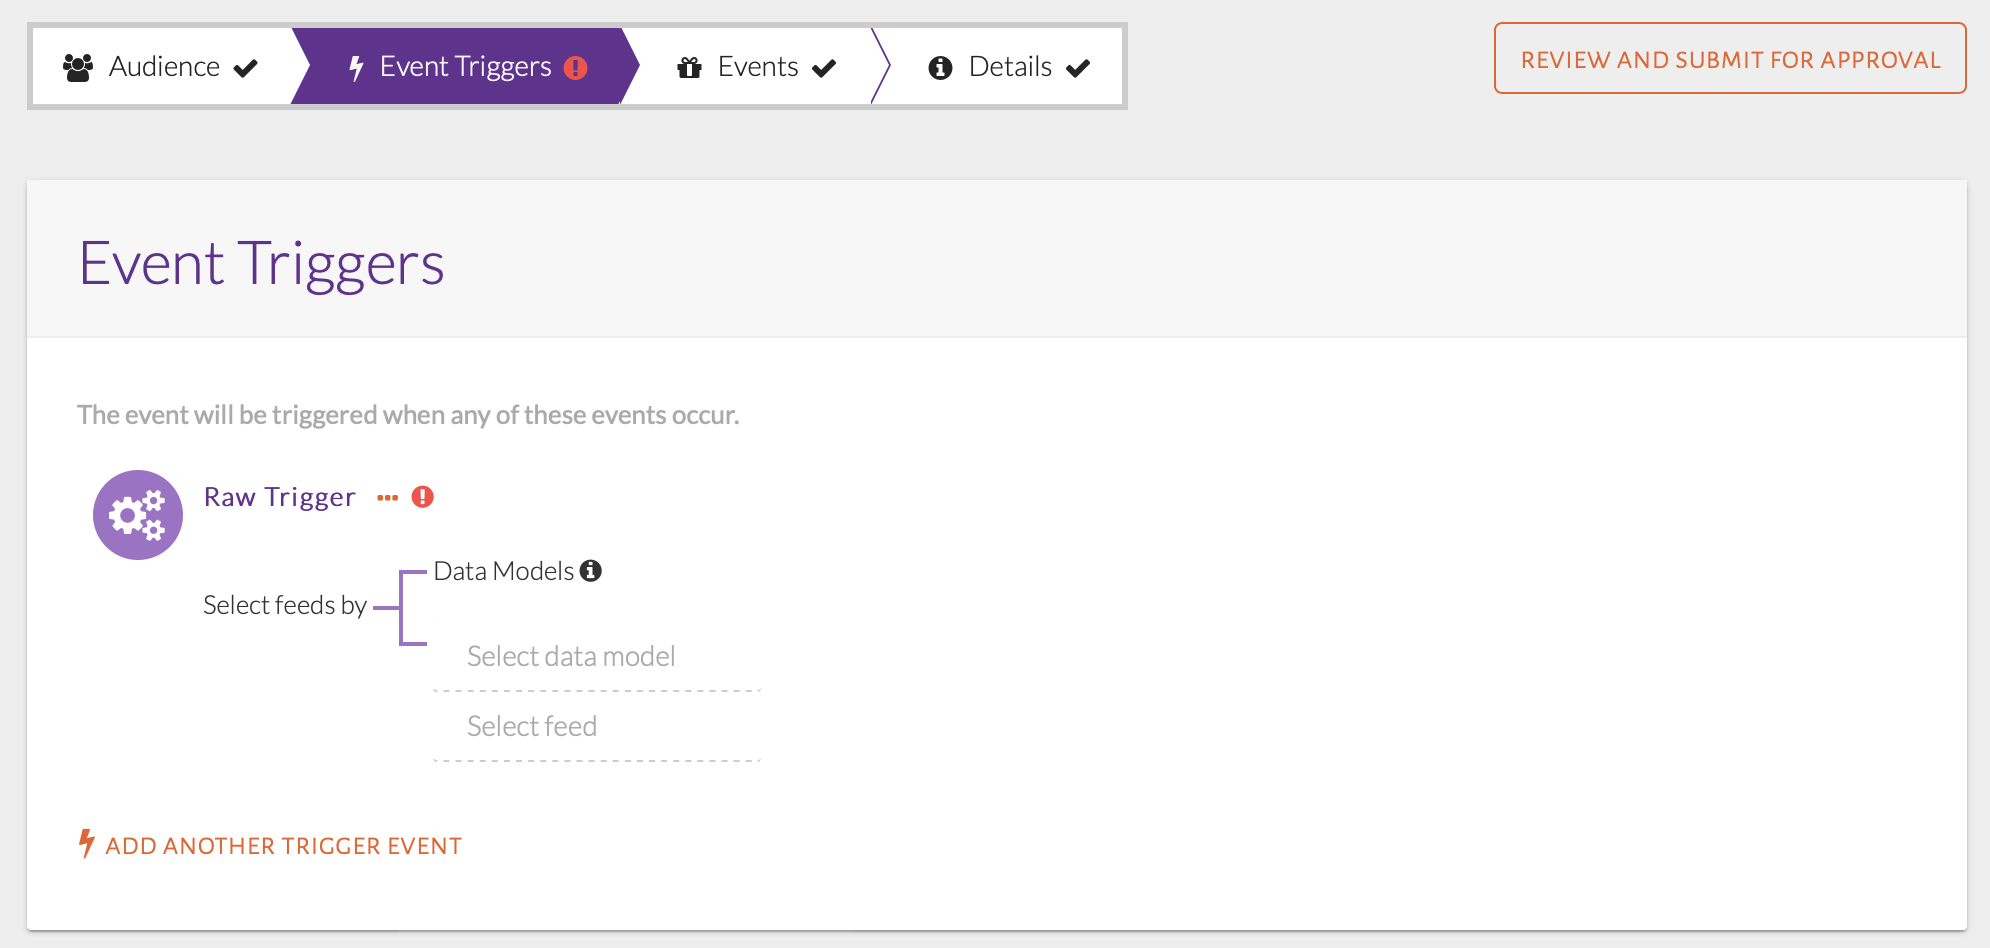
Raw trigger condition displayed
Clicking on Select feed will display the list of feed names to choose from, as seen in the image below. Each of these feeds contain sets of related attributes and aggregations. Select Feed Name as Transaction Based Triggers which represents the real-time credit card feed.
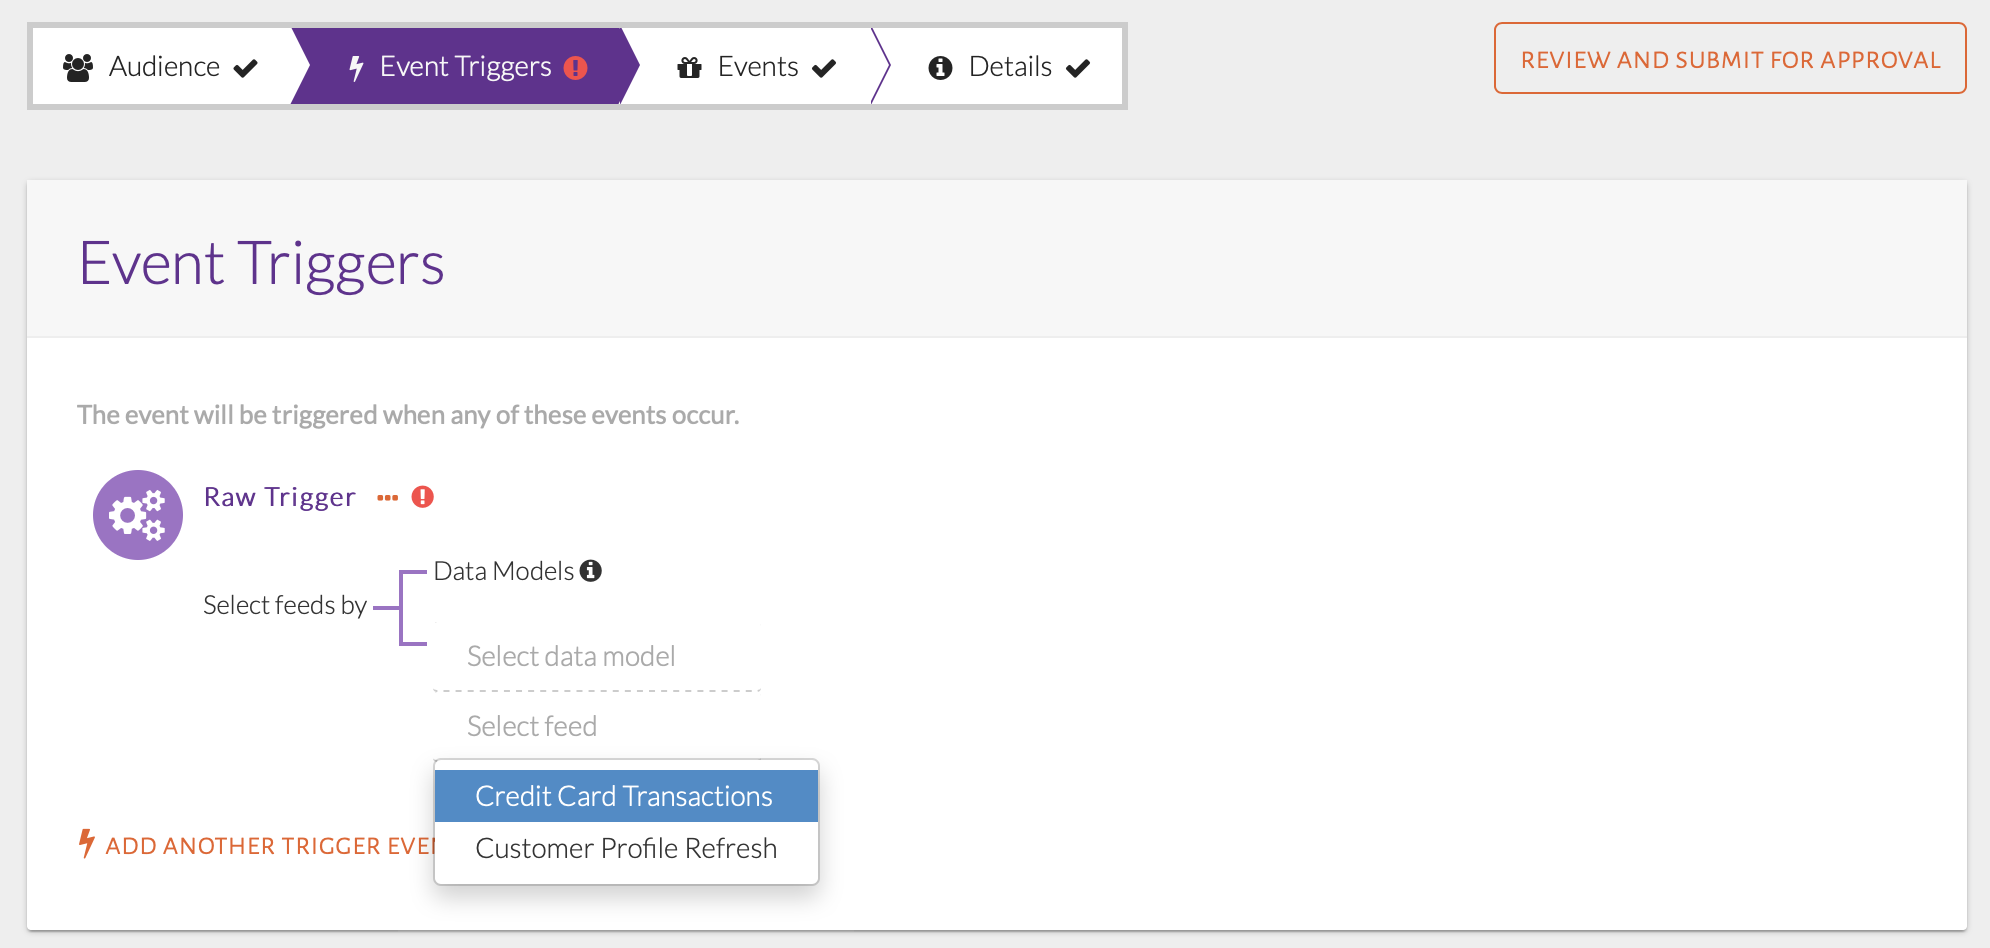
Filtering by feed name
Choosing this feed will display a condition group where the attribute or aggregation to be filtered by can be selected, as seen in the image below.
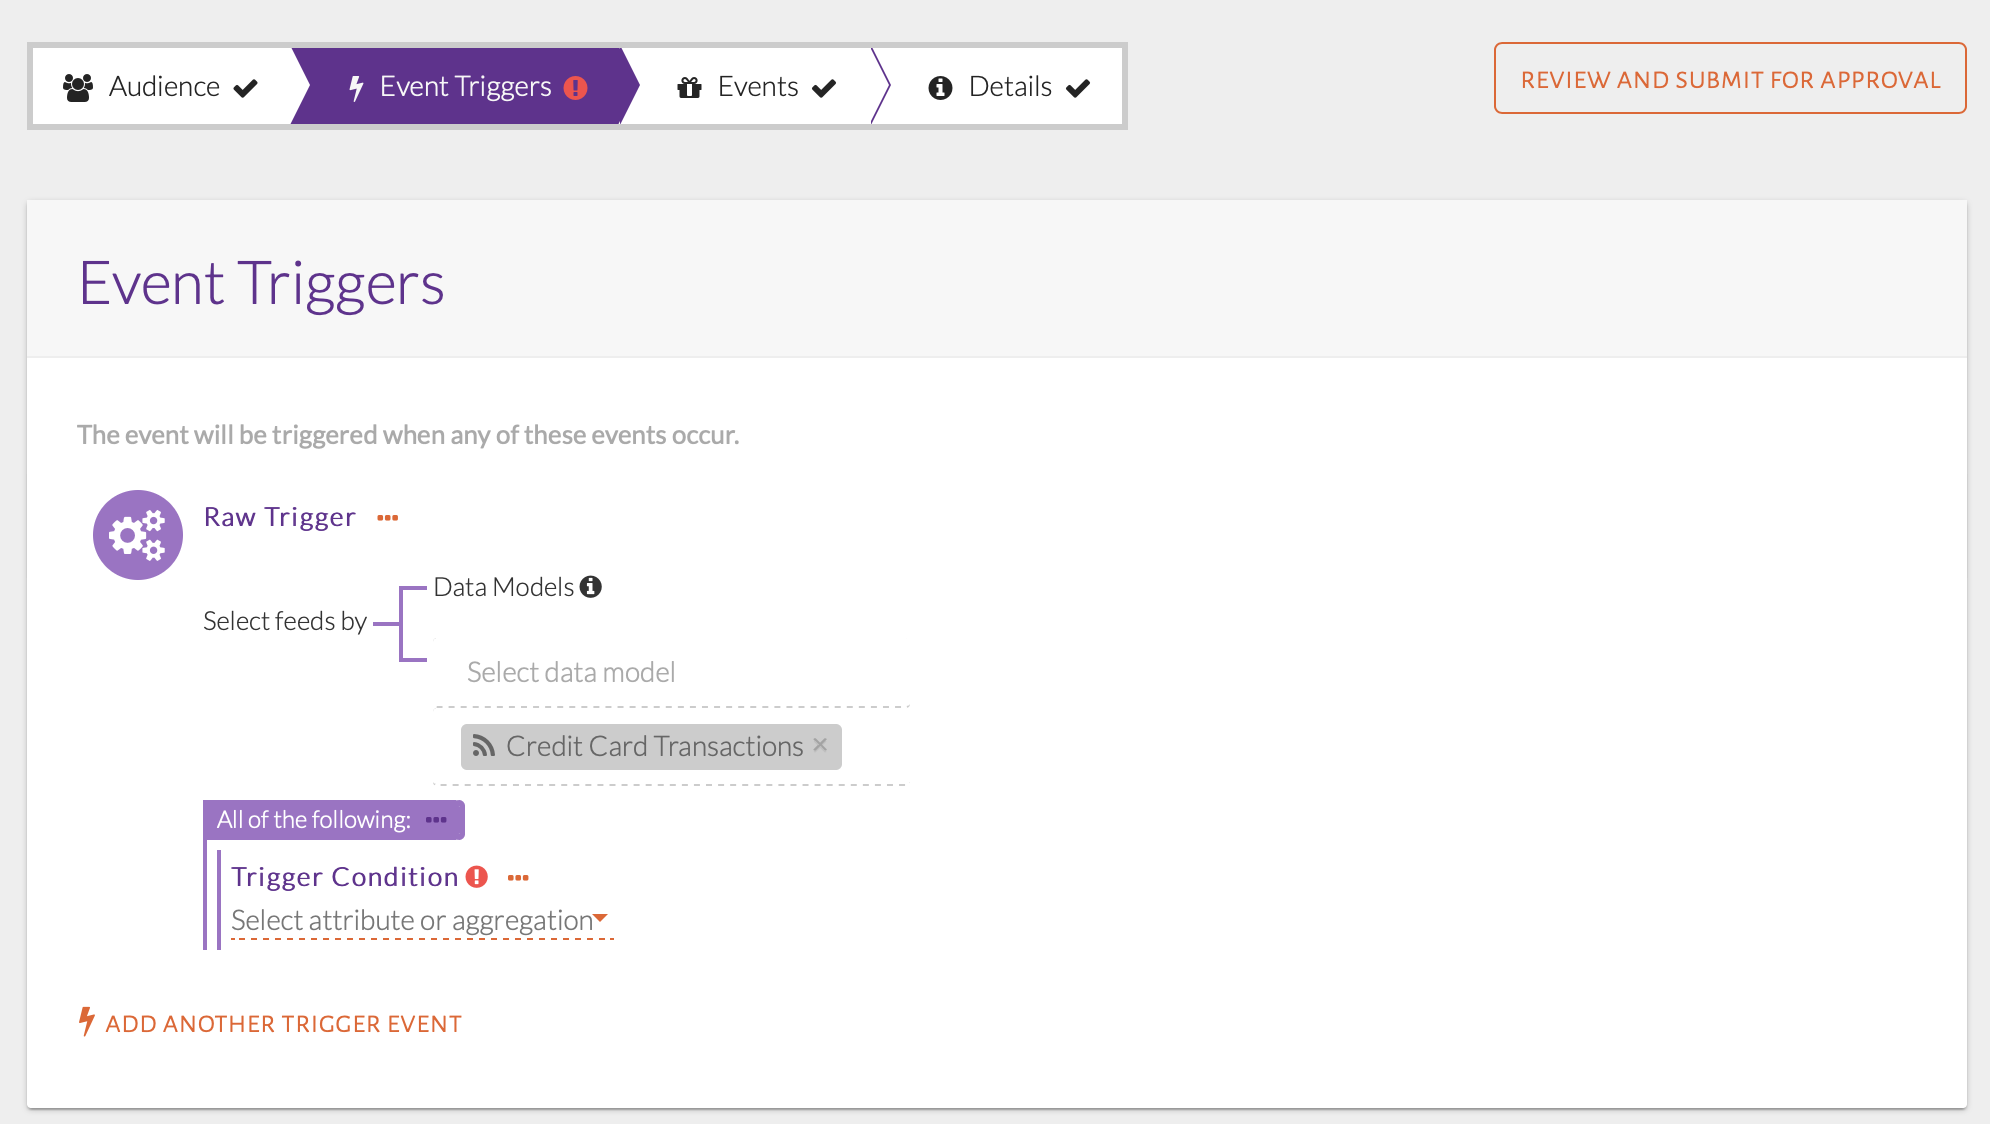
Choosing the Credit Card Transaction feed
A list of attributes and aggregations available for that feed will be displayed, as seen in the image below. Select transactionType. In our example, both attributes are expected to be present in Credit Card Transaction feed, otherwise another feed can be selected here.
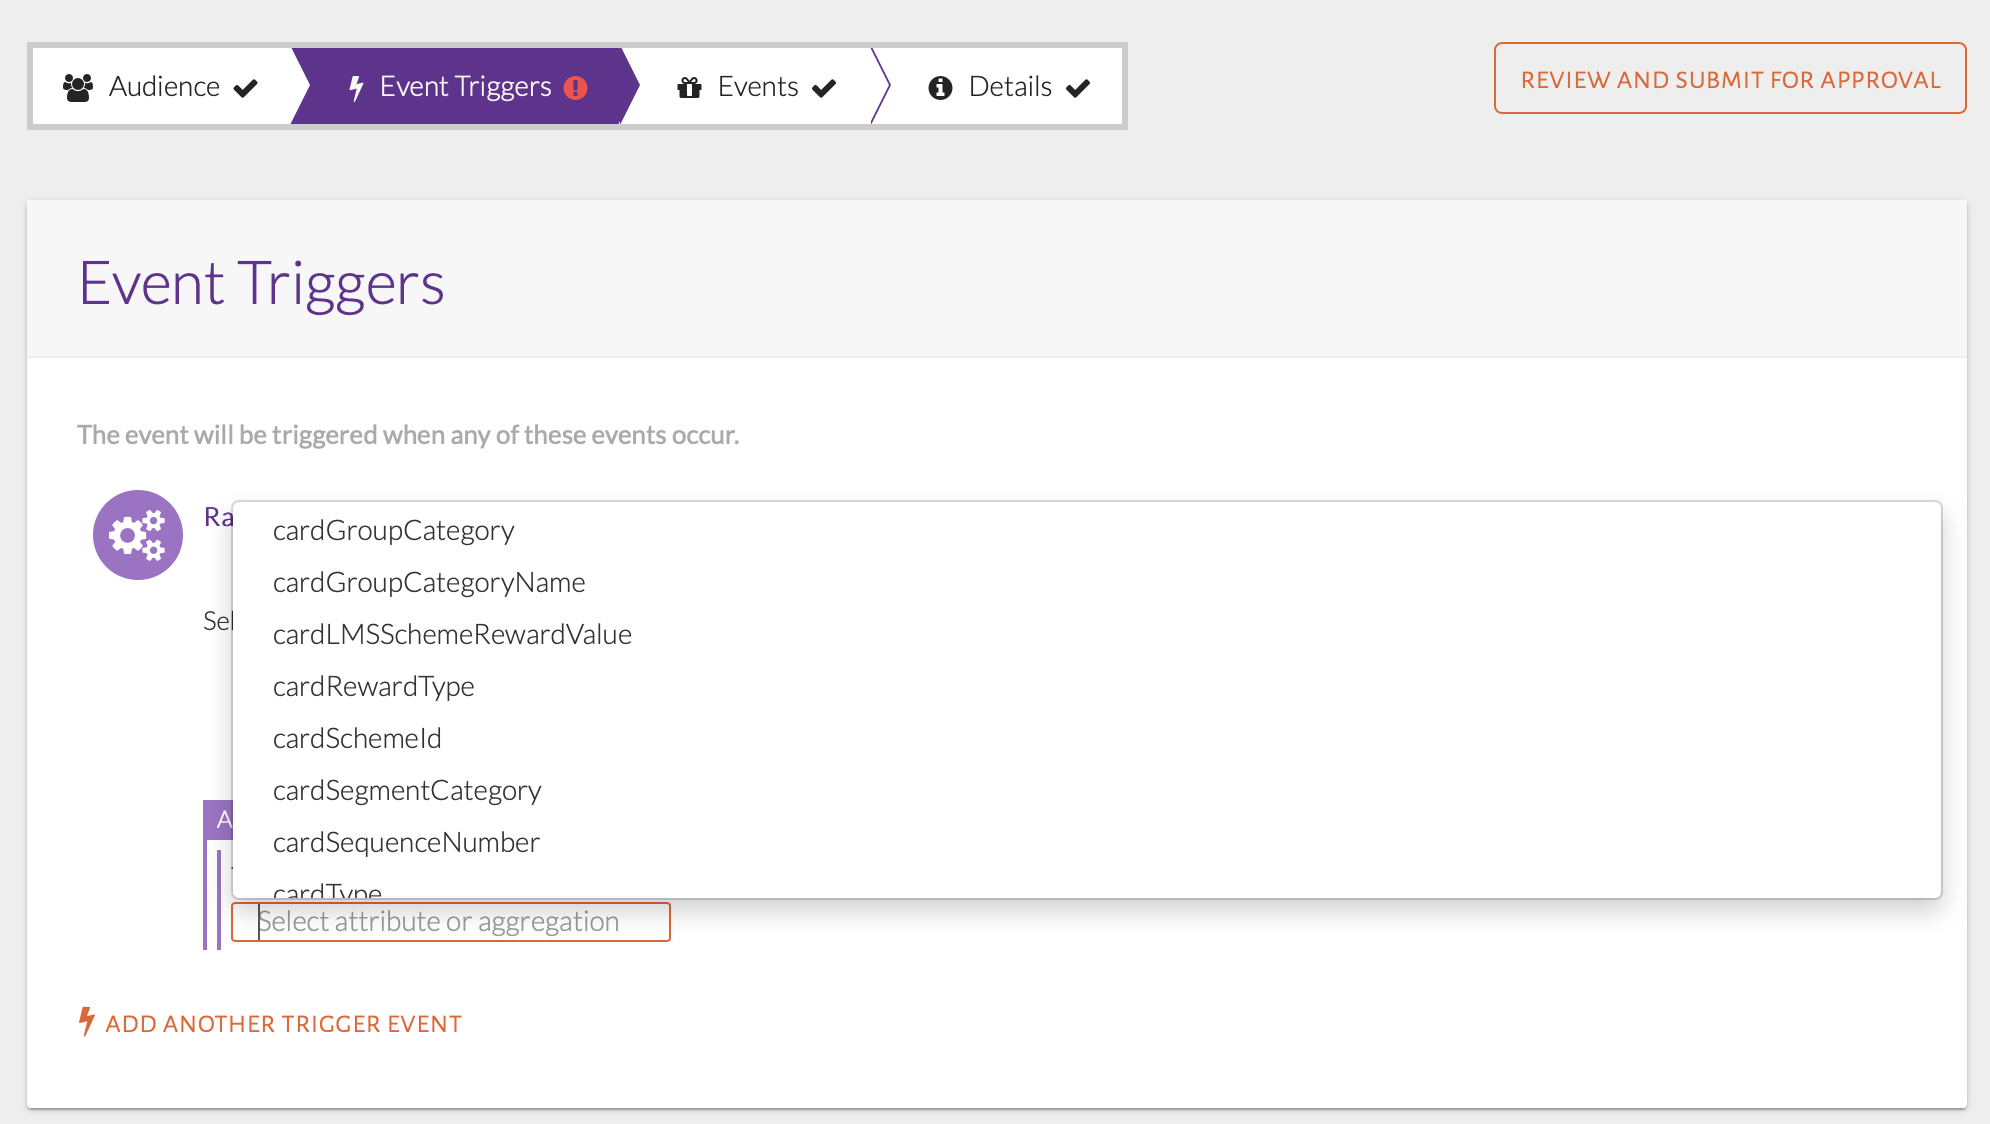
List of attributes and aggregations
Please select cardDescription and transactionCountry, which is equal to “Freshers” and “TW” respectively, in this example. The cardDescription attribute will be displayed, as seen in the image below.
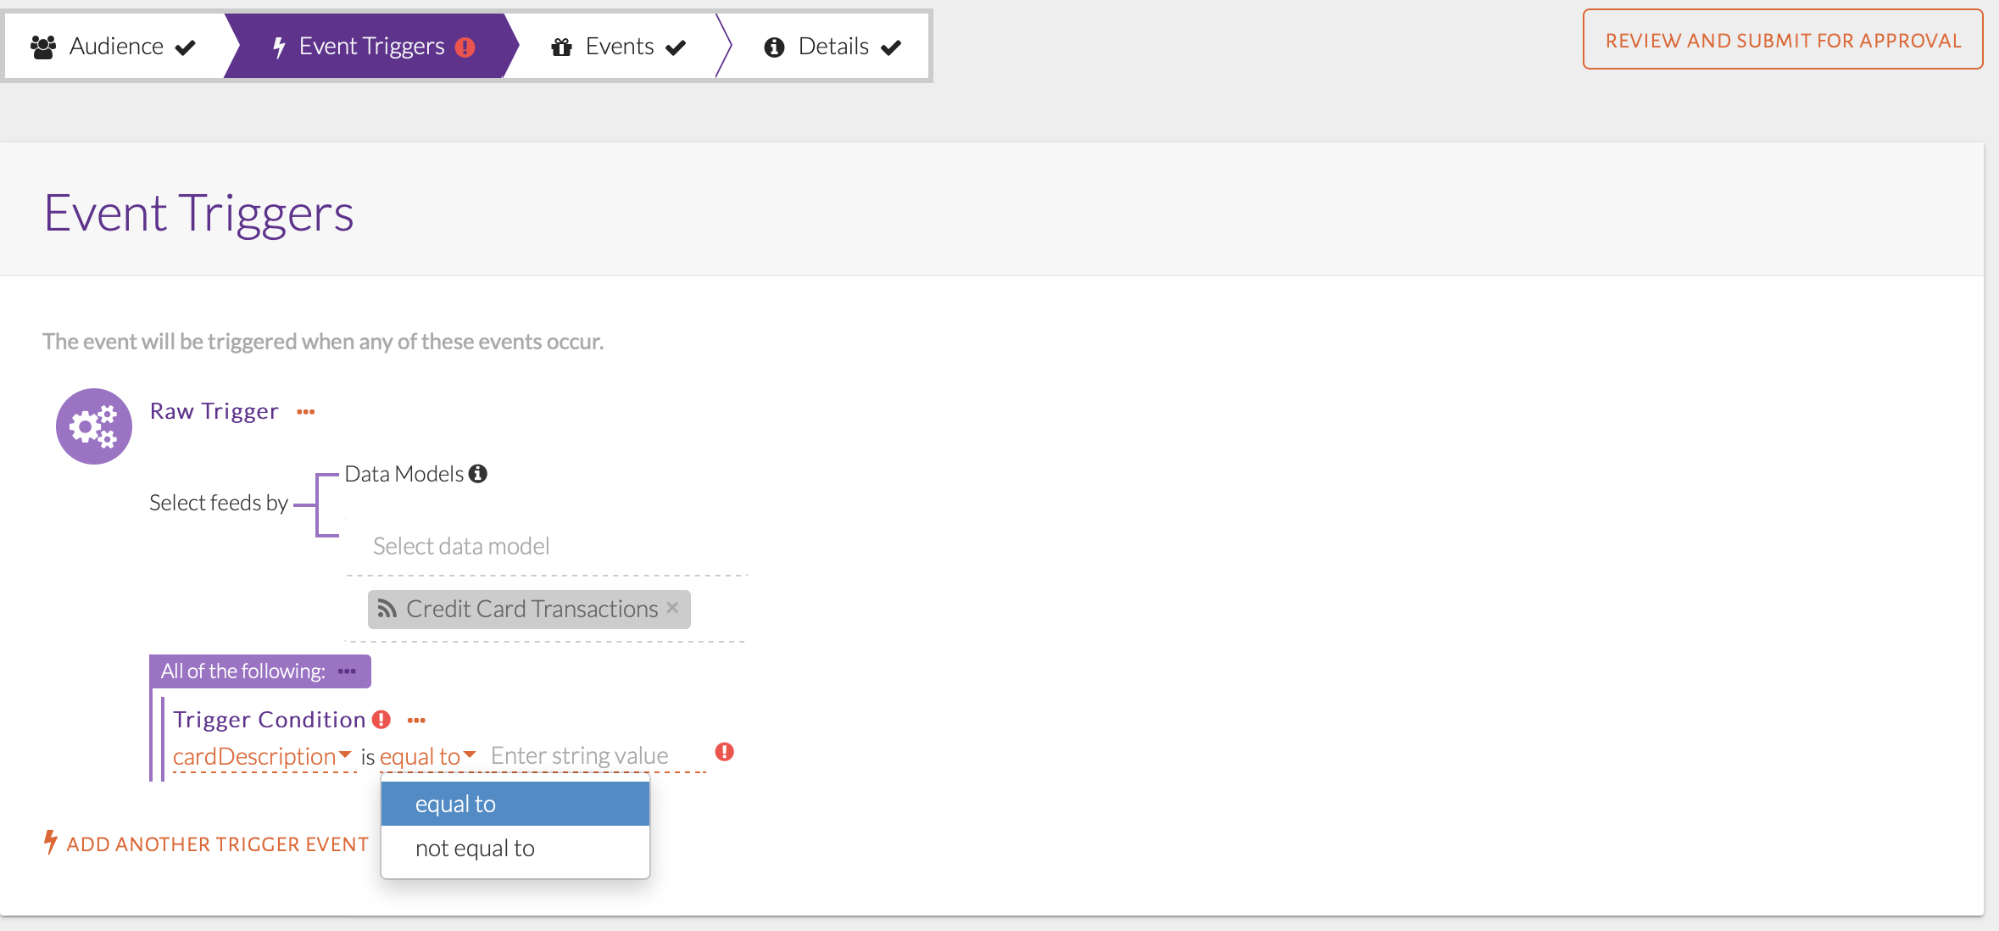
Setting up first condition of raw trigger
The operator will be displayed, as seen in the image below. Type the value that represents Freshers cards in the space provided, enclosed in double quotes as this is a String. The appropriate error condition will be displayed that can be used as a hint to what type of value is expected like a string, integer (number) or boolean (true/false).
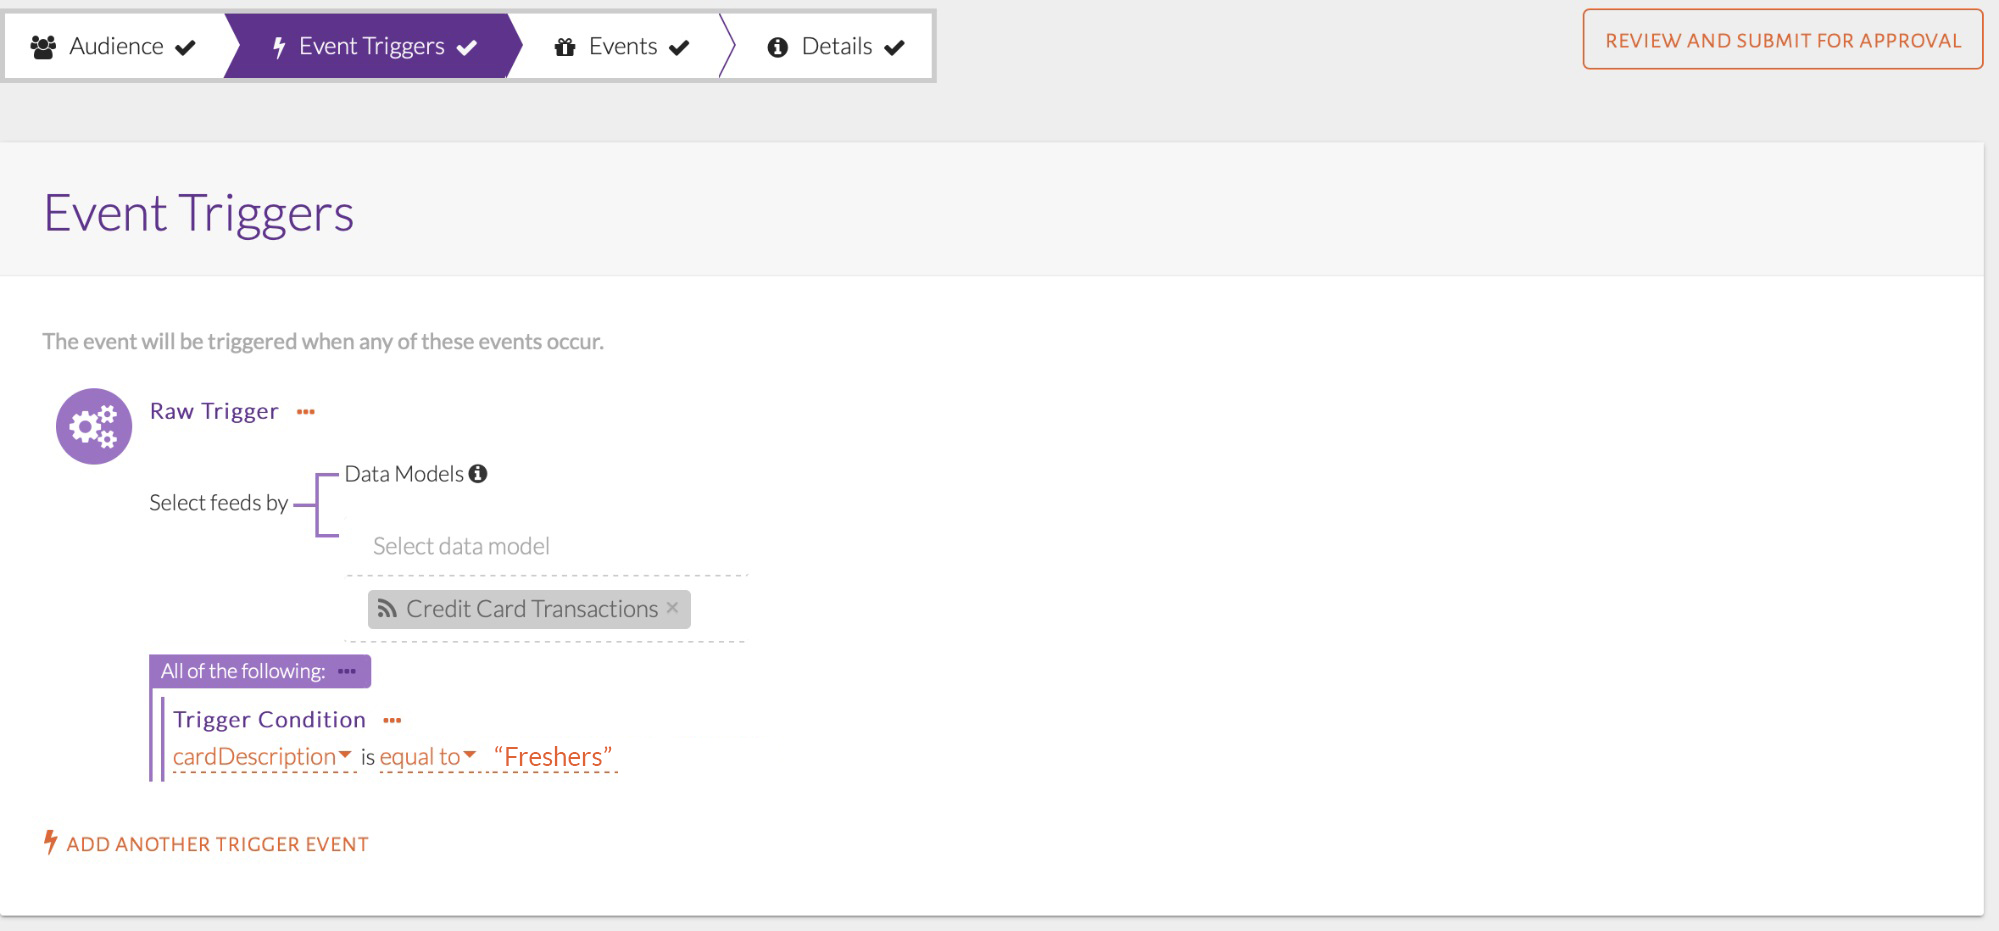
Specifying the transaction type enclosed in double quotes
Click the ellipses on the condition group to add another condition within that group, as seen in the image below. In our example, both attributes are expected to be present in Credit Card Transaction feed, otherwise another feed can be selected above.
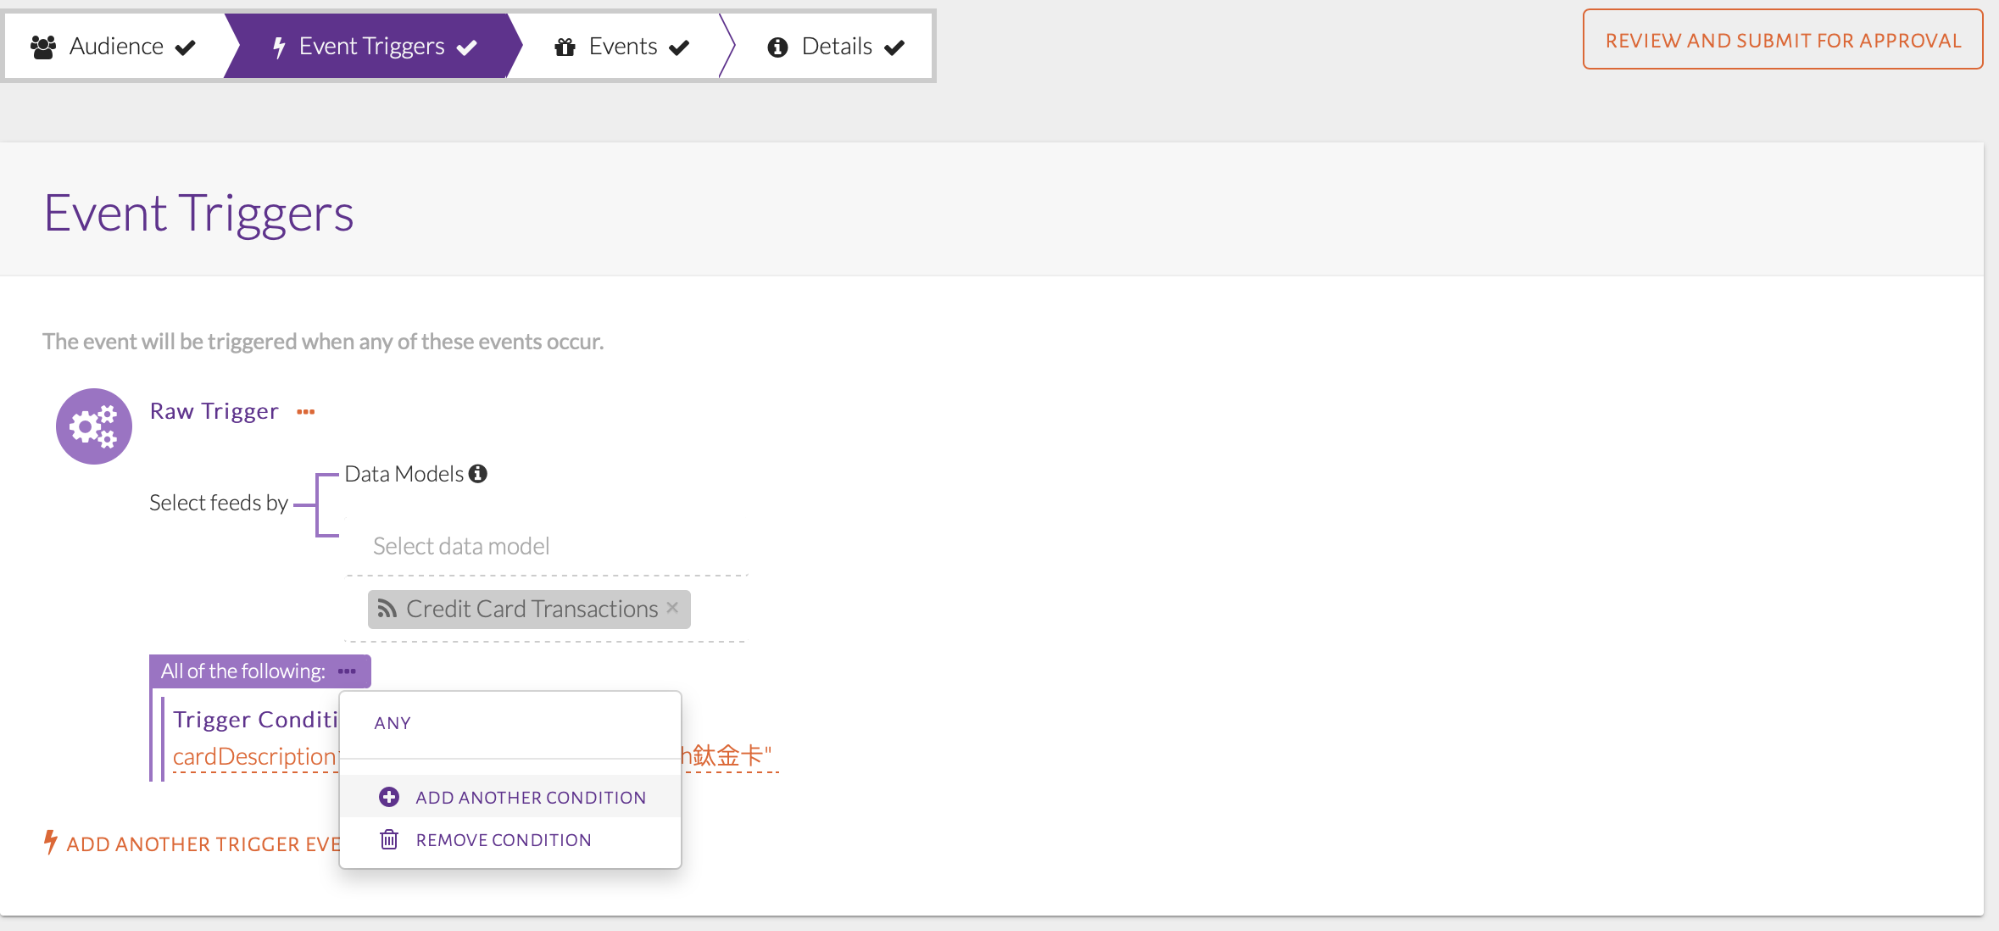
Options for trigger condition
A new raw trigger condition will be displayed, as seen in the image below. Specify transactionCountryCode values. This will be kept as an ALL condition group.
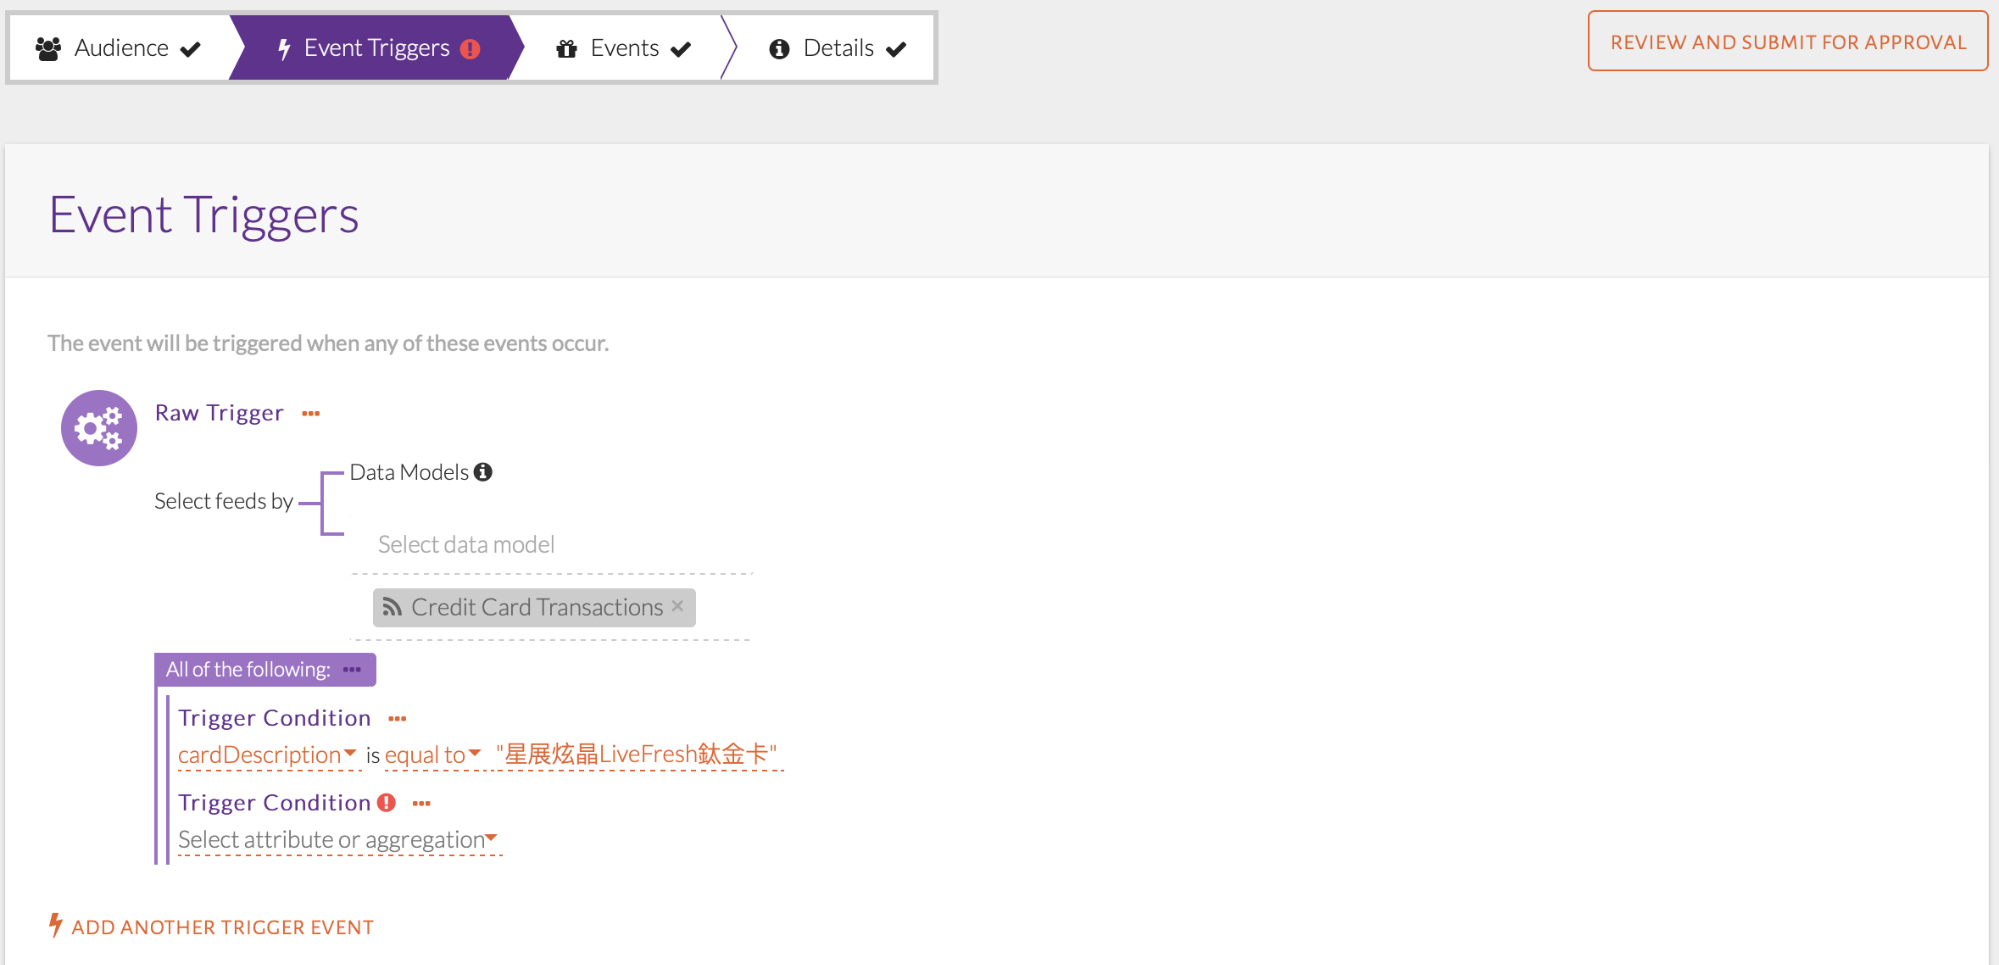
New raw trigger displayed
The final set of trigger conditions can be seen in the image below.
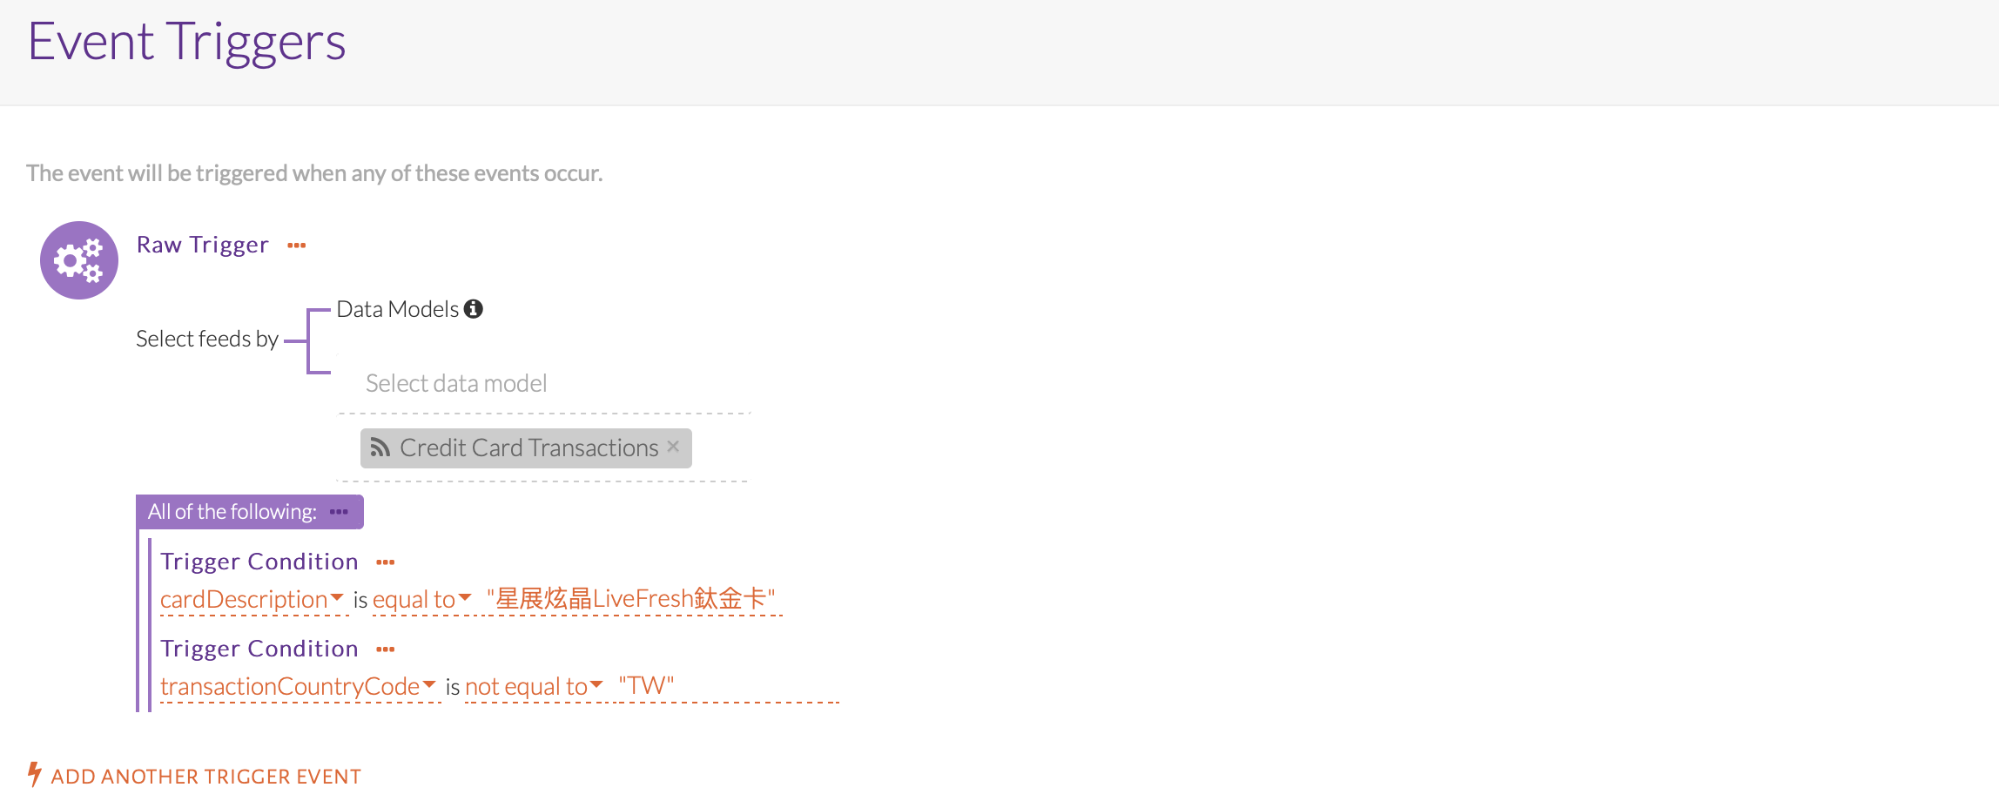
Final trigger conditions
The second condition filters whether the transaction has occurred abroad or not. The transactionCountryCode refers to the country where the transaction occurred. The code for Taiwan is TW, therefore a code not equal to TW refers to a transaction abroad. Note that the value for this condition is enclosed in double quotes.
Events
There are 2 event types to choose from: Message-Only & Action-Based. Both events require an Event ID and Endpoint to be selected. Additionally, the UI allows attributes from each data source to be selected which is forwarded to the chosen endpoint. For all events, we suggest selecting customer first/last name, email ID, phone number, and all relevant channel information (push note, email and text message) with their preference flags from the customer profile with customer ID (custID) and transaction date time (sysDateTime) from real-time attributes.
The checkbox “Mark all events as a non-marketing event message” disables our default global contact policy check. This default is currently set to limit the outgoing events to 50,000 in 1 day, per customer, across all events. There is also an event level contact policy that can be configured in the Details tab.

Global event settings
In order to better understand each event option, we will explore different use-cases as we have done above.
Message-Only Events
Message-Only events are used when an event needs to be sent out each time audience & trigger conditions are met. This is the default selection in the Events tab. Inputs to be provided are shown in the image below. Mandatory fields are marked with an asterix in the UI, without which the user cannot progress.
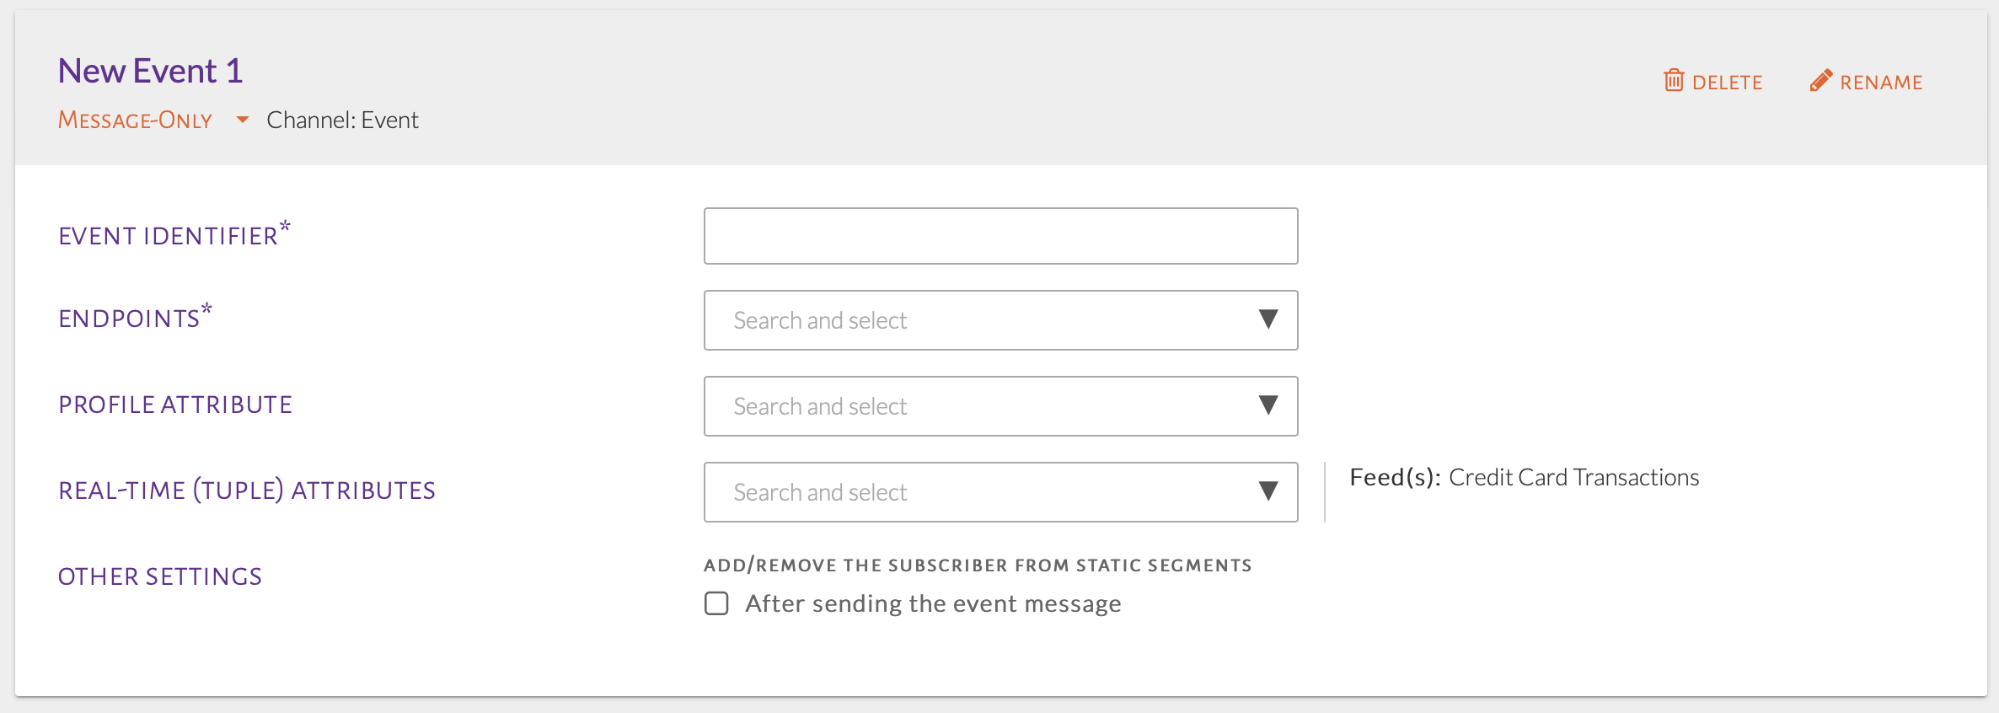
Message-only event
Event Identifier & Endpoints selection is mandatory. The image below contains a sample event ID. It is important that this ID matches with the one expected by the endpoint systems (Application or DB) so that stitching together events with offers is seamless. Endpoints should be selected
based on if the event is real-time (Application) or batch (DB). Both can be selected as shown in the image below.
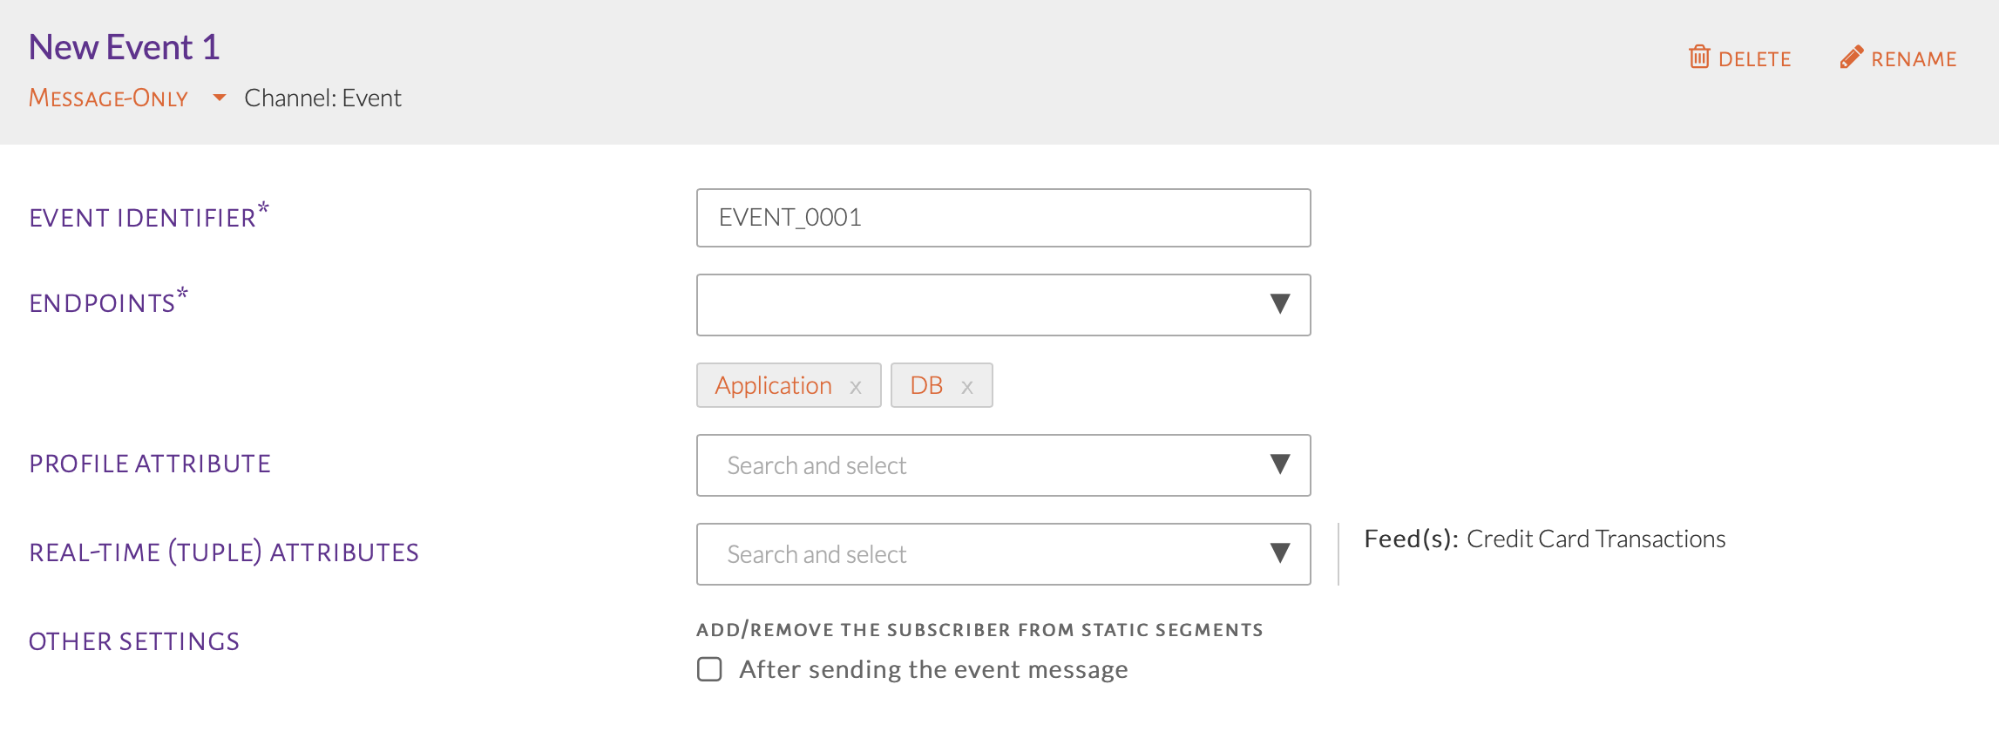
Event ID & endpoints selected
The Profile & Real-time Attributes dropdowns provide all attributes being ingested by either data source to be selected by the user. Multiple attributes can be selected based on what is expected by the downstream systems. For the real-time source, the Feed(s) with attributes present for selection are displayed on the right. Currently, we are only ingesting Credit Card Transactions in real-time.
The image below shows how attributes can be searched for and selected. Continuing our previous use case, with trigger conditions identifying usage of Freshers card for international transactions, we can choose to forward transactionAmount.
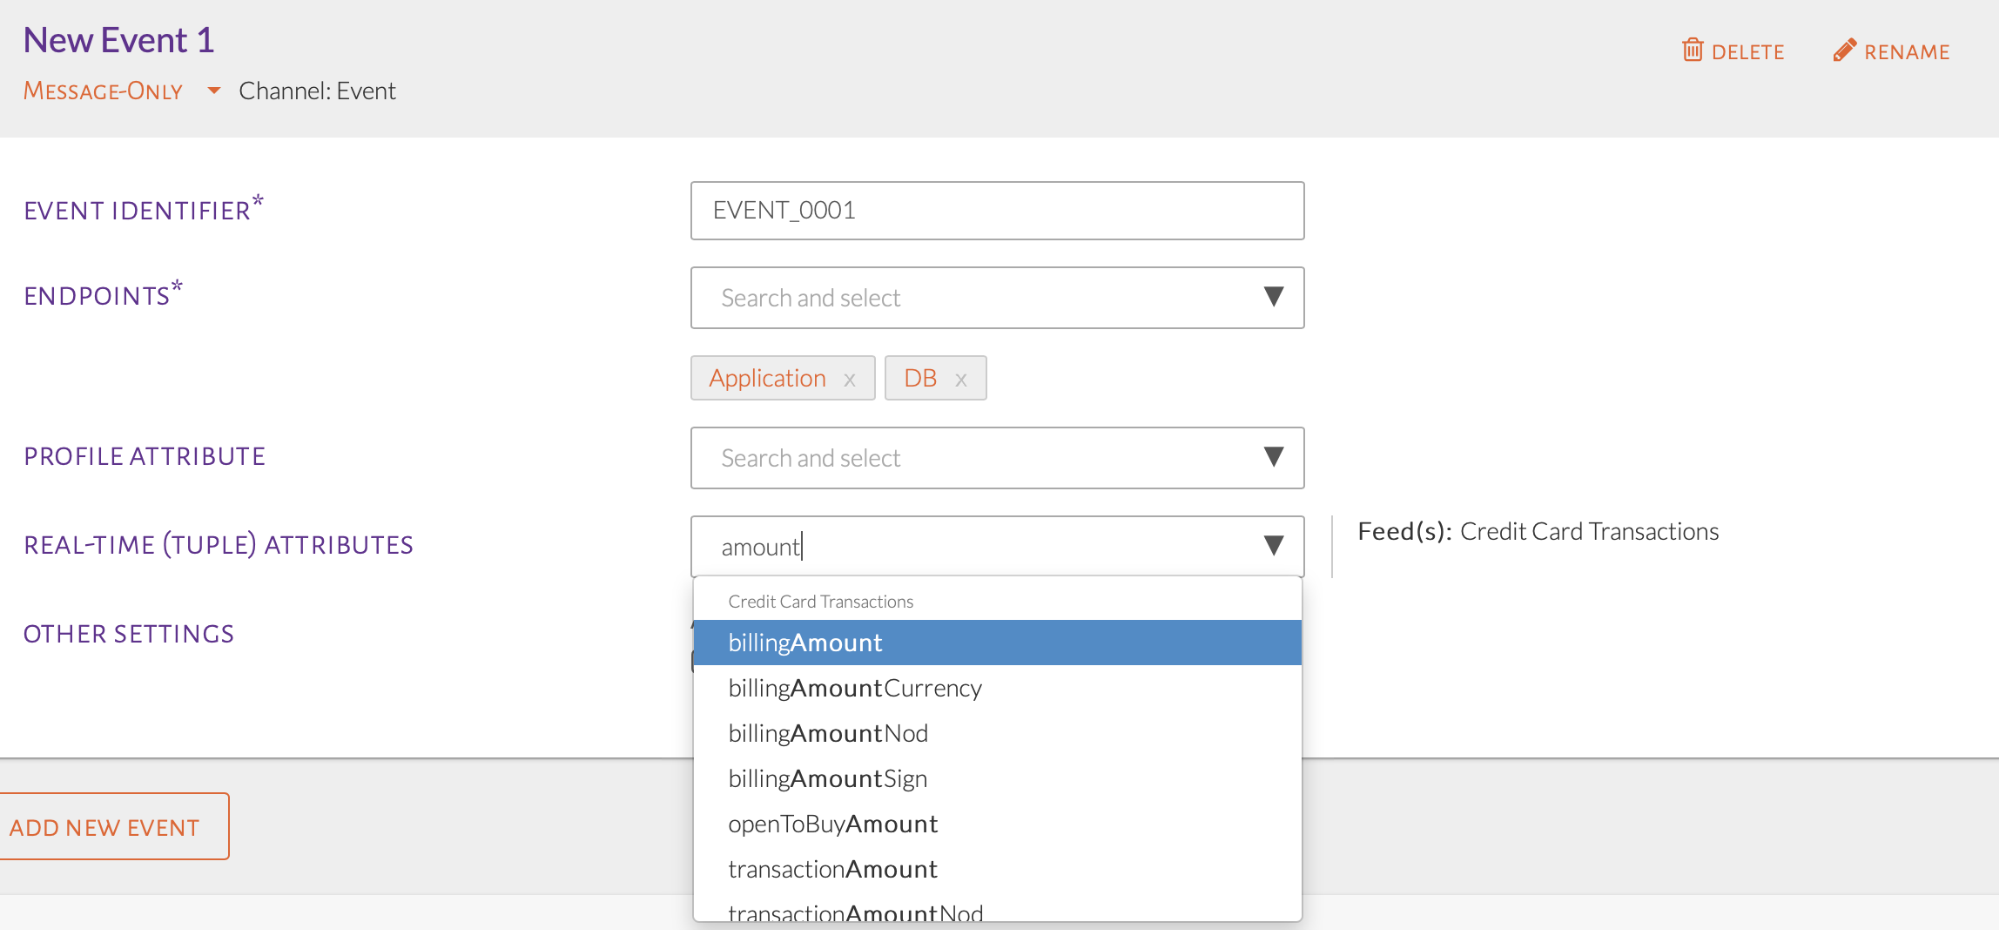
Real-time attribute search
Similarly, we can choose to forward profile attributes as well, for offer personalization. Final attributes selected are shown in the image below.
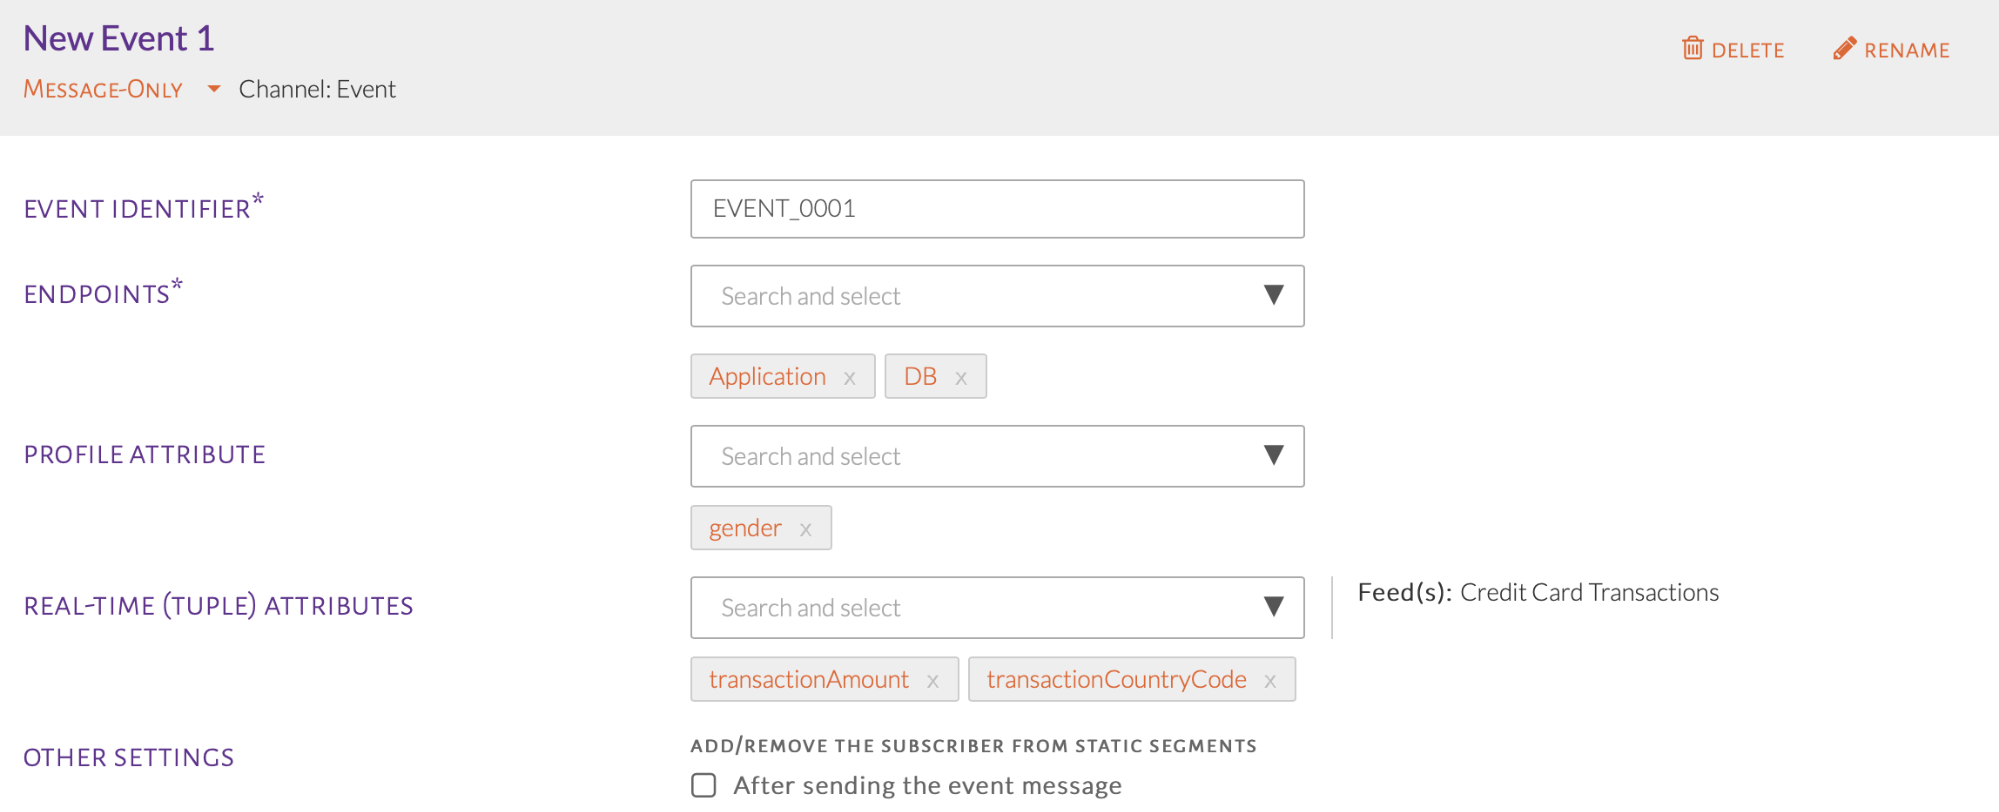
Final event selection
Action-Based Events
For Action-Based Events, the customer must complete an action to receive the product of an event. Time-based & Milestone-based reminders can be added as well.
USE-CASE: Inform customer that if they spend a total of NT 15,000 on Sports Goods (運動嗜好) within 7 days they will receive a discount on sports goods
Summary of Steps:
From the Events page, select Action-based and fill up general event information.
Select Event Action.
Fill in the Action details.
Set Time-Based Reminders and/or Milestone Reminders.
Fill in the Fulfillment Event information.
Select Action-Based as shown in the image below and add in the information as seen in below.
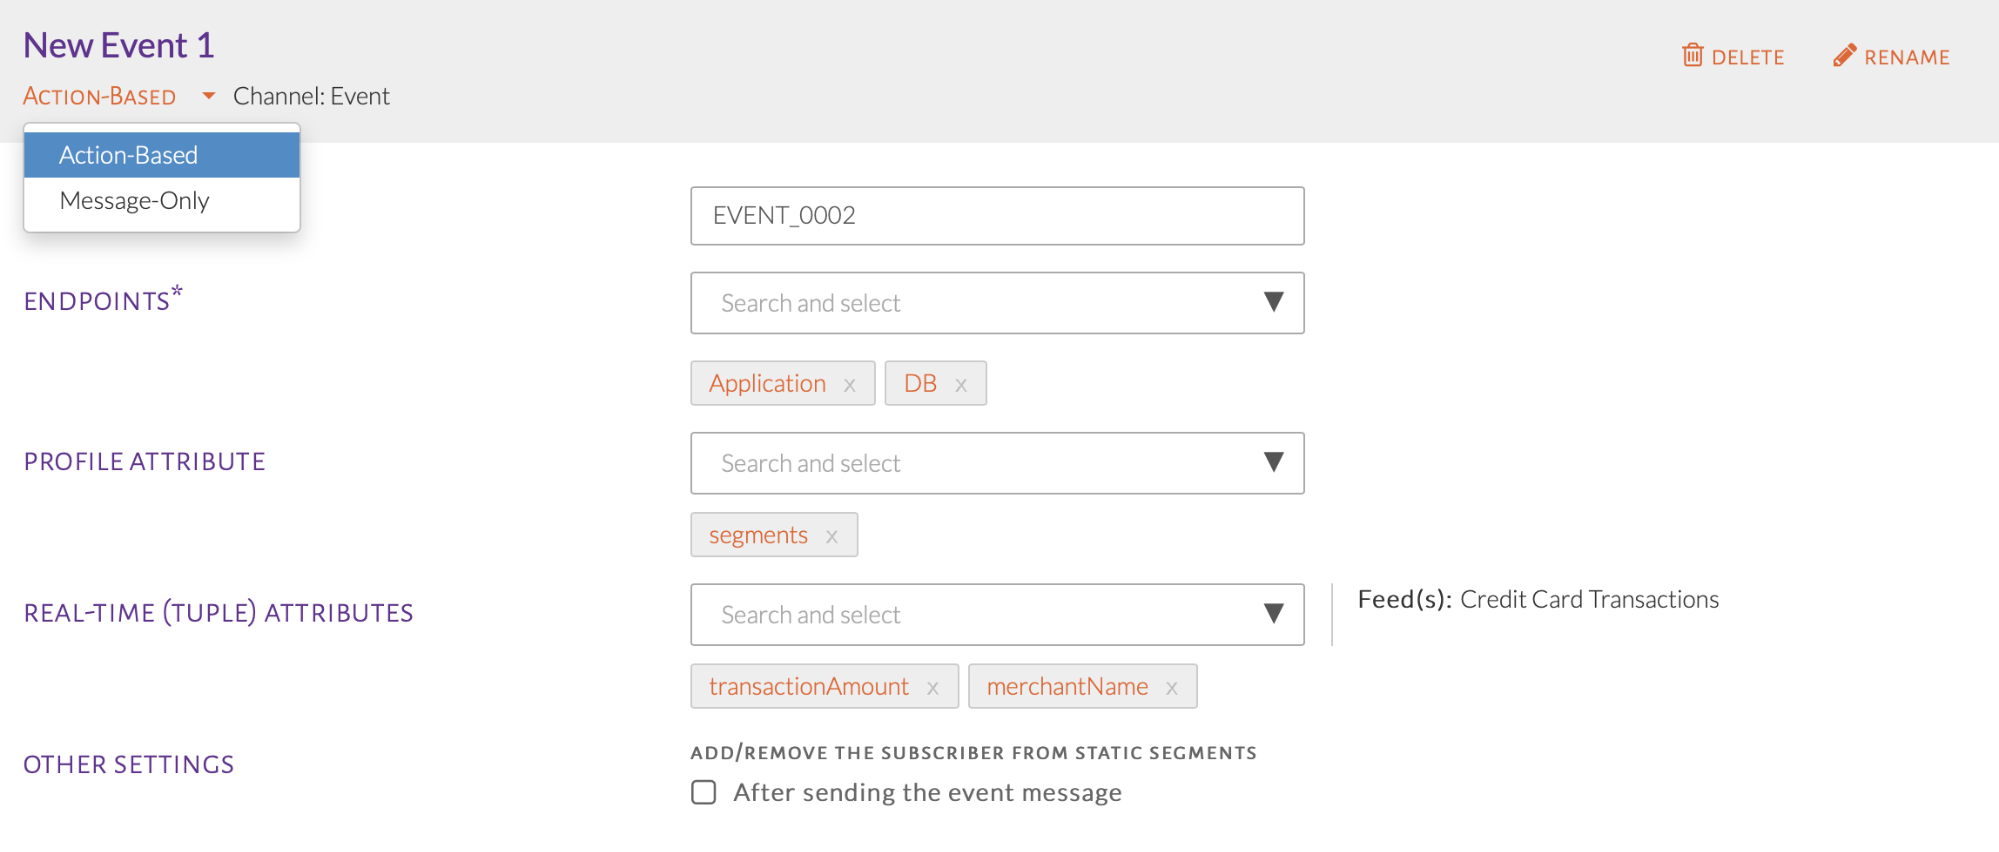
Action-based event
Next, select the desired event action, as seen in the image below. Among the customers qualified for the event, this filter will monitor which customers performed a specified action. For this example, select Cumulative Transaction as we want to monitor the total spend amount in a given time period.

Event action options
The Single Transaction option will monitor the transaction amount but for a single transaction only, in a given period of time. Cumulative Count of Transactions monitor the number of transactions in a given time period. Do note that for the Cumulative Count option, the threshold does not take into consideration the message that has been sent out the first time a customer fulfills the trigger and audience conditions.
For all selected actions, filters can be added to all of these options as well. Add in the target amount of $15,000 and time limit of 7 days as per our example use case. This is shown in the image below.

Cumulative transactions
Filters can be implemented as shown in the image below. These are in addition to the audience and trigger configurations and can be modified similarly.
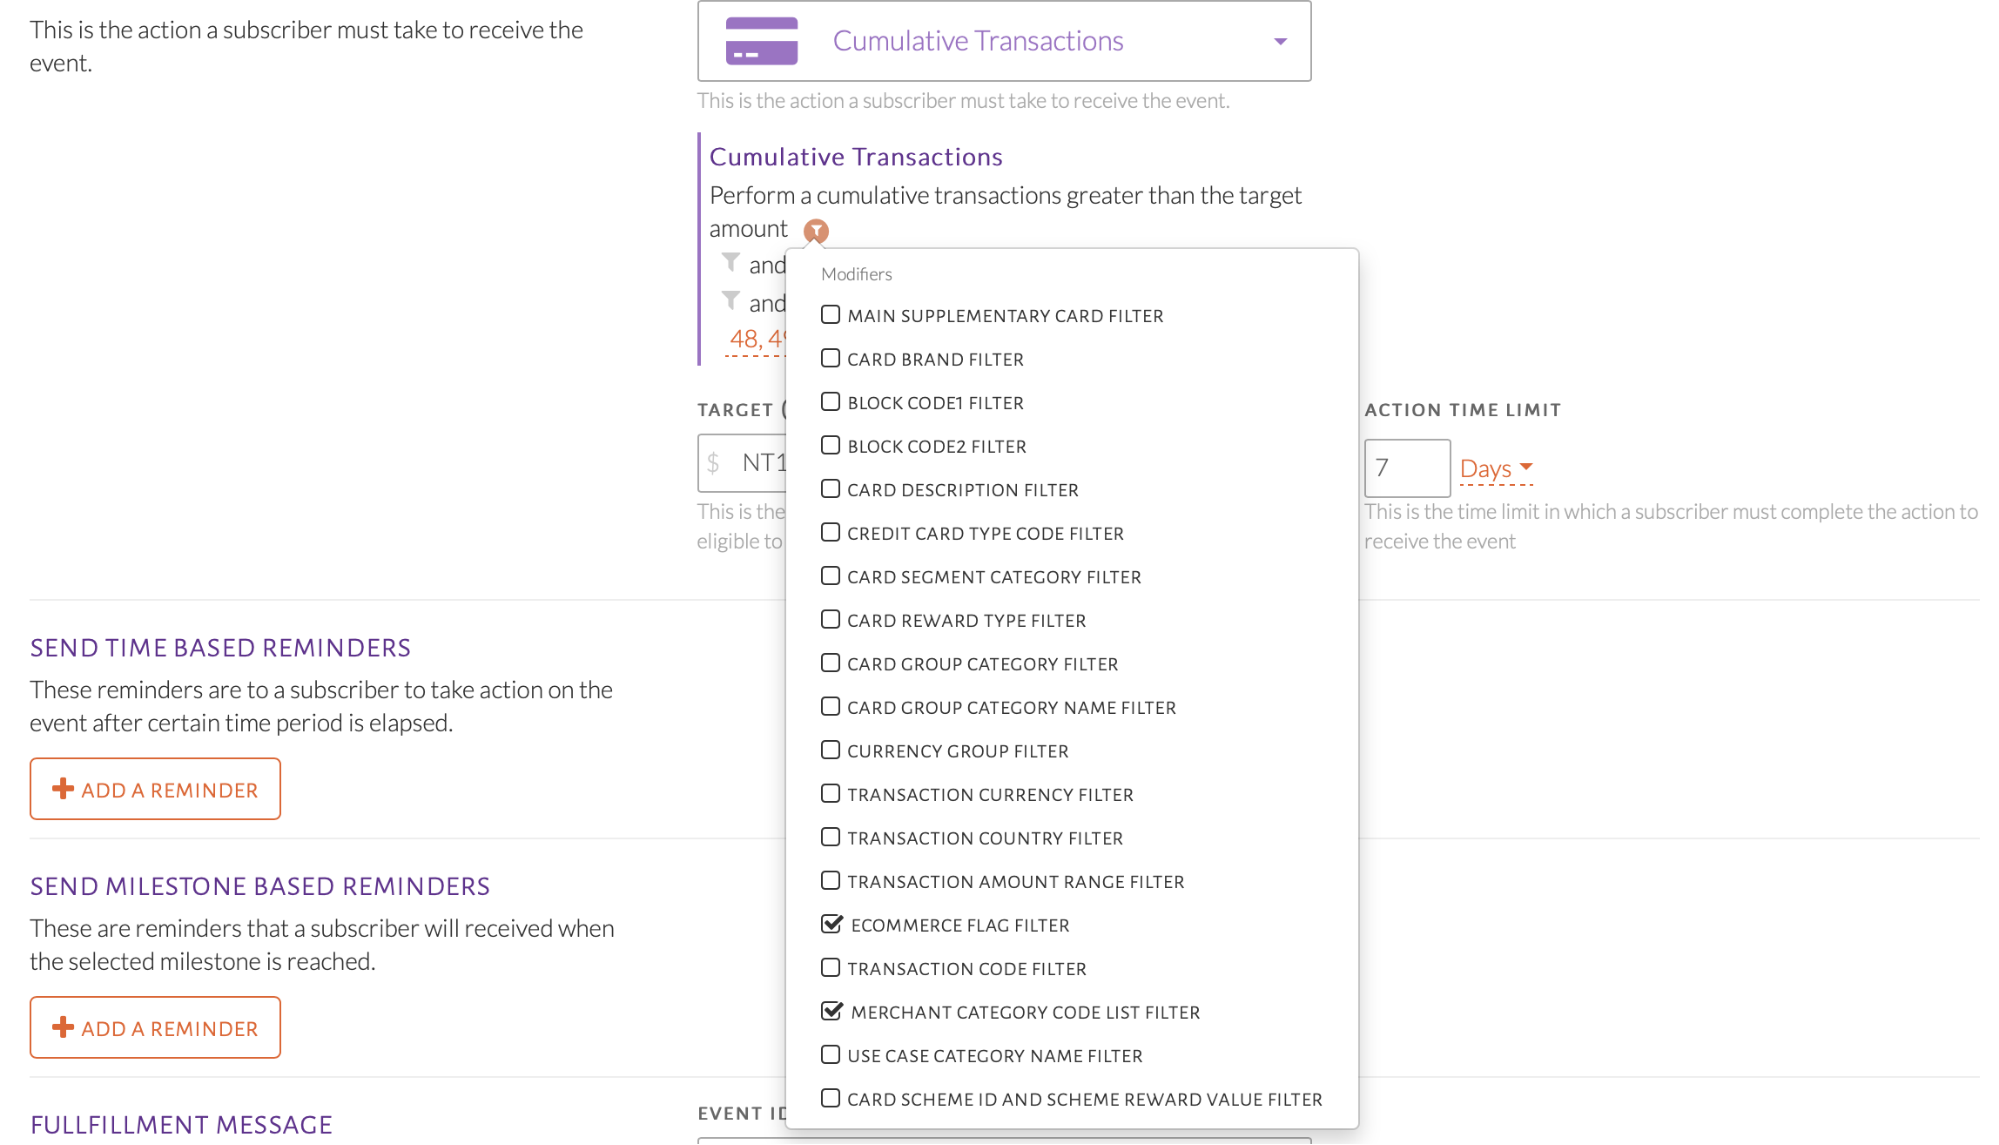
Cumulative transaction filters
Final filter selection shown in the image below. As a result of this setup, the downstream systems will receive a message once the amount and time period conditions are met. The message received is defined in Fulfillment Message, mentioned below after reminders.

Final filter selection
Reminders can also be set by clicking Add a Reminder. Time-Based Reminders send a message to the customer based on the amount of time that has passed, which can be specified. Milestone-based Reminders send a message to the customer based on the purchase amount the customer has reached, which can be specified. These can be seen in the image below. For Cumulative Transactions, both reminders are possible and so are available for selection.

Reminders in an event
Upon clicking Add a Reminder to both options, the same options as a message-only event appear with a time and amount threshold for time and milestone based reminders respectively. The image below shows these fields. Once those thresholds are reached, another event is triggered by the system and forwarded to the selected downstream systems. Multiple time and milestone based reminders can be set as required.
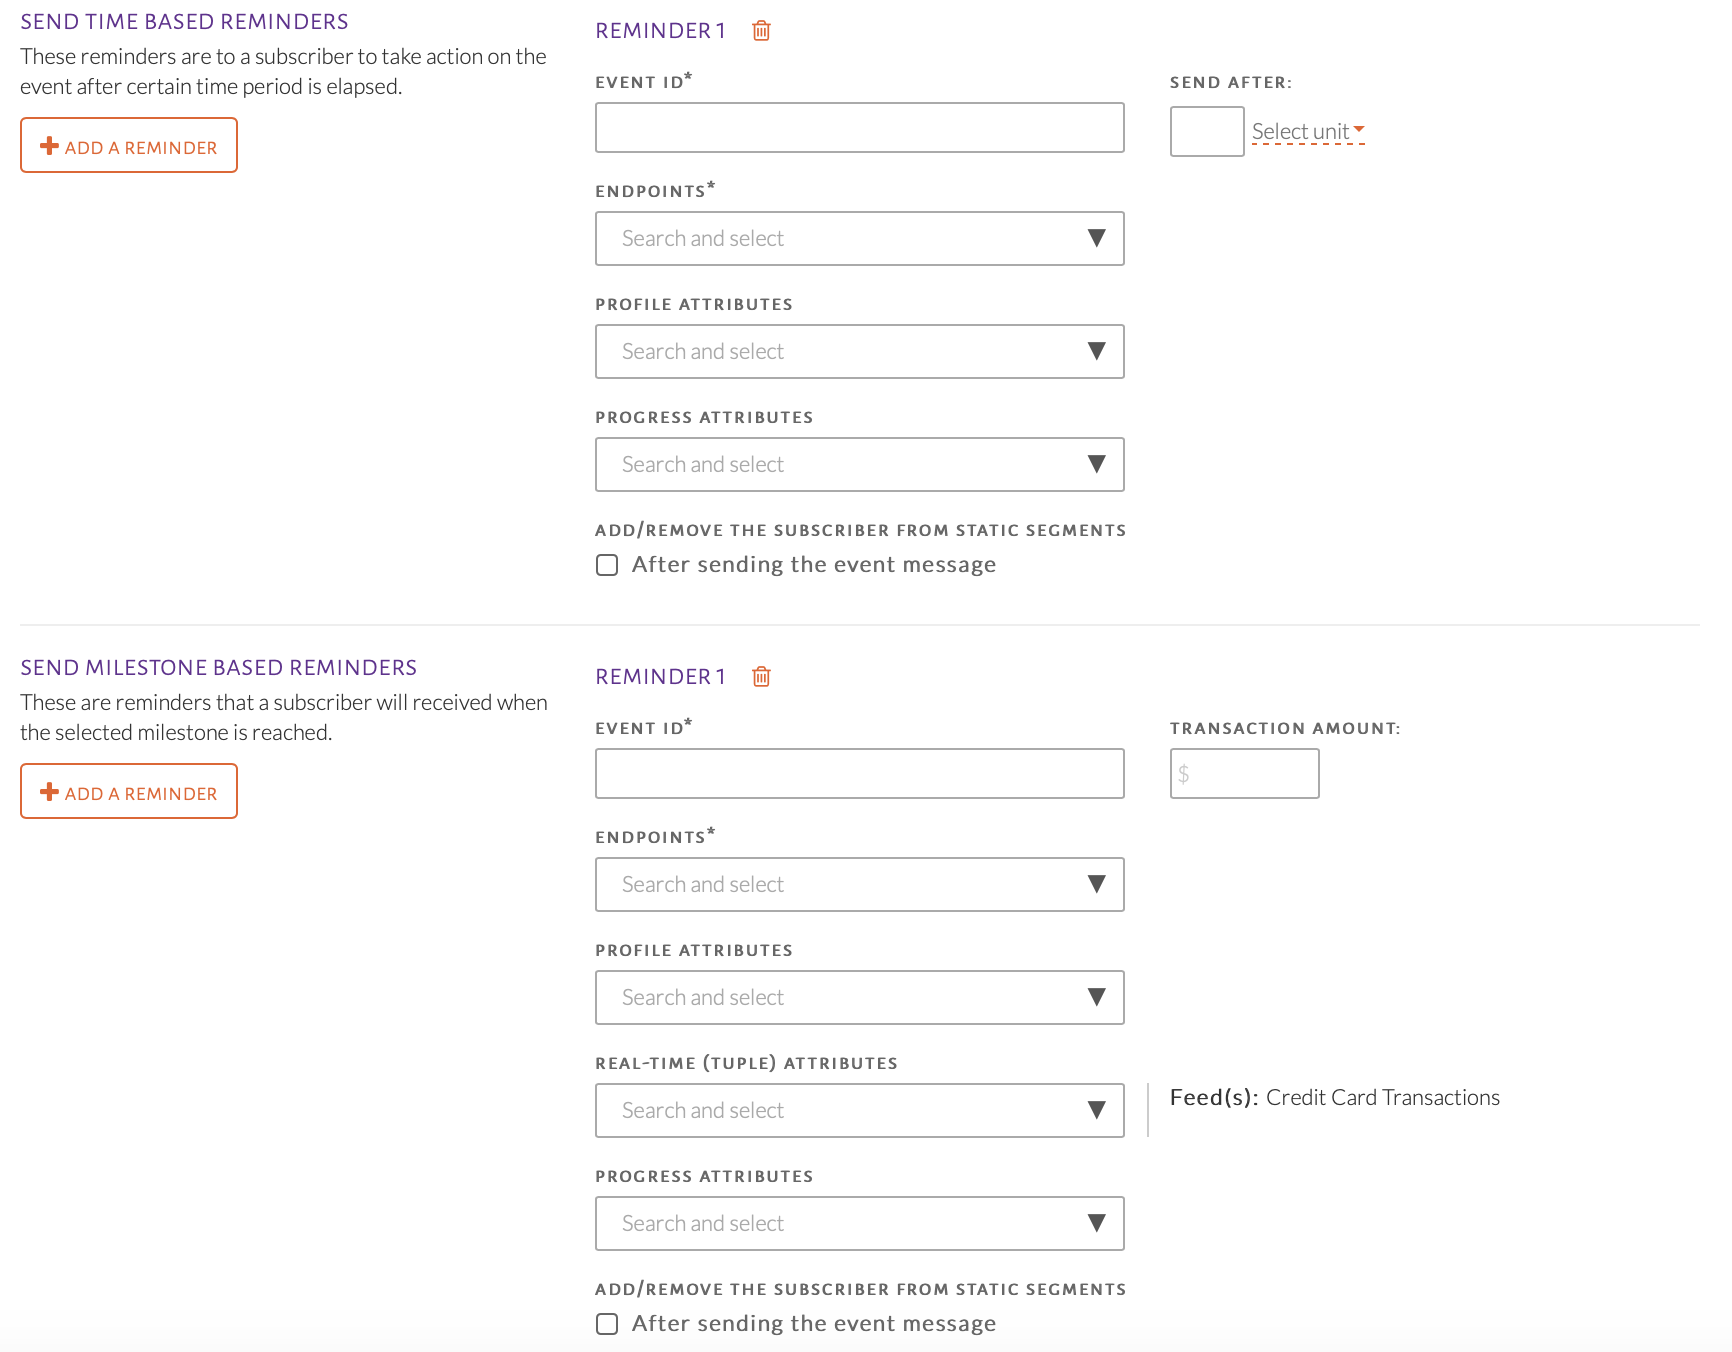
Time and milestone based reminders
In the image above, there is also an option to forward Progress Attributes to the selected downstream systems. These 4 attributes represent the count or amount progress of the customer. They are Current Value, Remaining Value, Target Deadline and Total Value. Current Value represents the completed transaction count/amount. Remaining Value represents the transaction count/amount that is left for the action to be completed which is to meet the threshold in Selected Event Action. Target Deadline represents when the time threshold, configured in Selected Event Action will end. Total Value represents the target count/amount to be achieved in order to complete the action.
The Fulfillment Message defines what will be sent to the downstream system once the Event Action criteria is fulfilled. Selections here can be same or different than the initial event message and following reminders as shown in the image below.
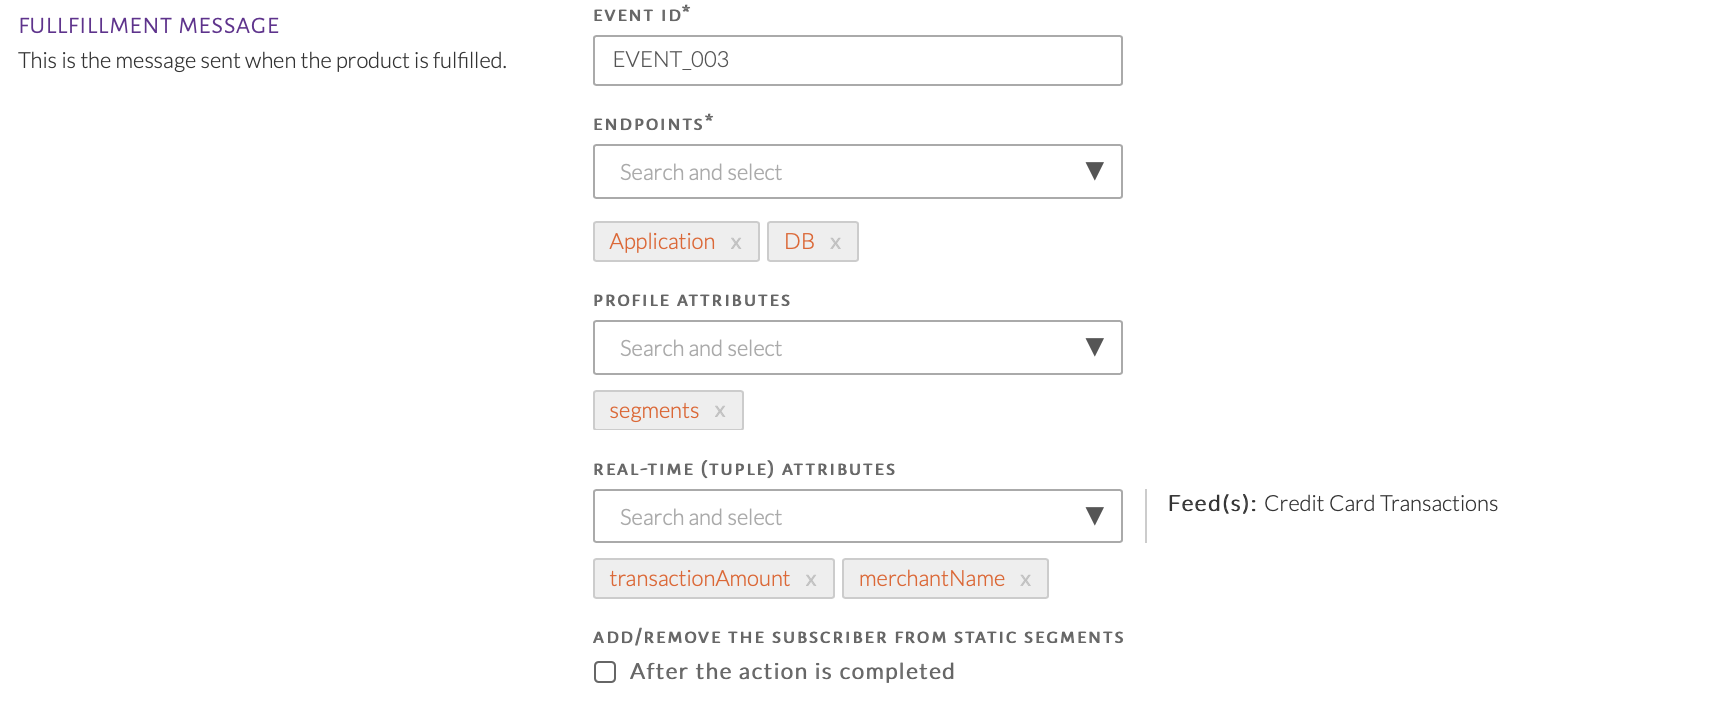
Fulfillment message
Target Groups
Target groups can be used to assign events to different groups among the customers who have qualified for the event.
USE-CASE: Assign the event “Nike Women” to all females who qualify, “Nike Men” to all males who qualify, and “Nike Others” to everyone else who qualifies
Summary of Steps:
Create multiple events by clicking Add New Event.
Choose conditions for each target group, making sure a customer cannot be part of multiple groups.
Assign an event to each target group.
Set an Everyone Else target group.
The events can be set-up as shown in the 3 images below. Edit the name of an event by clicking Rename.
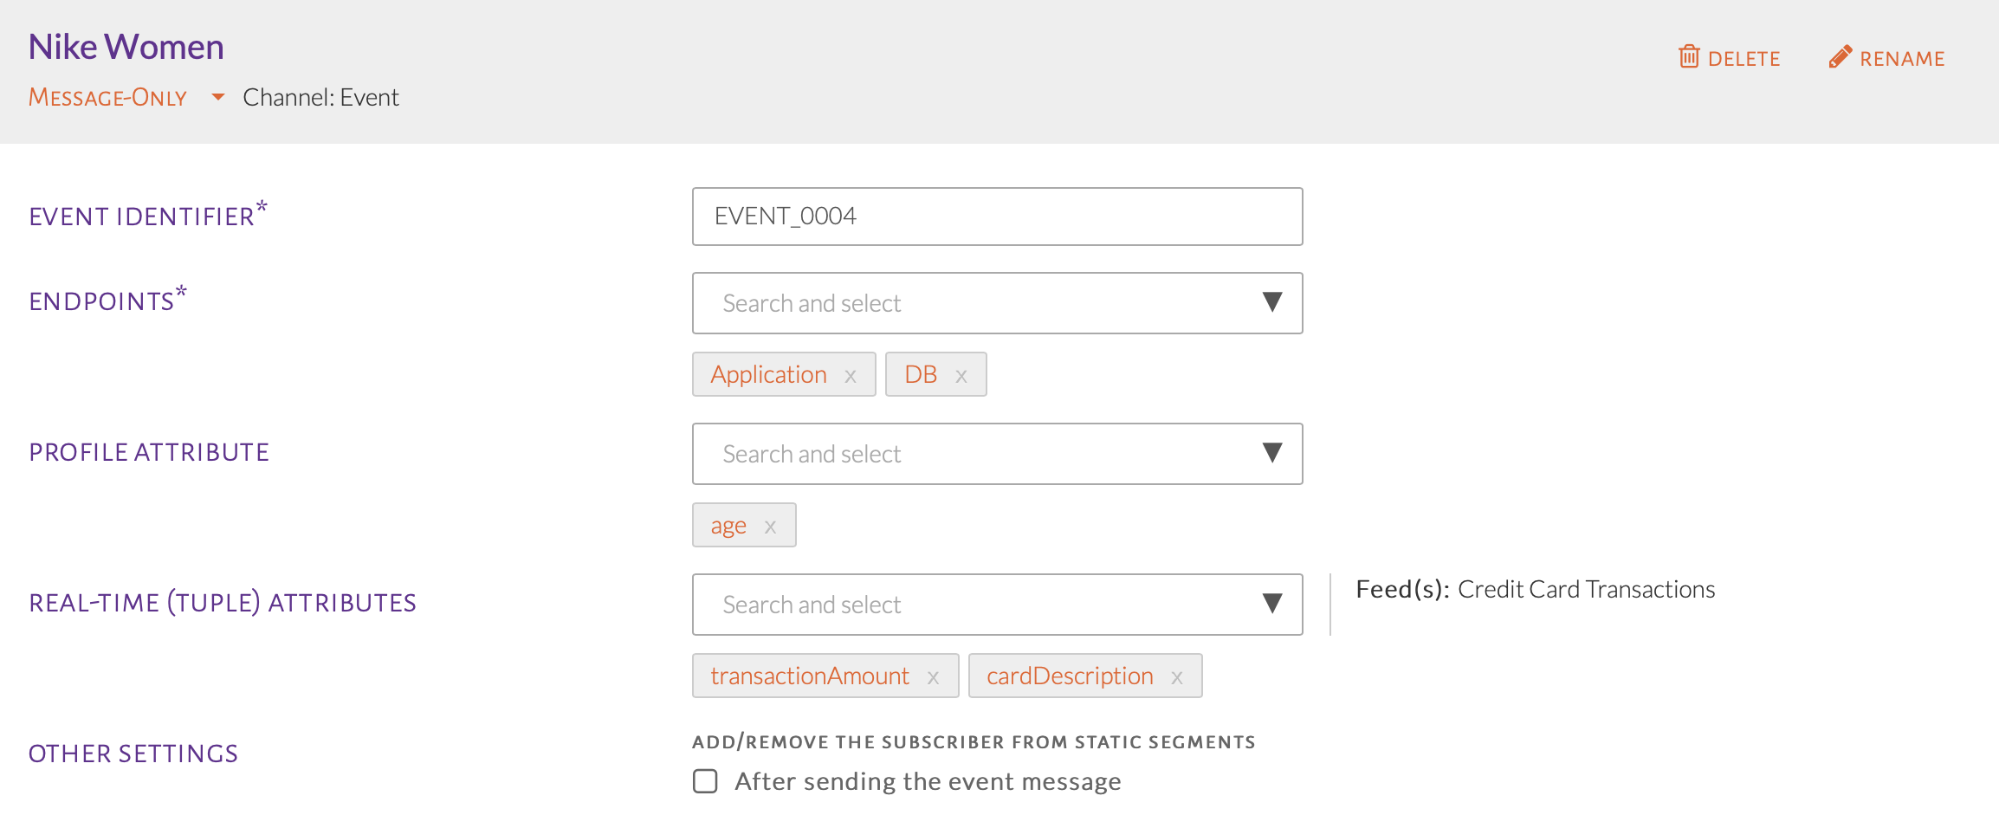
First event
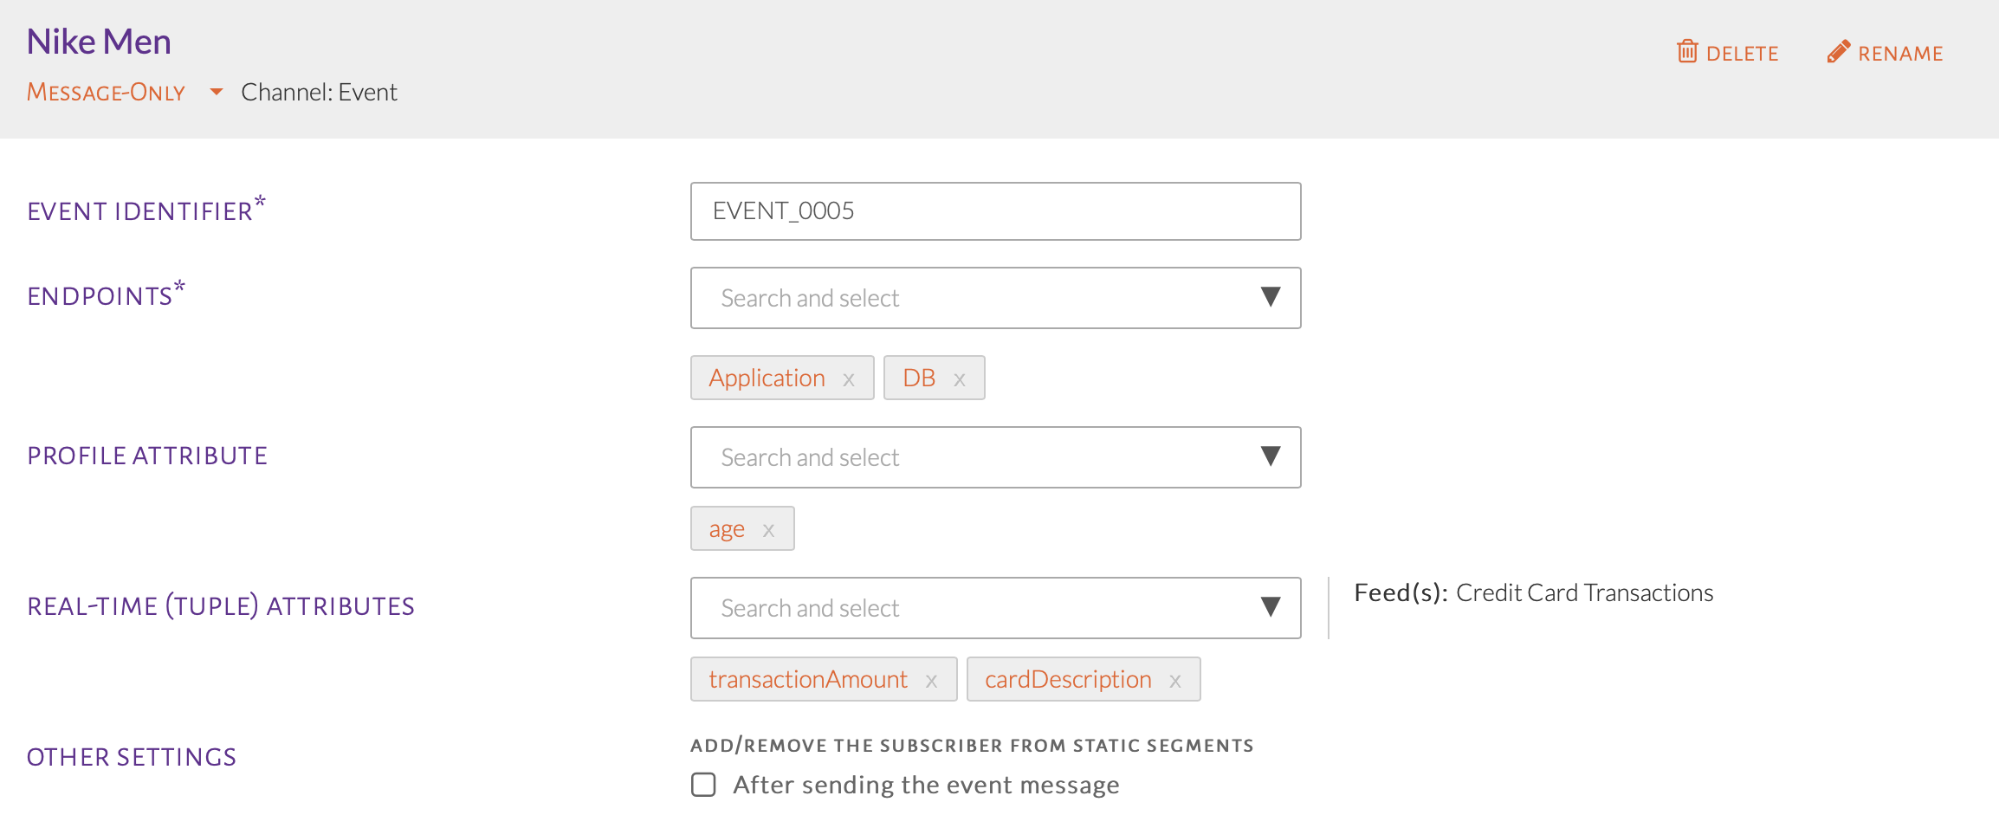
Second event
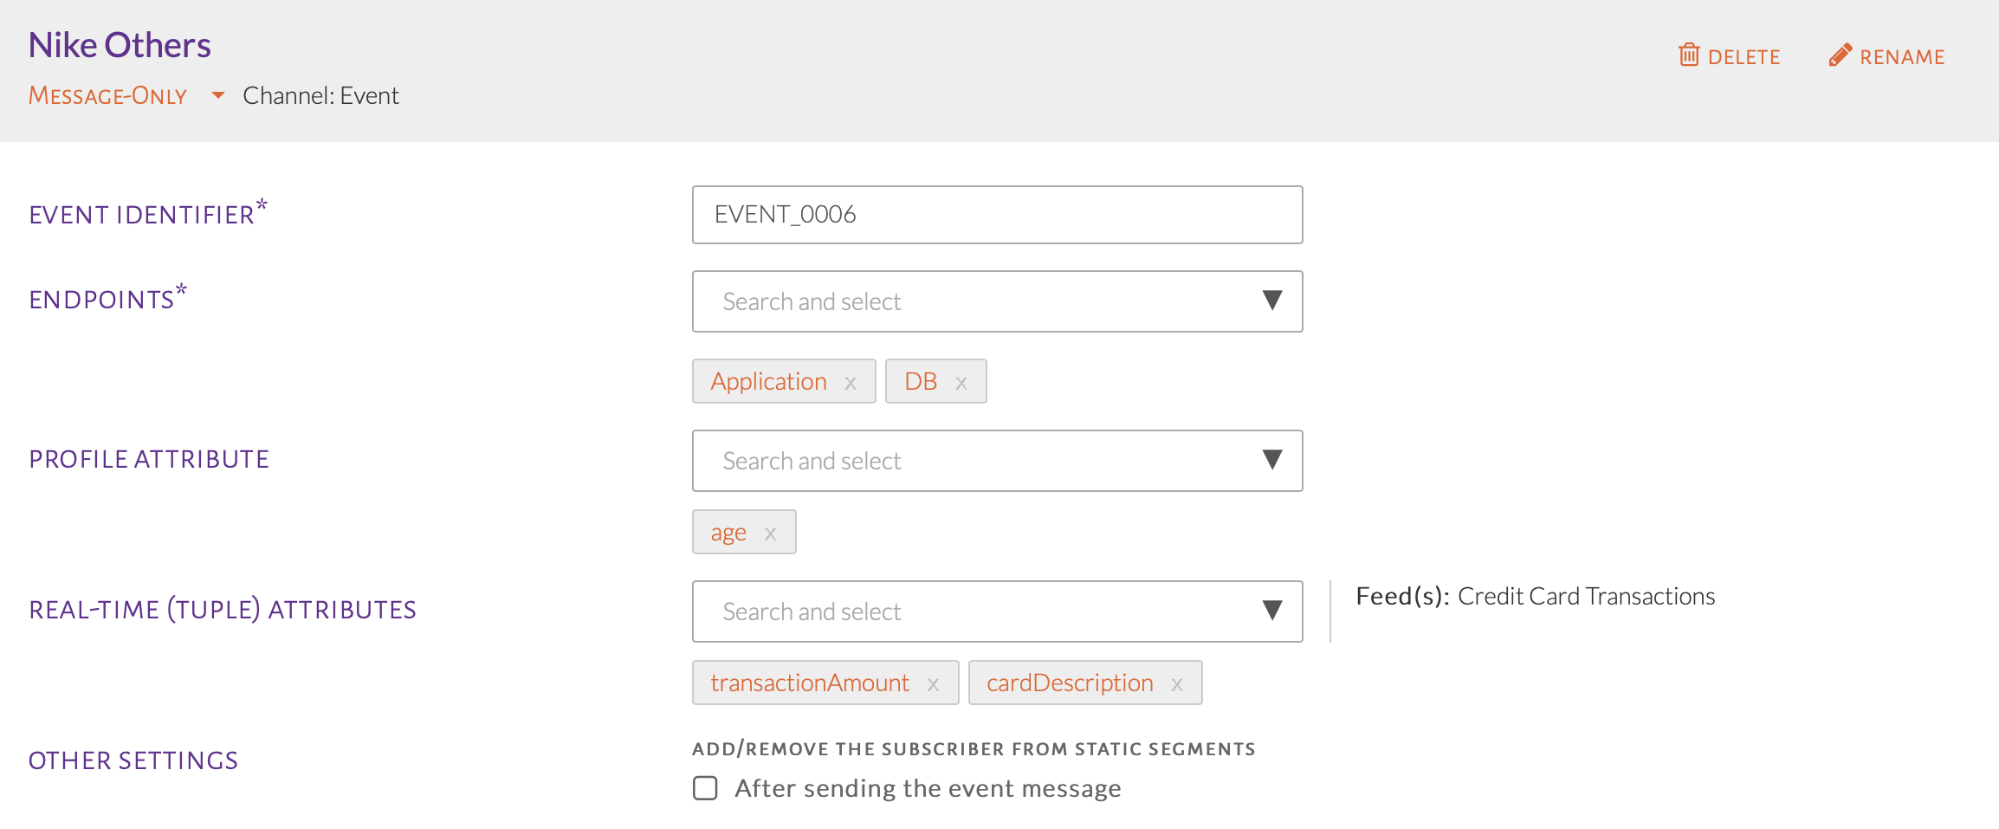
Third event
Assign an event to a specific target group as seen in the image below. Click on the orange icon near the event dropdown, to choose the conditions for each target group.

Assigning an event to a target group
The popup for audience conditions will be shown, as seen in the image below. Select the desired conditions for the target group. For this example, we will select the condition Customer’s Gender which is in demographic conditions.
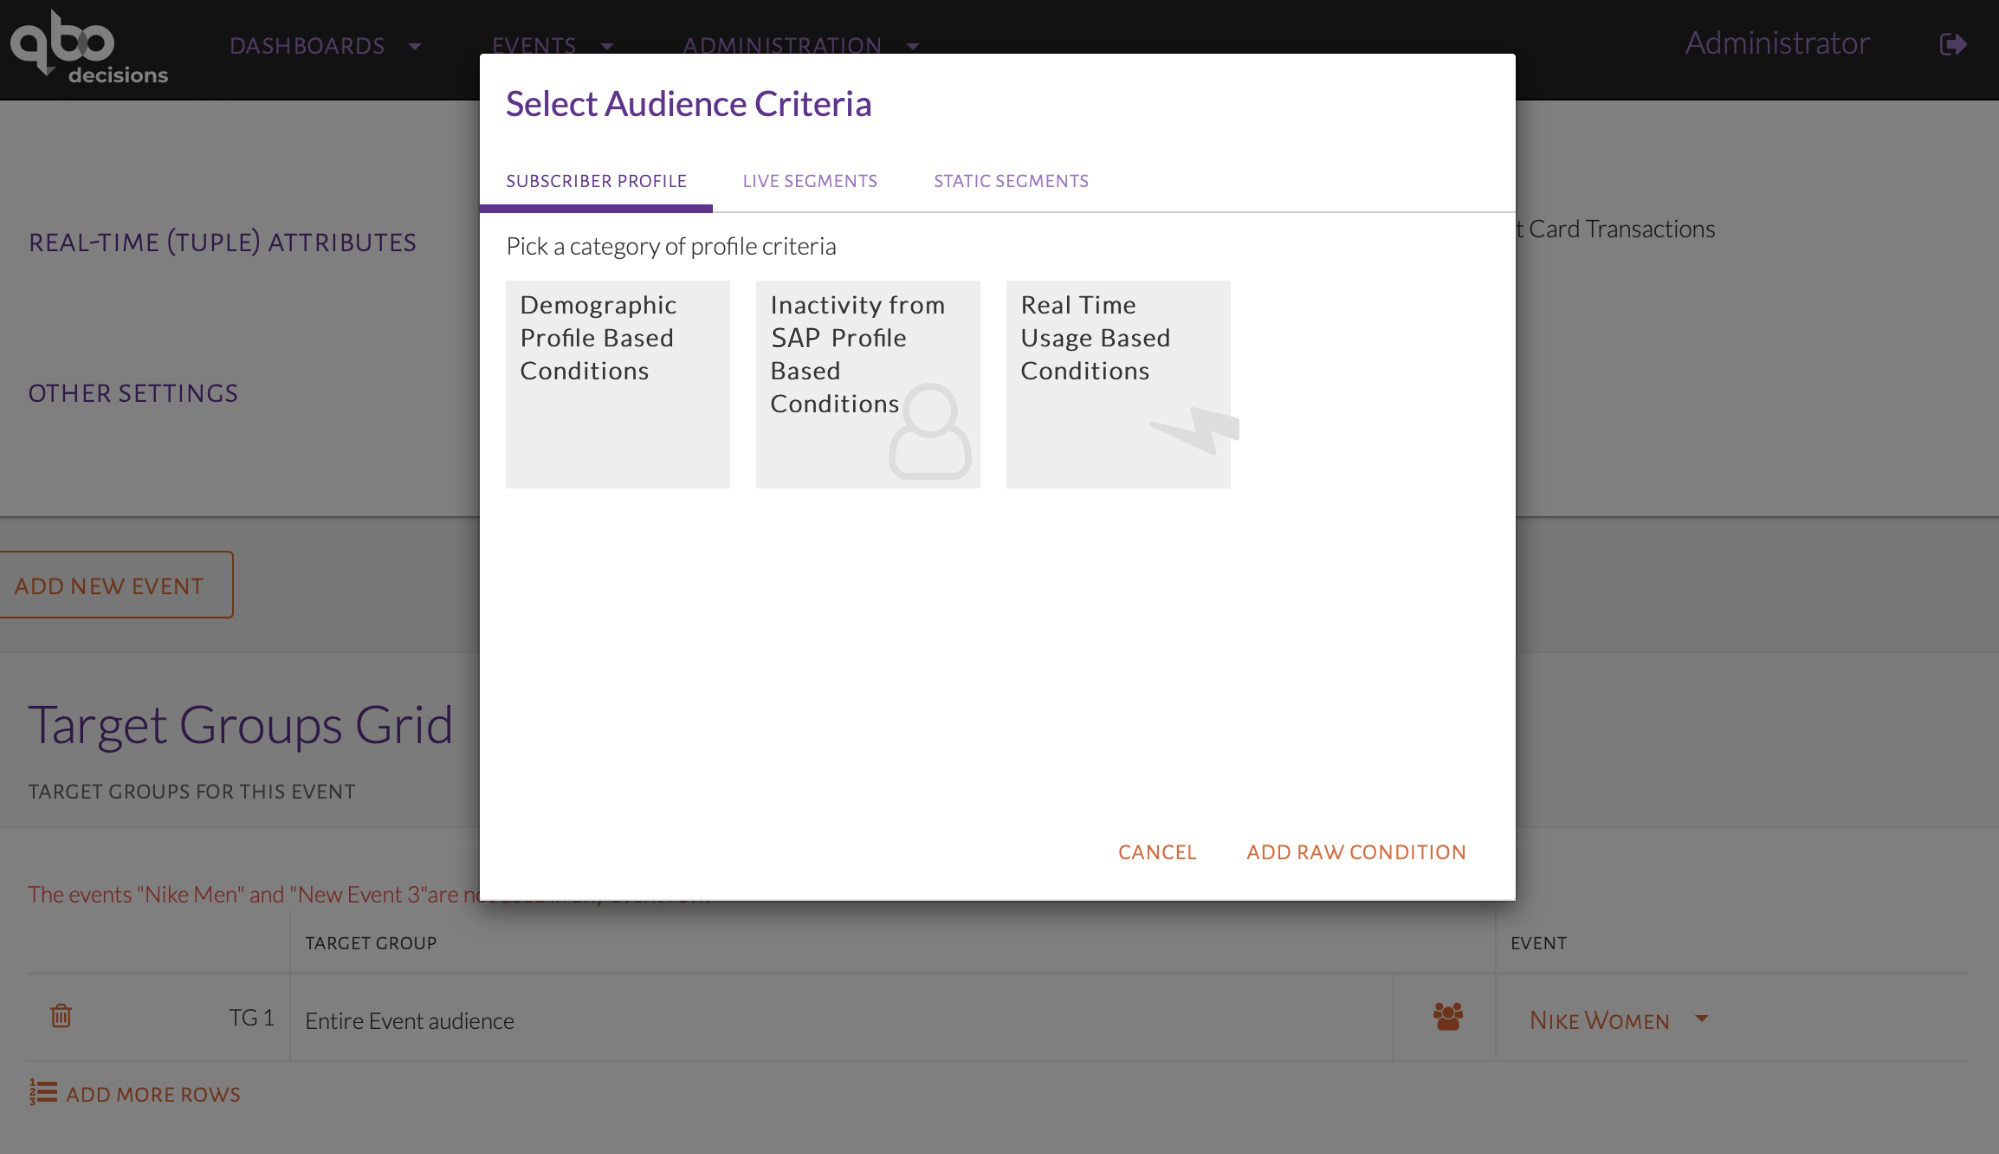
Selecting conditions for the target group
The condition for the target group is shown in the image below, along with the event assigned.

Target Group 1 comprises the females who qualify for the event.
The final set of target groups can be seen in the image below. It is important to note that an Everyone else target group must be set. Target groups must also never intersect, that is, a customer should not be part of 2 target groups. If this happens, only the event of the first target group will be received.
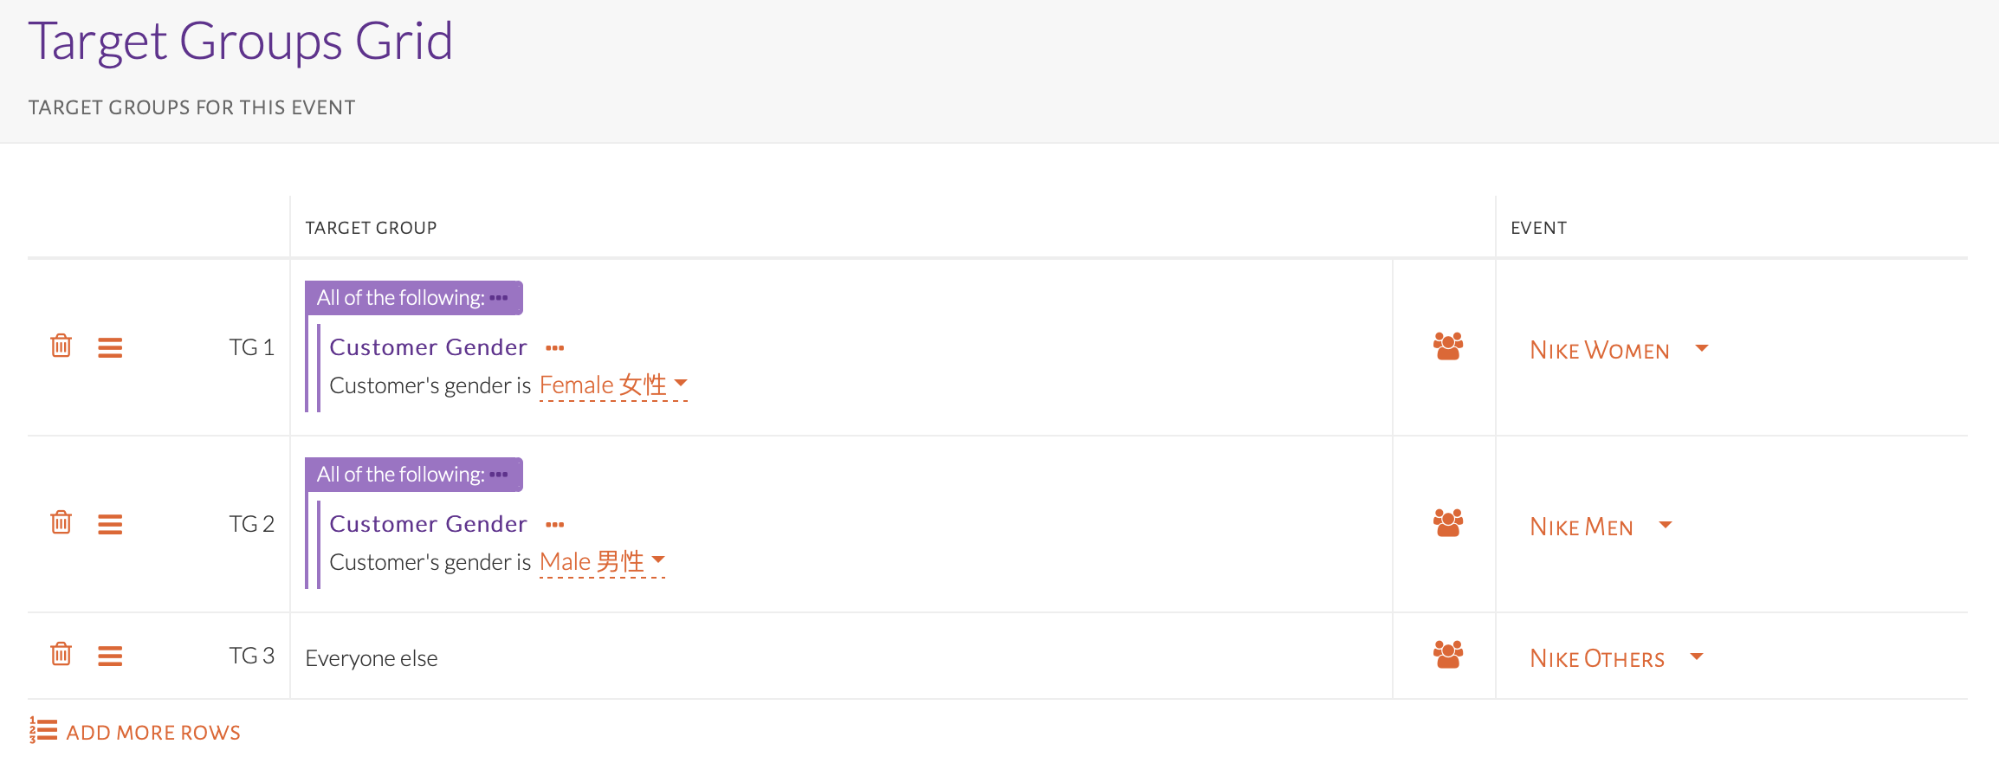
Final set up of target groups
Event Approval and Deployment
Maker Permissions
A maker is a user with the permissions to create an event and submit it for approval once ready. A maker follows the steps outlined above in event creation and then does the following for event submission, with the ability to edit upon event decline. A maker can edit events created by any user.
Submitting an event for approval can be done after reviewing the event. The image below shows how.
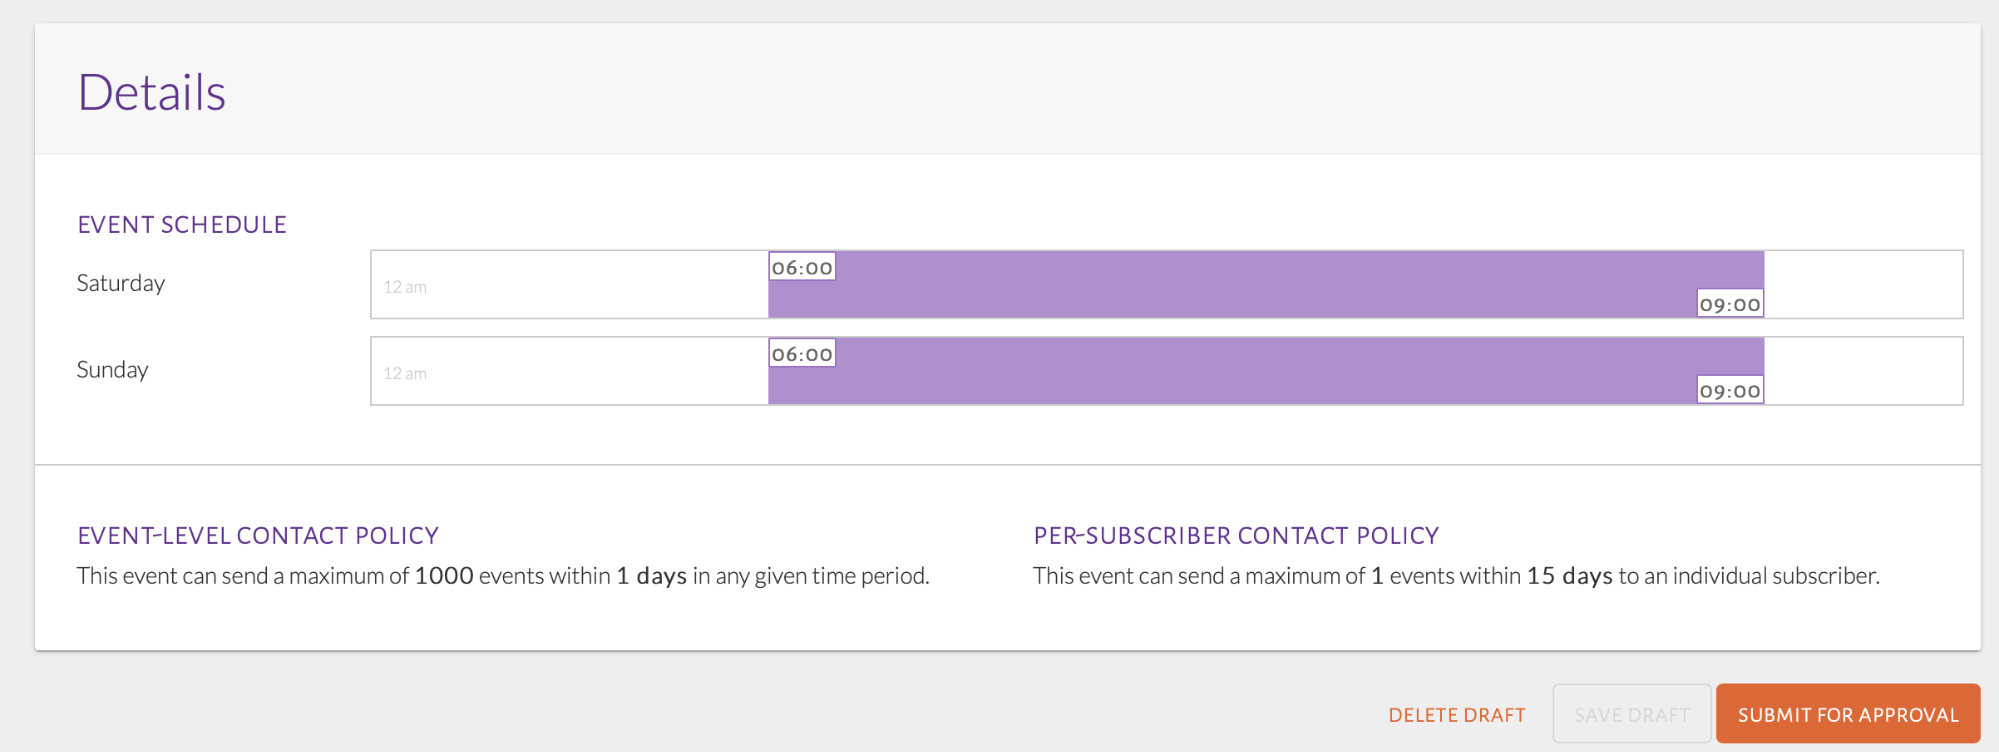
Submit event for approval
Once submitted, the event status will change as indicated in the image below.

Pending approval of event
The same event can be found under My Events, Pending while it is still Pending Approval. If the checker declines the event, the maker can find it under My Events, Pending tab with the status declined. The same applies for approved events and pending approval events. An example is shown in the image below.
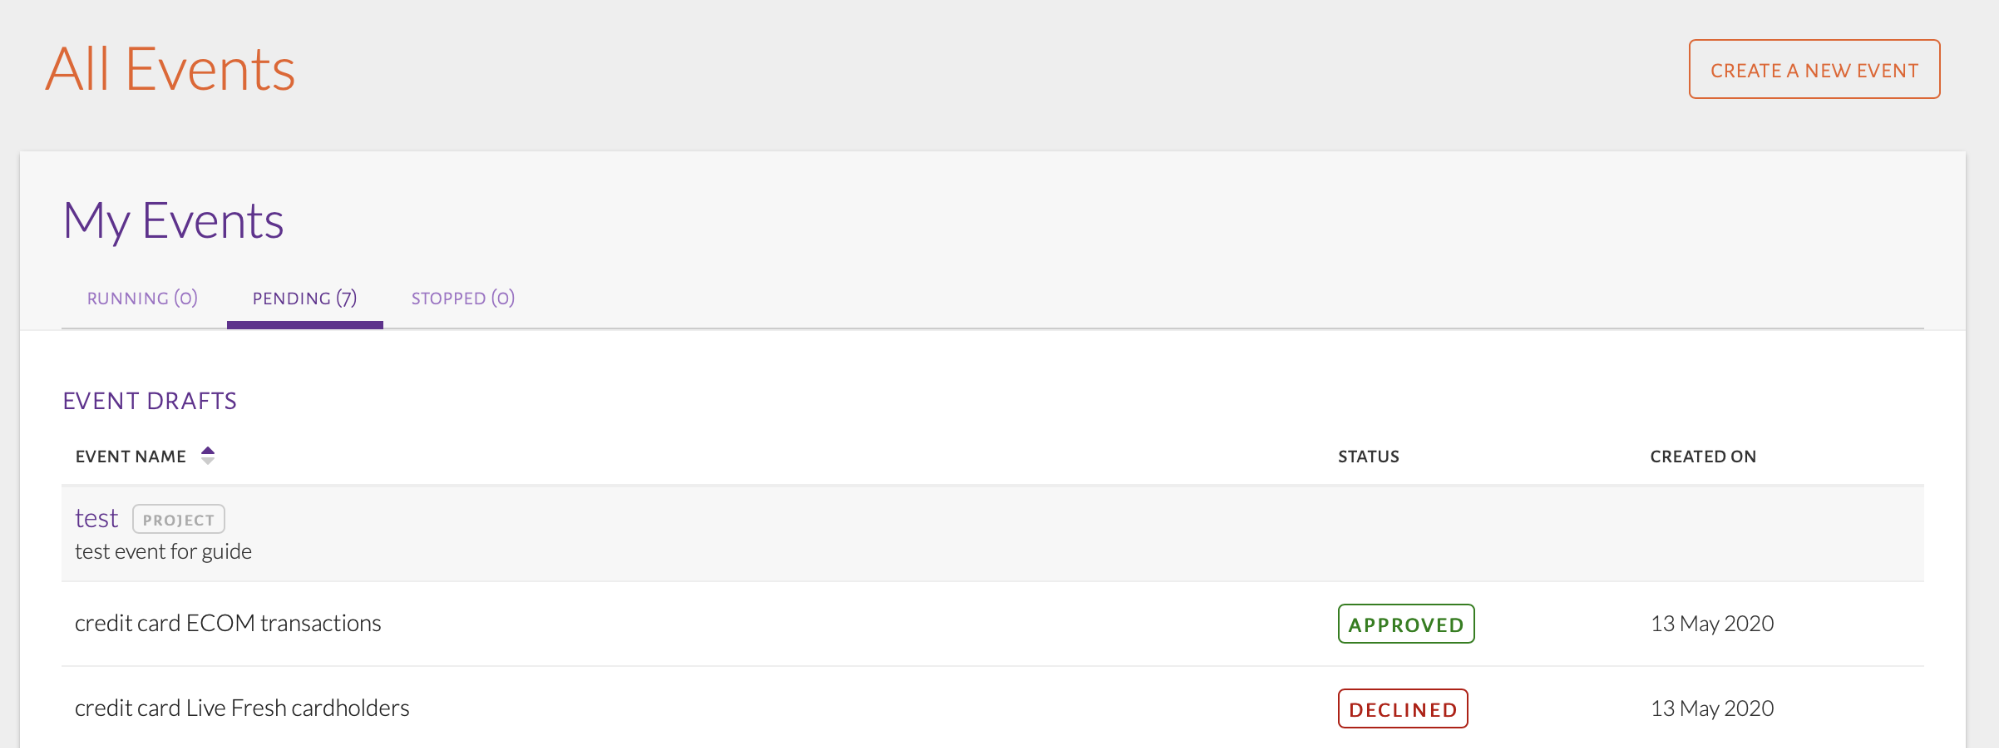
Approved or Declined events
The My Events page, Running tab shows events that have been approved and deployed by the checker.
Checker Permissions
The checker can find events for approval under Events, Events By Others. The Pending tab shows all events pending approval. The checker has permissions to approve or decline submitted events, shown in the image below.

Checker event review options
If the checker decides to approve, the following options are available, in the image below.

Checker event approve options
Upon choosing Review and Deploy the event status changes and the next steps are outlined in the image below. These are present at the bottom of the page, after taking one last look at the event setup.

Deploying an event
Following this, the checker can choose the start and end event dates before they Confirm and Deploy. In the case of a declined event, similar steps are to be followed. If the checker selects Decline from above, the image below shows the available options and event status.

Declined Event
The checker can still Approve the event or the maker can edit the event and resubmit for approval. Outside of approving/declining and deploying events, a checker can create events too, following the same steps as a maker.
Editing an Event
When editing a running event, a duplicate of the event is made and saved as a draft without impacting the original event.
Summary of Steps:
Click Events and select All Events.
Select a running event.
Click Edit on the top-right of the new page.
Click Create New Draft.
Click on Events in the top navigation bar then All Events. Choose the running event that is to be edited. Clicking on the name of an event displays a page as seen in the image below. Click Edit on the right to edit the event.

Edit a running event
A popup will inform the user that a new draft will be created as seen in the image below.

Creating an event draft
By clicking on Create a New Draft, a new tab titled Draft will be added as seen in the image below. Click on Draft to begin editing the event. Notice the status changes as well.

Editing the draft
Making any changes to the draft follows the same steps as creating an event and deploying it (based on the user permissions) as mentioned above. If the edited event is still running, deploying the draft version will replace the current running version.
Stopping an Event
A running event can be stopped by the user before its end date.
Summary of Steps:
Click Events and select All Events.
Select a running event.
Click Stop Event on the top-right of the new page.
Click on Events in the top navigation bar then All Events. Choose the running event that needs to be stopped. Clicking on the name of the event displays a page as seen in the image below. Click Stop on the top-right to stop the event.

Stopping an event
A popup appears to confirm that the chosen event is to be stopped as in the image below.

Confirm stop event
The event status is changed to Stopped and the options are available are shown in the image below.

Stopped event
The event can now be found under the Stopped tab of the Events page. Similarly, the same event can be restarted with a new end date. Edits can be made before if required.
Cloning an Event
Existing events of any status can be copied by a user to edit as their own. Each event that is copied will be available as a draft for the user to edit before submitting for approval/deploying.
Summary of Steps:
Click Events and select All Events.
Select any event.
Click the Clone Event icon and make any edits to the resulting event.
Click on Events in the top navigation bar then All Events. Hover over any event (under My Events or Events by Others) to see the ‘Clone Event’ icon as shown in the image below. Events with any status, made by any user can be selected here.
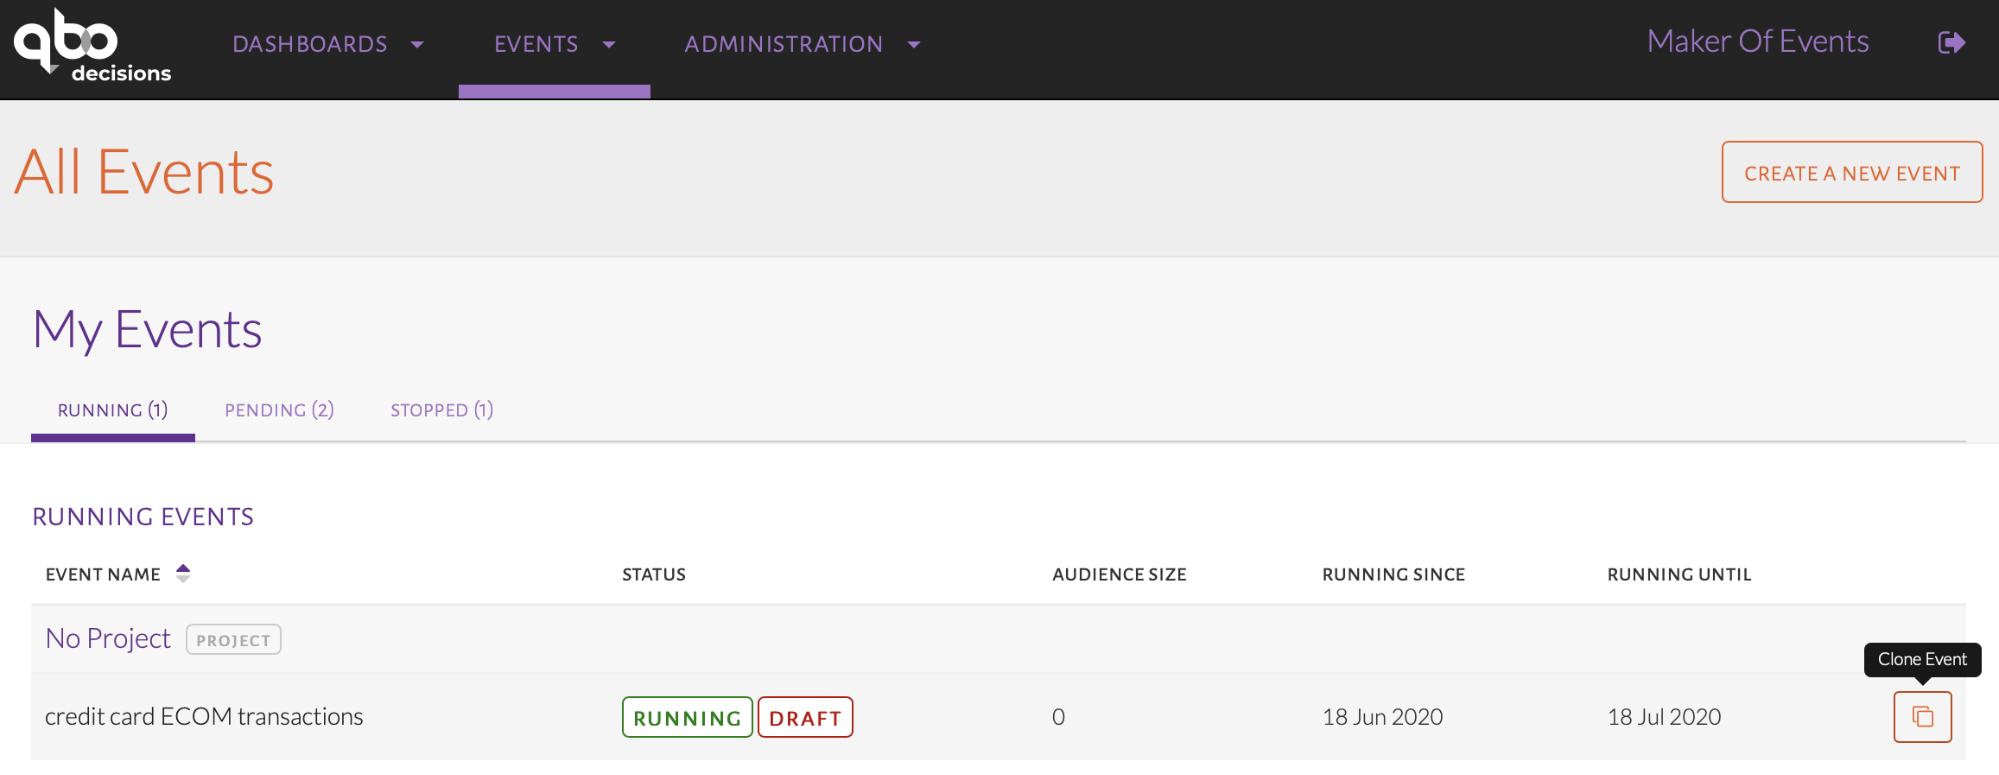
Clone event icon
Upon clicking the icon, a window will appear so the user can edit the Event Name, and Description. In the case that the chosen event has more than one status, there is also a dropdown to select the status of the event to be cloned. This is shown below in the image below.
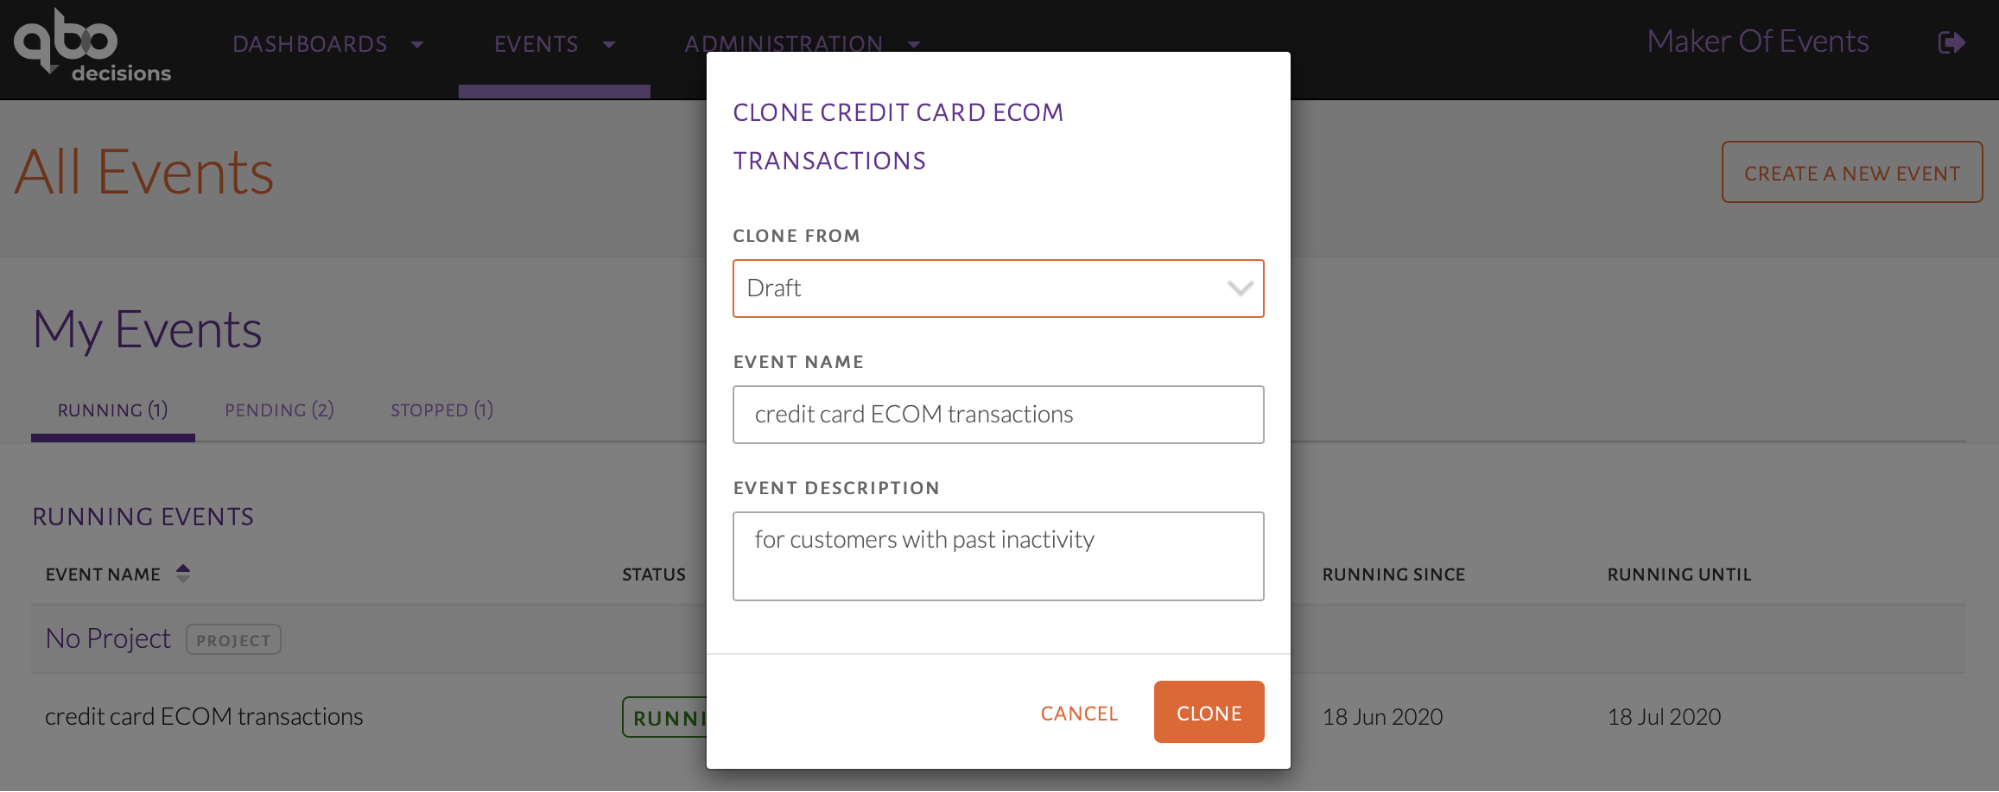
Clone event window
The Event Name needs to be unique so the event can be cloned. An error message will appear if the name is not unique. Select the running event to clone and edit the name as shown in the image below as we can now edit the event to target Payment based customer inactivity in the audience while keeping all other event configurations the same.
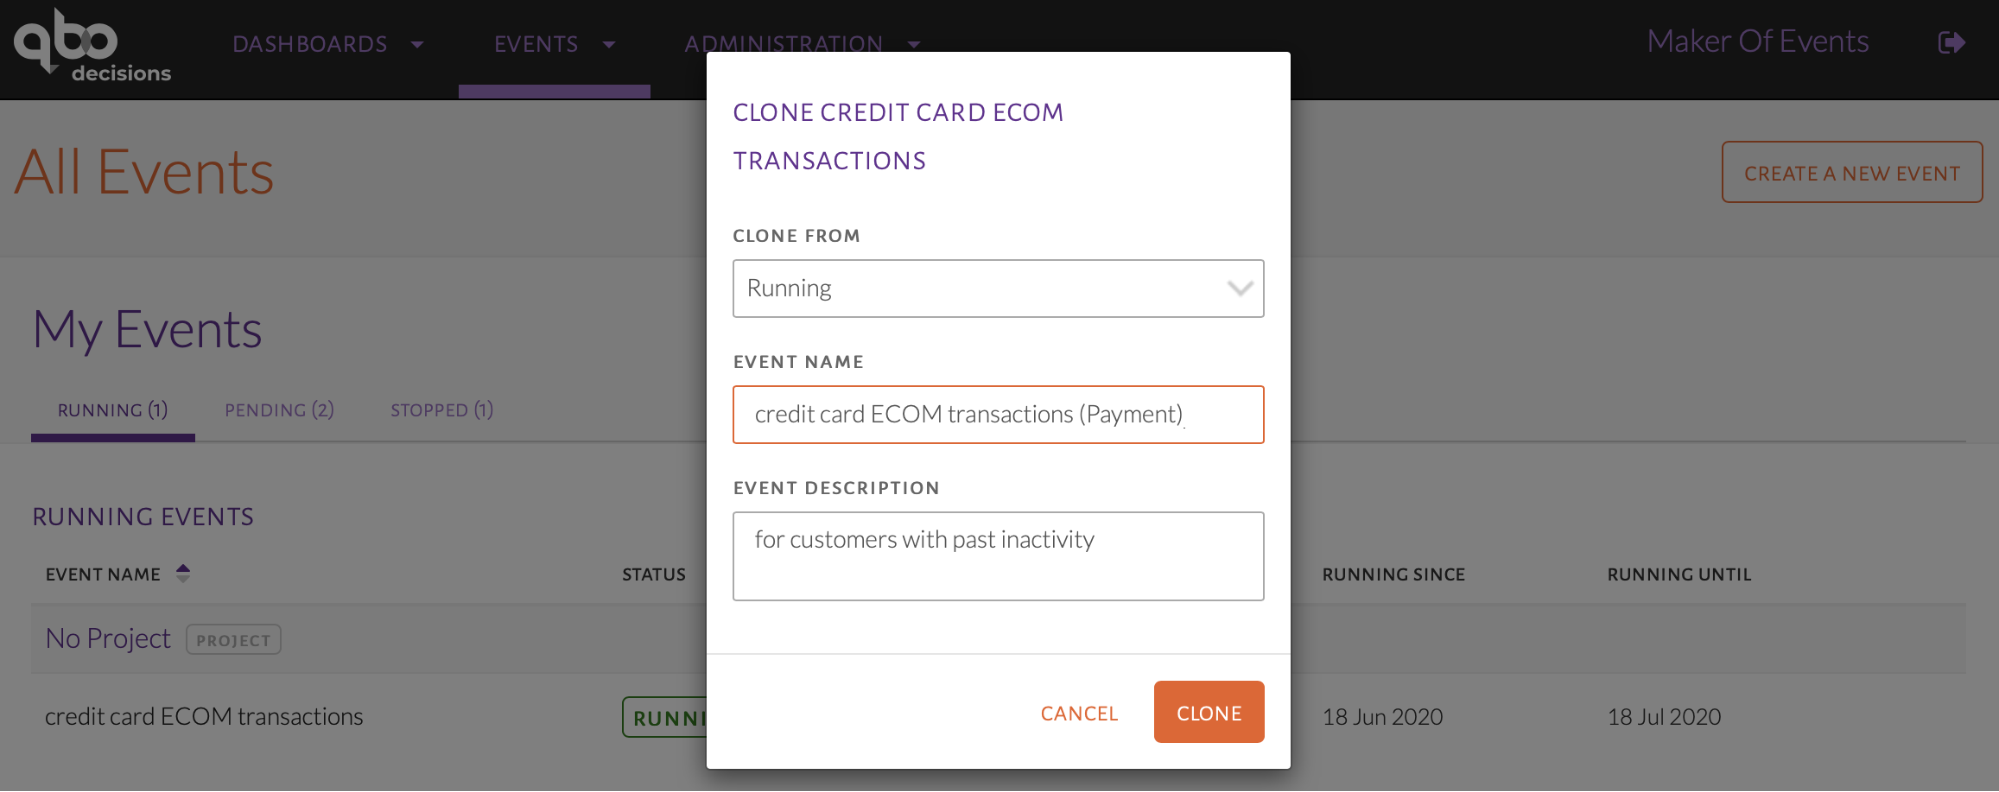
Edit event details
Upon clicking Clone, the event will become a draft for the user and can be edited as any other draft as in the image below. The project is not copied with other event details and can be selected by the user as required.

Cloned event

