Administration interface
User & Role Management
The only user that comes pre-configured with Unscrambl Qbo Decisions is the admin user.
The admin user can add additional users, including other administrators, as well as perform other user management
tasks by accessing the User And Role Management link located under the Administration category in the top navigation bar.
The user management screen is shown below:
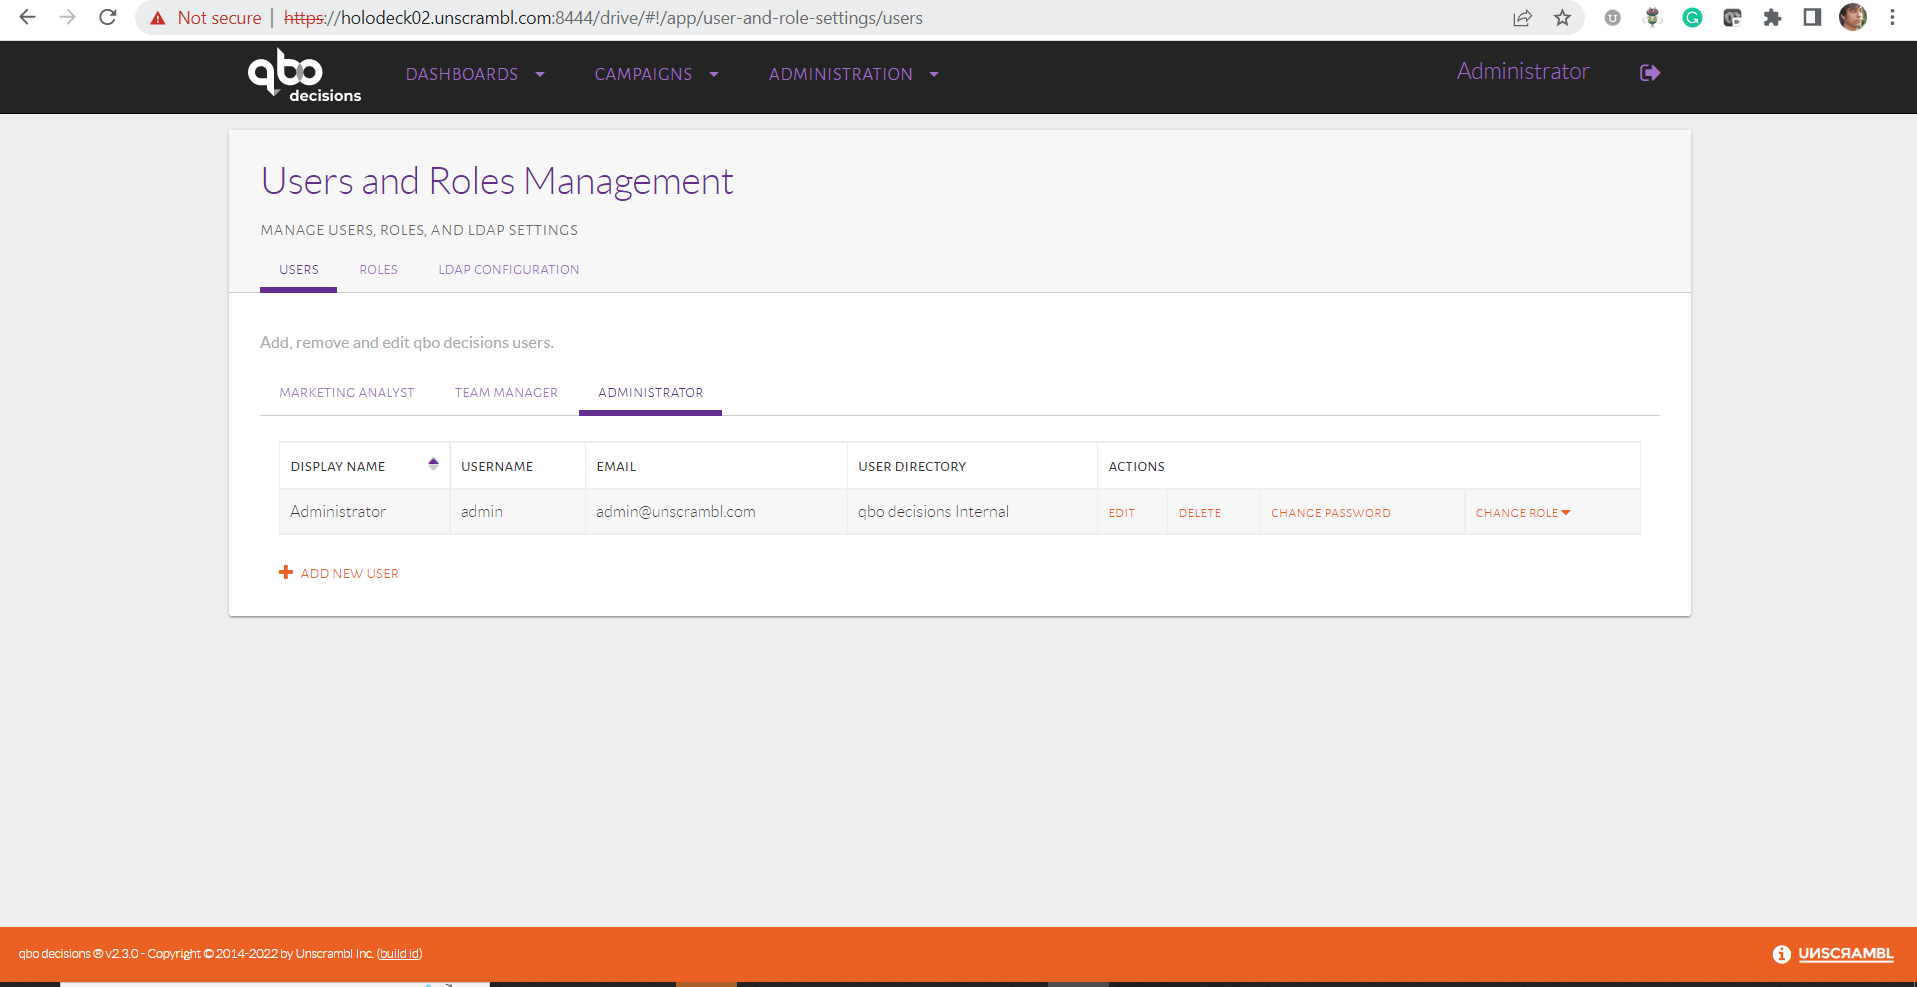
The User And Role Management page.
In the Users tab, the various roles that are configured in the system and the users that exist for each such role
are depicted.
To add a new user, the administrator must first decide the role for such a user, for example, the Marketing Analyst
role can be selected by picking the corresponding tab in the User Management page and by clicking on the Add New
User link:
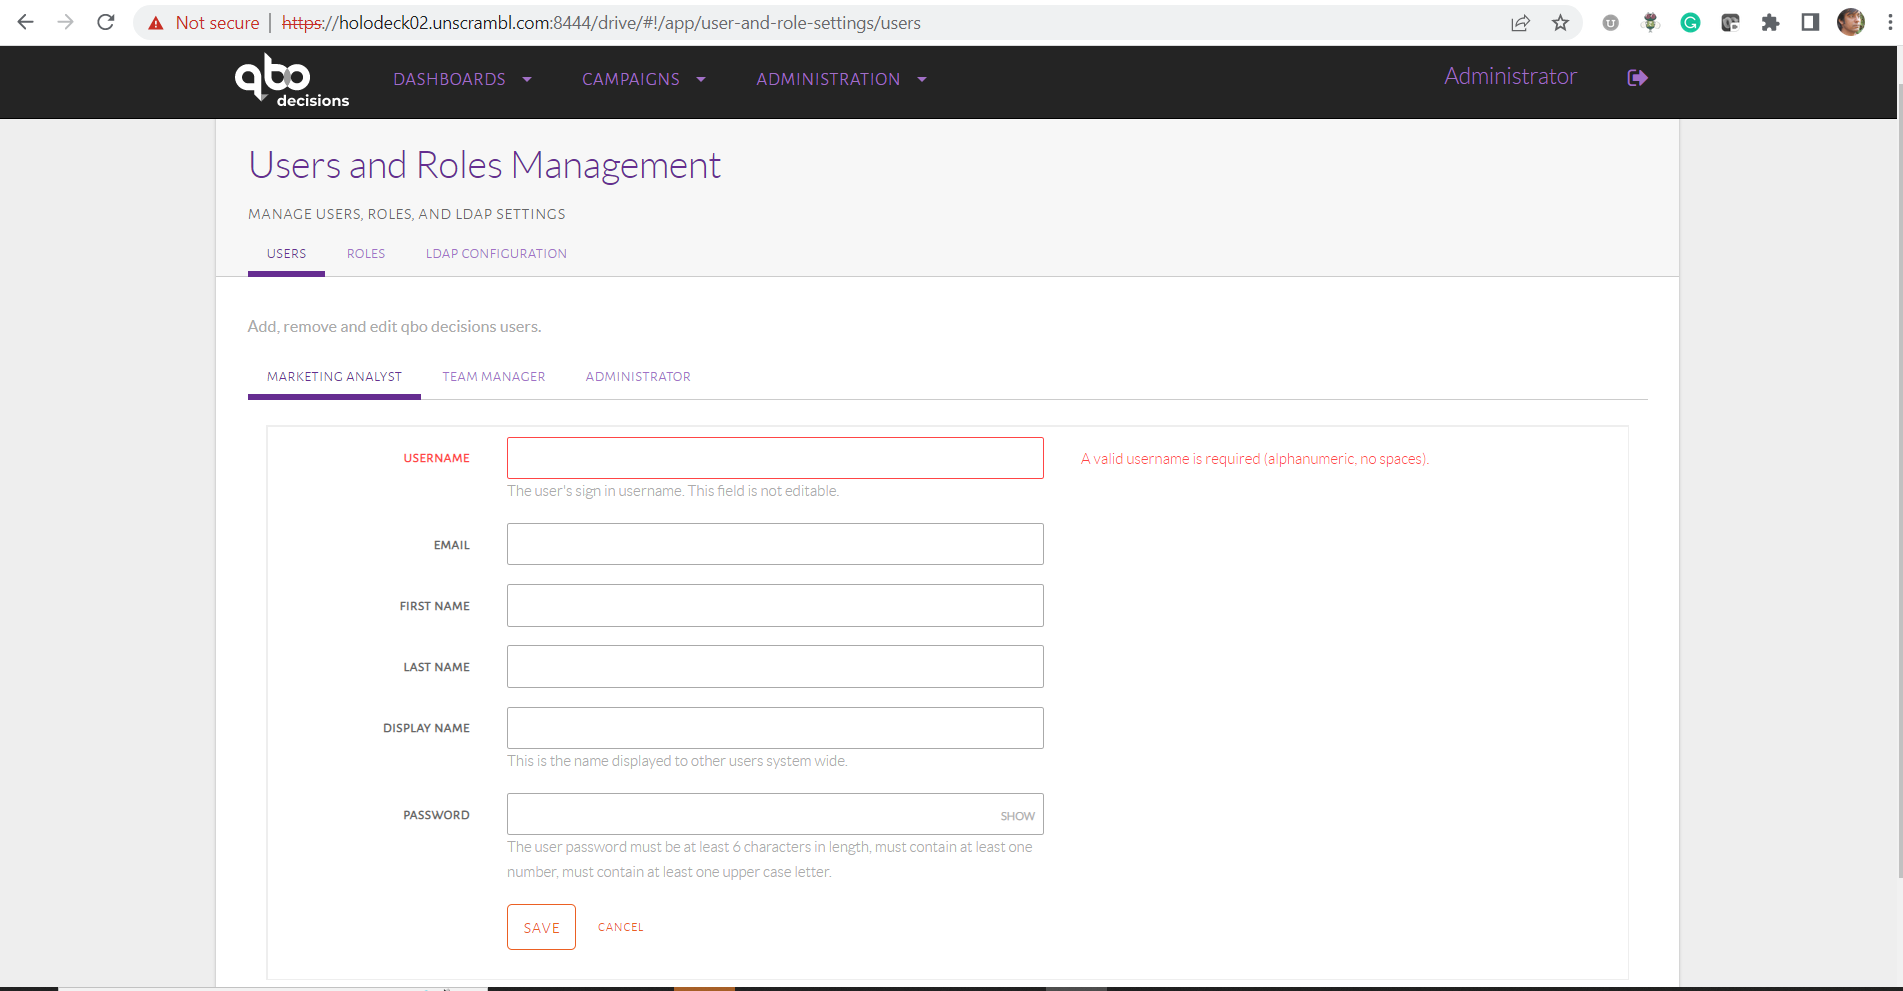
Adding a new user.
Subsequently, the Username, Email, First Name, Last name, Display name and Password attributes should be filled
out. Finally, the Save button can be pressed to store this data.
Once completed, the newly added user should be visible in the user interface:
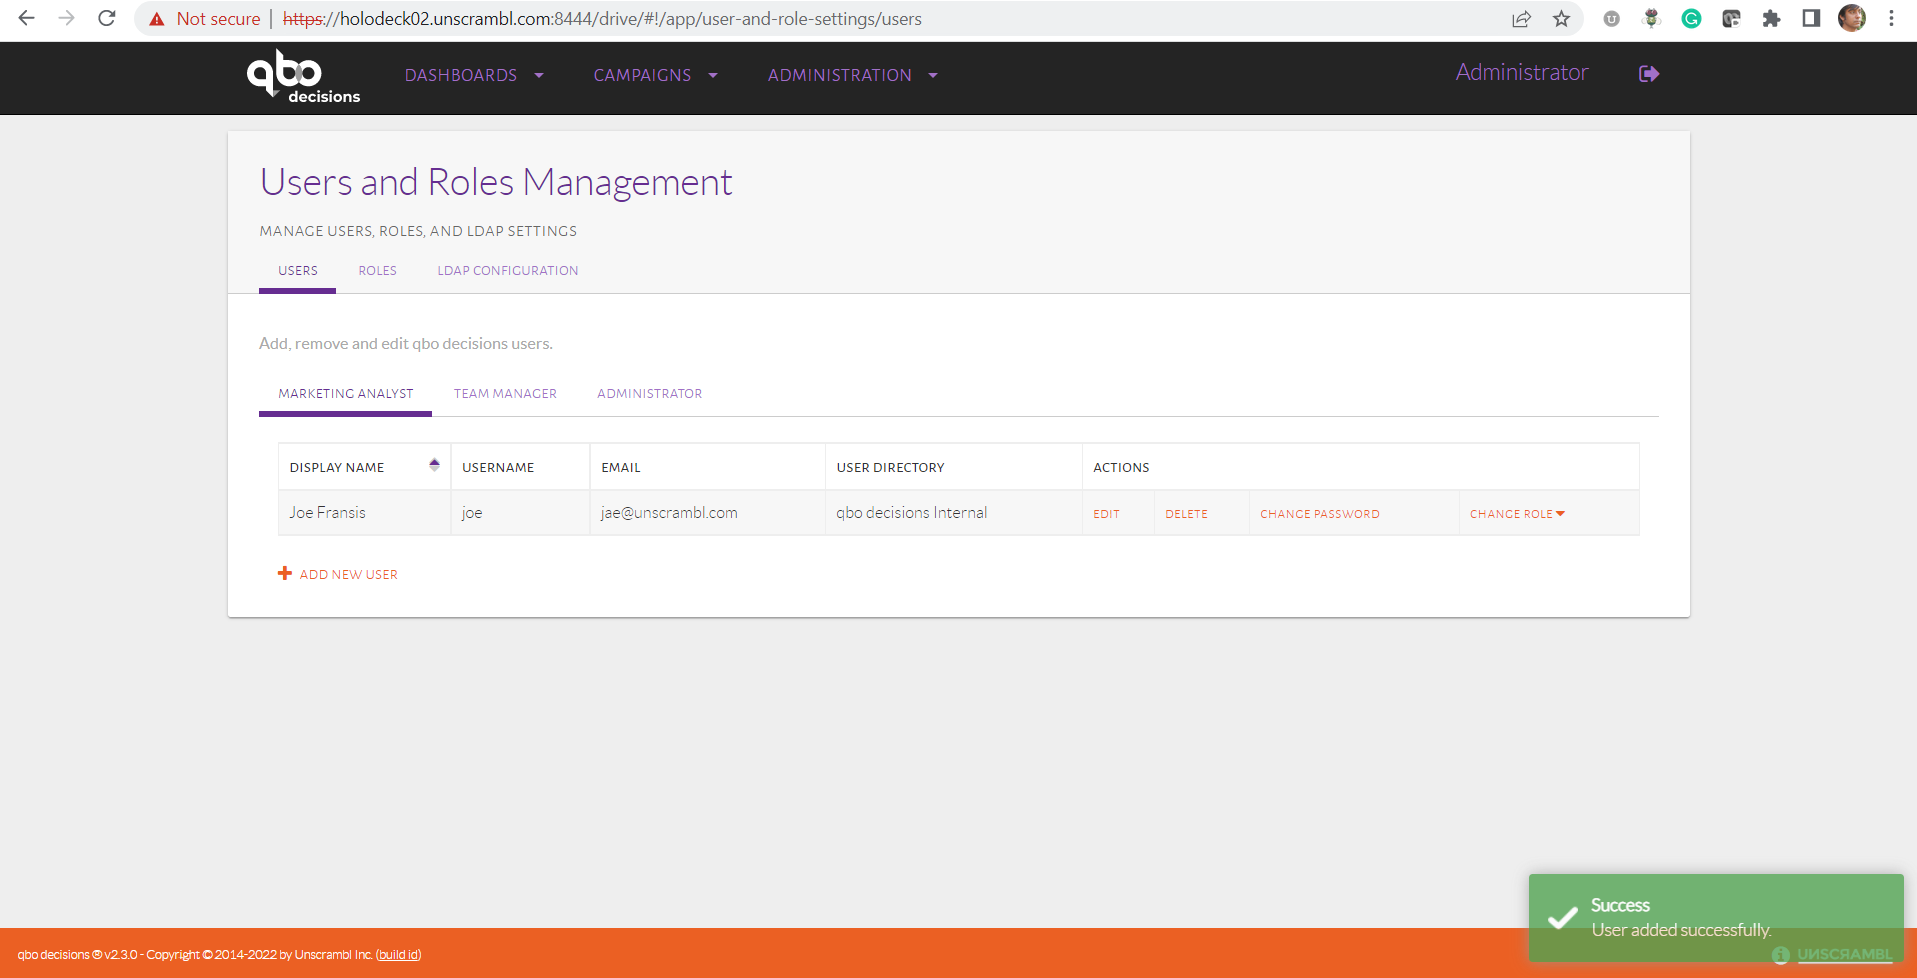
A newly added user.
The data for an existing user can be modified and the user itself can be removed by another user with user management entitlement.
The deletion and editing are perfomed using Delete and Edit button under Actions head of the table:
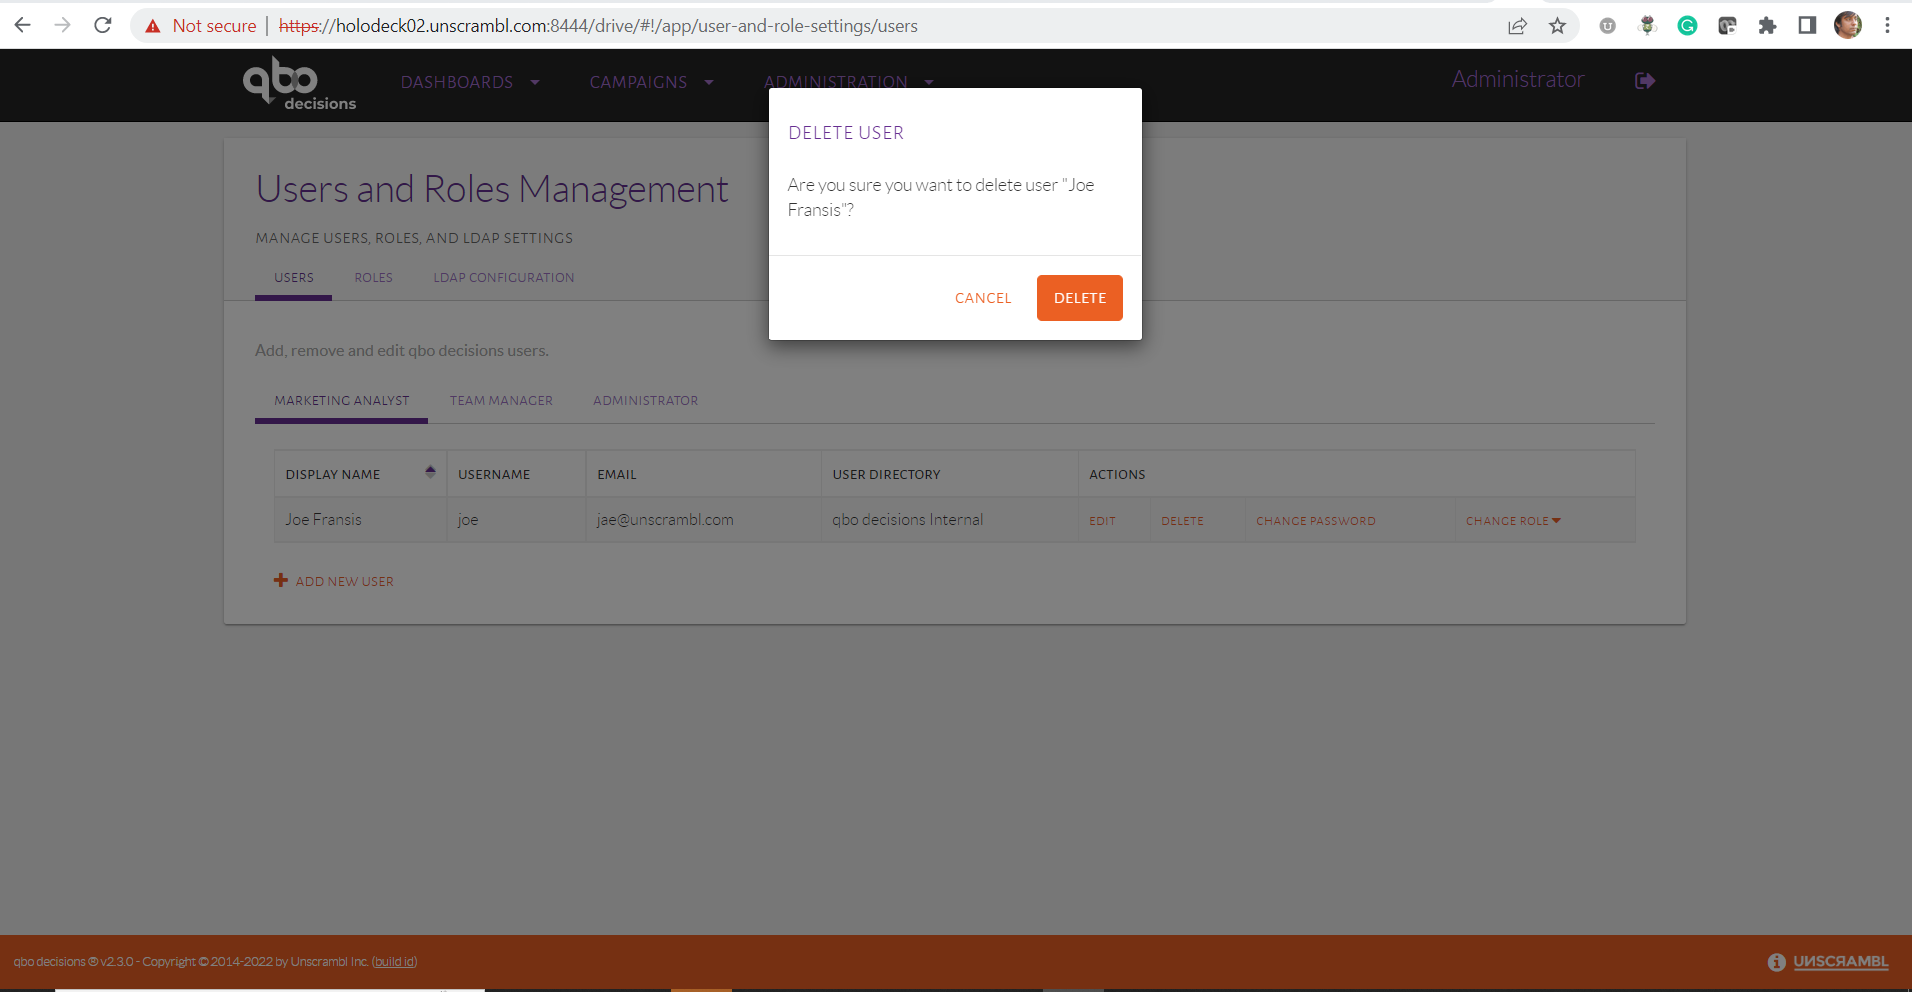
Removing or updating a user’s data.
The Roles page can be accessed by accessing the Roles tab in the navigation bar:
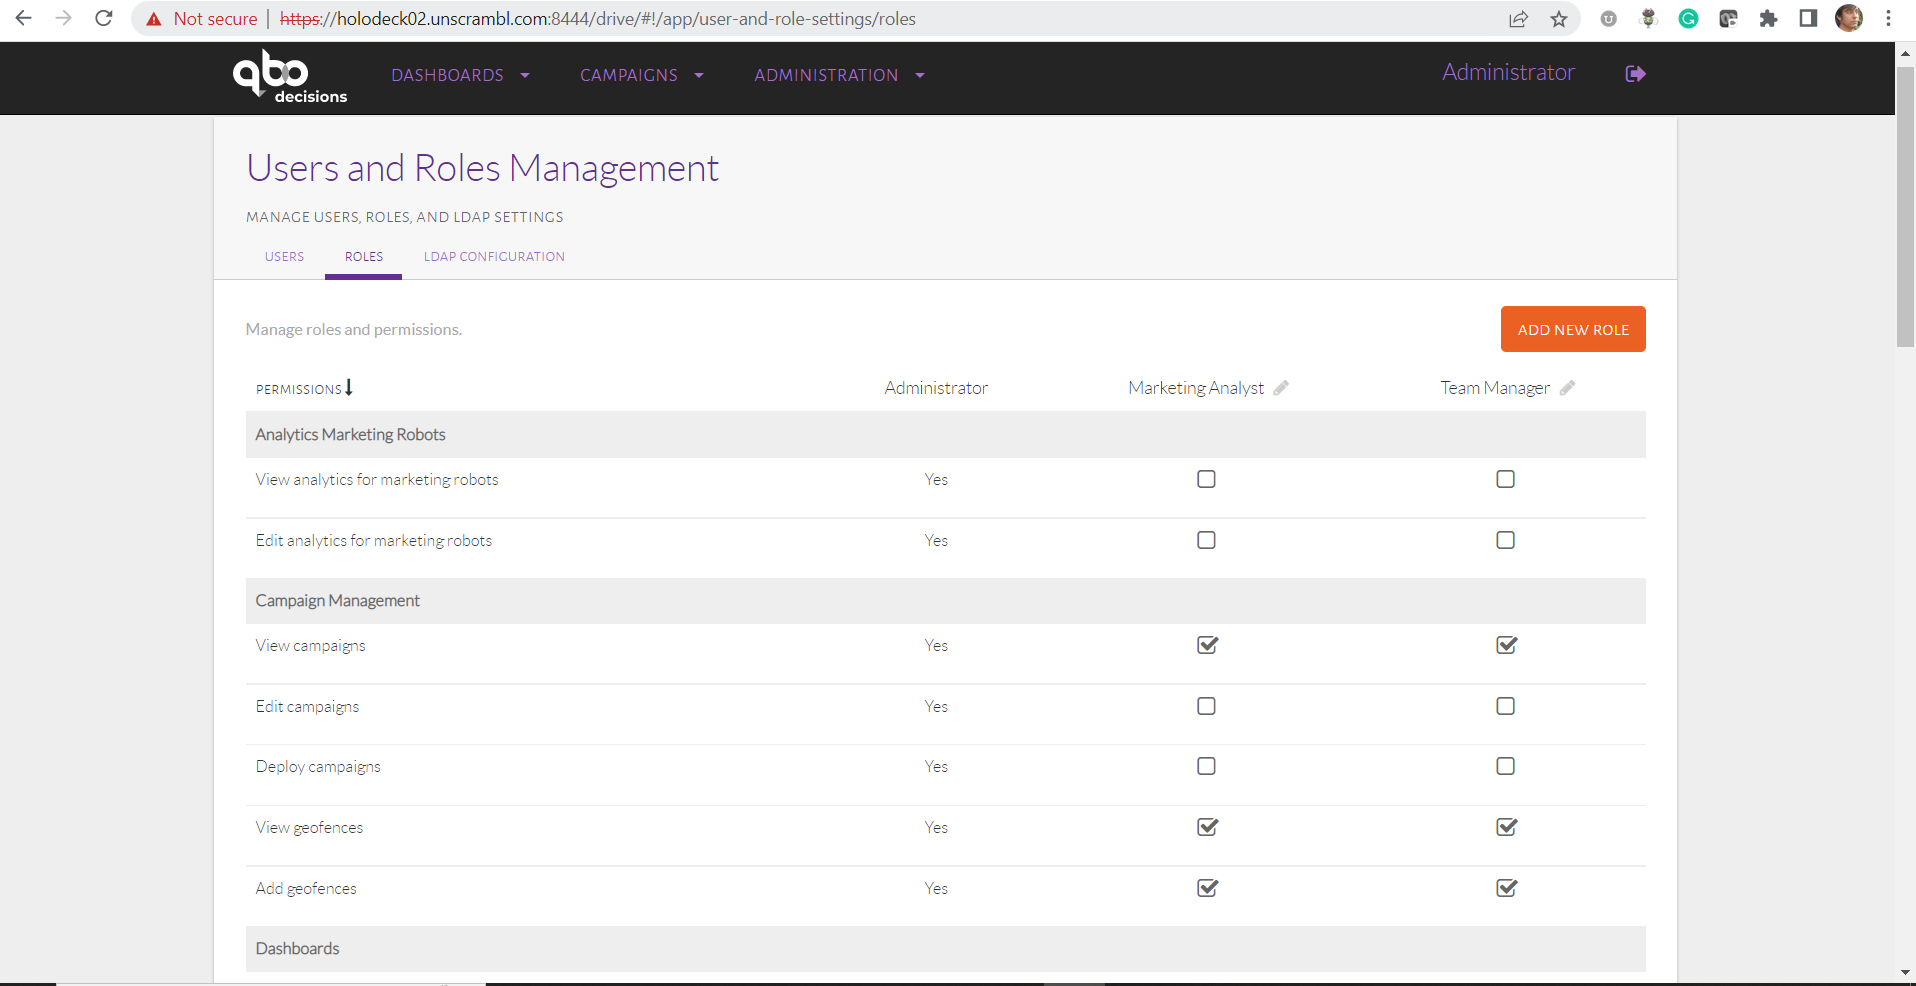
The Roles tab.
The Unscrambl Qbo Decisions, by default, comes with three default roles: the Administrator, the Team Manager and the
Marketing Analyst:
The
Administratorhas unrestricted permissions in Unscrambl Qbo Decisions.The
Team Managerdoes not have the permissions associated with user and role management, but has all the other permissions.The
Marketing Analysthas permissions that are a notch below aTeam Manager, excluding, for instance, the ability to edit the feeds.
Roles can be renamed and removed.
The removal of a role can only be accomplished if no user(s) with that role exists. The user interface shows an appropriate error when an attempt is made to delete a role that has user(s) assigned to it:
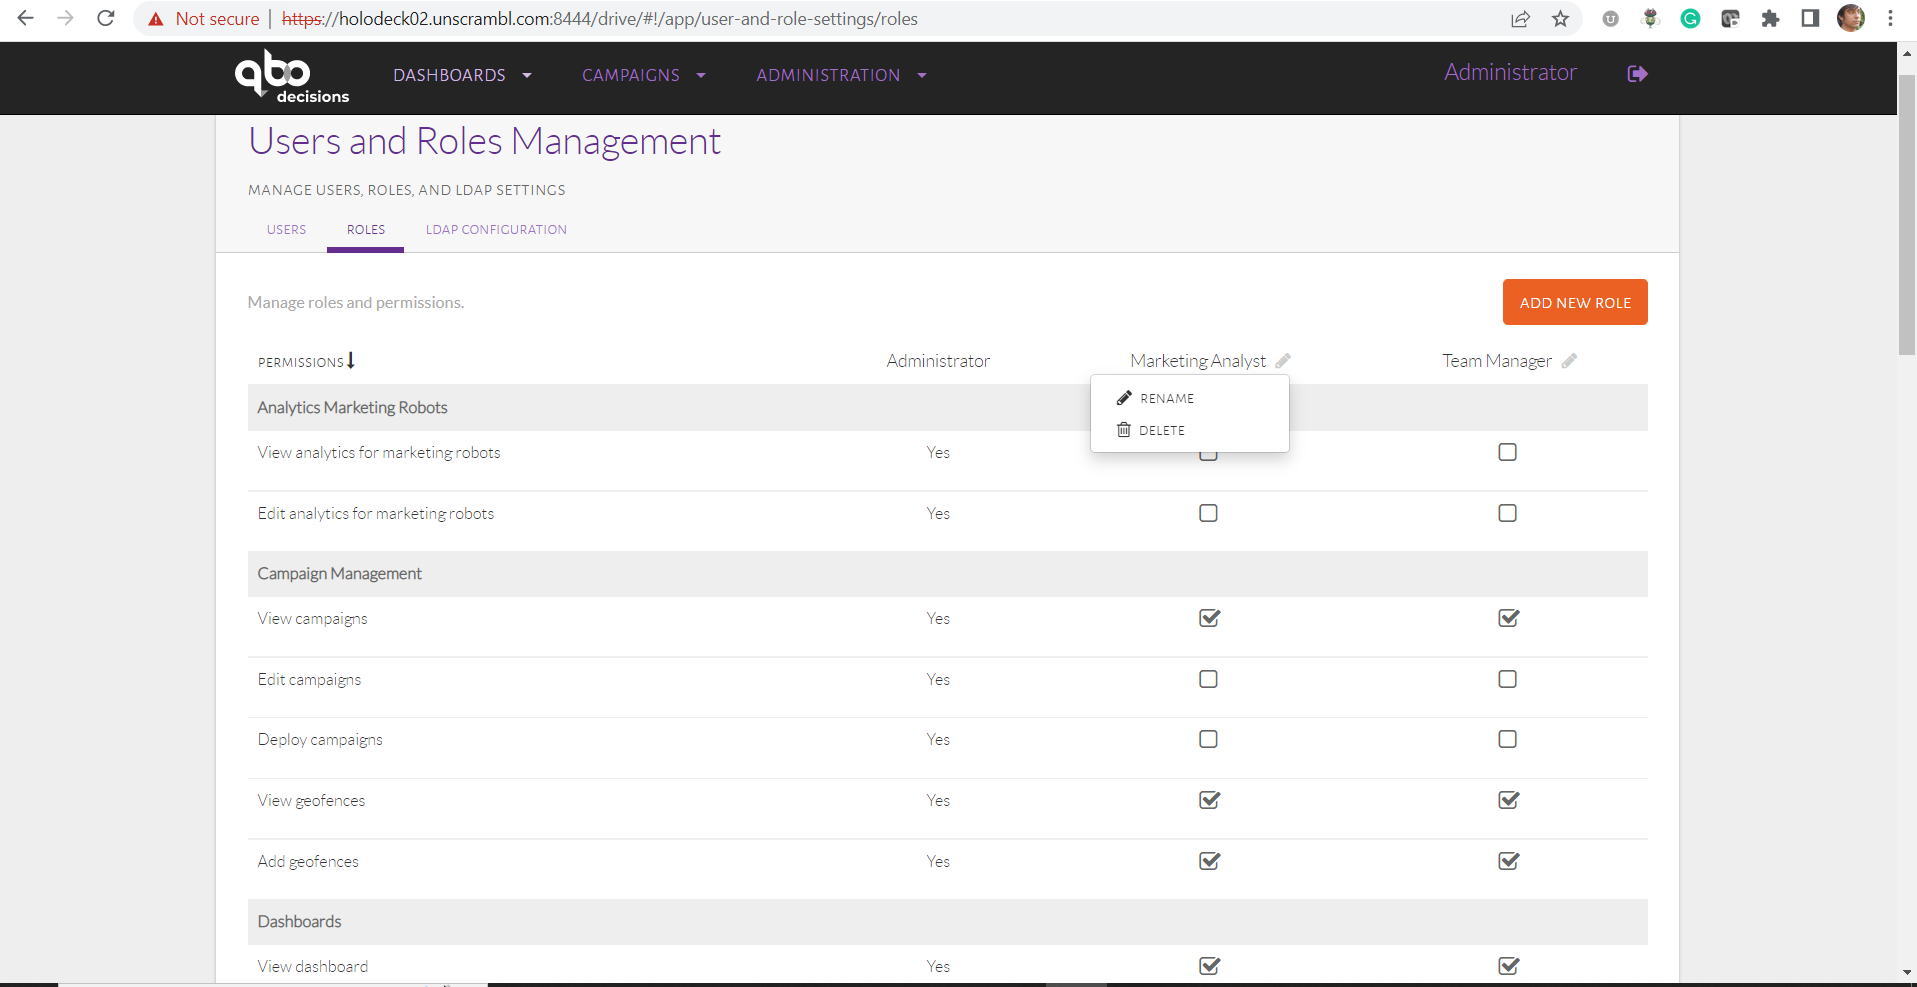
Renaming and deletion options for a role.
A new role can be created by clicking on the Add New Role button located at the top-right corner.
The resulting popup asks the user to enter the name of the new role and, upon clicking on the Create button, the
corresponding new role is created.
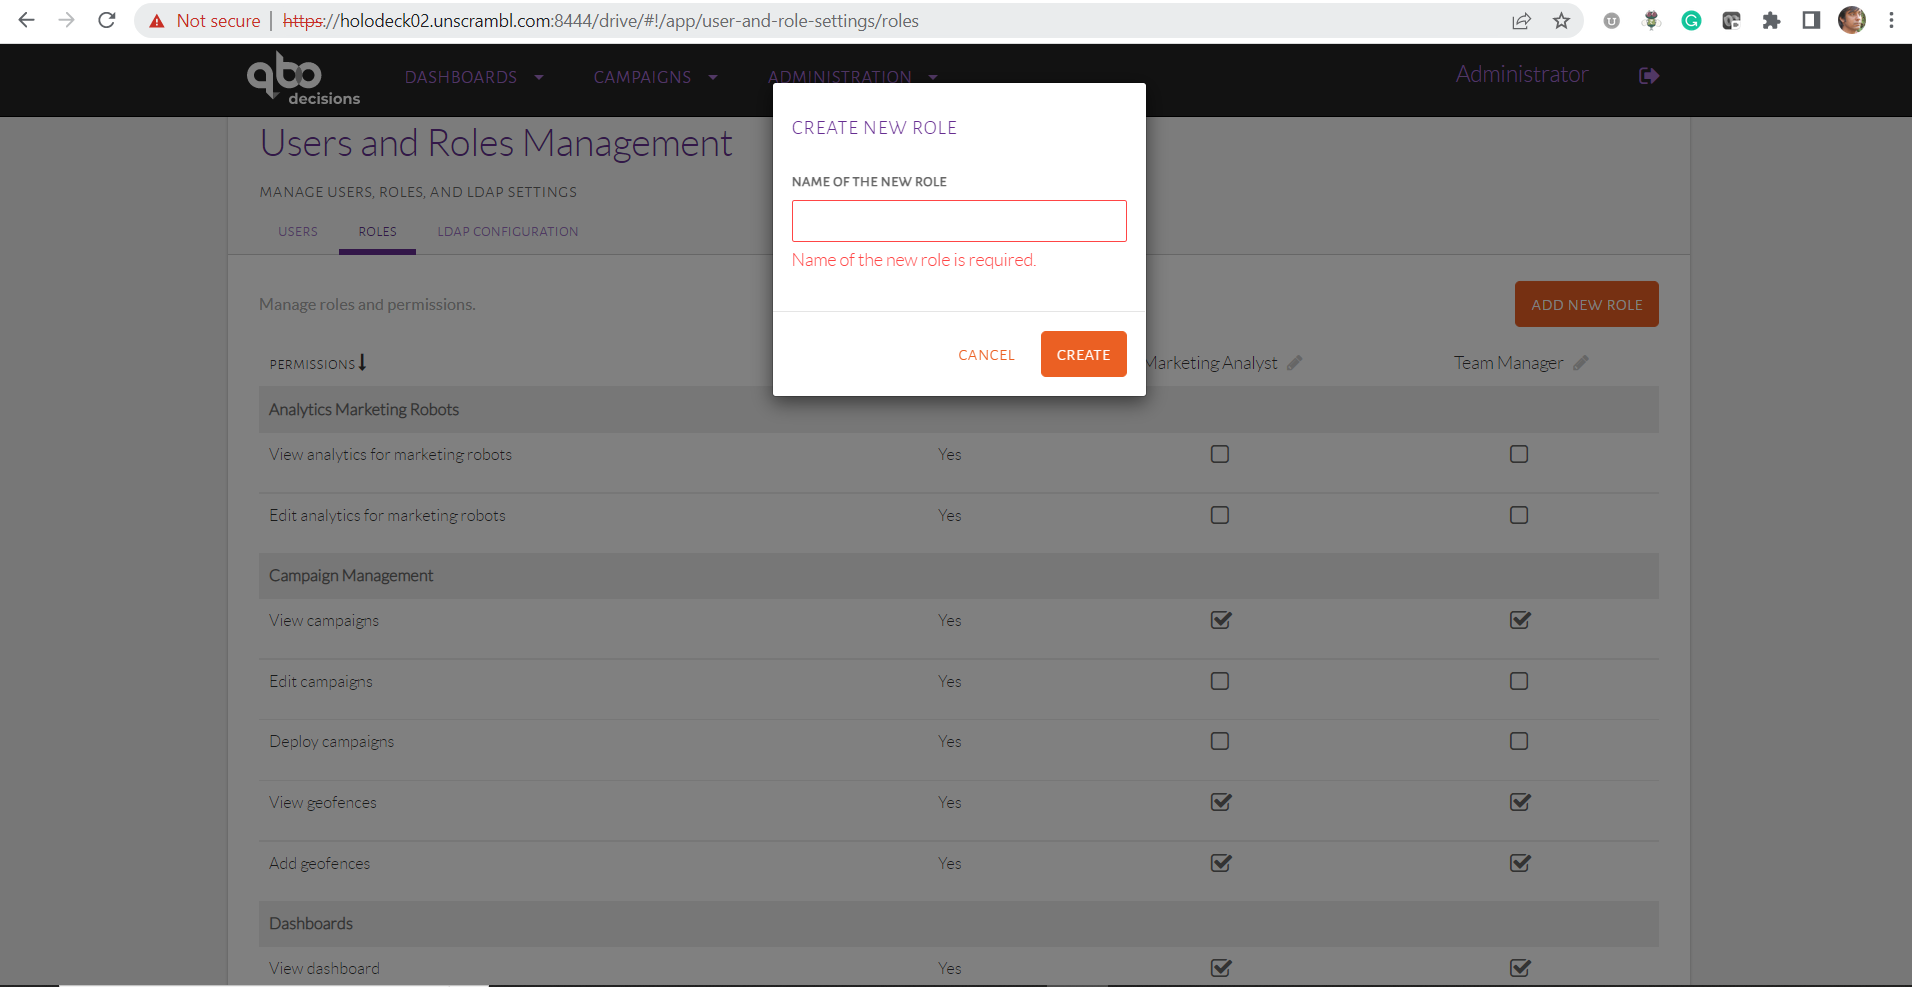
Adding a new role.
A new role is created without any permissions. Permissions can then be added to the newly created role by clicking on the corresponding checkboxes:
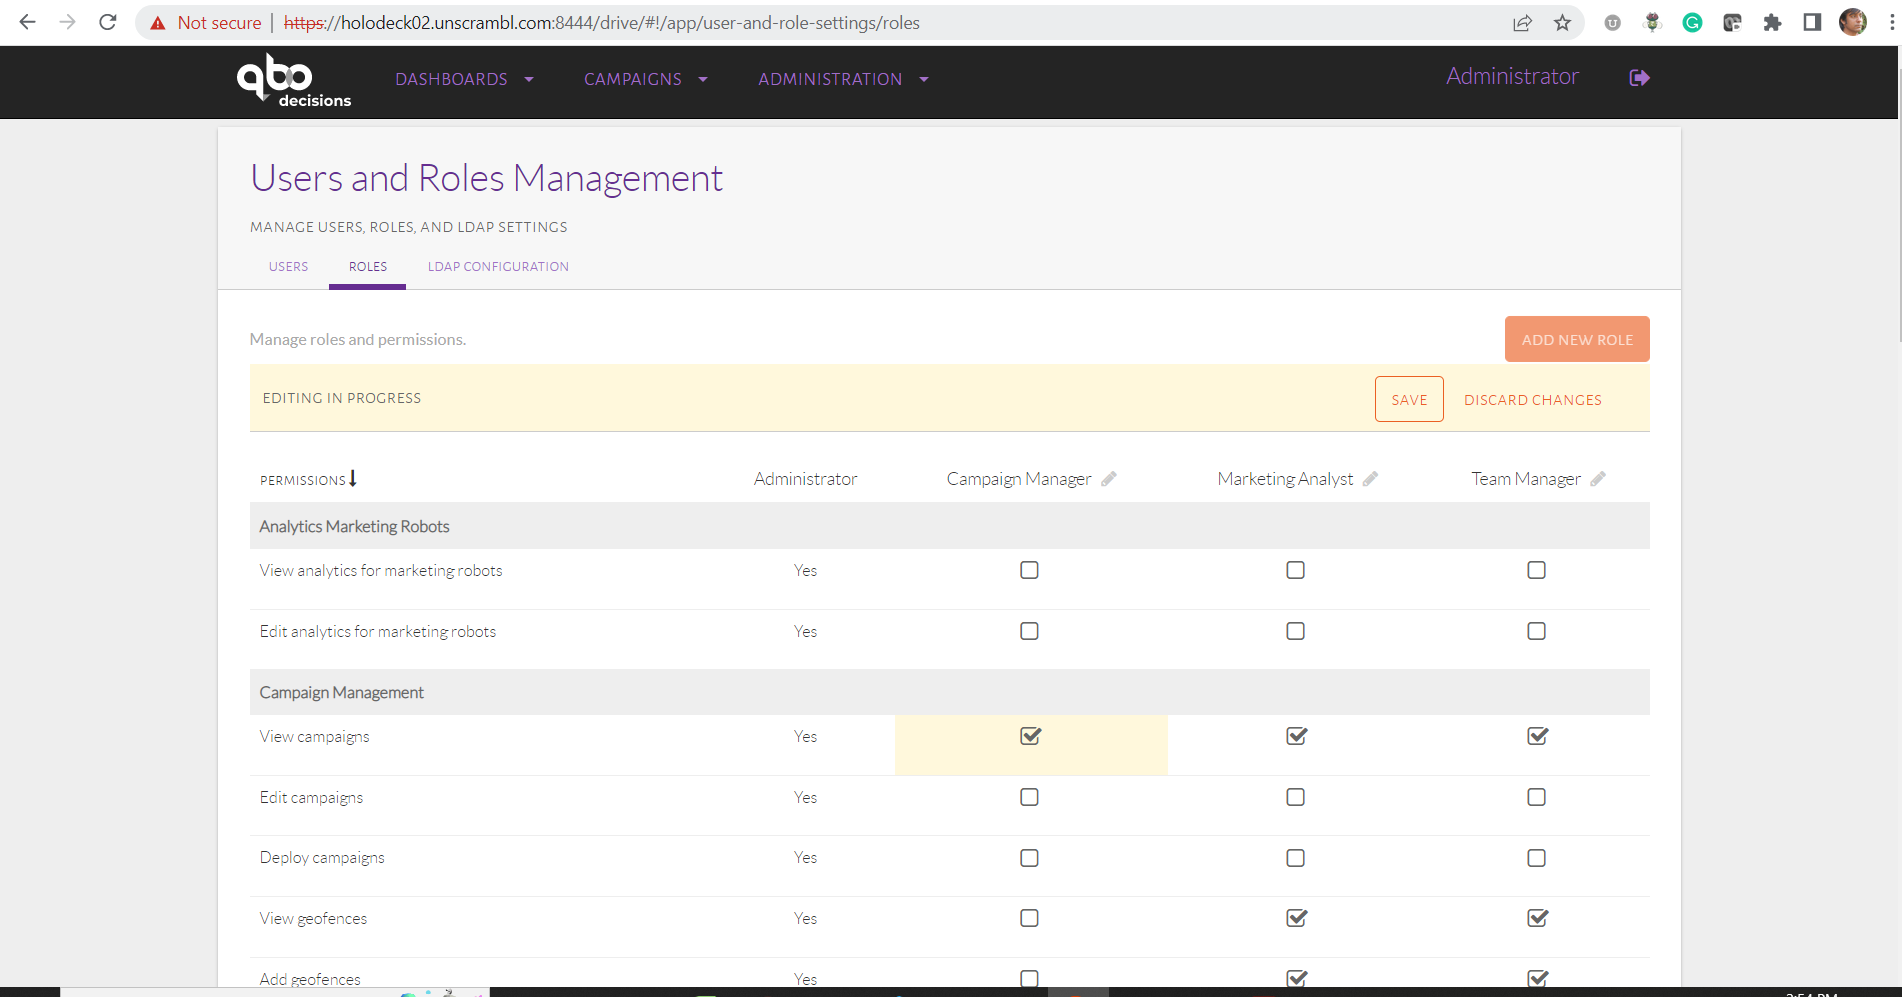
A newly created role (Campaign Manager) with View campaigns permissions only.
Unscrambl Qbo Decisions can be optionally configured to do LDAP based authentication. The LDAP Configuration page can be used to
configure the LDAP Configuration tab in the navigation bar:
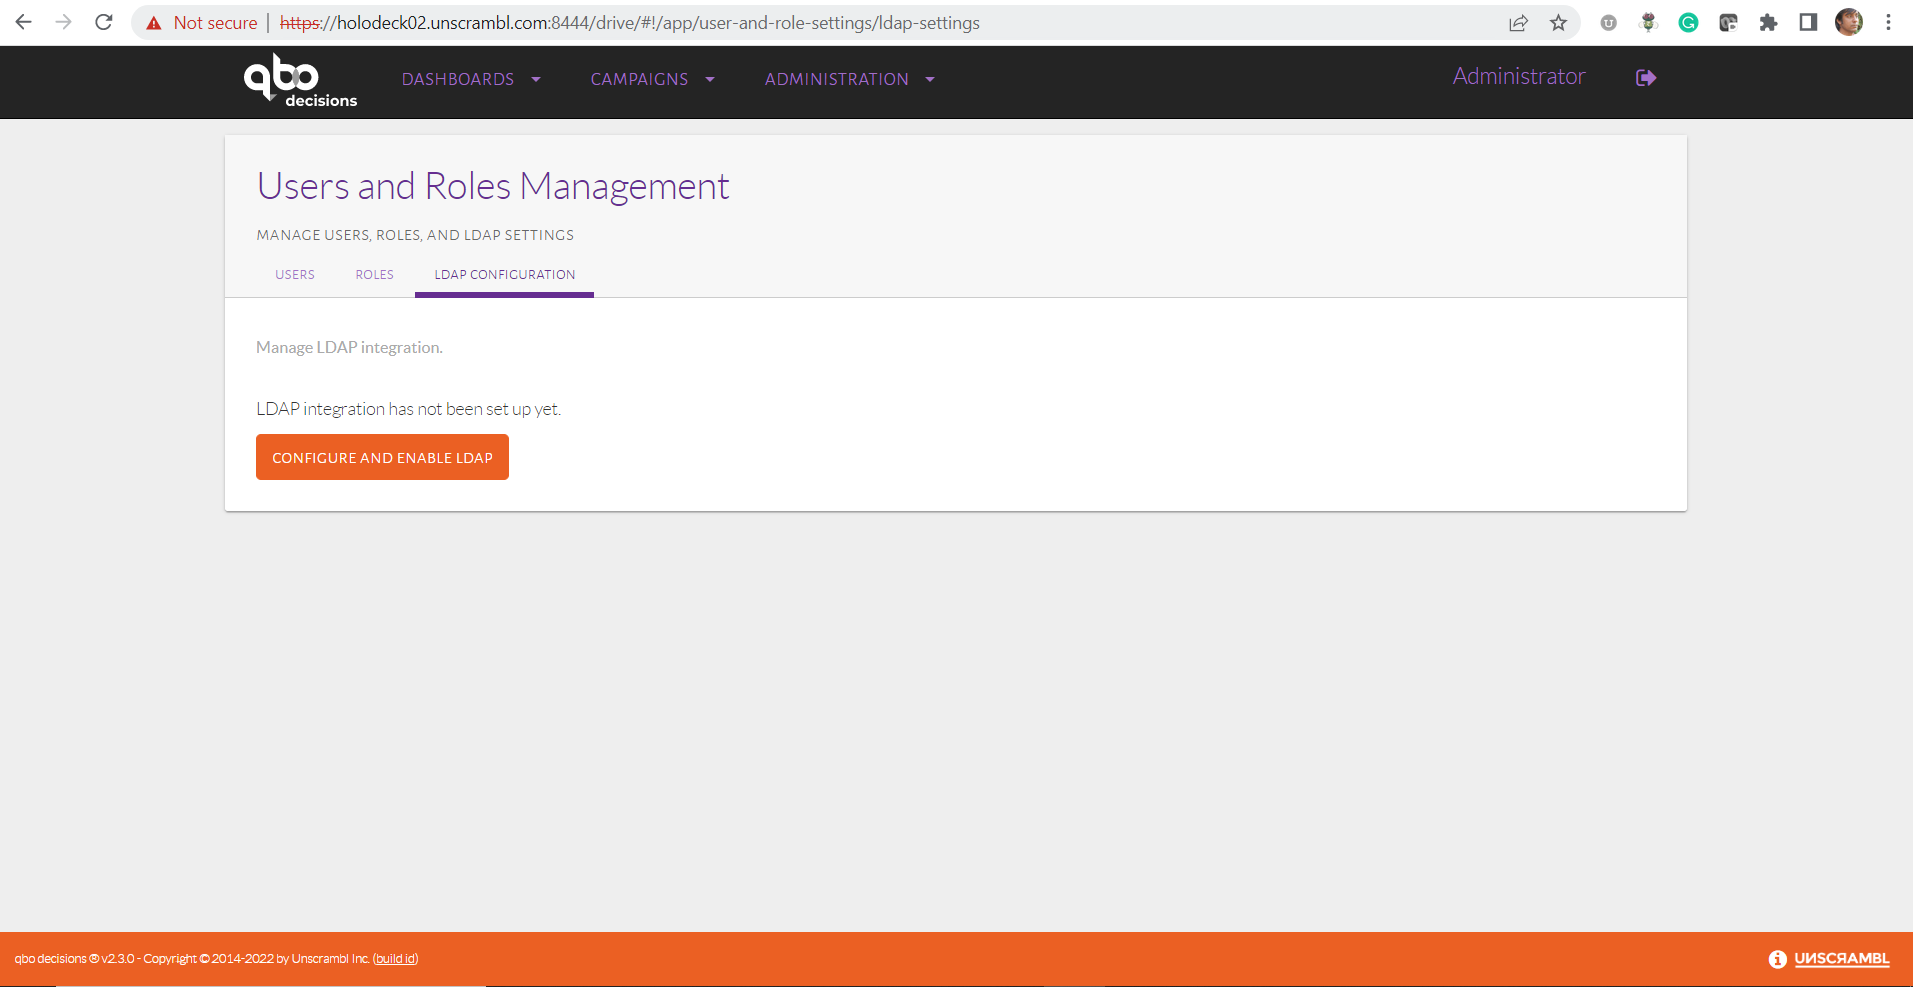
The LDAP Configuration tab.
To enable LDAP based authentication, we need to click on Configure And Enable LDAP button:
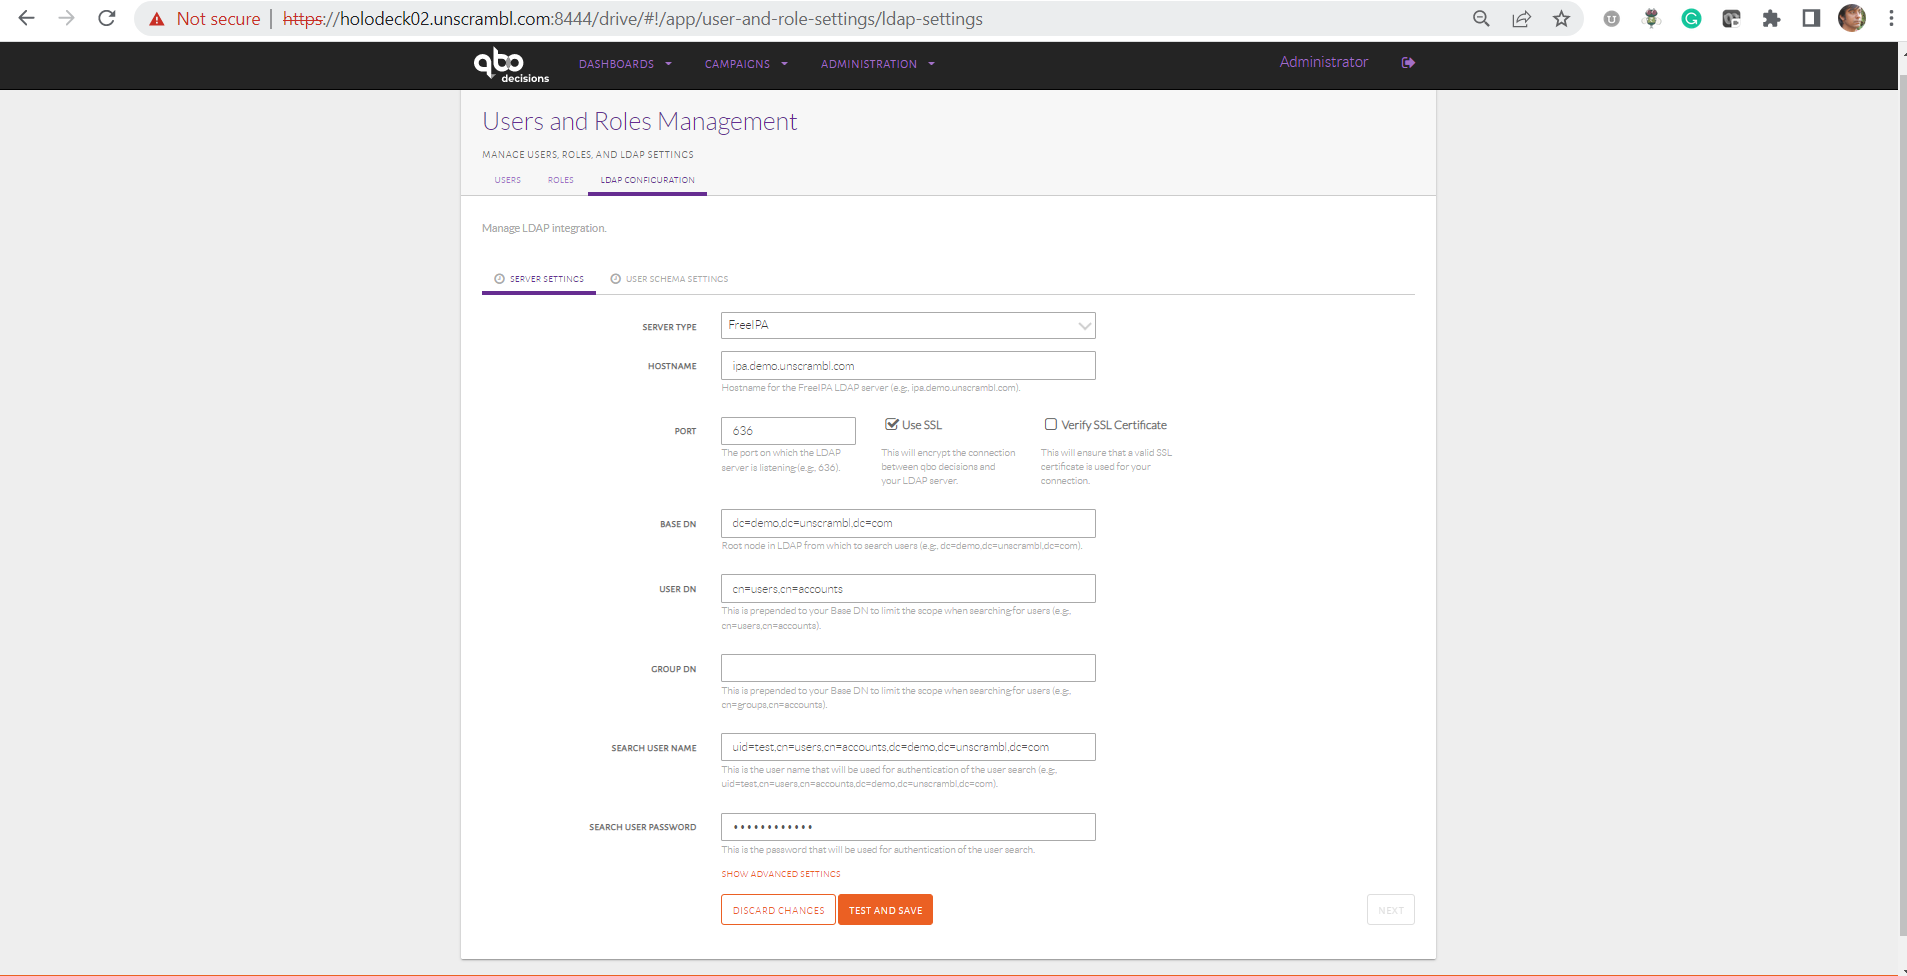
Configuring the LDAP Configuration tab.
Subsequently, the Server Type, Hostname, Port, Base DN, User DN, Group DN, Search User Name
and Search User Password attributes should be filled out.
Current two type are servers are supported, i.e., Free IPA and Active Directory.
Finally, the Test And Save button can be pressed to test the server setting:
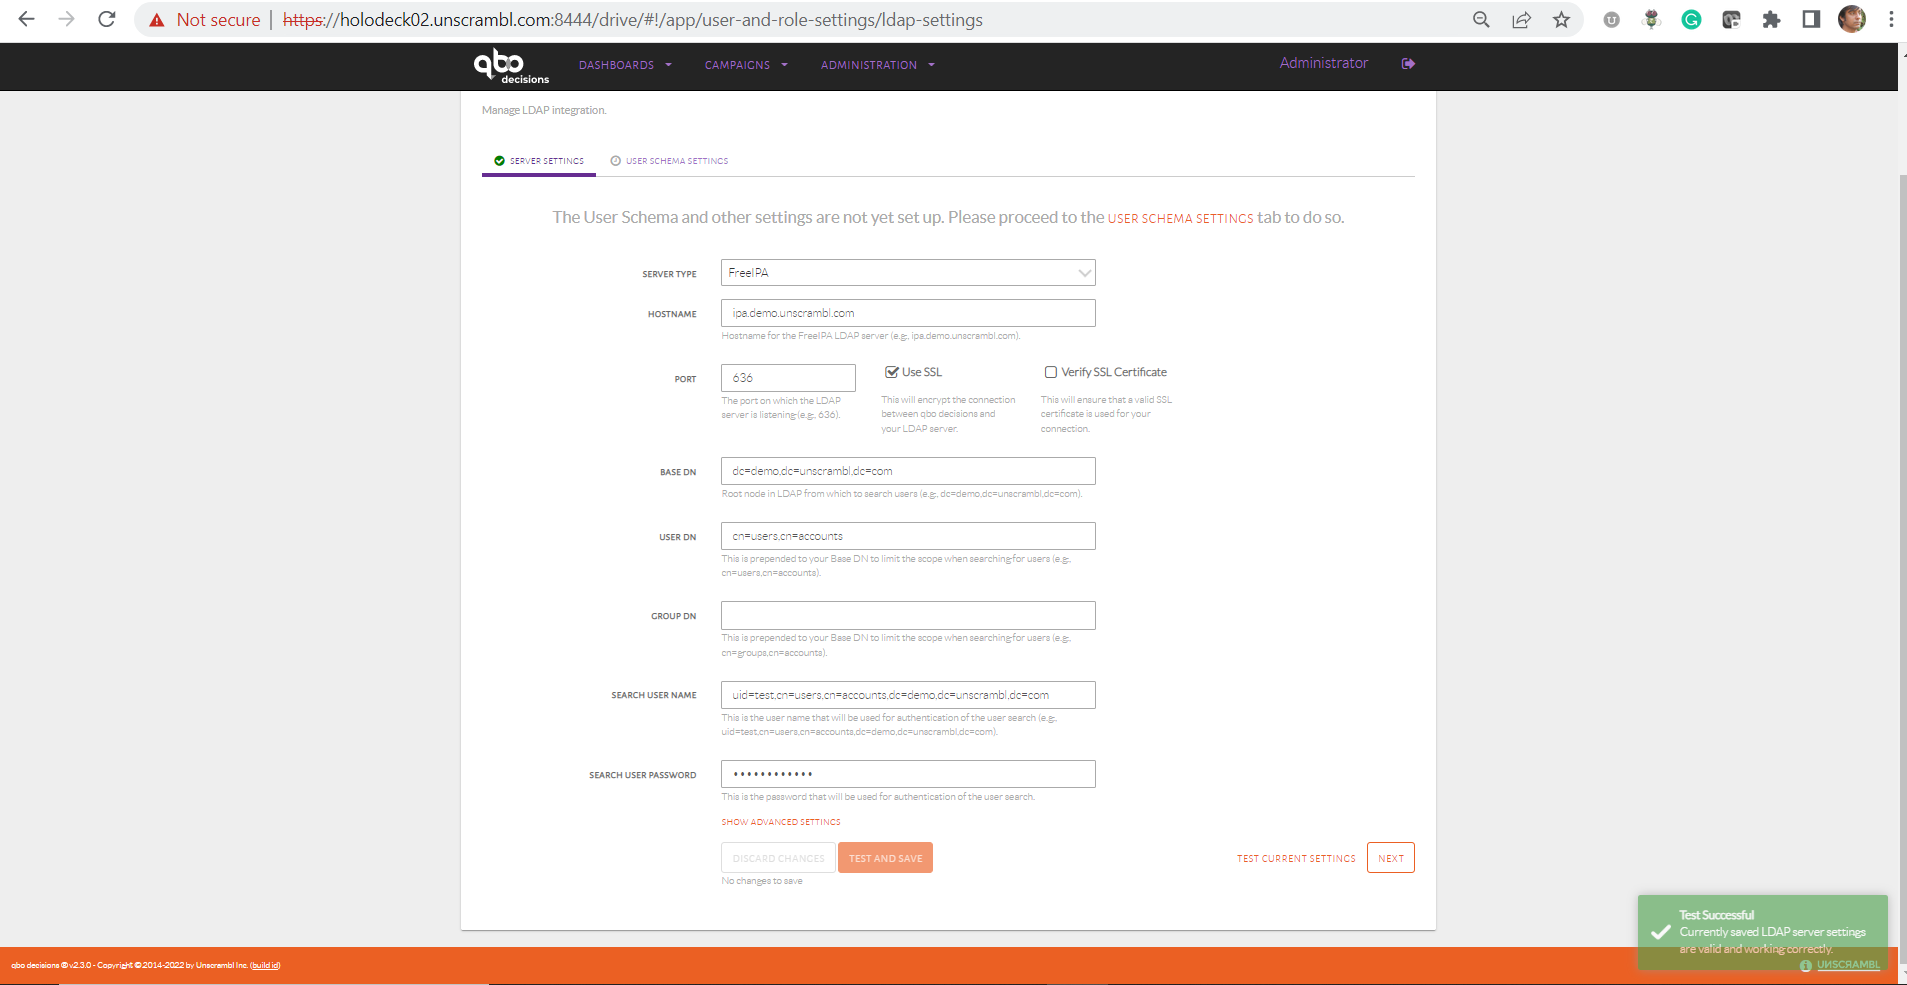
Testing the Server Settings.
Press Next Button to start configuring the User Schema Settings tab.
Now user Object Class, User Object Filter, Username Attrbute, User Name RDN Attribute, User First Name Attribute,
User Lastname Attribute, User Display Name Attribute, User Email Attribute and User Distinguished Name Attribute attribute
needs to be filled based on your organization’s LDAP configurations:
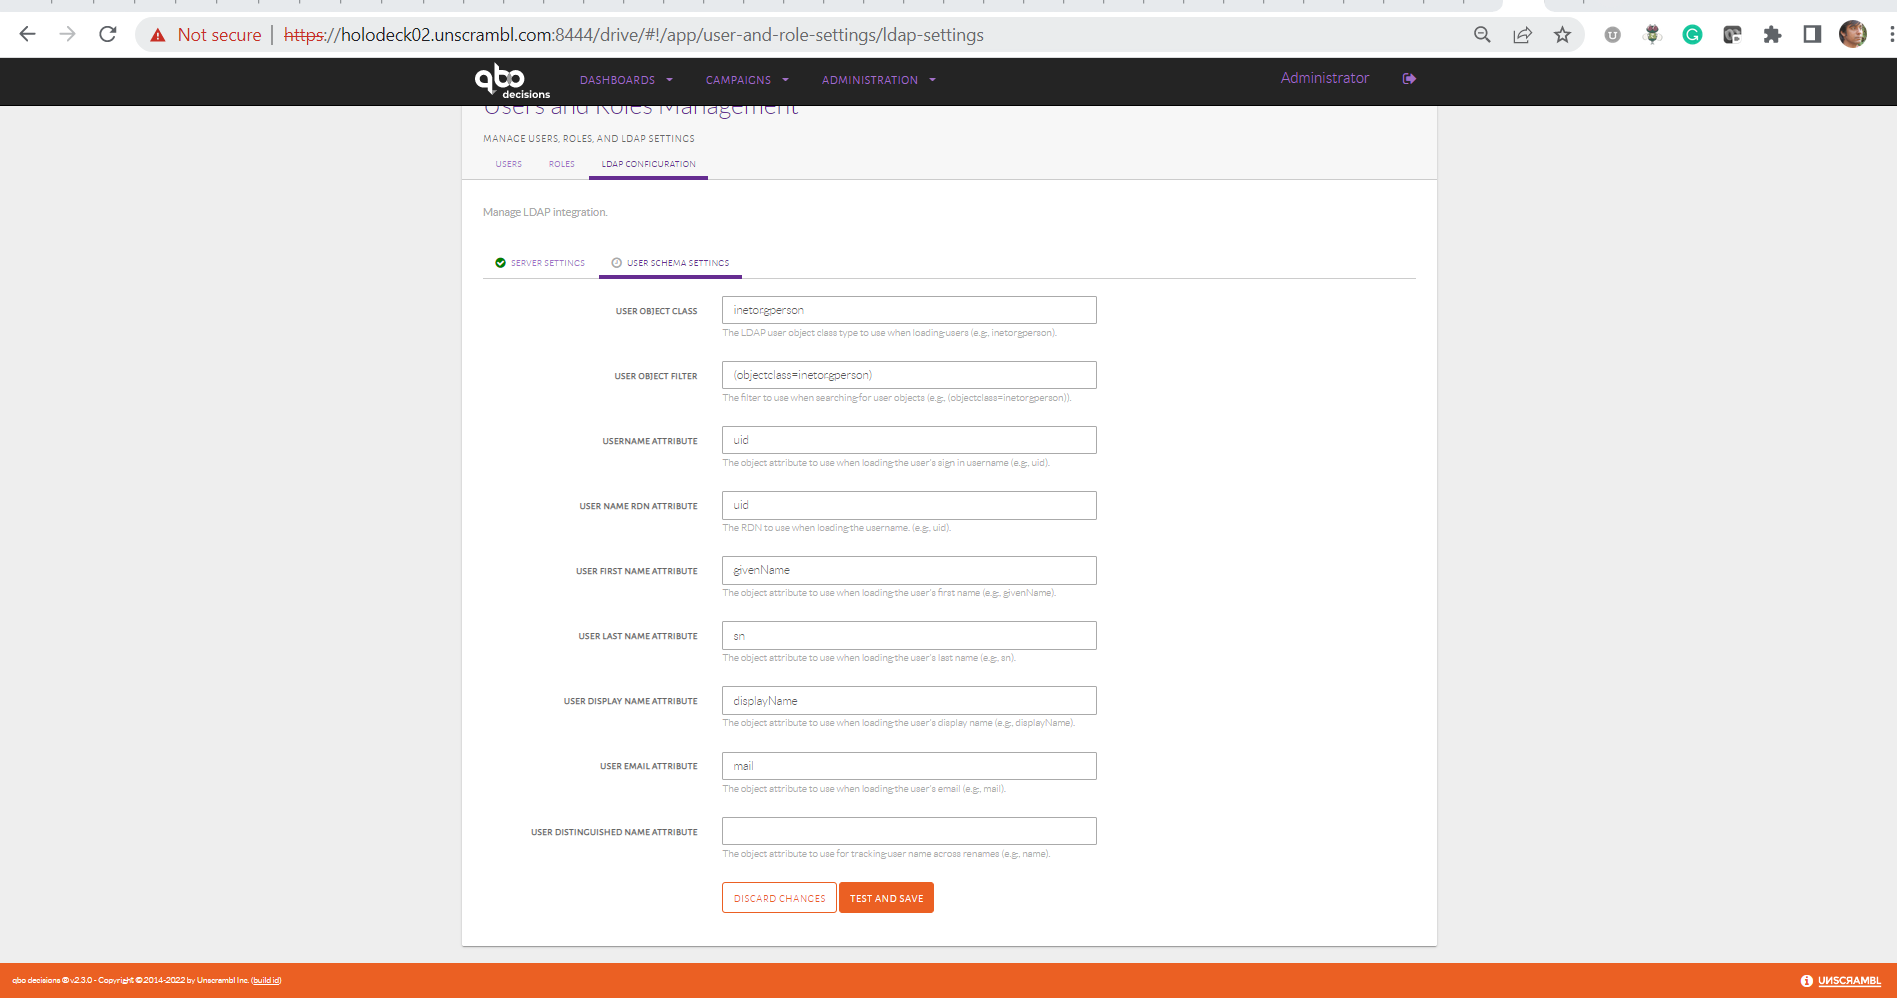
Configuring the User Schema Settings.
Now Click on Test And Save button to test the configuration.
Test it by filling Username and Password for any existing LDAP user and clicking `Test And Save on the popup display.
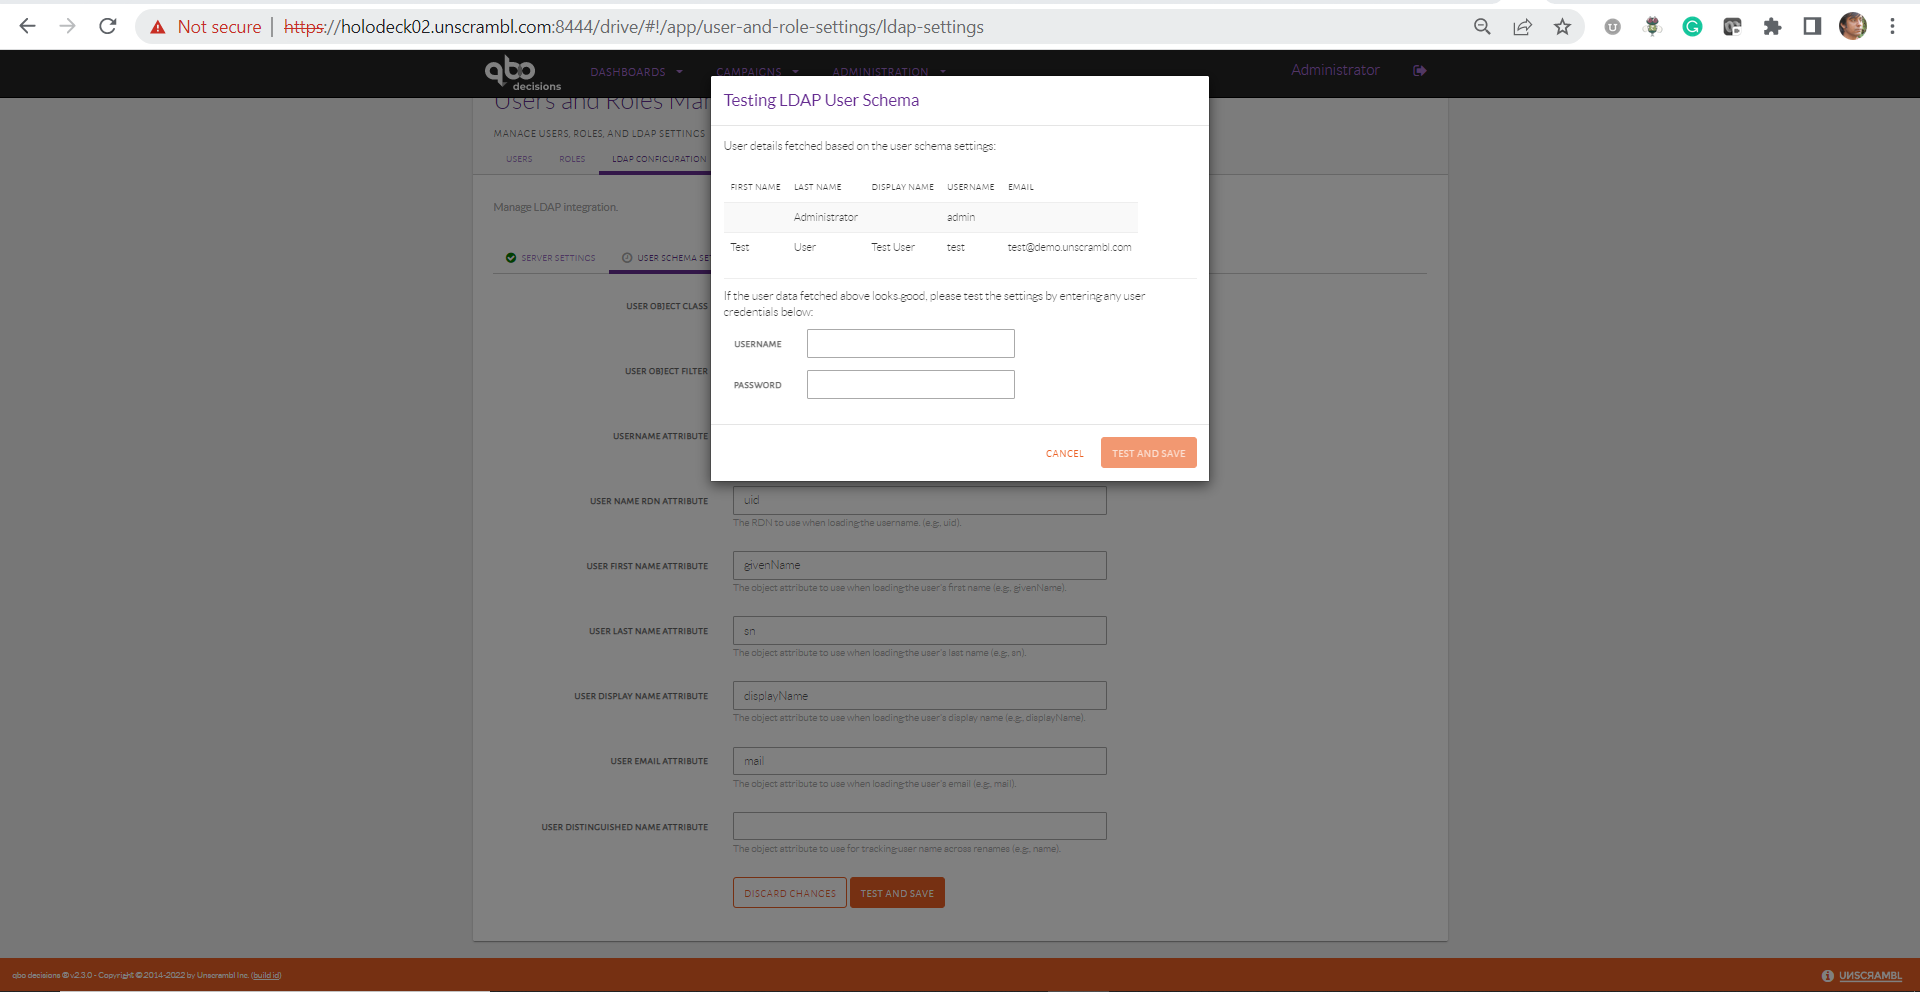
Testing the User Schema Settings.
System Health
The System Health dashboard can be accessed by clicking on the System Health link in the top navigation bar.
The dashboard shows the status of the Analytics Applications, Feed Applications, System Applications and Other Components.
Feed Applications are used for ingesting the incoming streaming data, Analytics Applications are used for stream or Batch based analytics jobs,
System Applications are built-in applications used for different important functions of application like
detecting events or managing batch segment updates.
Other Components are the Unscrambl Qbo Decisions supporting components, including the FastPast, the PinPoint, the Kafka and the Zookeeper:
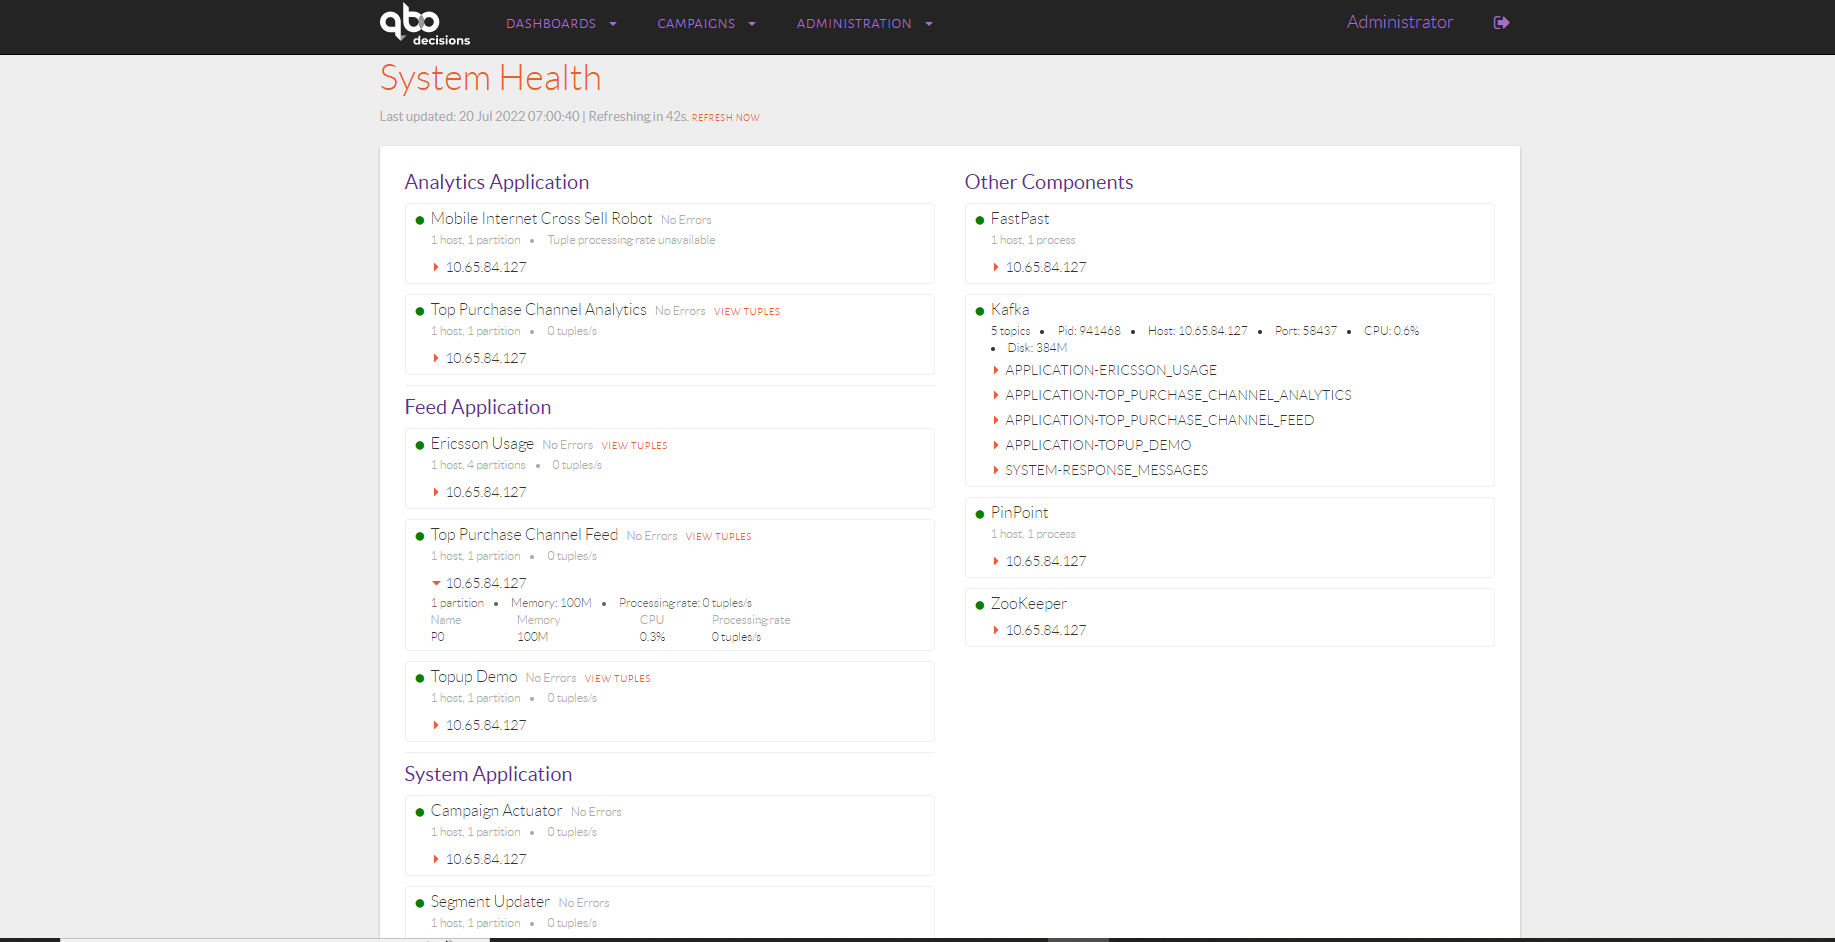
The System Health dashboard.
Feed Applications can also be used to see the last few data rows/tuples beign processed by clicking View Tuples button:
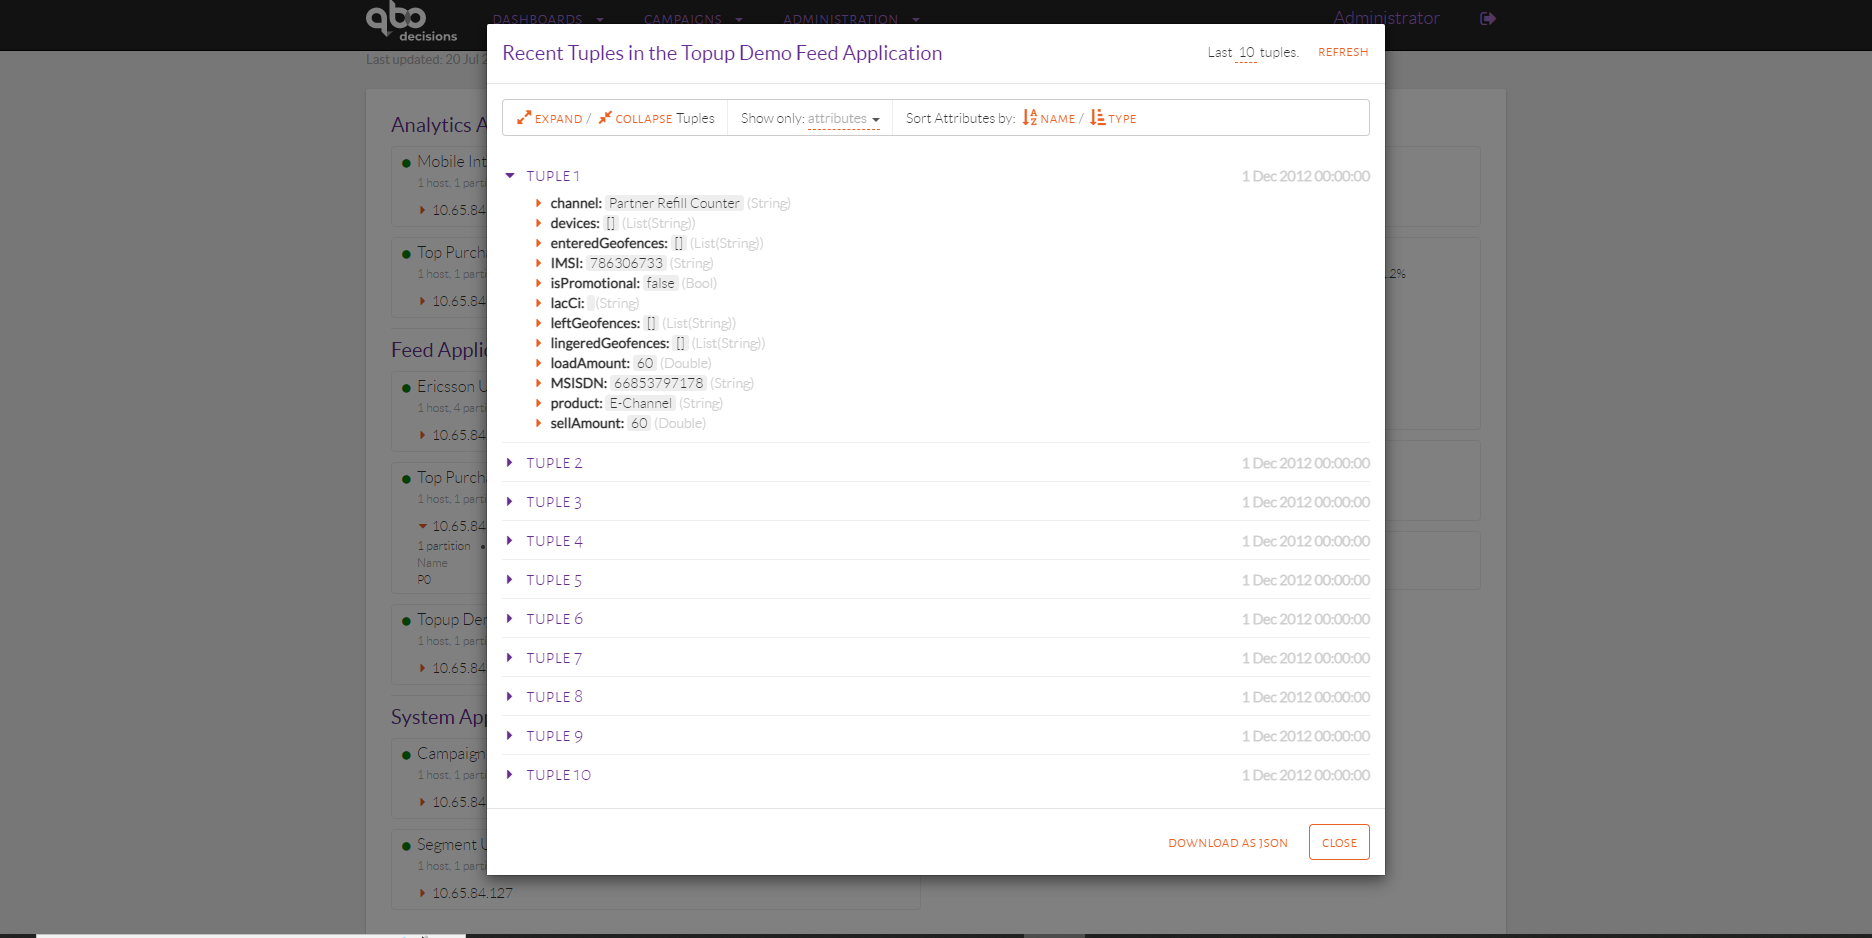
View tuples from feed applications.
Feed Applications also shows the resource utilization of a feeds and parallel processing flow of each feeds.

partitions and statistics of a feed application.
Applications, Aggregates & Enrichments
All of the feed applications configured in Unscrambl Qbo Decisions can be seen by clicking on the Administration link in
the top navigation bar and then by clicking the Settings menu item. We have to use Feed Management tab to see feed applications.
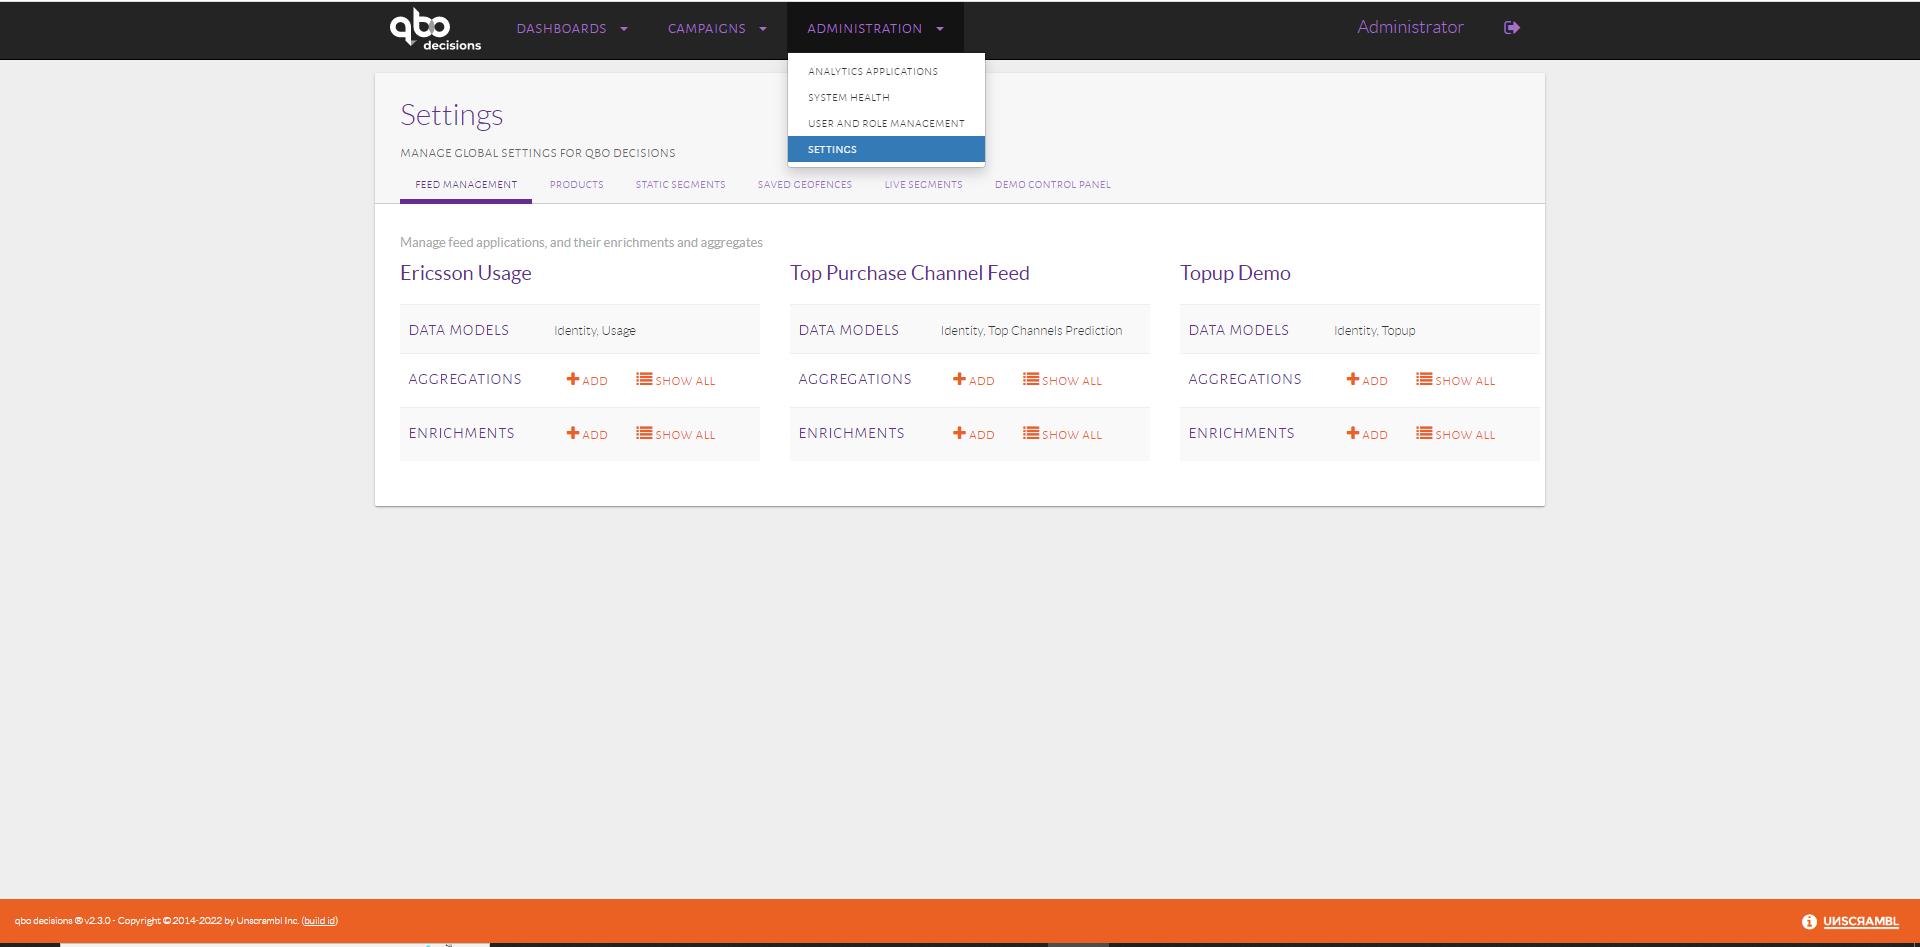
The applications configured in Unscrambl Qbo Decisions.
This dashboard shows the applications and their associated data model, e.g., ‘Topup’, ‘Usage’, etc.
Users with the appropriate permissions can use this page to view, edit, add and/or delete the aggregates and enrichments associated with a given feed application.
The existing aggregates configured for a feed application can be seen by clicking on the Show All button in the
Aggregations row for that application.
The dialog showing the aggregates associated with the Topup Demo application is below:
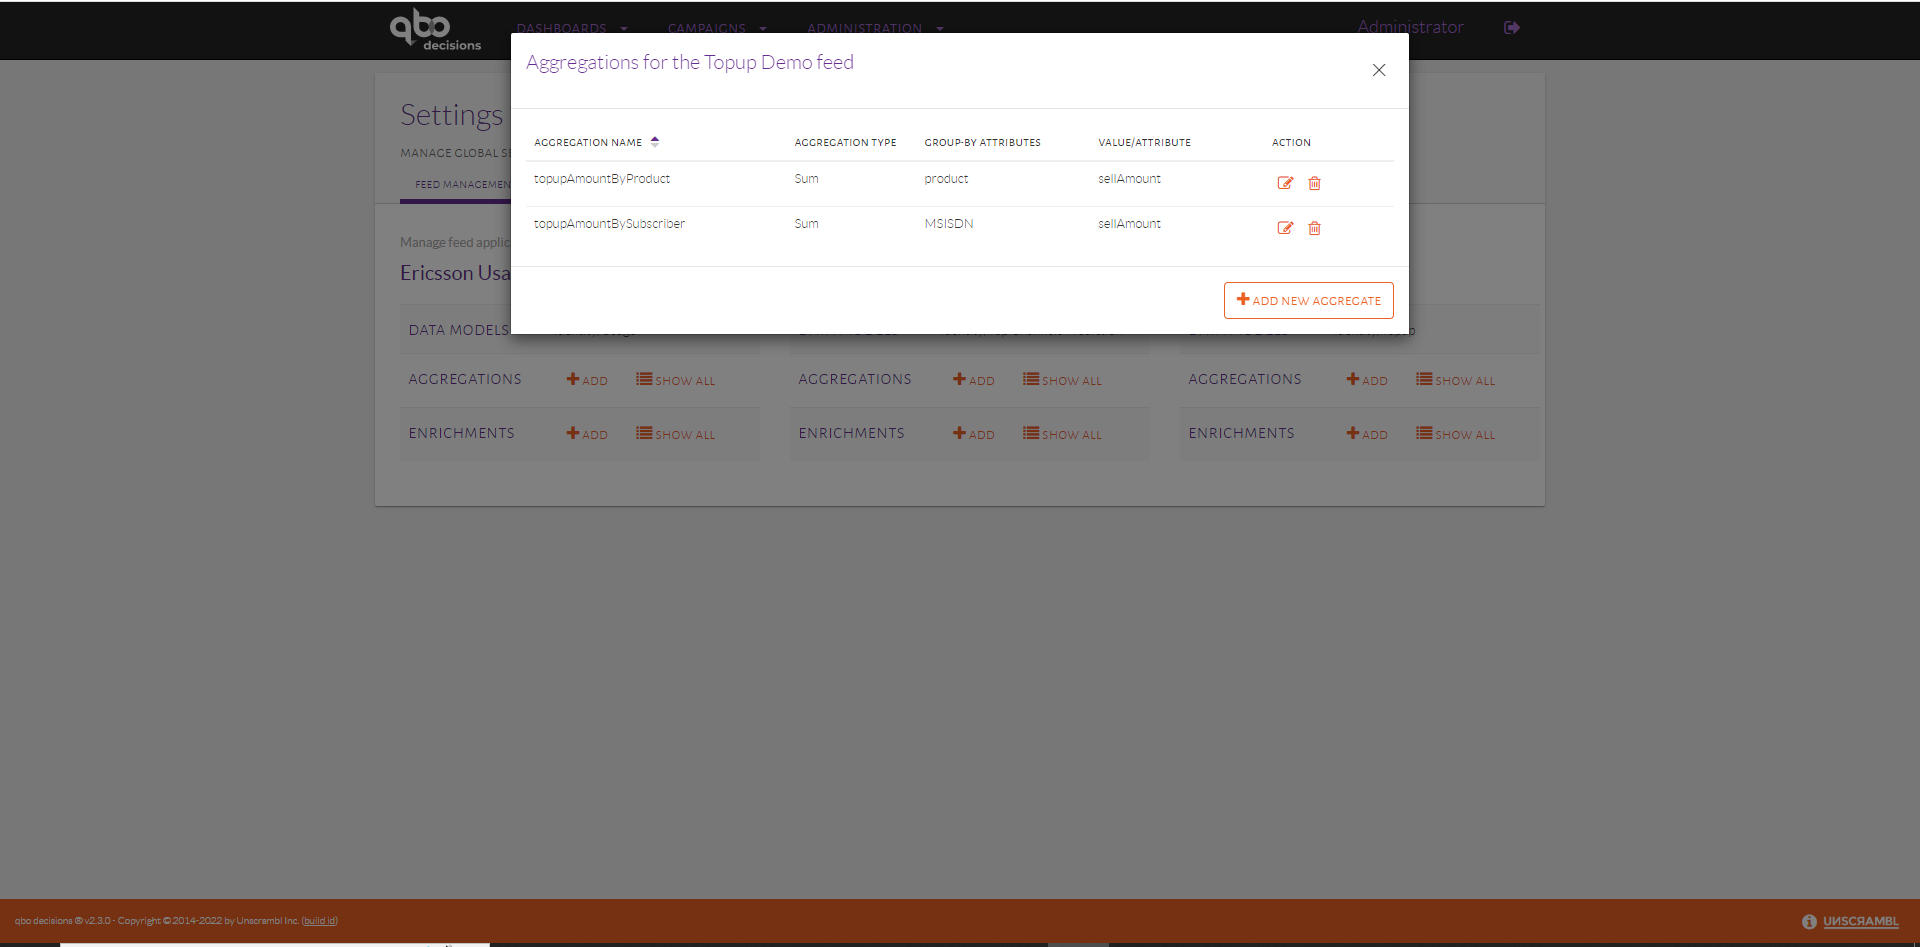
The aggregates associated with the Topup Demo feed.
The aggregates associated with a feed can be edited and removed.
To explain the aggregates a bit further, let us consider the aggregate called topupAmountBySubscriber. The dialog
that opens up upon clicking on the edit button is shown below:
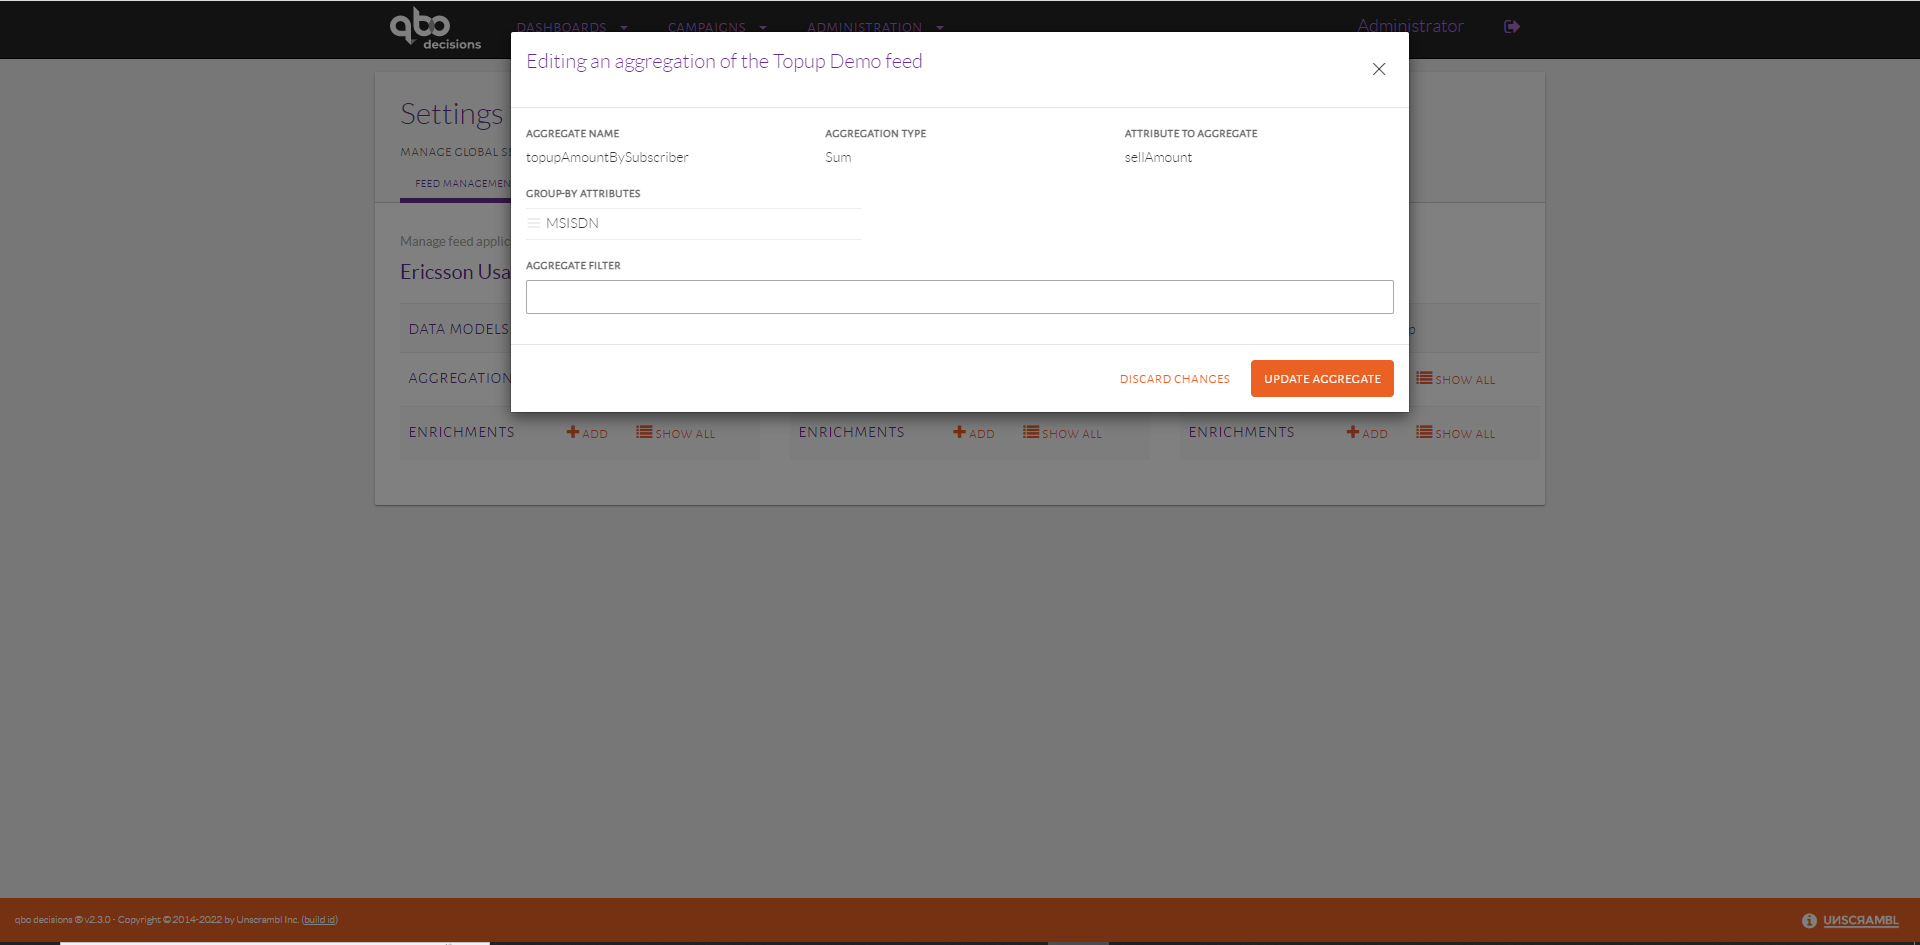
Editing an aggregate.
This aggregate is designed to count the number of calls by subscriber over various time windows (e.g., currentDay,
lastDay, etc.).
topupAmountBySubscriber, i.e. the aggregate Name, is the name that is used to refer to the aggregate when using
it in a trigger.
The Aggregation type, in this case Sum, is used to accumulate the topup amounts, and the group-by attribute, in
this case, MSISDN, is used to produce per-user tallies, since it identifies individual subscribers.
Additional group-by attributes can be added in a manner similar to the group-by clause used in traditional relational database management system (RDBMS) query languages.
A filter condition can also be used when only a subset of tuples is to be considered for an aggregation.
For instance, if the incoming tuples in the feed contain a Boolean isDroppedCall, indicating a dropped call, then
one can calculate droppedCallsBySubscriber by using isDroppedCall equals to True as a filter condition with
the MSISDN as the group-by attribute and Count as the aggregation type.
To add a new aggregate, we need to click on Add button for that feed application. A dialog with form needs to be filled
by filling Aggregate Name, Aggregation Type, Attribute to Aggregate, Group by Attribute and Aggregation Filter:
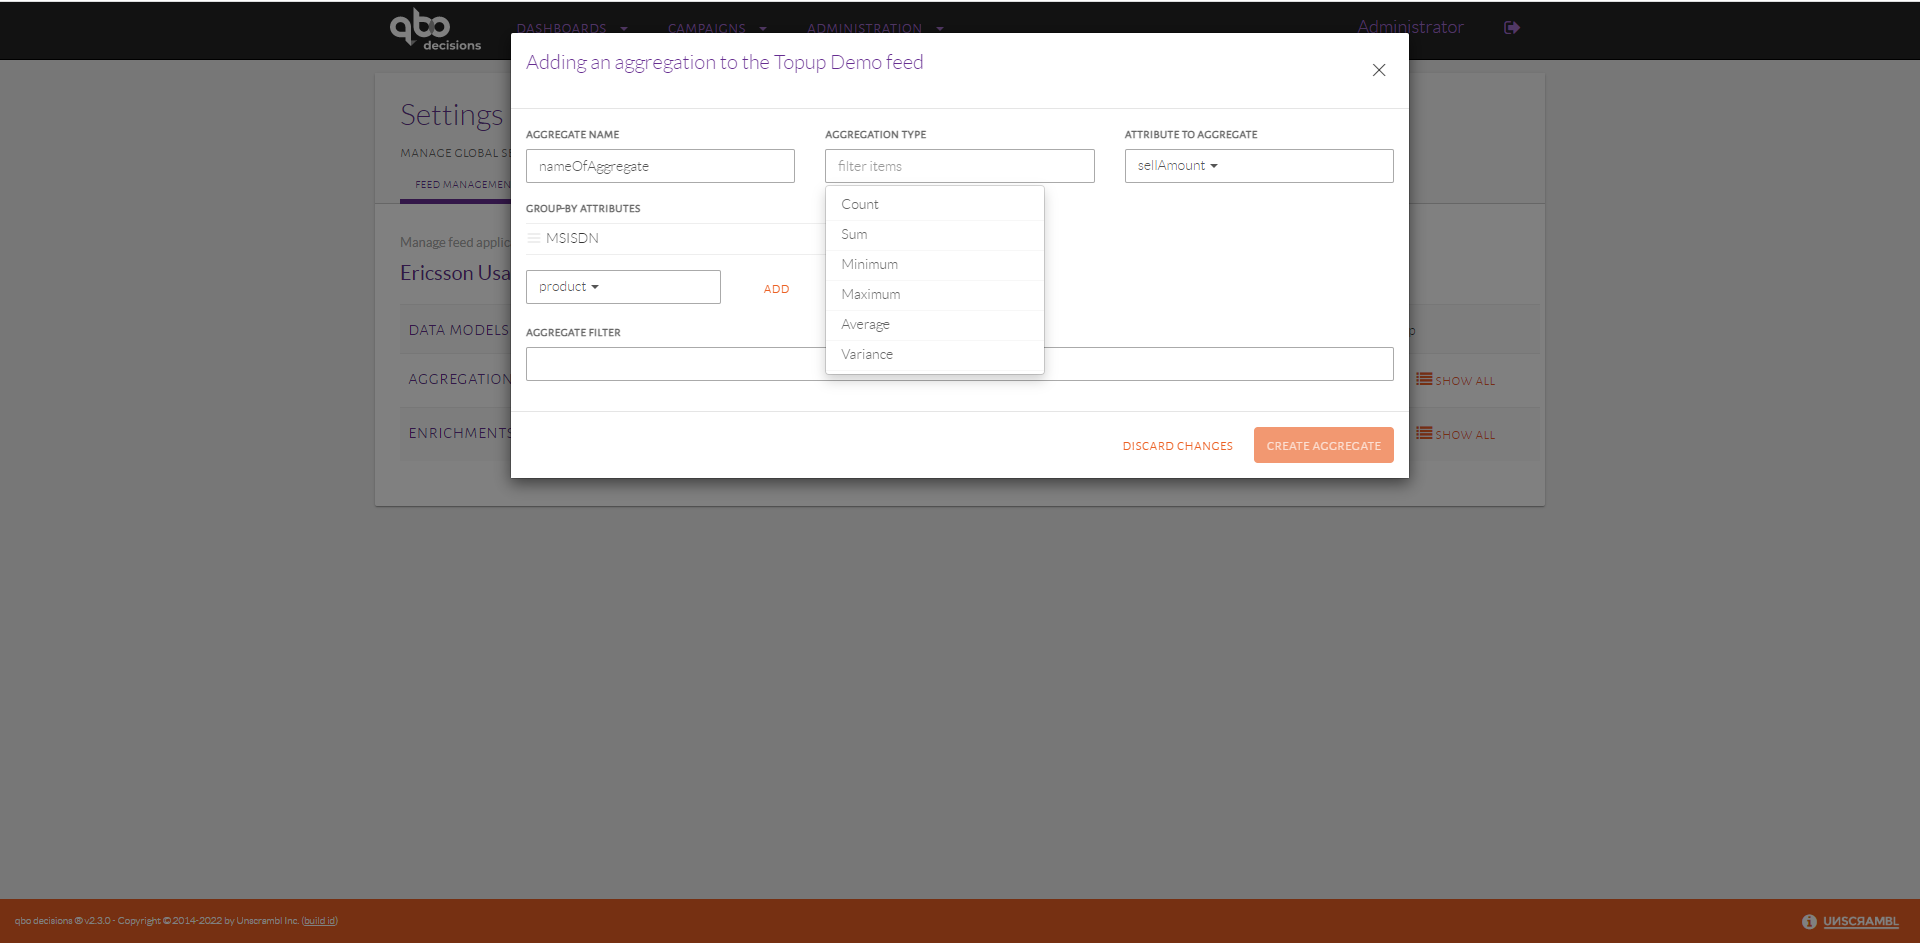
Adding new aggregate to a feed.
The list of enrichments associated with a feed can be seen by clicking on the Show button in the Enrichments
row. The enrichments associated with the Topup Demo feed can be seen below:
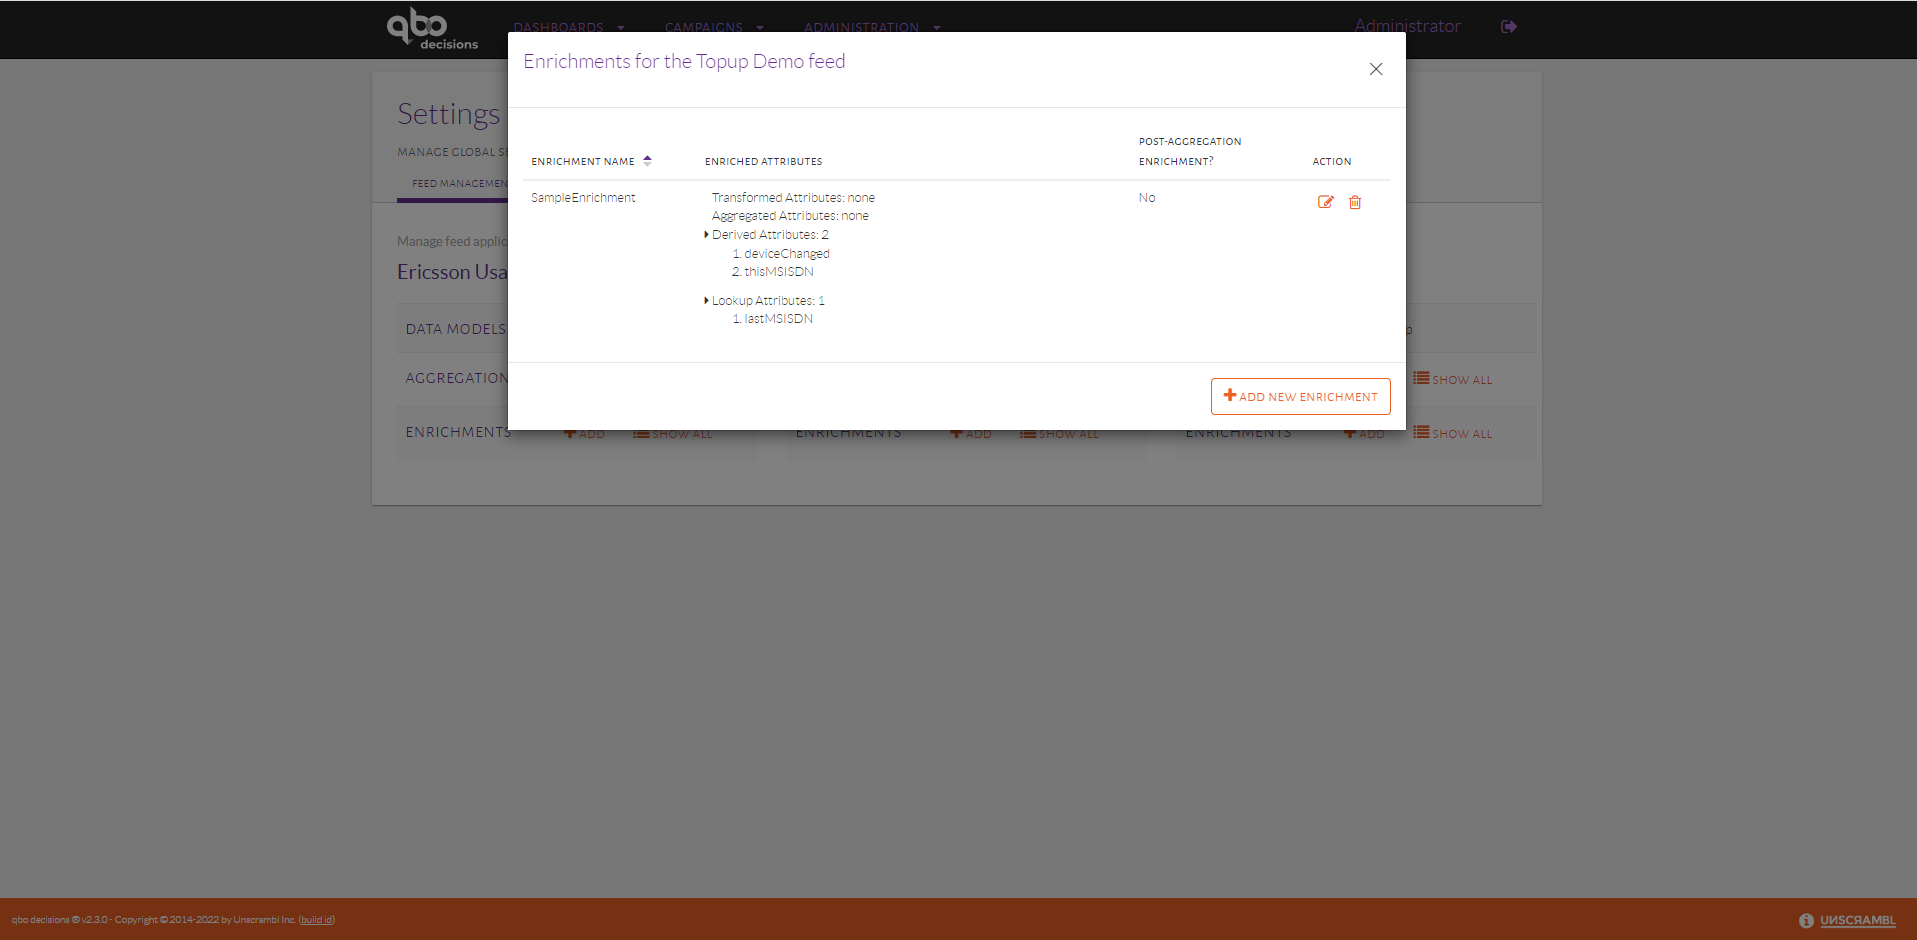
The enrichments associated with the Topup Demo feed.
Unscrambl Qbo Decisions supports 4 kinds of enrichments:
The transformed attributes enrichment enables one to add attributes to the tuple that have either a constant value or a value that can easily be derived from an UEL expression. Such transformed attribute may be needed by other enrichments or retained as an attribute in the enriched tuple. Note that retaining and forwarding the constant attributes as part of the output tuple from the enrichment step is optional.
The lookup-based enrichment, which retrieves attributes from the profile store and possibly add them to the outgoing tuple. Note that retaining and forwarding the looked up attributes as part of the output tuple from the enrichment step is optional. We have to first select a key attribute present in the tuple, the associate
Pinpointtable will be listed inLookup Tabledrop-down, finally we have to select the attribute from the lookup table to be looked up.The aggregate-based enrichment, which fetches data from
FastPastand possibly adds such attributes to the outgoing tuple. As part of configuring an aggregated attribute, it is necessary to (1) select an aggregate from the list of available aggregates for the feed, (2) select the window length unit, which can beMinute,Hour,Day,MonthorYear, (3) select the period which can be one ofCurrentorLastand (4) optionally selectWindow length, which can be used to indicate that only a subset of an aggregate is to be used. For instance, when theDaywindow length unit and theLastperiod withWindow Lengthset to 7 is chosen, the aggregated value for the last 7 days can be computed. Note that when using theMinutewindow length unit,Window Lengthneeds to be multiple of 10-minute i.e., backend configured sub-hour buckets length. Similarly to lookup-based enrichment, aggregate-based enrichment attributes may or may not be retained and forwarded as part of the output tuple.The derived attributes enrichment, which enables the execution of an external Python function. One such a function takes in a tuple (as well as any other required additional parameters, if any), performs a user-defined computation, and produces a result. This function invocation’s return value can then be retained and forwarded as part of an outgoing tuple. This capability can be used, for instance, to invoke a scoring function on an incoming tuple, which computes a score (e.g., based on previously mined data) that can then be added as an attribute to the corresponding outgoing tuple. The derived attributes enrichment are basically of three types, i.e., enrichment function based, expression based and scorer function based. expression based takes an UEL expression explained in Miscellaneous » UEL section.
The interface for editing enrichments is shown below:
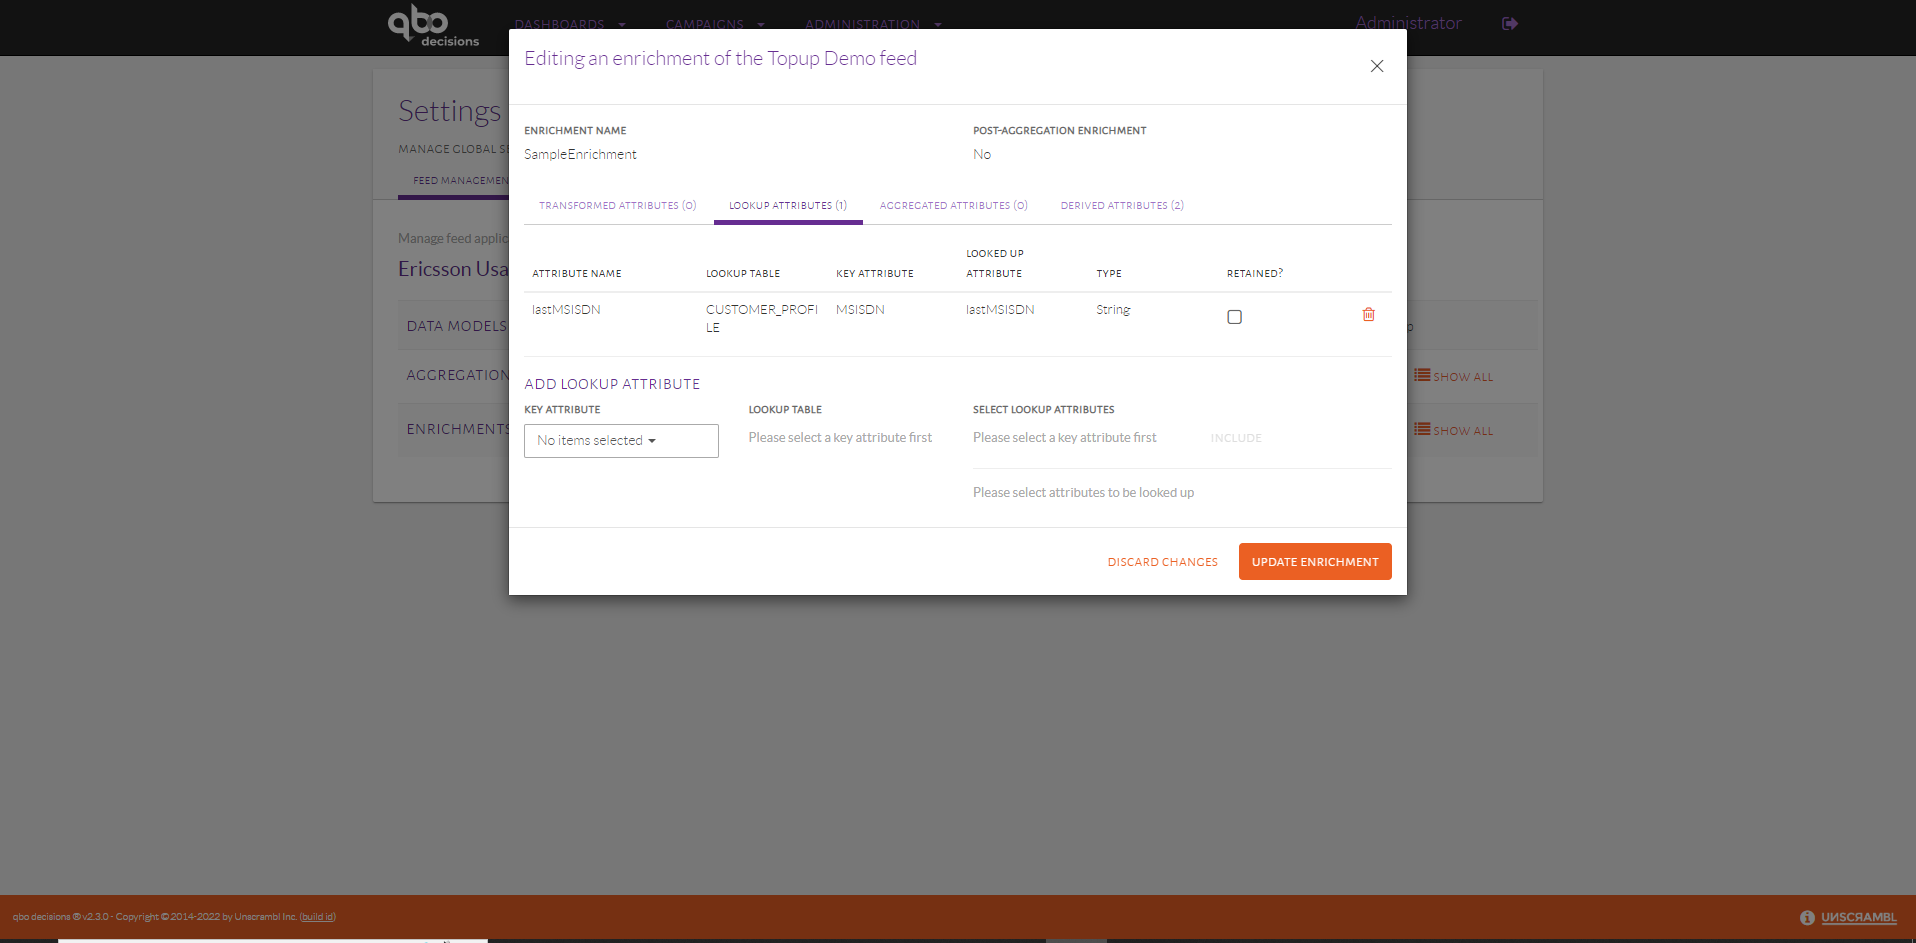
Interface for editing enrichments.
The interface for editing derived attribute type enrichments is shown below:
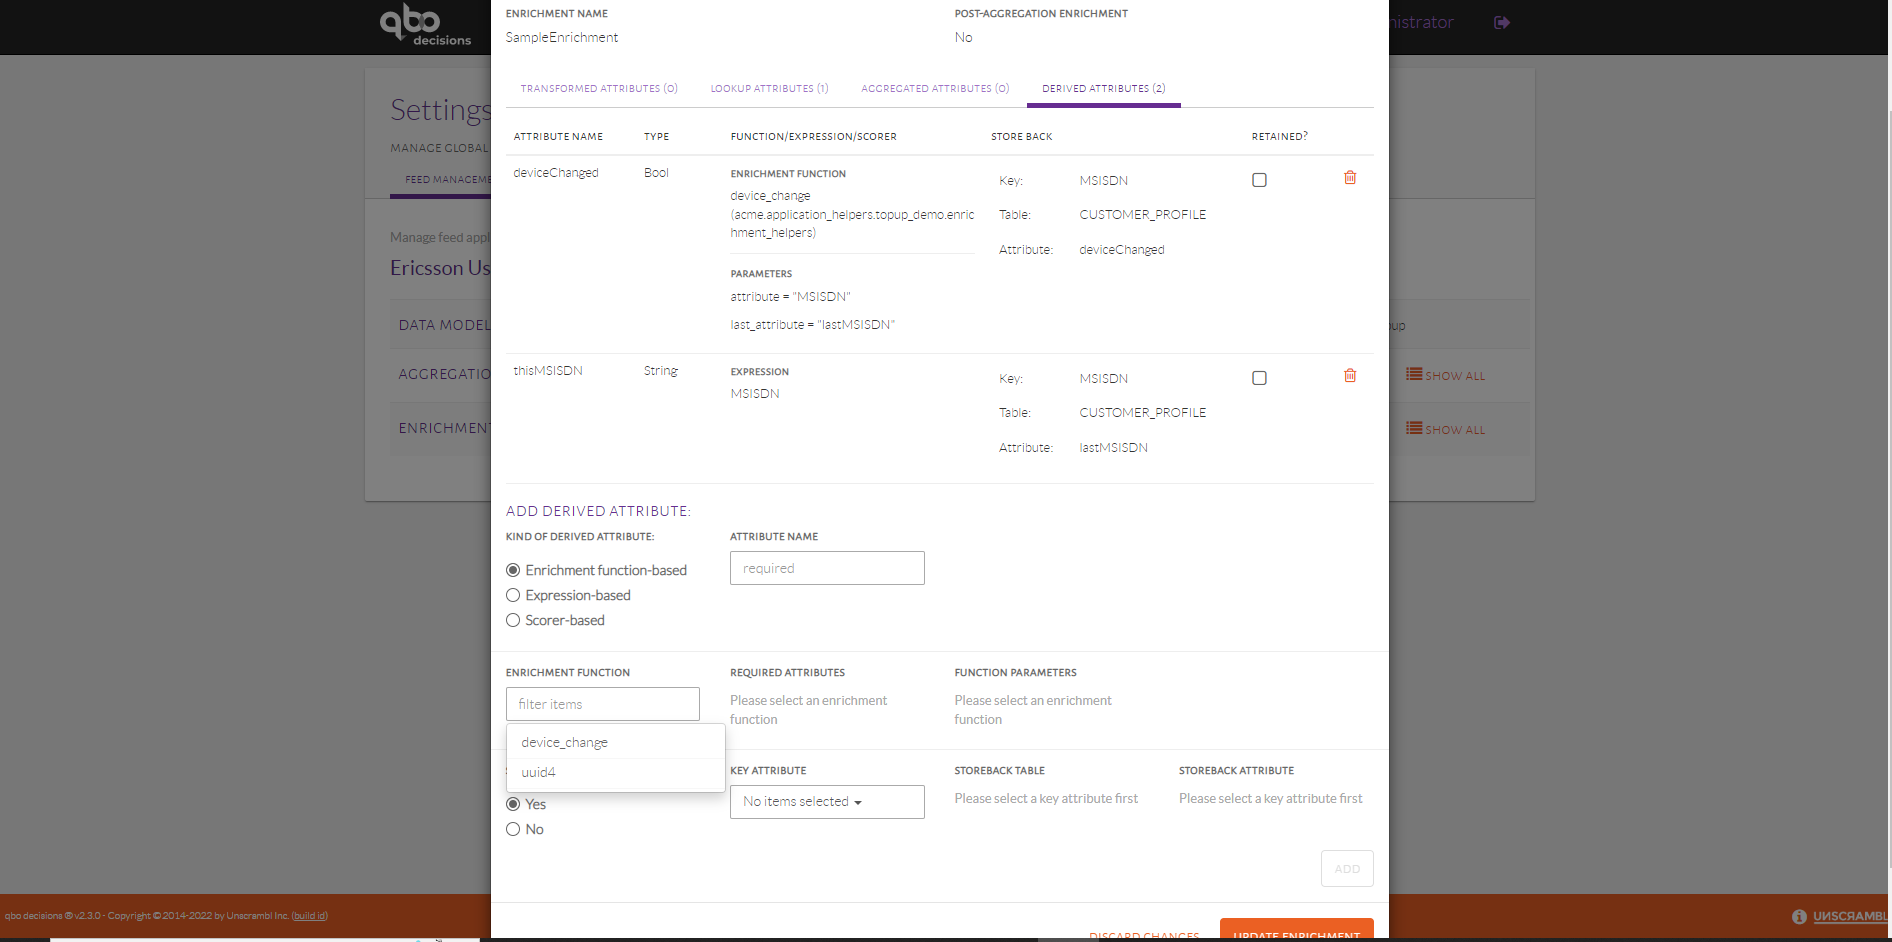
Interface for editing derived attribute type enrichments.
Enrichment operations can be configured to before aggregations are performed or after aggregations are performed.
The value of a enriched aggreate-based attribute may change based on whether it configured to run before or after the
aggregation operation. We can choose this while creating an enrichment by checking the Post-Aggregation Enrichment check-bit
as shown in the below image:
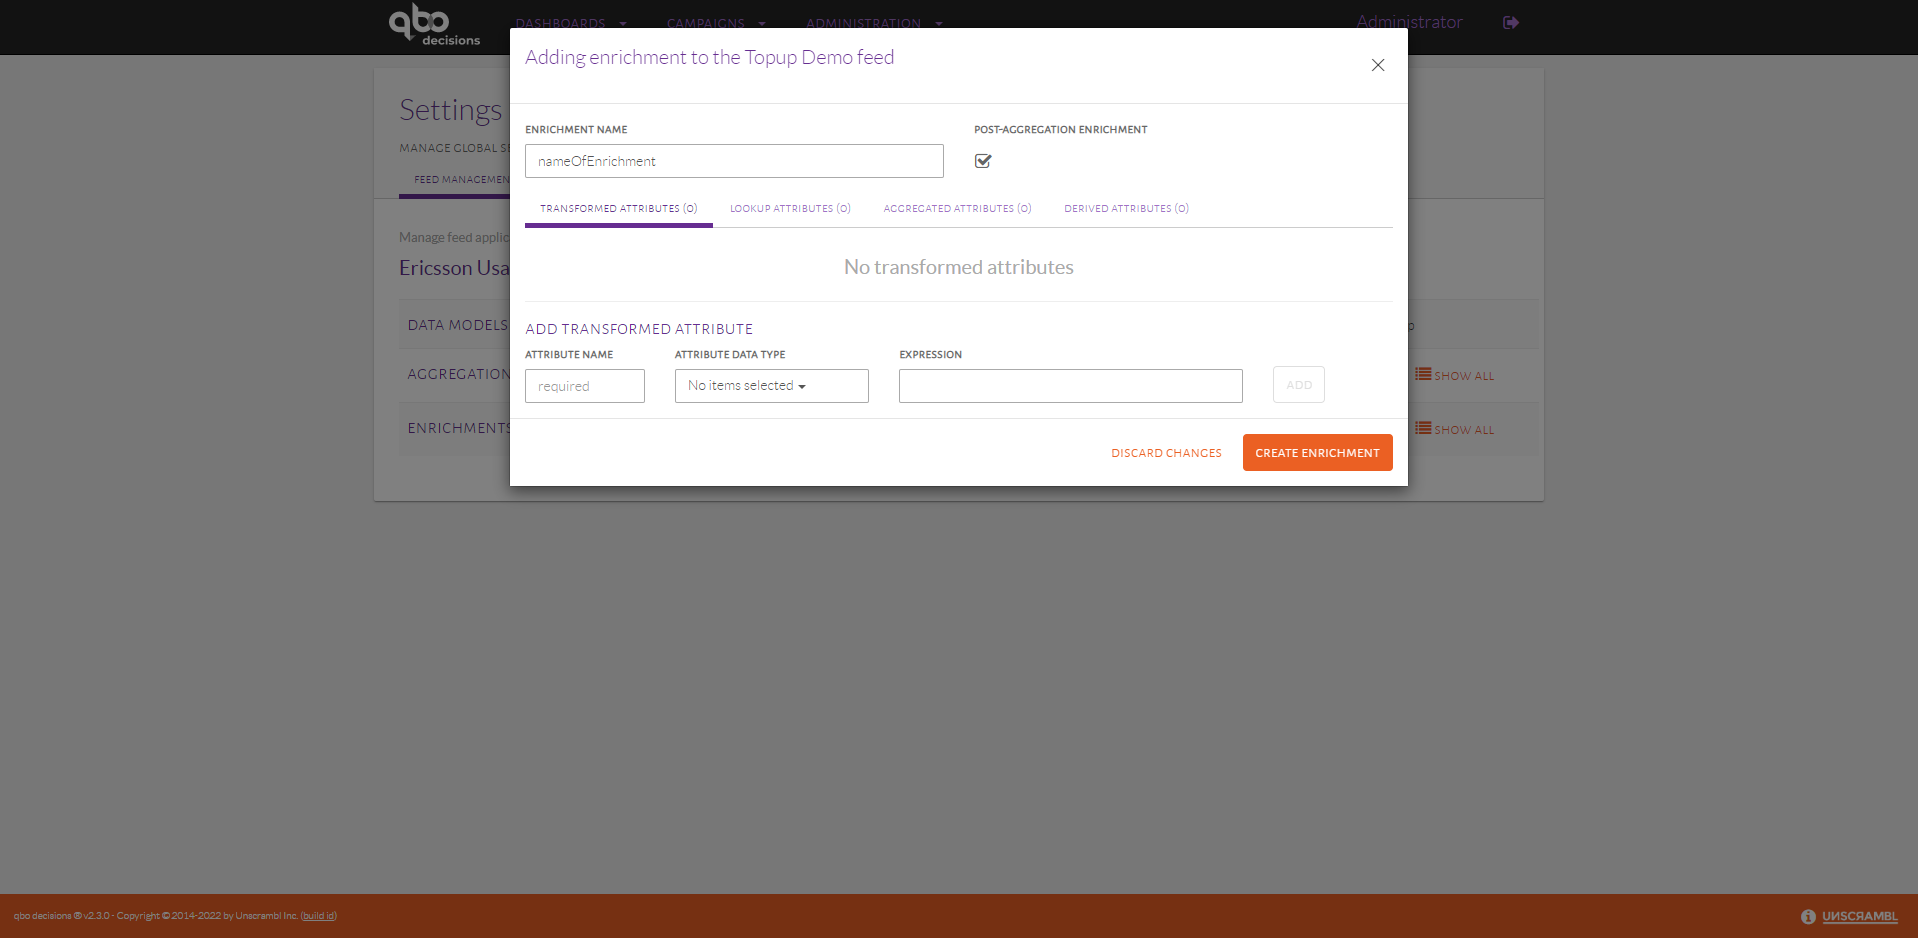
Interface for creating a new enrichment.
Subscriber Segments
Segments are groups of customers with some similarities, setup segments based on preset conditions (Live), or through user selection list (Static). Grouping customers into Segments helps target them more appropriately or continuously across events with Qbo Decisions. Qbo Decisions supports 2 types of segments, Live & Static Unscrambl Qbo Decisions can make use of subscriber segments. Such segments can be used to include or exclude a group of subscribers from being considered as subjects for a trigger.
Static Segments
The set of Static Segments can be inspected by clicking on Settings from the Administration menu and then selecting the tab
titled Static Segments.
The example below shows a view of the page with 2 segments: the Data Users and the High Value users.
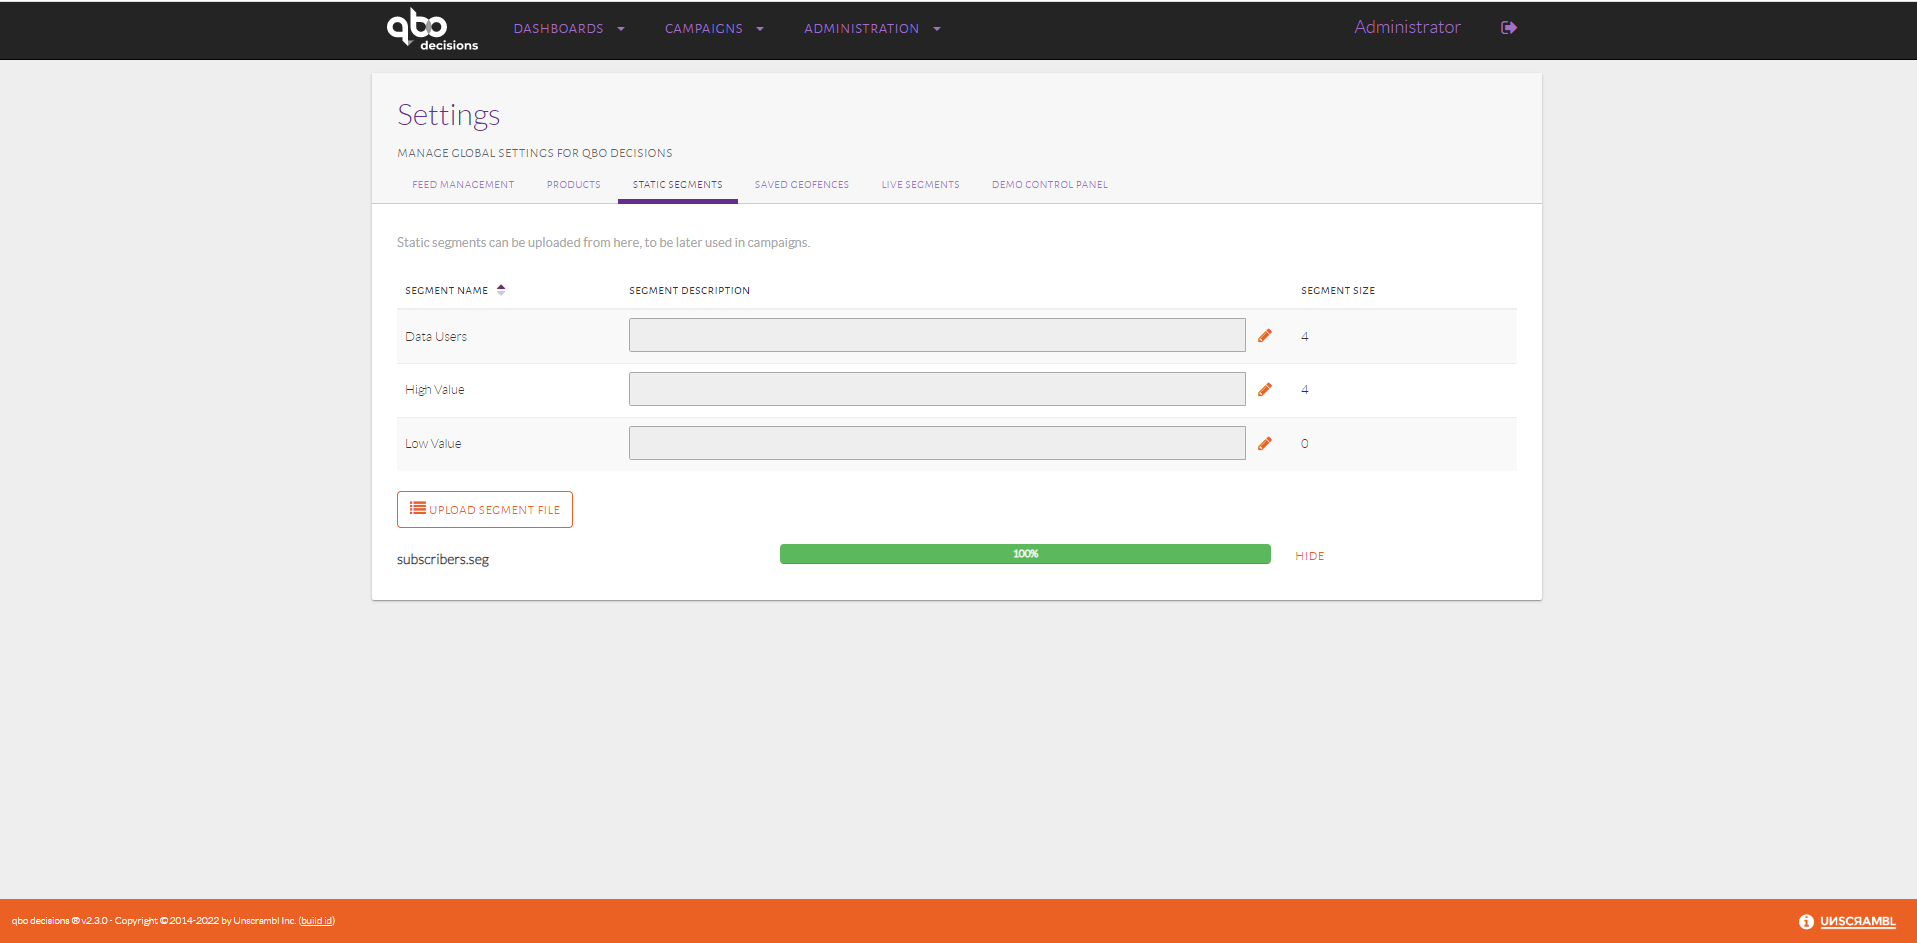
Uploading a segment file.
To add, edit or delete a segment, a text file with its contents specified in a particular format can be uploaded to
Unscrambl Qbo Decisions using the Upload Segment File button.
Two formats are supported. The first is a plain-text file with a simple linear organization as shown below:
[Data Users]: add
911323232323
918787879988
918787989021
919898990906
[High Value]: add
912323989899
912367367676
912398982337
919828738787
[High Value]: remove
912388728787
[Low Value]: remove_all
Alternatively, the file can also be specified in JSON format, in which case it must have a .json extension. An
example is given below (note that the order of the fields is important):
{
  "segmentUploads": [
    {
      "operation": "Add",
      "segment": "Data Users",
      "users": [
        "911323232323",
        "918787879988",
        "918787989021",
        "919898990906"
      ]
    },
    {
      "operation": "Add",
      "segment": "High Value",
      "users": [
        "912323989899",
        "912367367676",
        "912398982337",
        "919828738787"
      ]
    },
    {
      "operation": "Remove",
      "segment": "High Value",
      "users": [
        "912388728787"
      ]
    },
    {
      "operation": "RemoveAll",
      "segment": "Low Value"
    }
  ]
}
Once uploaded, one can also add a description for the segments:
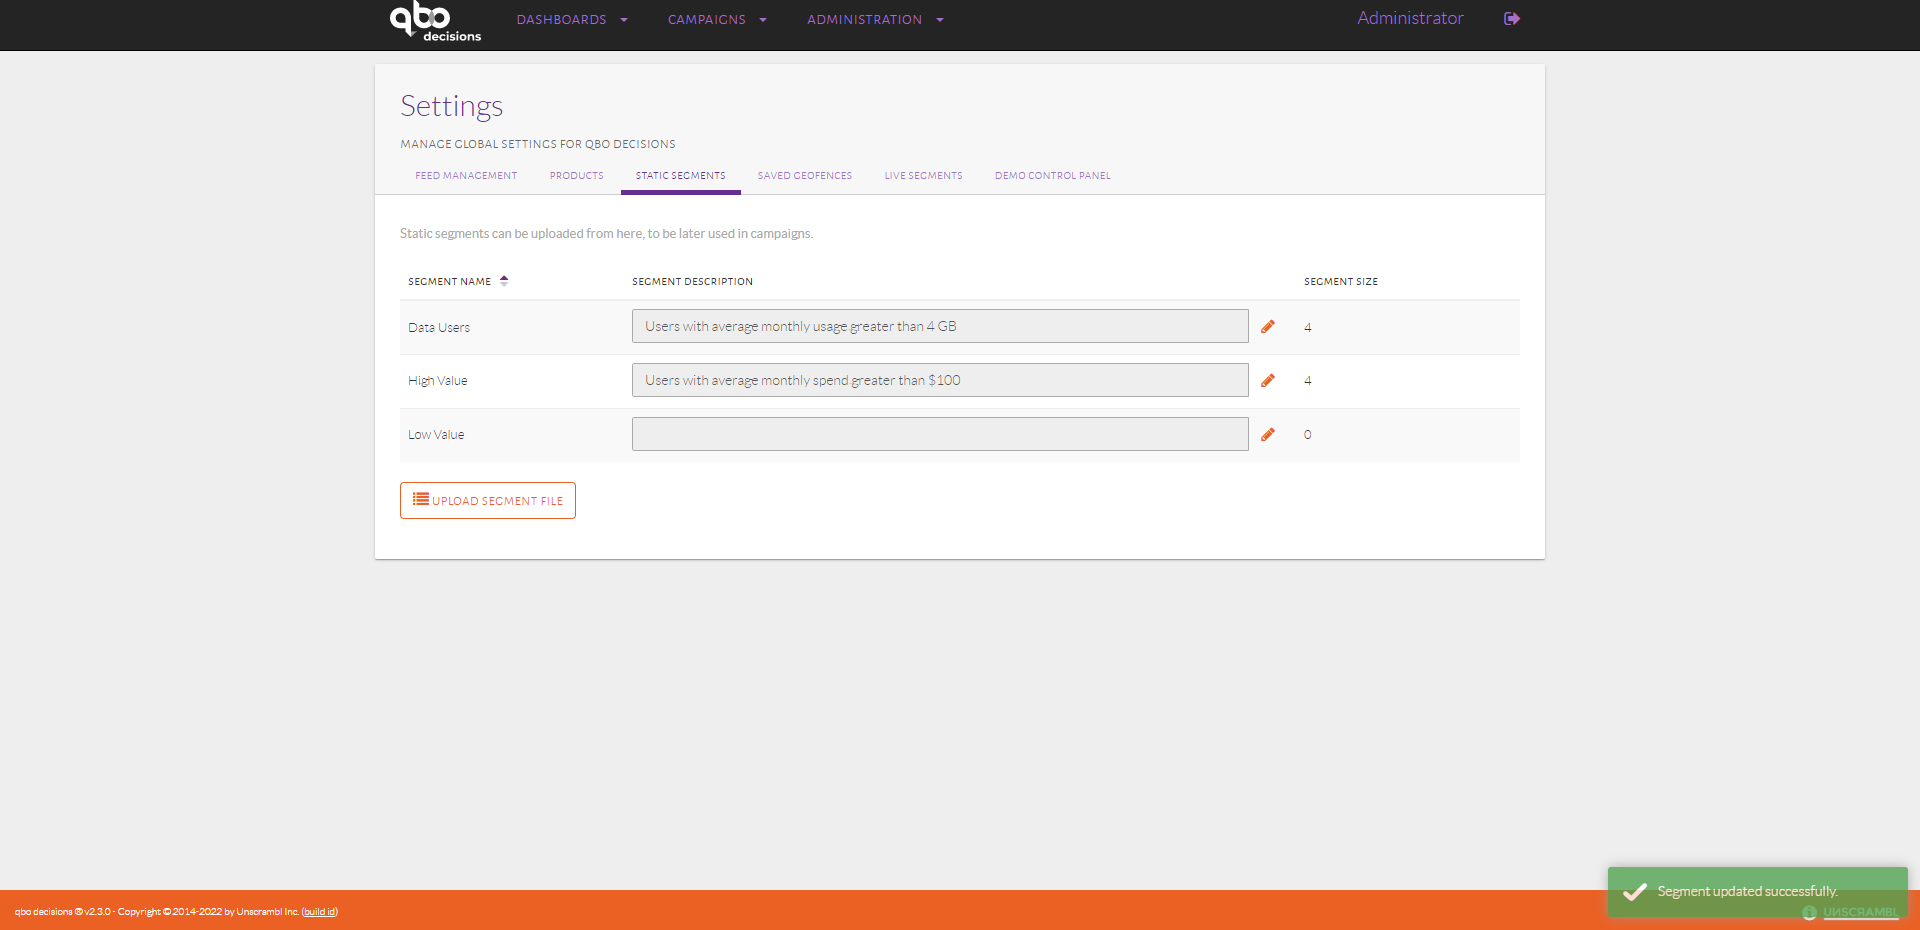
Segments and their descriptions.
Live Segments
Qbo Decisions allows the user to enter a set of audience conditions and saves customers who meet those criteria in a Live Segment. Qbo Decisions checks all customers against the defined conditions and maintains the segment over time. This means that Qbo Decisions adds or removes customers from the segment as they fulfill or stop fulfilling the defined criteria. For example: if you’d like to frequently target customers who have the main balance atleast $100 & who have installed a Mobile App i.e., Facebook, this can be saved as a Live Segment.
Qbo Decisions will check all customers against the defined Main balance check & app installation status and sort the appropriate customers to the segment. Conditions can be setup as shown below:
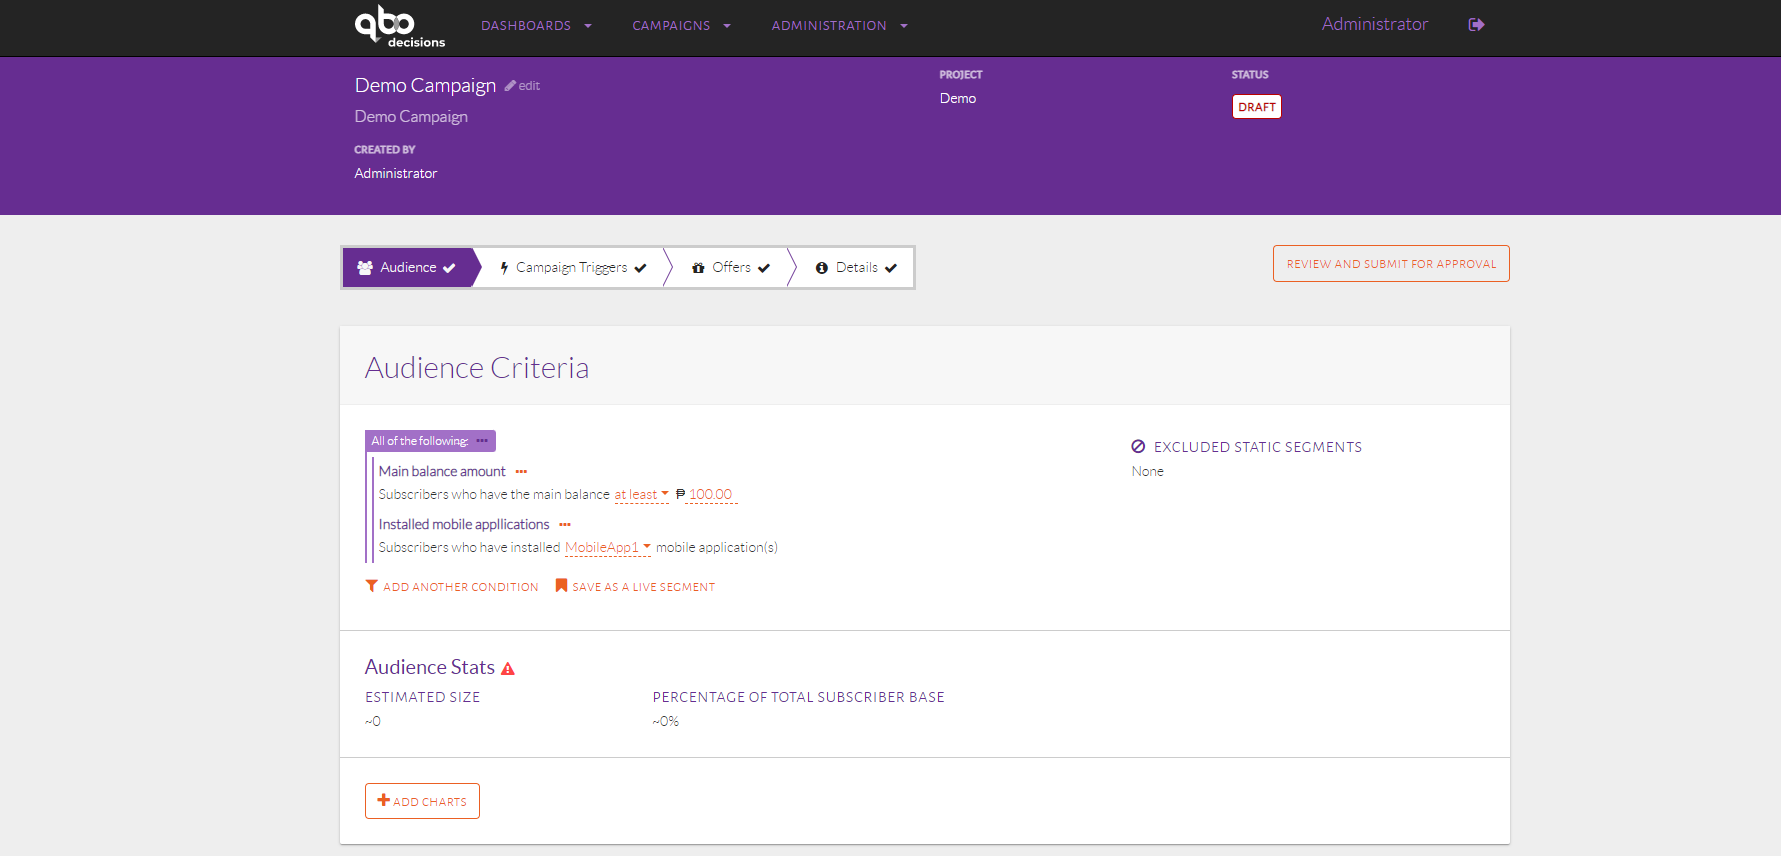
Creating an audience condition.
To save above audience condition as reusable live segement, we need to click on Save as Live Segment button. A dialog will
open to get the name of the live segment:
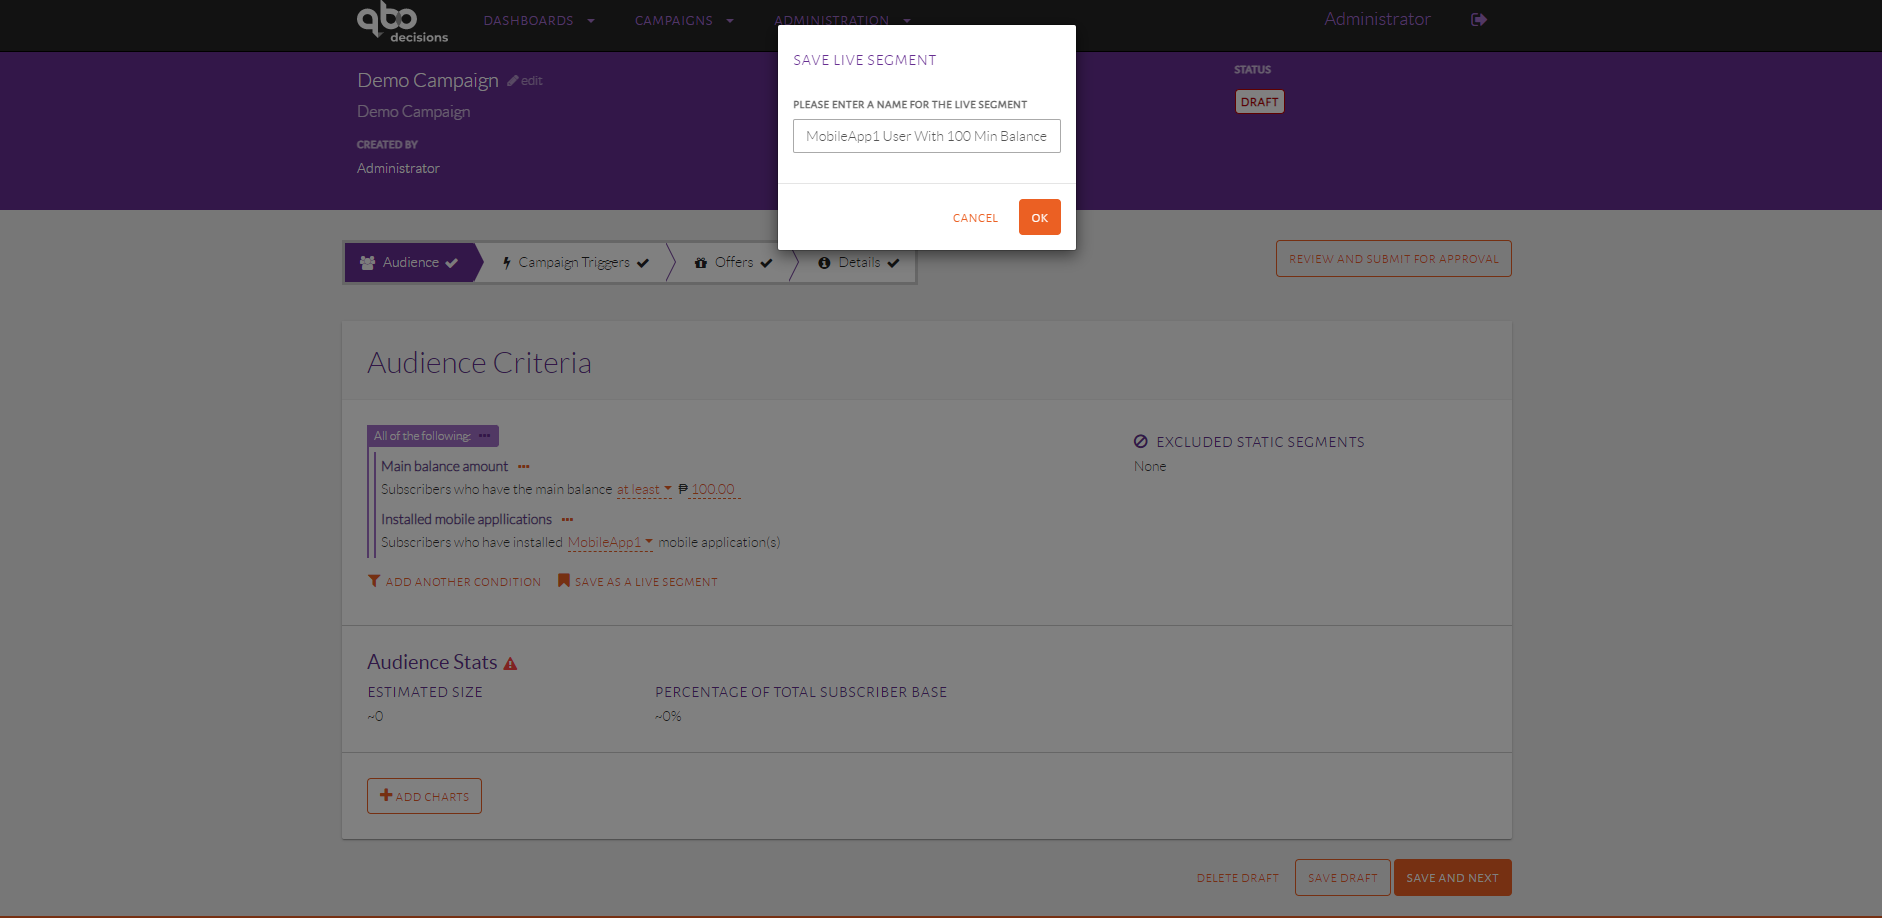
Saving a live segment.
Once the live segment is saved, the condition will be wrapped as a live segments. This live segment can be replaced and edited by clicking three dots on the live segment shown:
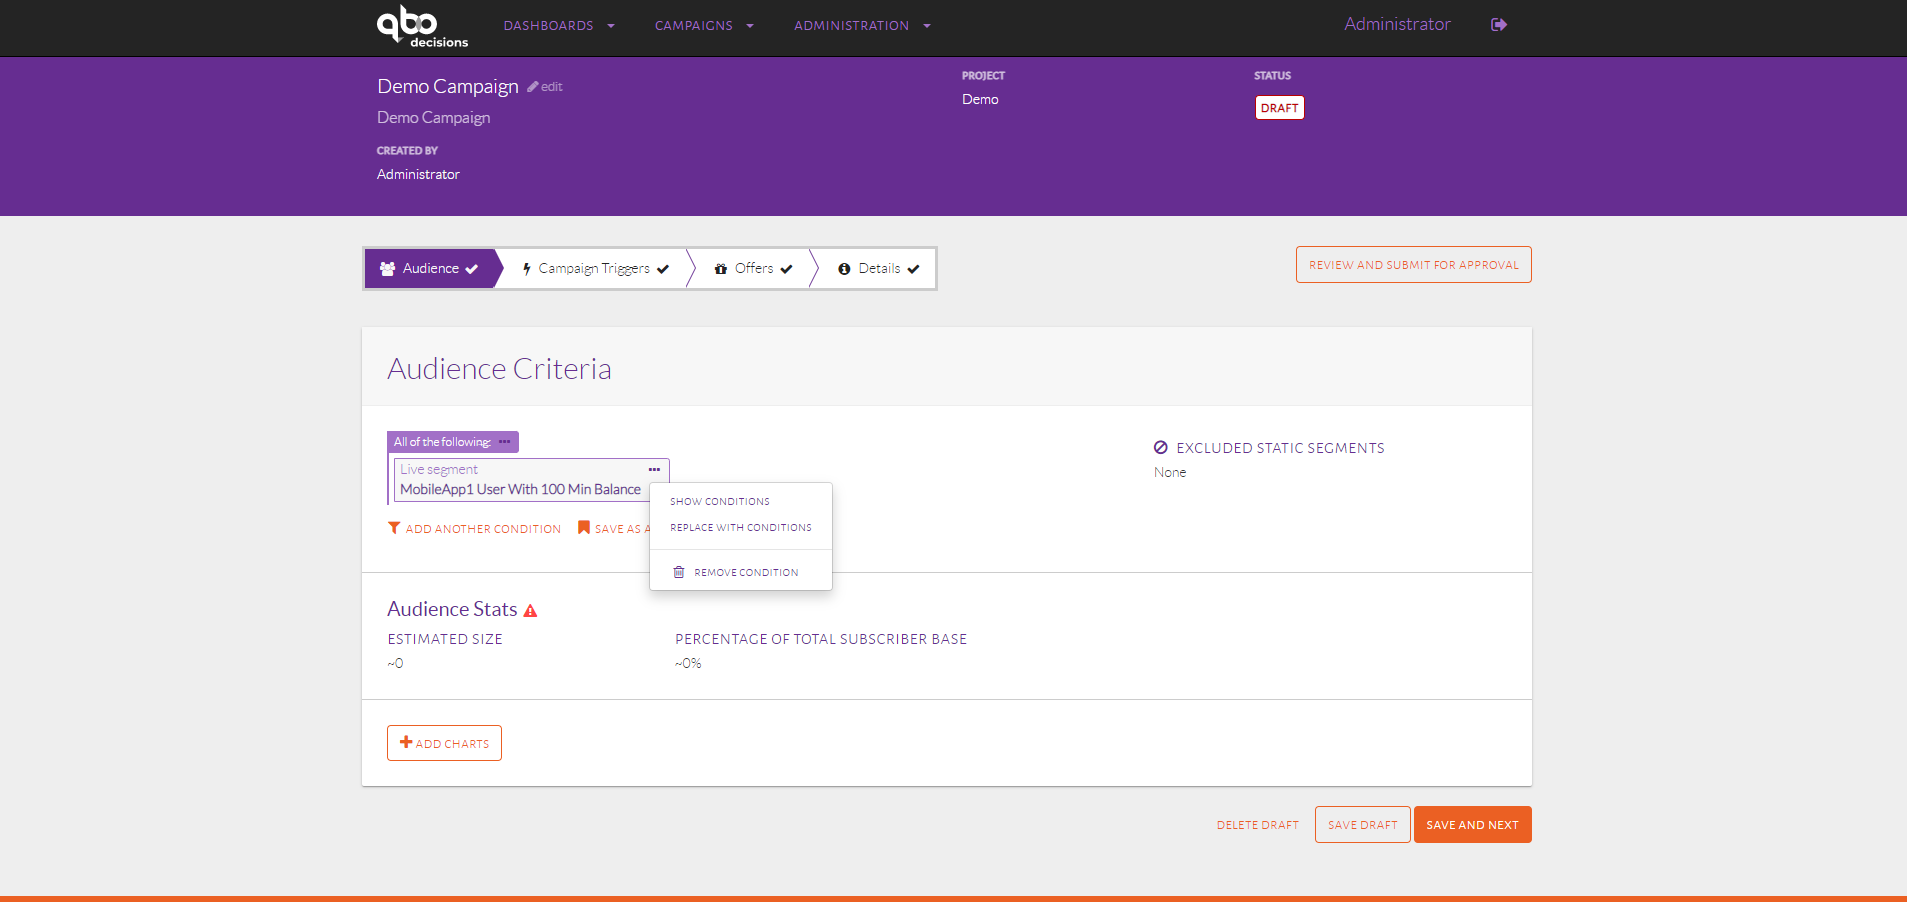
Using a live segment and editing it.
The set of Live Segments can be inspected by clicking on Settings from the Administration menu and then selecting the tab
titled Live Segments.

List of live segment.
Customers belonging to Live or Static Segments can be used as audience criteria by any user, in any event. Segments can be used along with other audience conditions as well, and can be added as shown below:
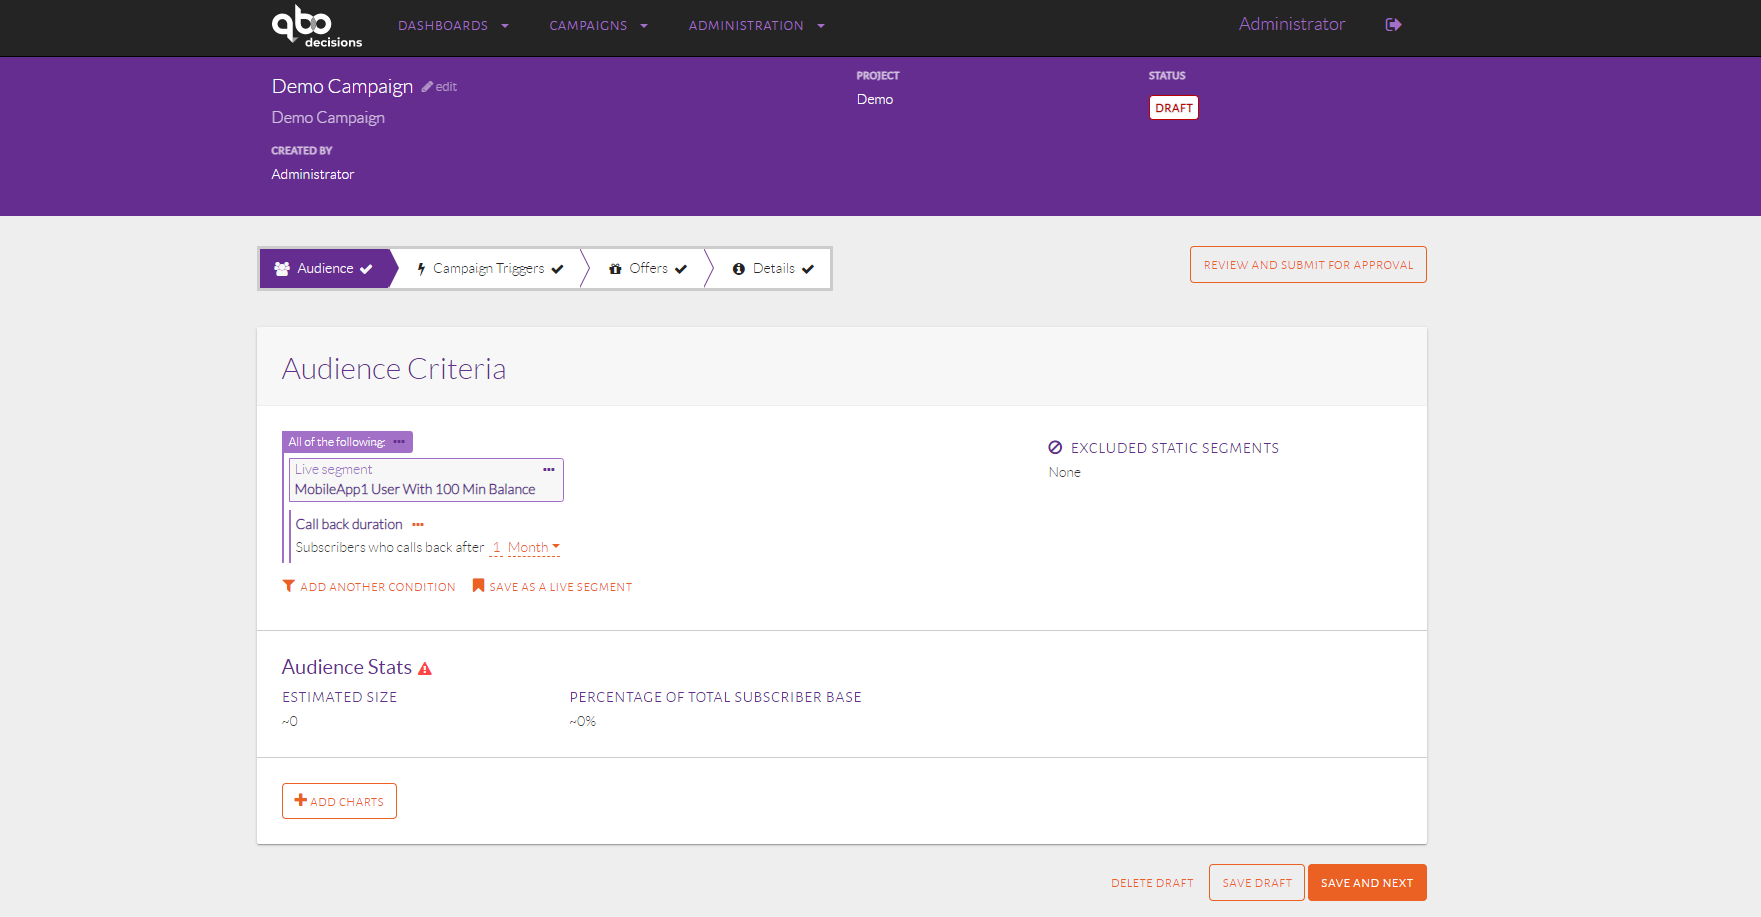
Audience condition using live segment and other audience conditions.
Fulfillment Products
Unscrambl Qbo Decisions can be customized to do fulfillment of offers given as part of campaigns. In order to add new fulfillment products, we have to upload the products as form of json files.
The set of Products can be inspected by clicking on Settings from the Administration menu and then selecting the tab
titled Products.
The example below shows a view of the page with 1 product: the Discounted Roaming Data Pack.
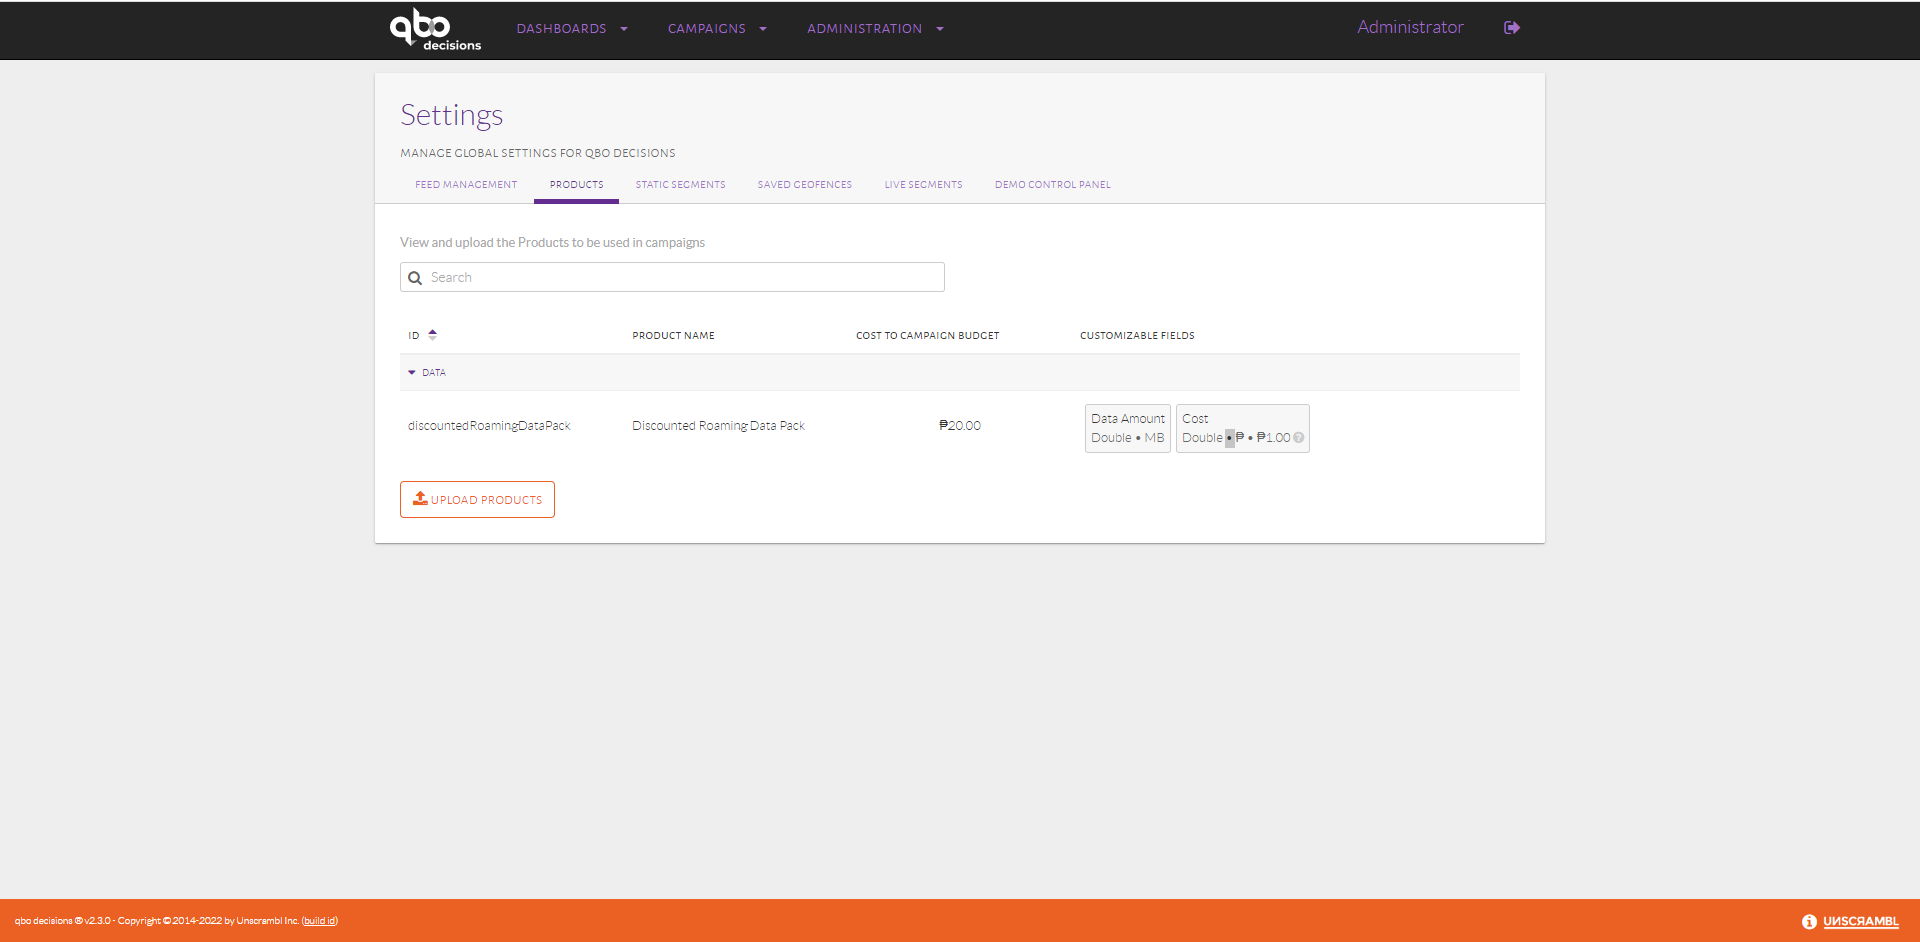
Uploading a product file.
To add new product, a json file with its contents specified in a particular format can be uploaded to
Unscrambl Qbo Decisions using the Upload Products button.
The Json file formats as shown below:
[ {
  "properties" : [ {
    "name" : "Voice Amount",
    "propertyId" : "voiceAmount",
    "type" : "Double",
    "unit" : "Minutes"
  }, {
    "presetValue" : {
      "doubleValue" : 10.0
    },
    "name" : "Cost",
    "propertyId" : "cost",
    "type" : "Double",
    "unit" : "#{currencySymbol}"
  } ],
  "category" : "Voice",
  "costToBudget" : 50.0,
  "fulfillmentProductId" : "discountedRoamingVoicePack",
  "name" : "Discounted Roaming Voice Pack",
  "productId" : "discountedRoamingVoicePack"
} ]
Once uploaded, newly uploaded product will be part of list of products:
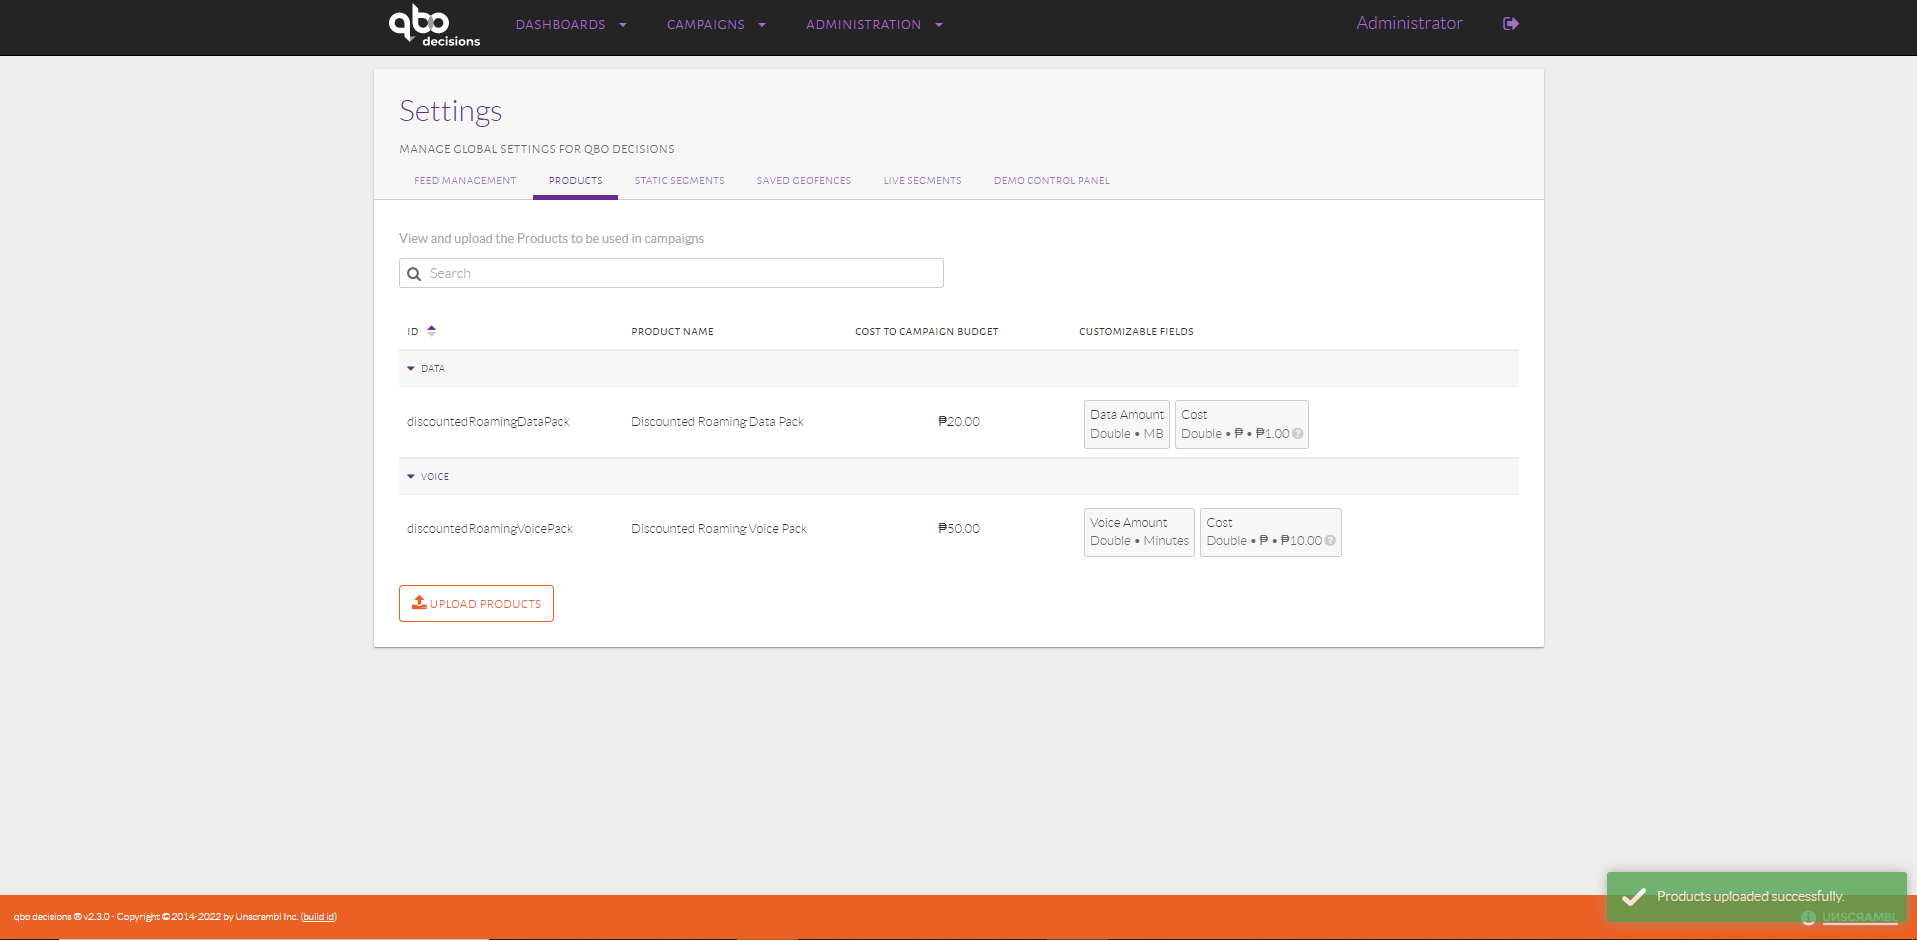
Peoducts with newly uploaded product.
Here productId is a unique product id, category is used to group the products, costToBudget is used to identify the cost of this product to campaign managers which helps to limit the number of offers to be constrained by a budget, properties are customized fields to be used in parameterizing the products in Fulfillment Engine.