The user interface for Unscrambl Drive
This section provides instructions for starting/stopping the Unscrambl Drive, administration, and trigger creation and deployment.
Starting and Stopping Unscrambl Drive
Unscrambl Drive can be started using the services_manager script located at $UNSCRAMBL_HOME/bin.
This script can be used to configure various parameters associated with the execution of the Unscrambl Drive platform. A list of available parameters can be obtained as follows:
$ cd $UNSCRAMBL_HOME
$ ./bin/services_manager --help

 usage: services_manager [-h] [-a] [-c path] [-i id] [-k] [-o [app [app ...]]]
                     [-r] [-p] [-s] [-t] [-u uri]
                     operation

 The 'services_manager' application is part of Unscrambl Drive 1.2.0 (build id:
 unscrambladmin@ubdev.unscrambl.com - commit id:
 465f0374ffc53c20139e54ed9575ef81505c8ca3)

 positional arguments:
   operation             specifies the operation to be performed, one of:
                         'start_applications', 'start', 'stop', 'check',
                         'stop_applications'

 optional arguments:
   -h, --help            show this help message and exit
   -a, --disable-fastpast
                         indicates that FastPast should not be checked (when
                         checking the status of Drive services), started (when
                         starting the Drive services), or stopped (when
                         stopping the Drive services) (default: False)
   -c path, --drive-config-file path
                         specifies the path of the Unscrambl Drive
                         configuration file (default: None)
   -i id, --instance-id id
                         specifies the instance identifier to use (default:
                         None)
   -k, --disable-kafka
                         indicates that Kafka should not be checked (when
                         checking the status of the services), started (when
                         starting the services), or stopped (when stopping the
                         services) (default: False)
   -o [app [app ...]], --applications-to-run [app [app ...]]
                         specifies the list of Drive applications to use (by
                         default, all of them are used)
   -r, --disable-pinpoint
                         indicates that PinPoint should not be checked (when
                         checking the status of the services), started (when
                         starting the services), or stopped (when stopping the
                         services) (default: False)
   -p, --disable-campaign-actuator
                         indicates that Campaign Acturator should not be checked
                         (when checking the status of the services), started
                         (when starting the services), or stopped (when
                         stopping the services) (default: True)
   -s, --disable-segment-updater
                         indicates that Segment Updater should not be checked
                         (when checking the status of the services), started
                         (when starting the services), or stopped (when
                         stopping the services) (default: False)
   -t, --disable-tomcat  indicates that Tomcat should not be checked (when
                         checking the status of the services), started (when
                         starting the services), or stopped (when stopping the
                         services) (default: False)
   -u uri, --instance-uri uri
                         specifies the instance URI to use (default: None,
                         indicating that a self-managed Name Service will be
                         started and used)
The user responsible for managing Unscrambl Drive (typically unscrambladmin) can start Unscrambl Drive using the
following command:
$ ./bin/services_manager start
Starting Name Service
--- running as process id 27981
--- instance URI is 'redis://10.0.2.15:34549/unscrambladmin'
Starting Kafka
--- running Kafka as process id 27991
--- running Zookeeper as process id 27983
Starting FastPast
--- running as process id 27994
--- waiting for FastPast to initialize (done)
Starting PinPoint
--- running as process id 27995
--- waiting for PinPoint to initialize (done)
Starting Tomcat
--- running as process id 28051
--- waiting for Unscrambl Drive to initialize.................. (done)
Starting application 'Segment Updater'
--- running as process id 28181
Starting feed applications: 'Topup Demo', 'Mobile Usage'
Starting application 'Topup Demo'
--- running as process id 28193
Starting application 'Mobile Usage'
--- running as process id 28209
After its execution, the Unscrambl Drive web-based user interface is accessible by opening the
http://<hostname>:8080/drive URL in a browser.
Unscrambl Drive can be stopped by invoking the following command:
$ ./bin/services_manager stop
Stopping feed applications: 'Topup Demo', 'Mobile Usage'
Stopping application 'Topup Demo'
--- waiting for application 'Topup Demo' to terminate.
--- stopped process id 28193
Stopping application 'Mobile Usage'
--- waiting for application 'Mobile Usage' to terminate.
--- stopped process id 28209
Stopping application 'Segment Updater'
--- waiting for application 'Segment Updater' to terminate.
--- stopped process id 28181
Stopping Tomcat
--- waiting for Tomcat to terminate.
--- stopped process id 28051
Stopping PinPoint
--- waiting for PinPoint to shutdown its servers.
--- waiting for PinPoint to terminate.
--- stopped process id 27995
Stopping FastPast
--- waiting for FastPast to shutdown its servers.
--- waiting for FastPast to terminate.
--- stopped process id 27994
Stopping Kafka
--- waiting for Kafka to terminate.
--- stopped process id 27991
--- waiting for Zookeeper to terminate.
--- stopped process id 27983
Stopping the Name Service
--- stopped process id 27981
Once the stop sequence is complete, the web-based user interface is not available anymore.
The sample services_manager invocation we used earlier starts up all applications available as part of your
installation. The Unscrambl Drive administrator user can, of course, make use of the other parameters associated with
the script. For instance, in order to start the services only with a single application named Topup Demo (assuming
it is available as part of your installation), the following command can be used:
$ ./bin/services_manager start -o 'Topup Demo'
Starting Name Service
--- running as process id 28730
--- instance URI is 'redis://10.0.2.15:57173/unscrambladmin'
Starting Kafka
--- running Kafka as process id 28741
--- running Zookeeper as process id 28735
Starting FastPast
--- running as process id 28743
--- waiting for FastPast to initialize (done)
Starting PinPoint
--- running as process id 28744
--- waiting for PinPoint to initialize (done)
Starting Tomcat
--- running as process id 28798
--- waiting for Unscrambl Drive to initialize.................. (done)
Starting application 'Segment Updater'
--- running as process id 28896
Starting feed applications: 'Topup Demo'
Starting application 'Topup Demo'
--- running as process id 28903
While the detailed status of the Unscrambl Drive services can be examined via the web-based user interface, the
services_manager script can also be used to get a brief status of all services. An example invocation is as
follows:
$ ./bin/services_manager check
Kafka is UP
Zookeeper is UP
FastPast is UP
PinPoint is UP
Tomcat is UP
application 'Segment Updater' is UP
application 'Topup Demo' is UP
application 'Mobile Usage' is DOWN
While the services are up, the services_manager script can be used start and stop individual applications. For
instance, the following command can be used to start the ‘Mobile Usage’ application:
$ ./bin/services_manager start_applications -o 'Mobile Usage'
Starting feed applications: 'Mobile Usage'
Starting application 'Mobile Usage'
--- running as process id 29058
A running application can be stopped in a similar way. For instance, the following command can be used to stop the ‘Mobile Usage’ application:
$ ./bin/services_manager stop_applications -o 'Mobile Usage'
Stopping feed applications: 'Mobile Usage'
Stopping application 'Mobile Usage'
--- waiting for application 'Mobile Usage' to terminate.
--- stopped process id 29058
Accessing the interface for the first time
The preferred browser for accessing the user interface is Google’s Chrome.
When accessing the user interface for the first time after the software installation, the user will be presented with a
screen to setup the admin password as seen below:
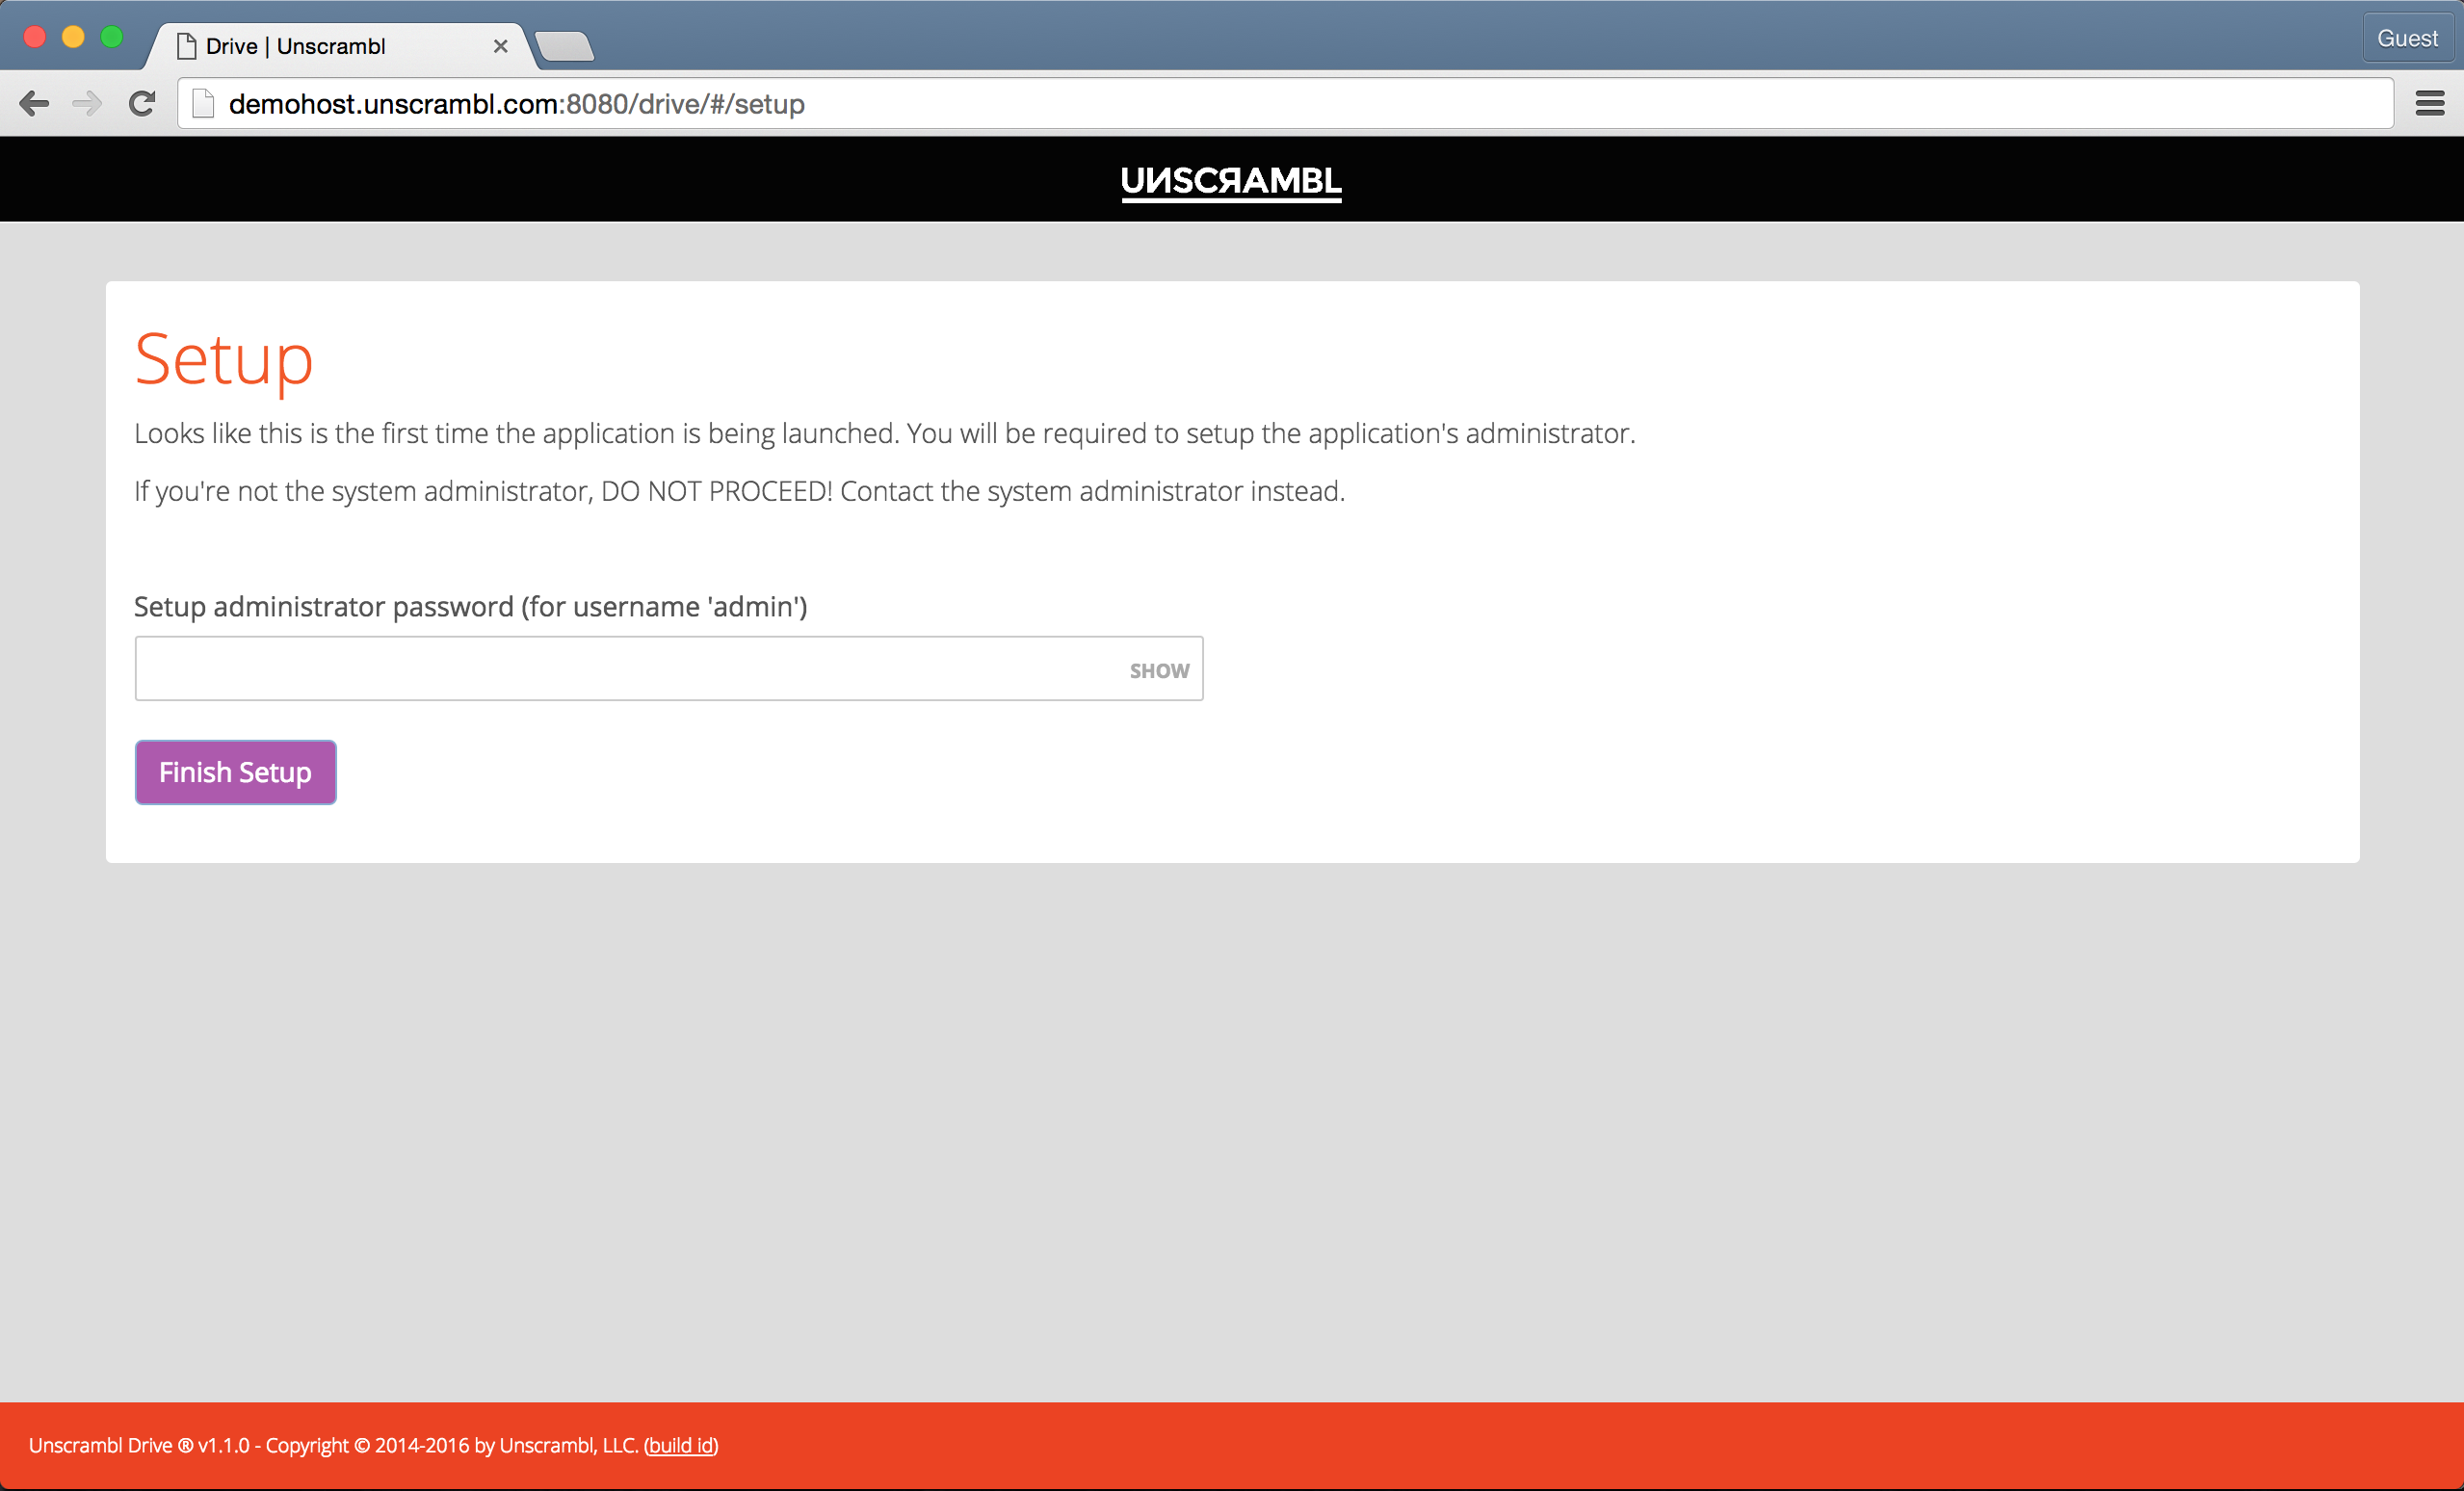
Setting up the admin password.
This should only be done by the user responsible for managing Unscrambl Drive.
The admin login provides unrestricted administrative access to Unscrambl Drive and, among other tasks, can be used
to add additional users.
Administration
User & Role Management
The only user that comes pre-configured with Unscrambl Drive is the admin user.
The admin user can add additional users, including other administrators, as well as perform other user management
tasks by accessing the Users link located under the Administration category in the left navigation bar.
The user management screen is shown below:
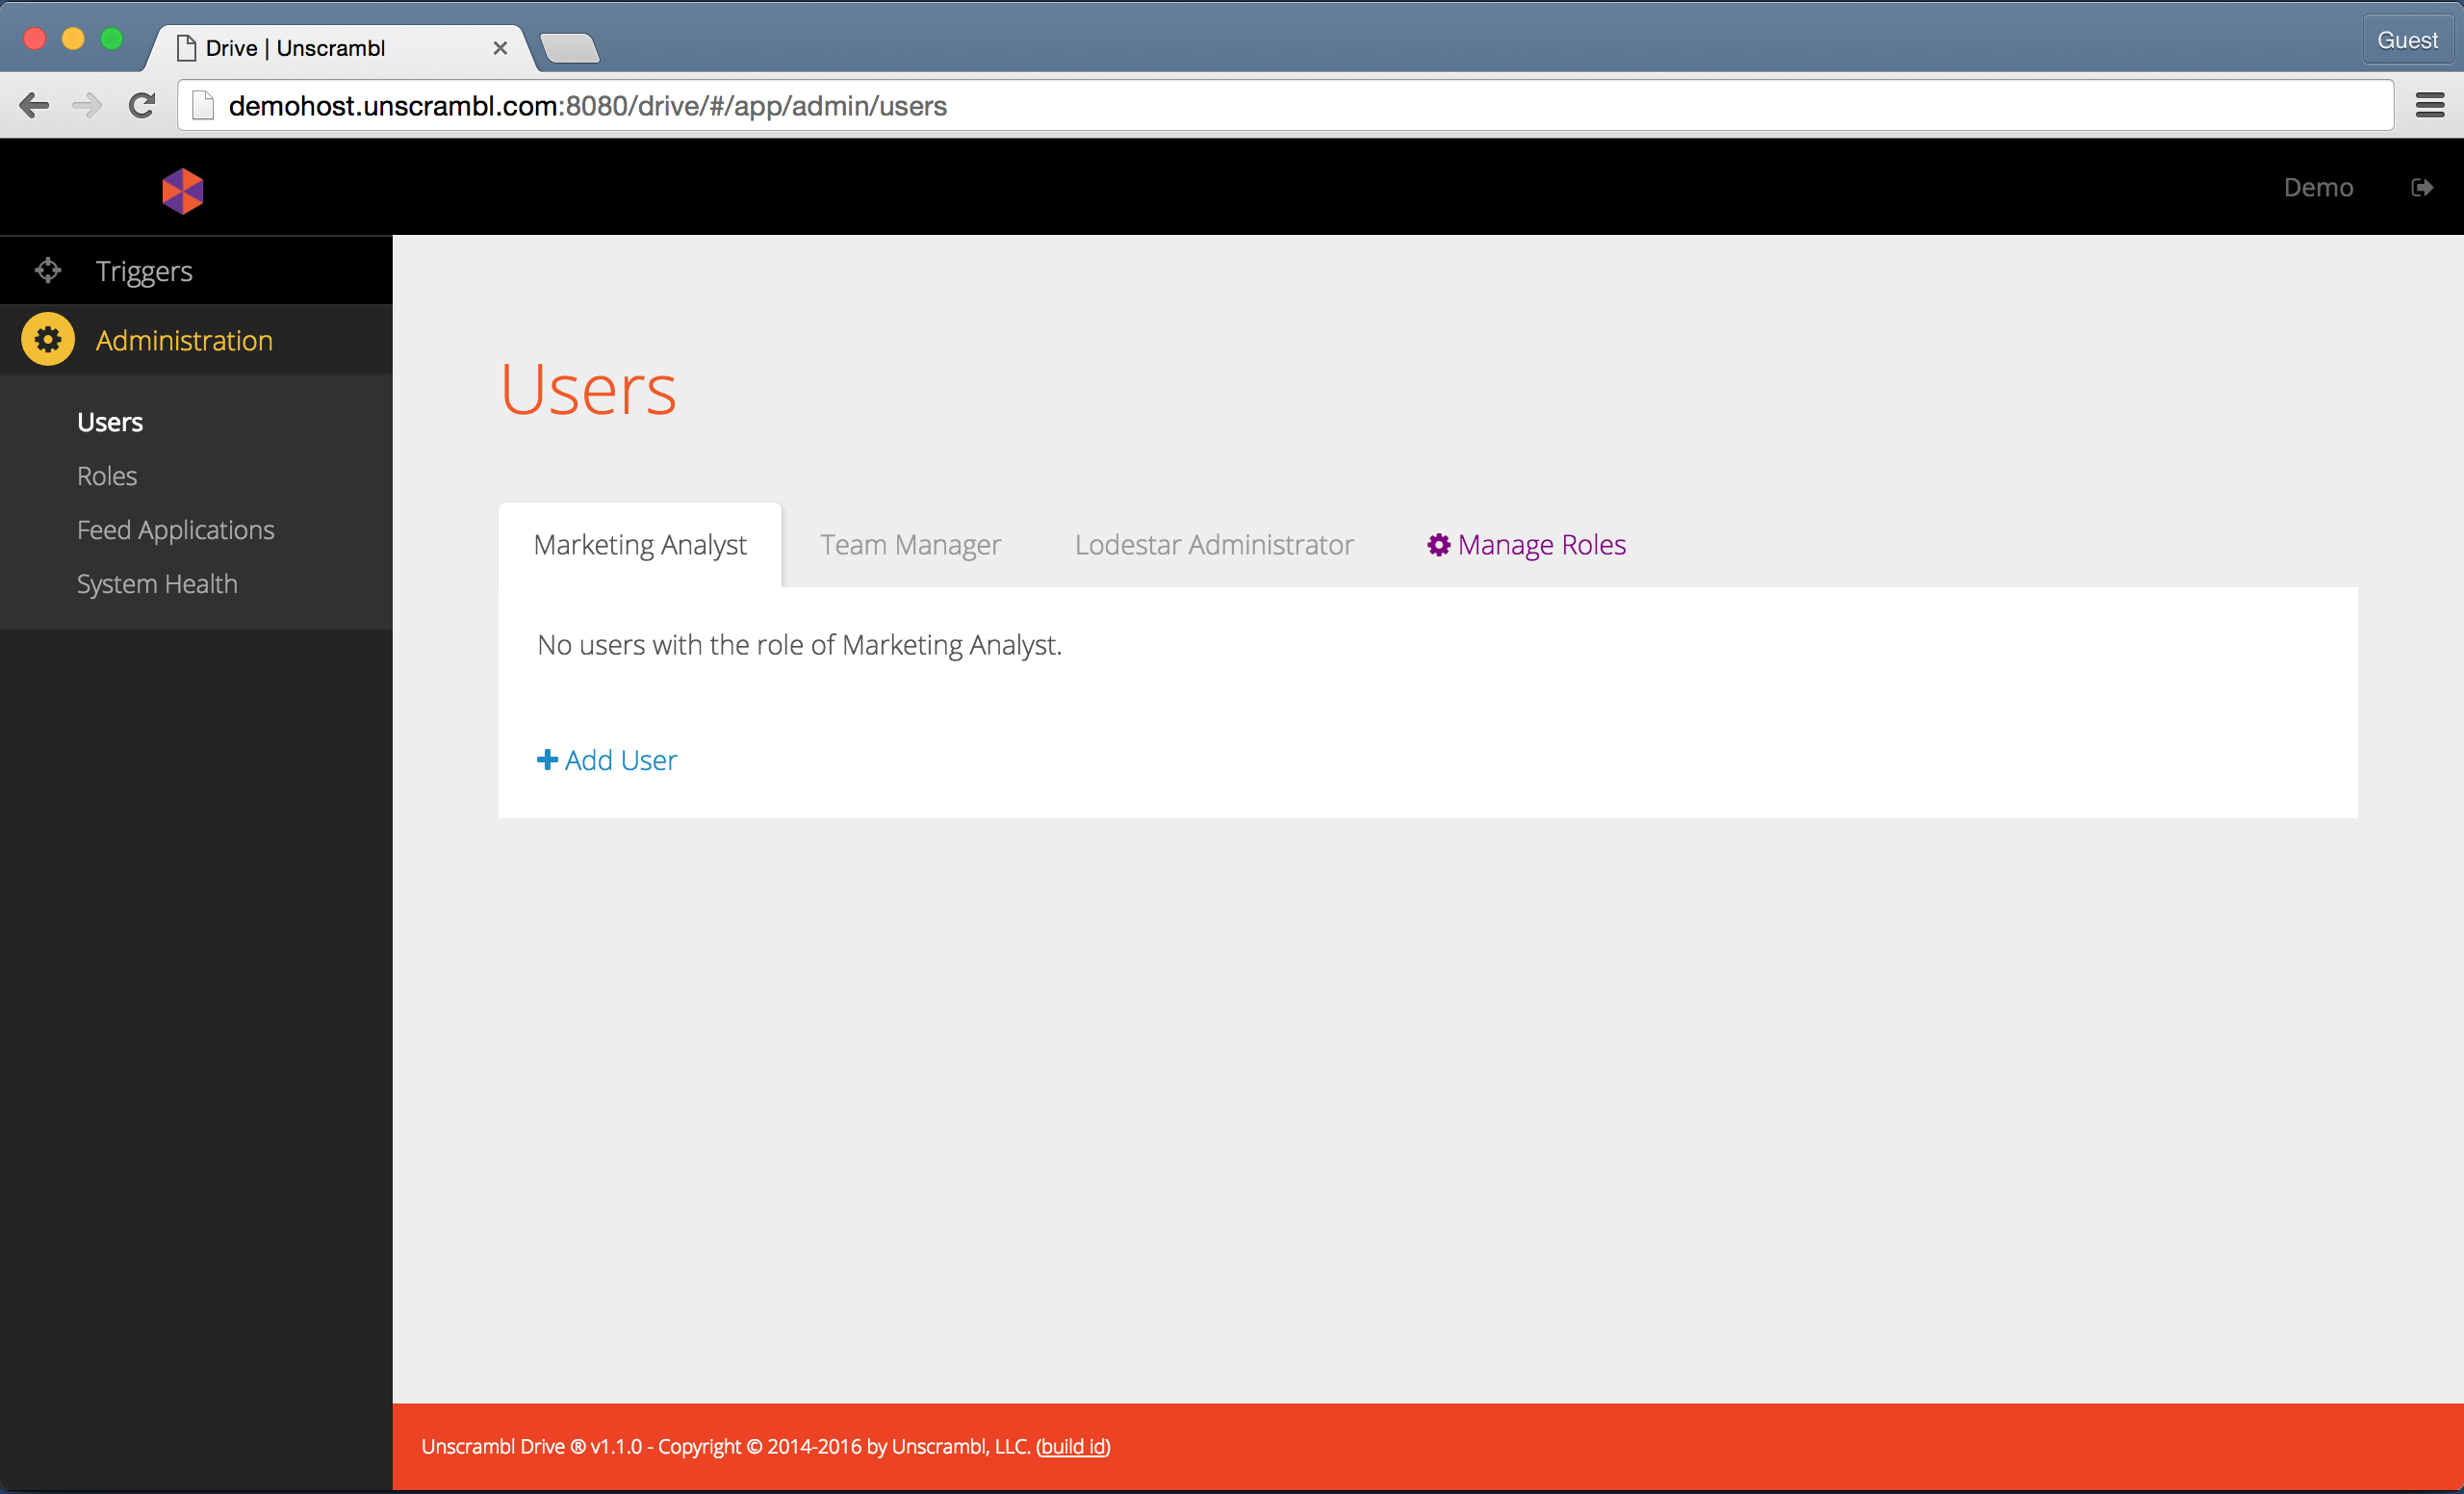
The Users page.
In the Users page, the various roles that are configured in the system and the users that exist for each such role
are depicted.
To add a new user, the administrator must first decide the role for such a user, for example, the Marketing Analyst
role can be selected by picking the corresponding tab in the User Management page and by clicking on the Add
User link:
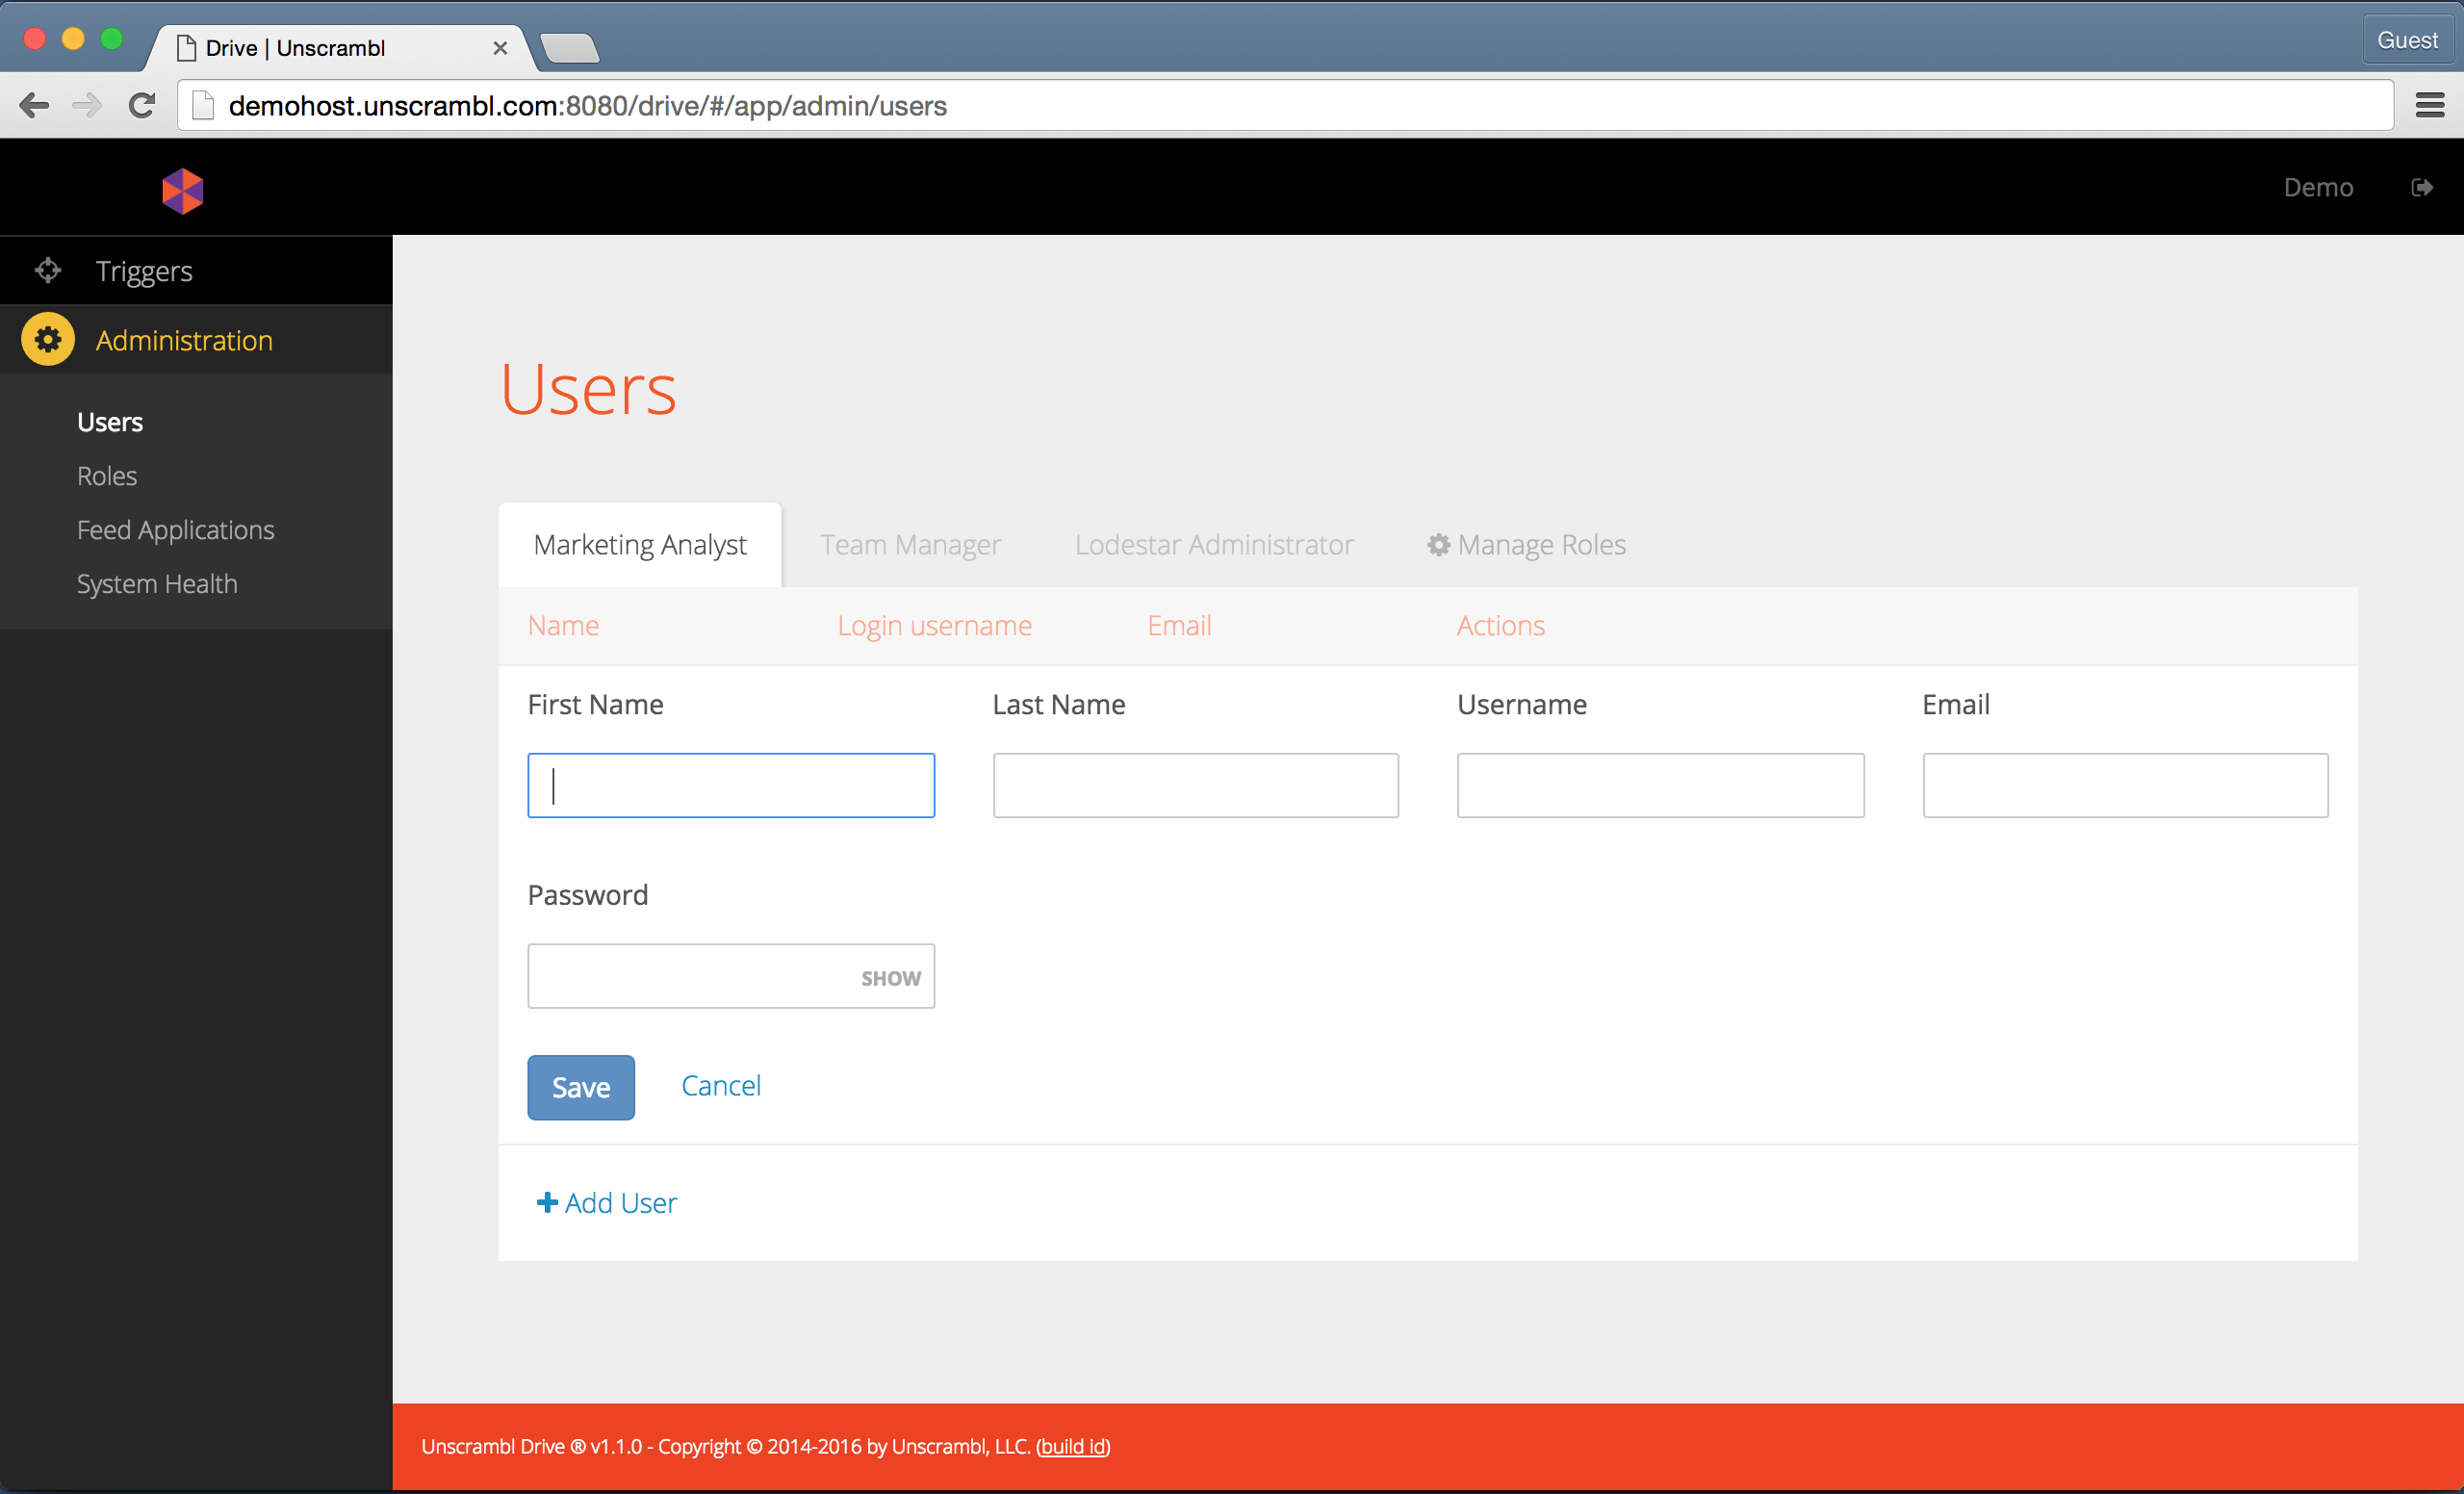
Adding a new user.
Subsequently, the First Name, Last name, Username, Email and Password attributes should be filled
out. Finally, the Save button can be pressed to store this data.
Once completed, the newly added user should be visible in the user interface:
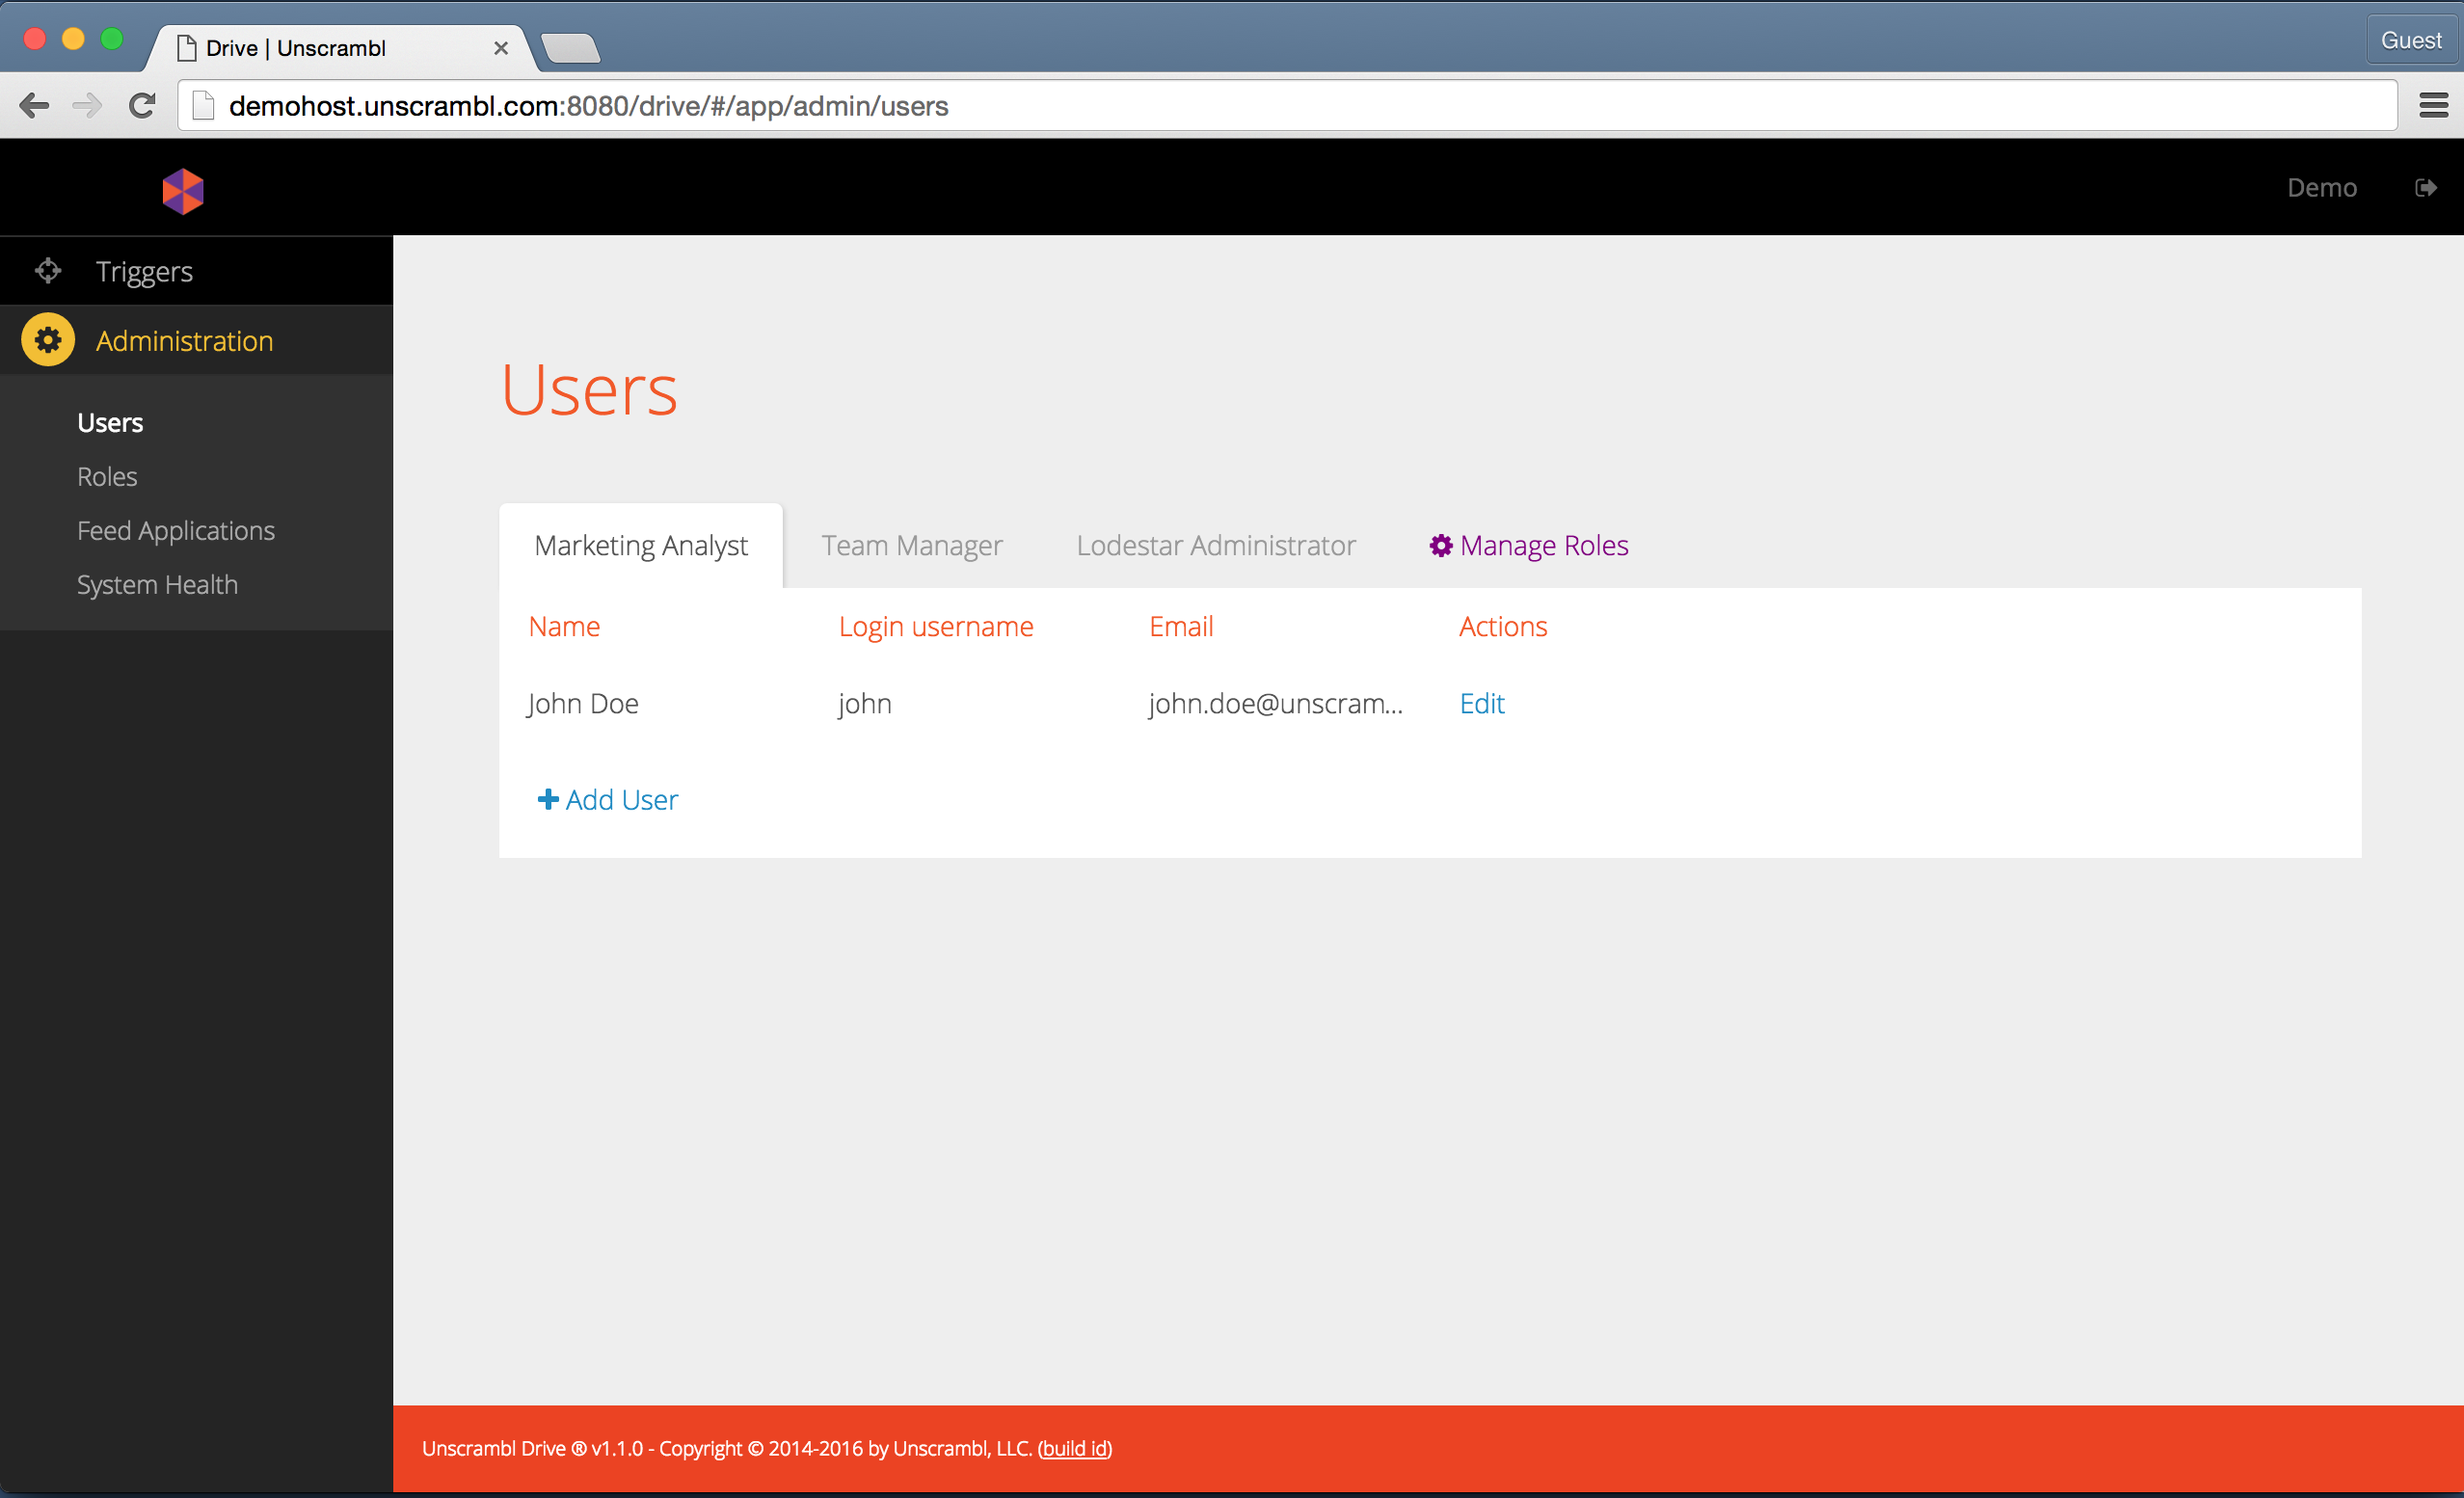
A newly added user.
The data for an existing user can be modified and the user itself can be removed by another user with user management entitlement.
The deletion and editing options become visible once a user hovers the mouse over the edit link associated with a user:
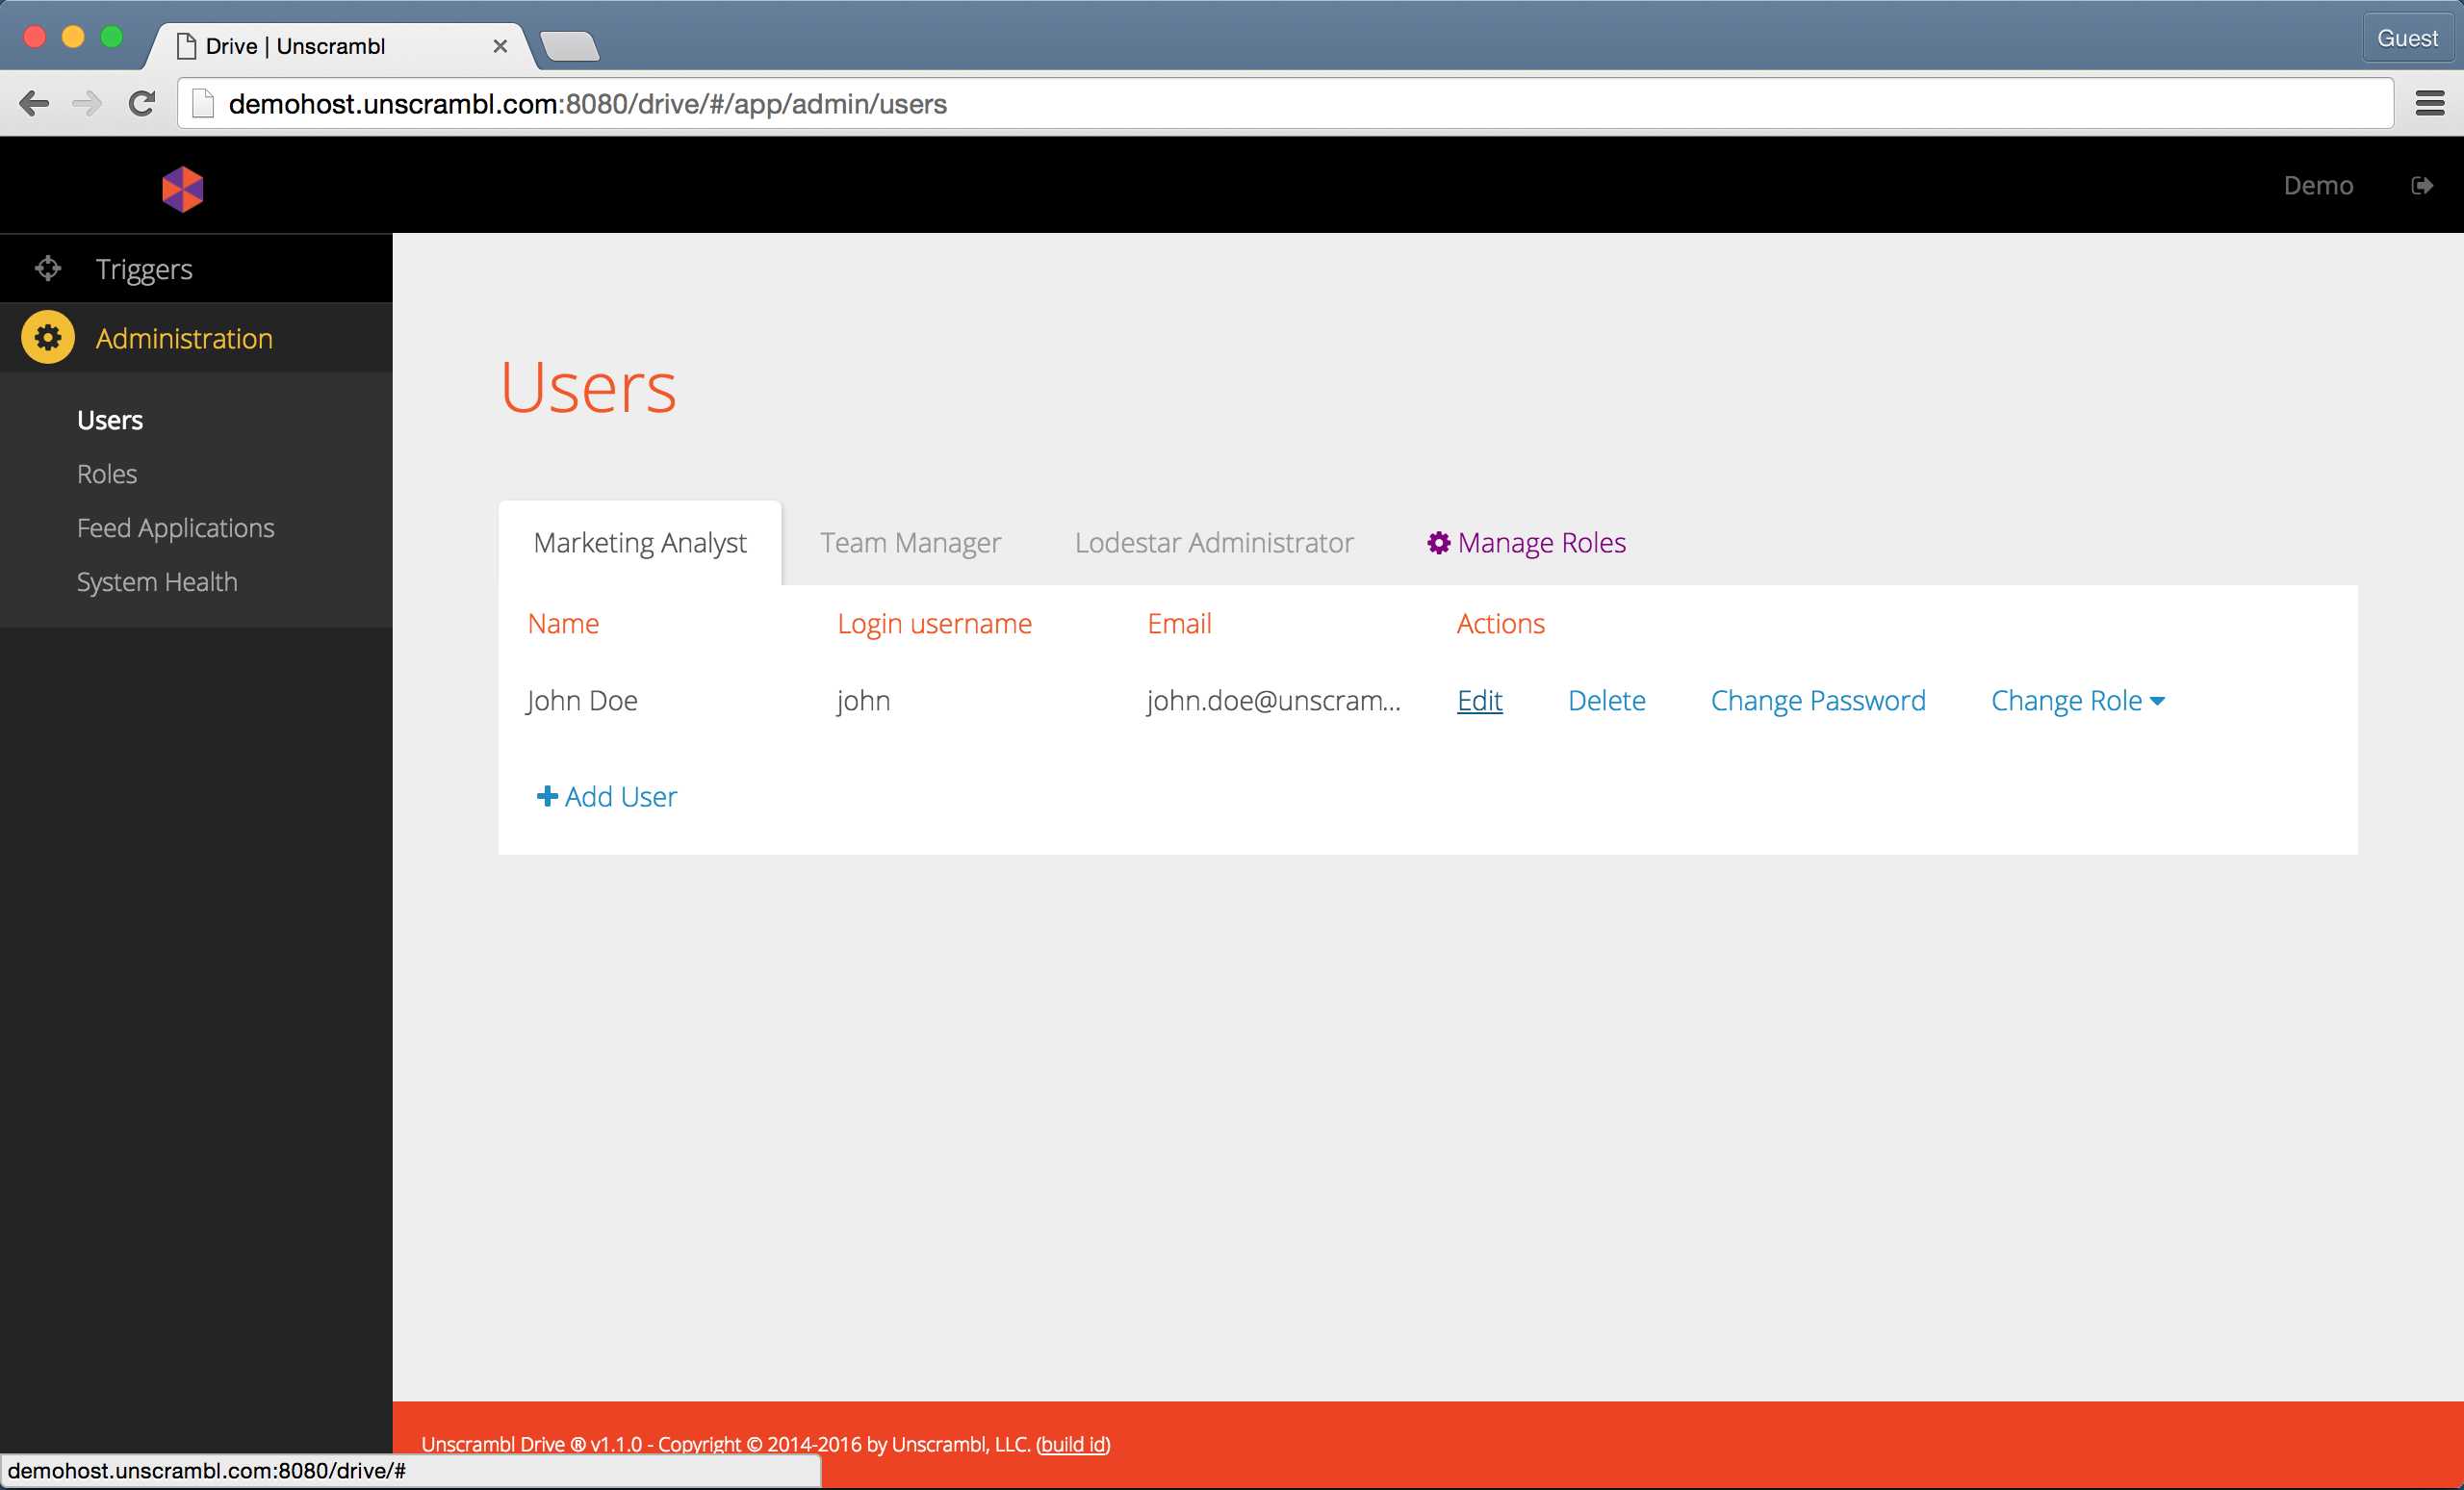
Removing or updating a user’s data.
The Roles page can be accessed by accessing the Roles link in the navigation bar. Alternatively, it can be
accessed via the link on the Users page:
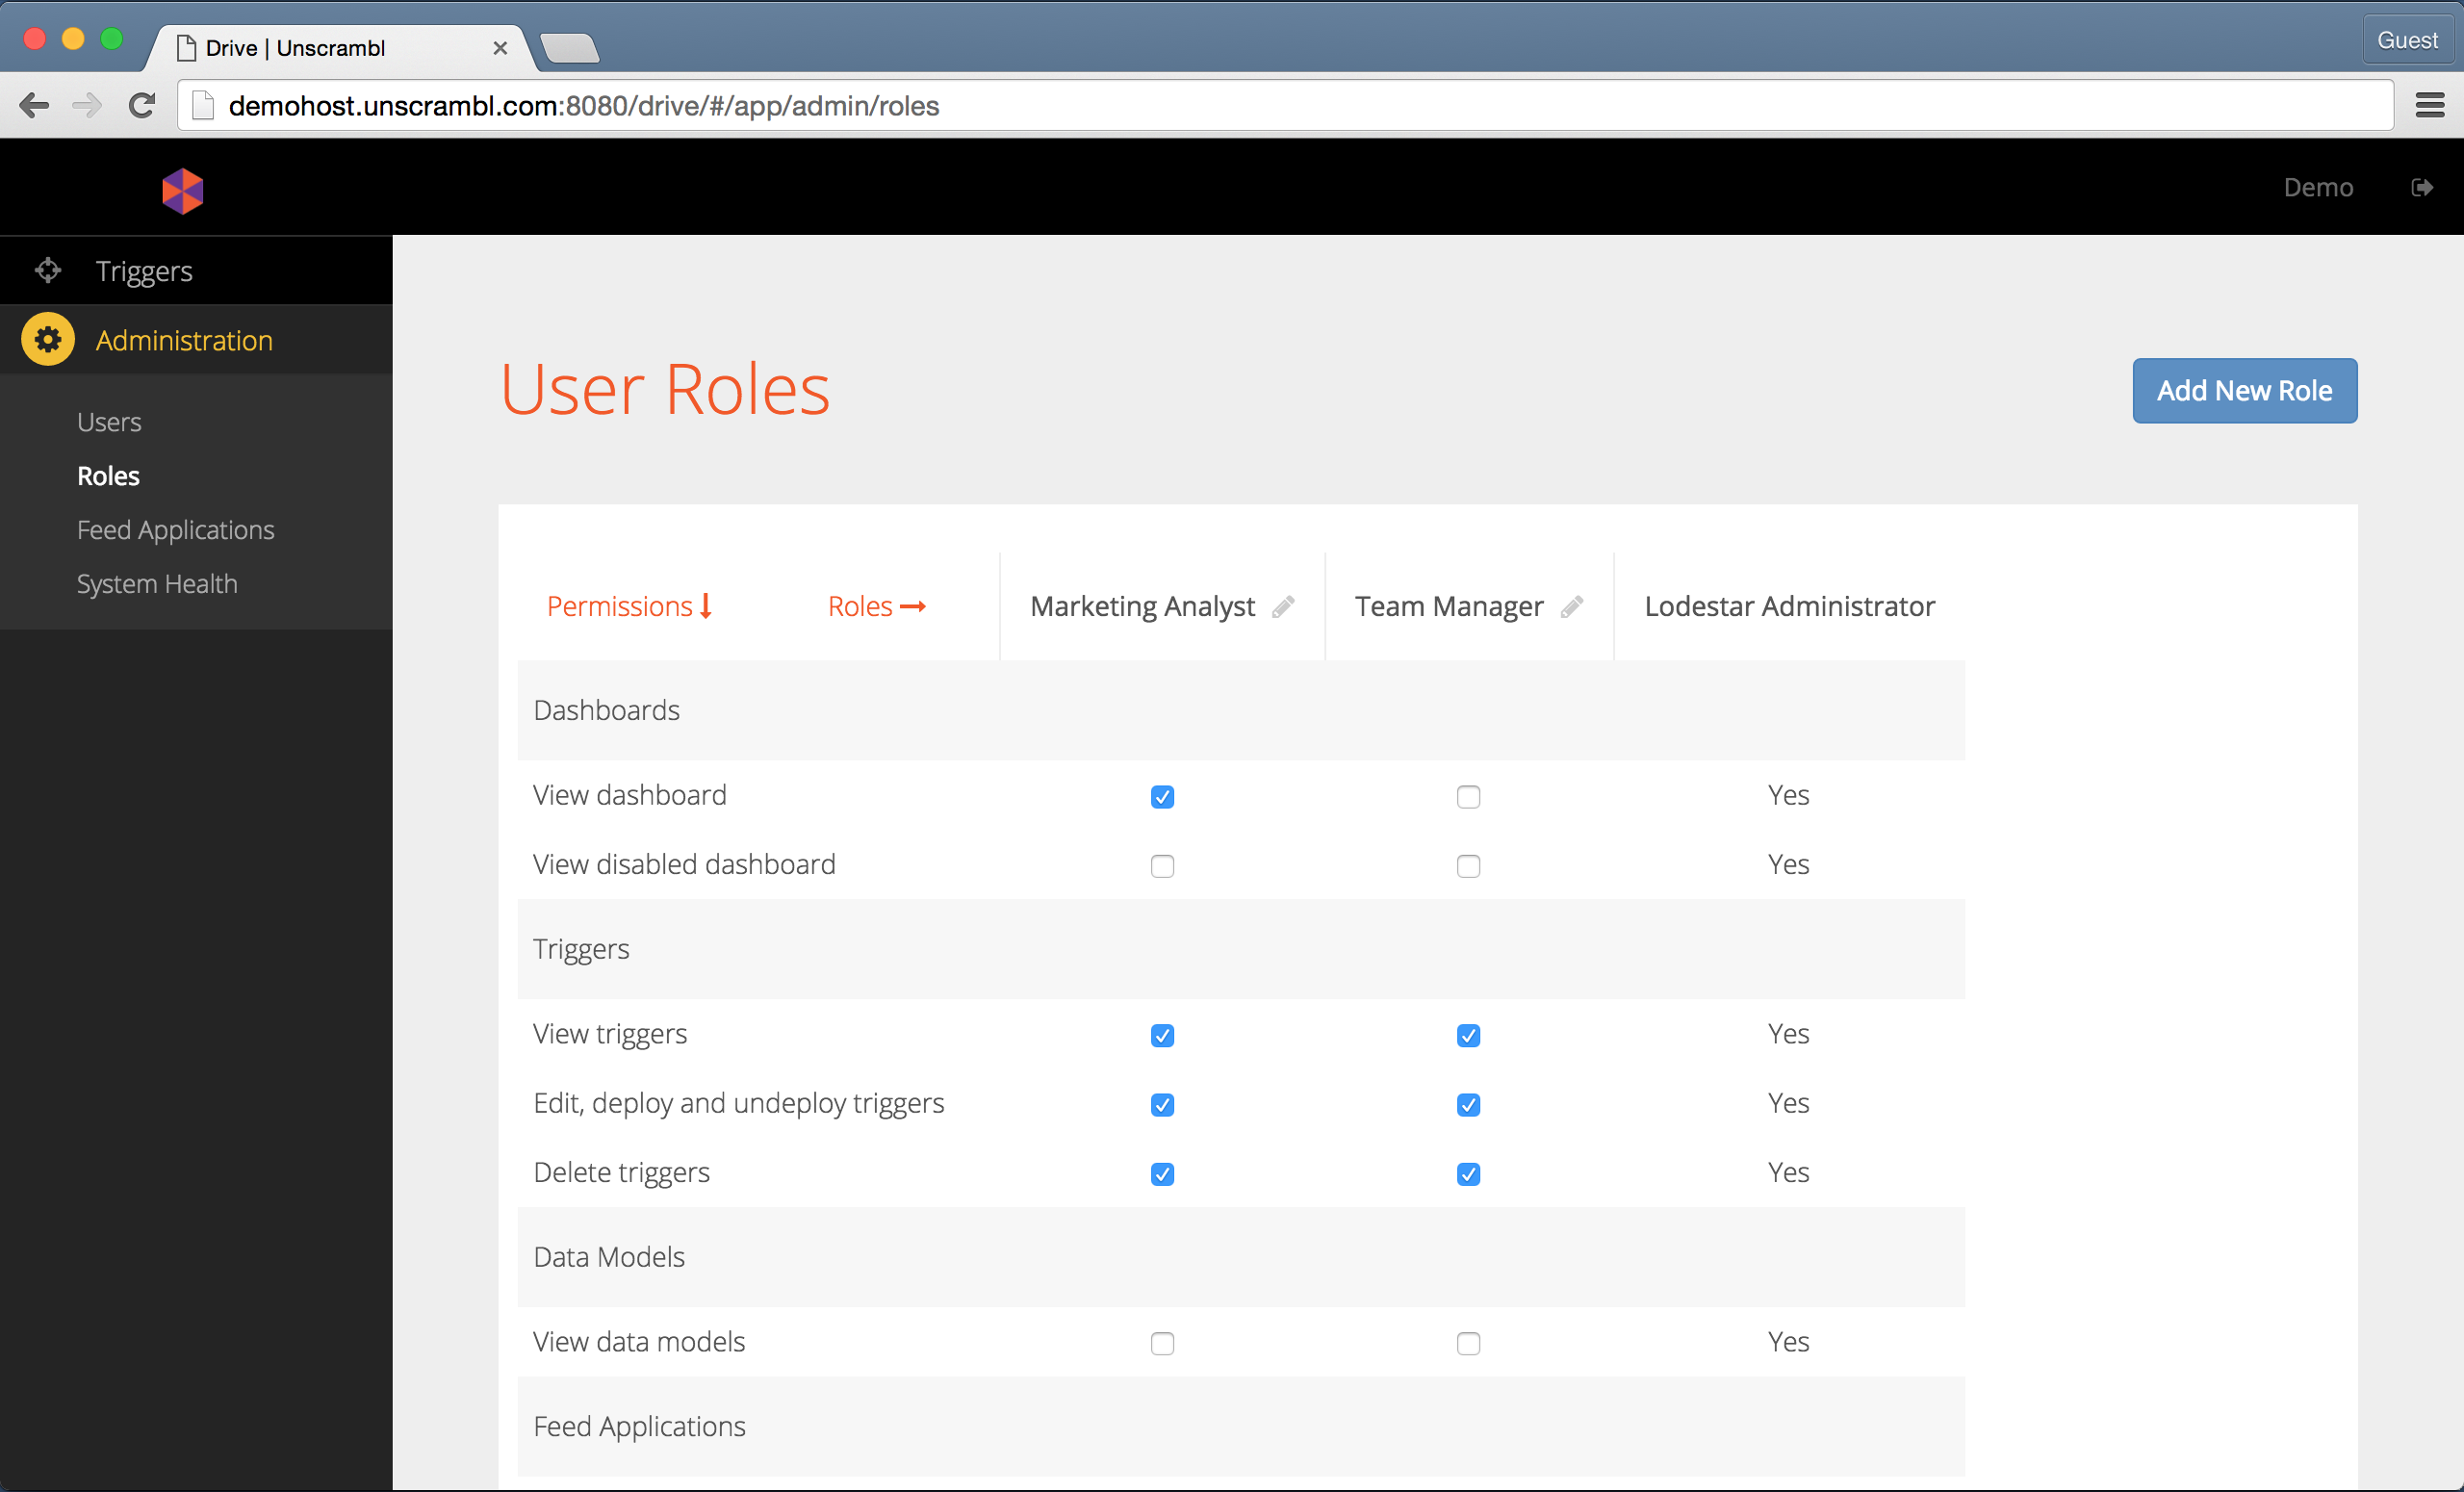
The Roles page.
The Unscrambl Drive, by default, comes with three default roles: the Administrator, the Team Manager and the
Marketing Analyst:
- The
Administratorhas unrestricted permissions in Unscrambl Drive. - The
Team Managerdoes not have the permissions associated with user and role management, but has all the other permissions. - The
Marketing Analysthas permissions that are a notch below aTeam Manager, excluding, for instance, the ability to edit the feeds.
Roles can be renamed and removed.
The removal of a role can only be accomplished if no user(s) with that role exists. The user interface shows an appropriate error when an attempt is made to delete a role that has user(s) assigned to it:
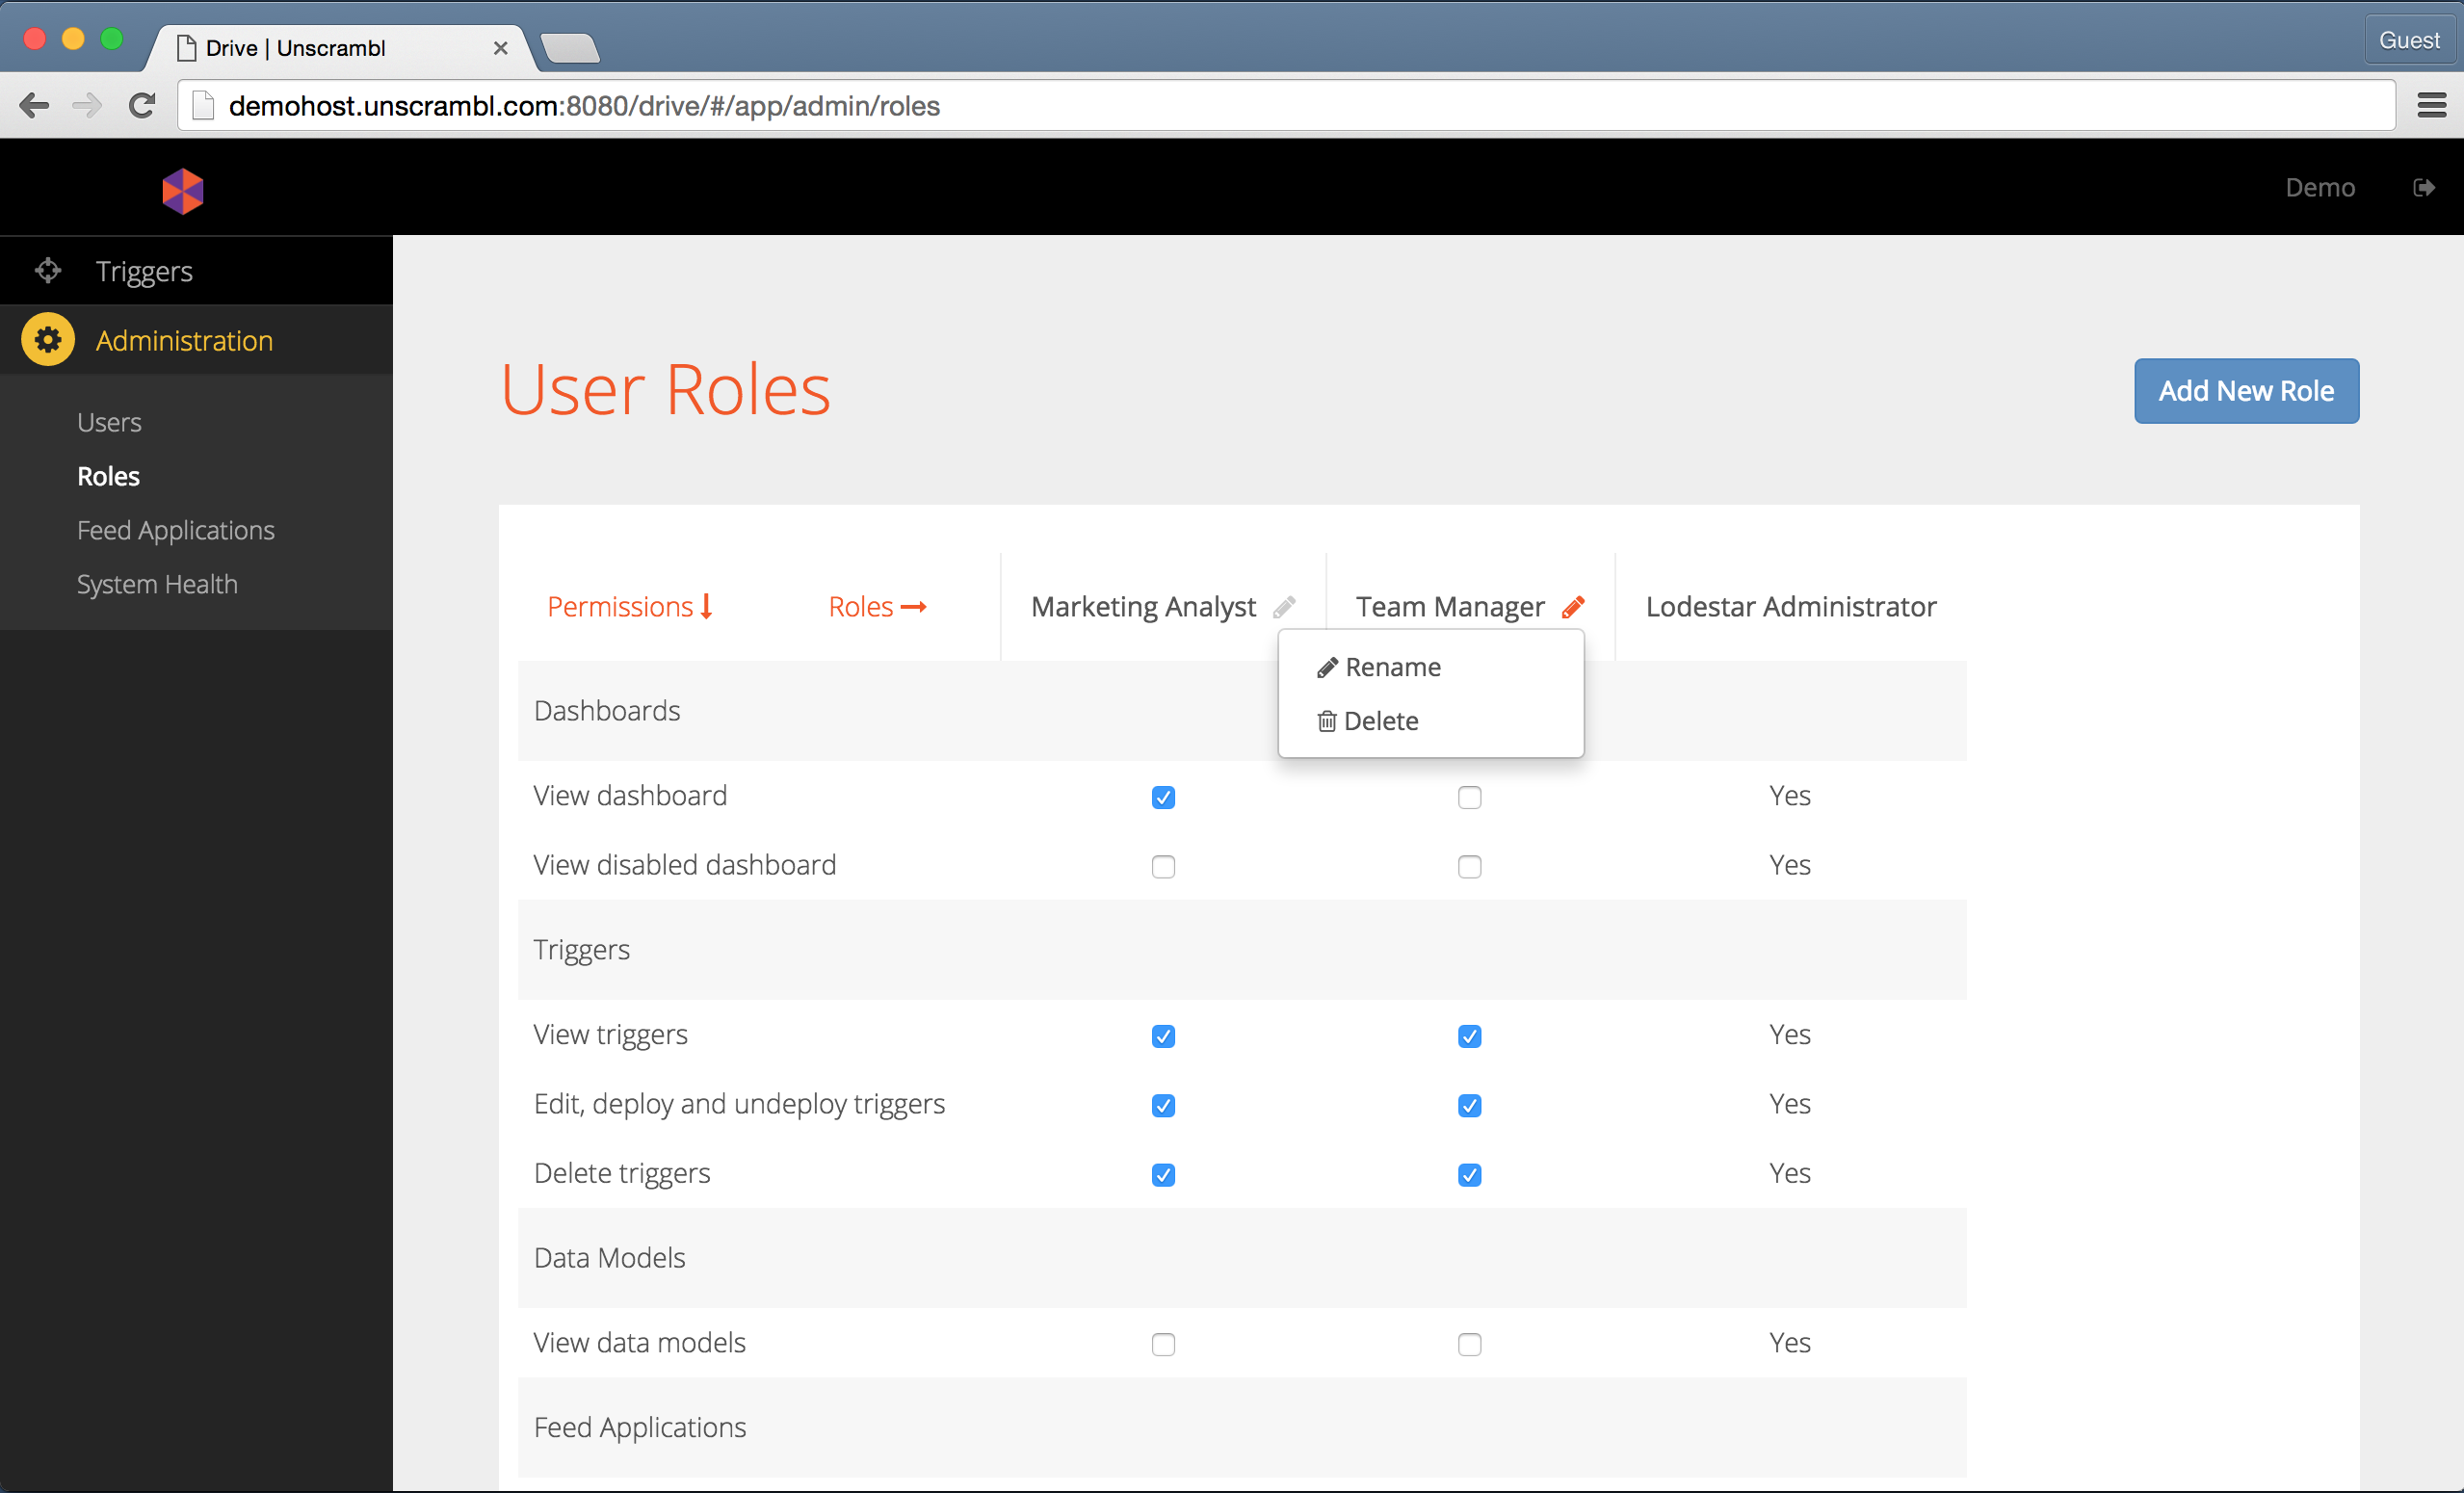
Renaming and deletion options for a role.
A new role can be created by clicking on the Add New Role button located at the top-right corner.
The resulting popup asks the user to enter the name of the new role and, upon clicking on the Create button, the
corresponding new role is created.
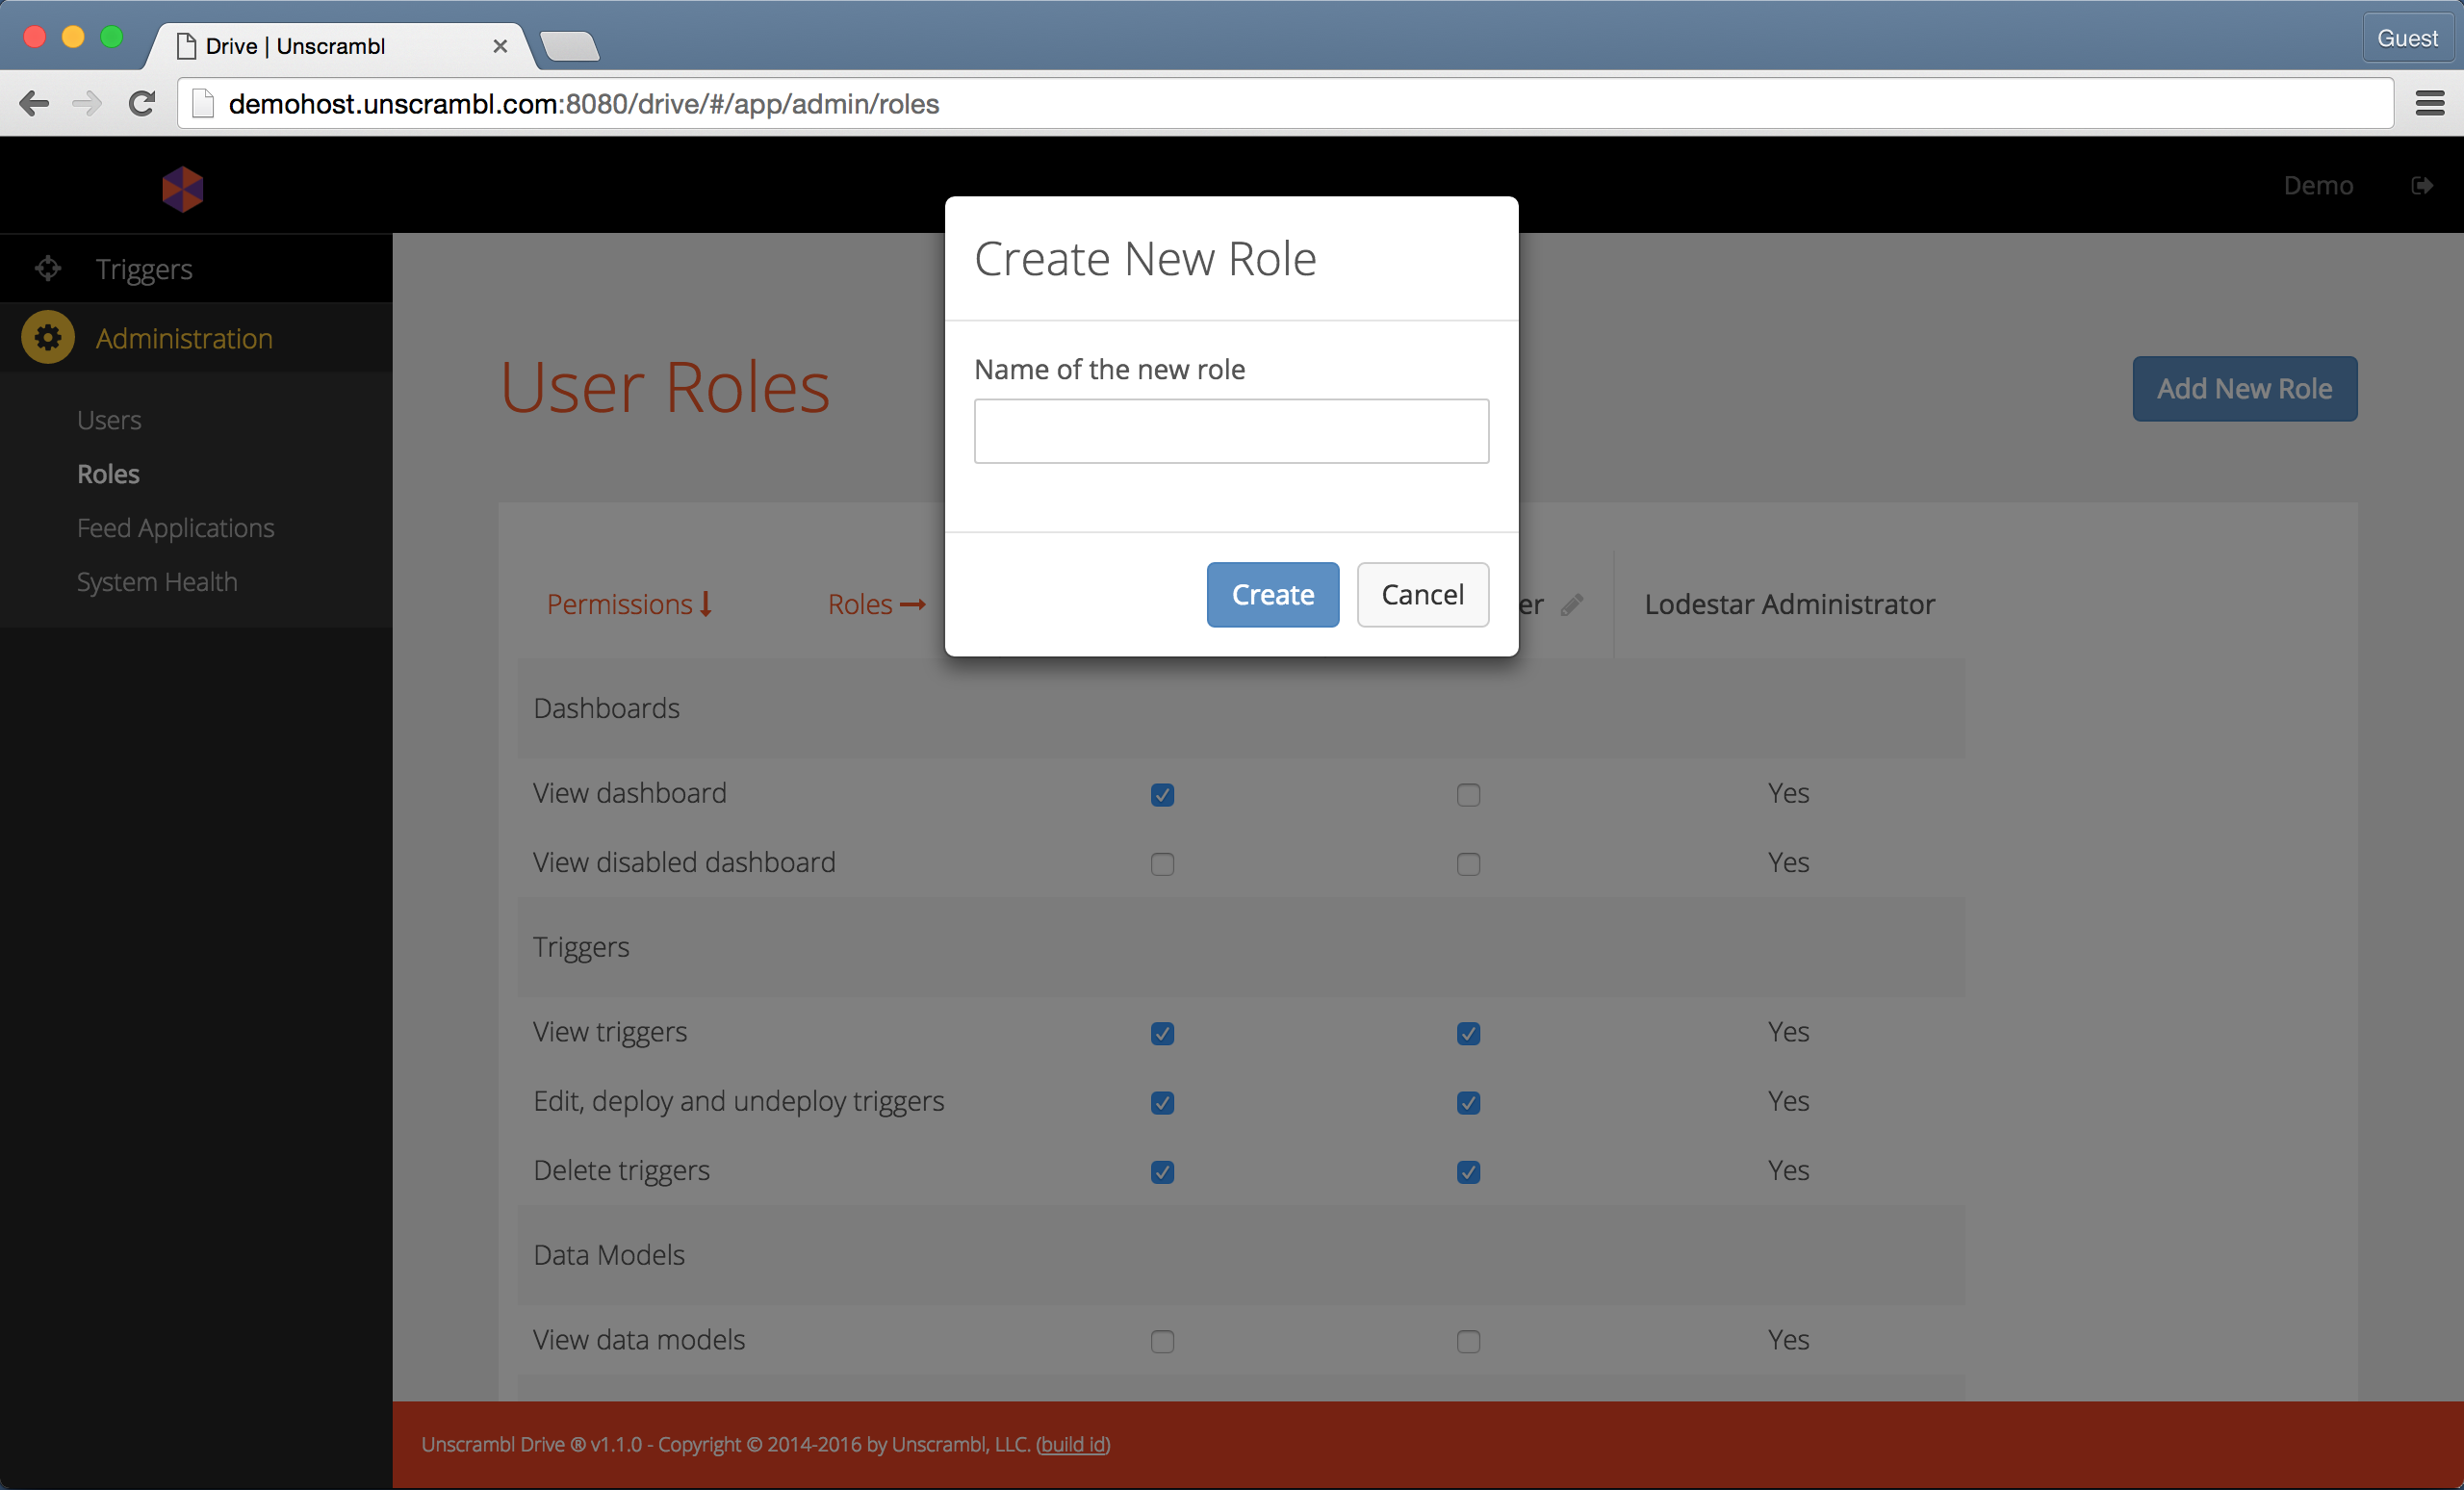
Adding a new role.
A new role is created without any permissions. Permissions can then be added to the newly created role by clicking on the corresponding checkboxes:
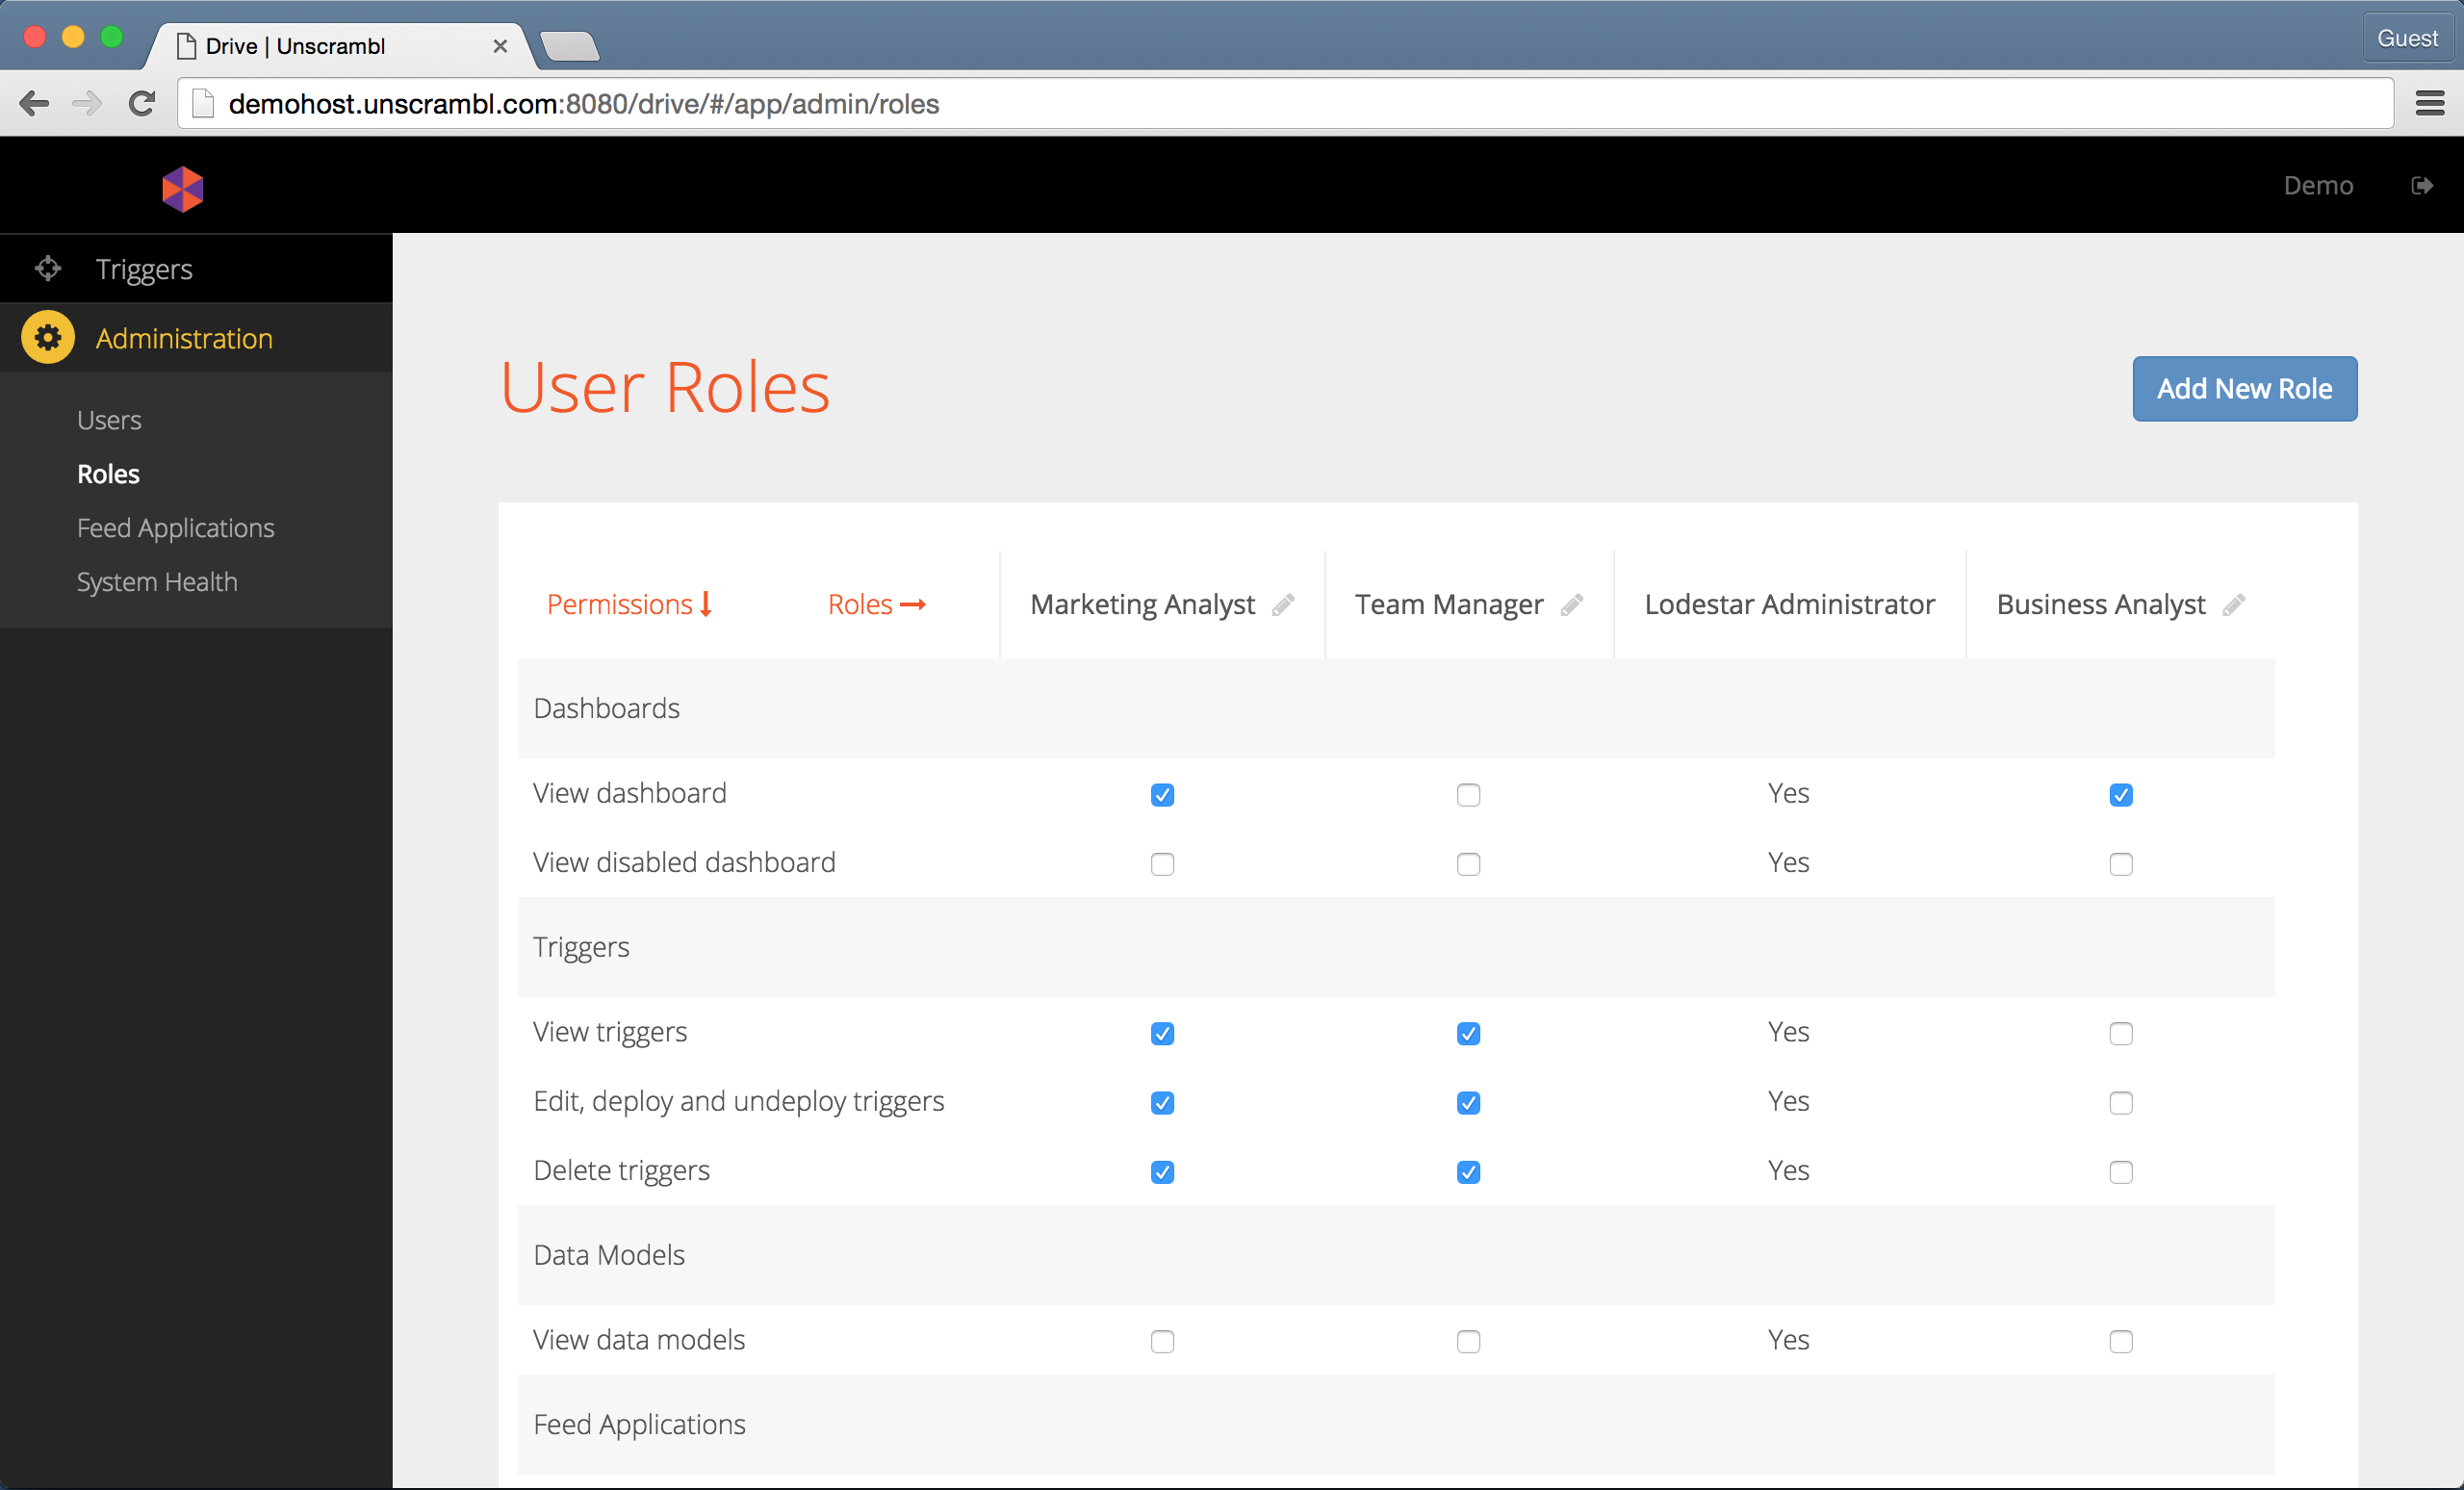
A newly created role (Business Analyst) with dashboard view permissions only.
System Health
The System Health dashboard can be accessed by clicking on the System Health link in the navigation bar.
The dashboard shows the status of the feed applications used for ingesting the incoming streaming data and the status of
the Unscrambl Drive supporting components, including the FastPast and the PinPoint:
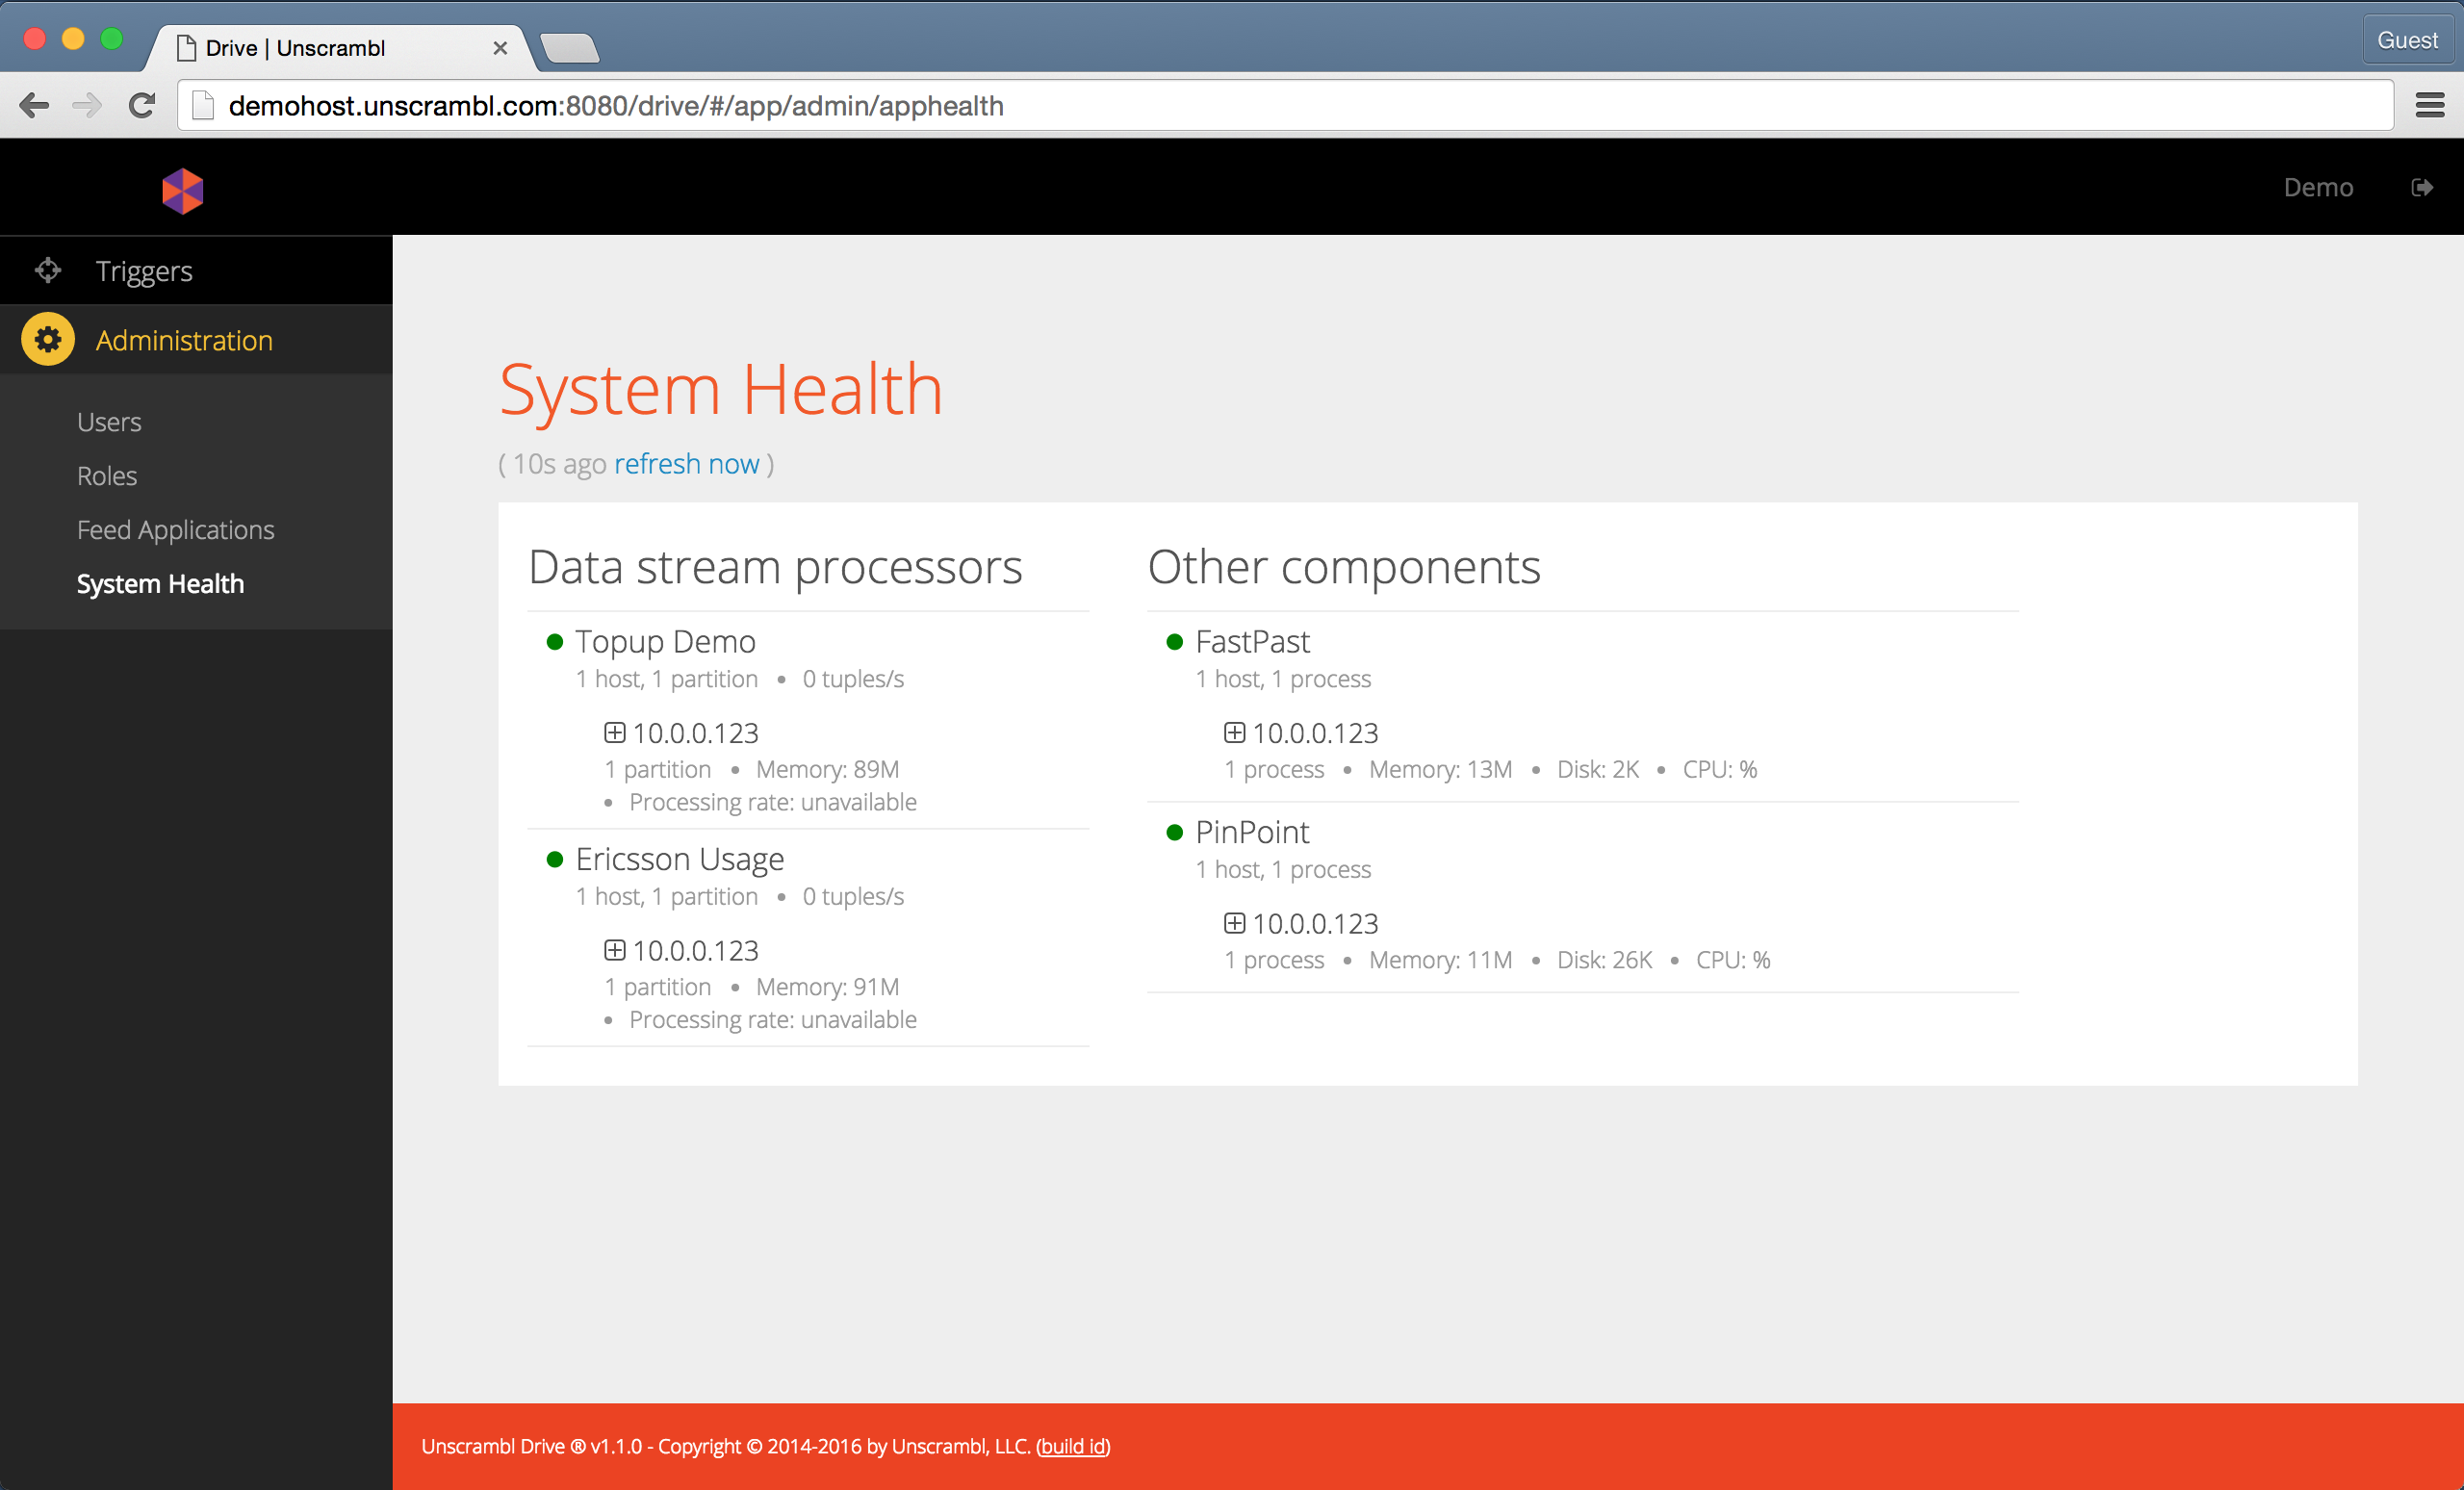
The System Health dashboard.
Applications, Aggregates & Enrichments
All of the feed applications configured in Unscrambl Drive can be seen by clicking on the Feed Applications link in
the left navigation bar.
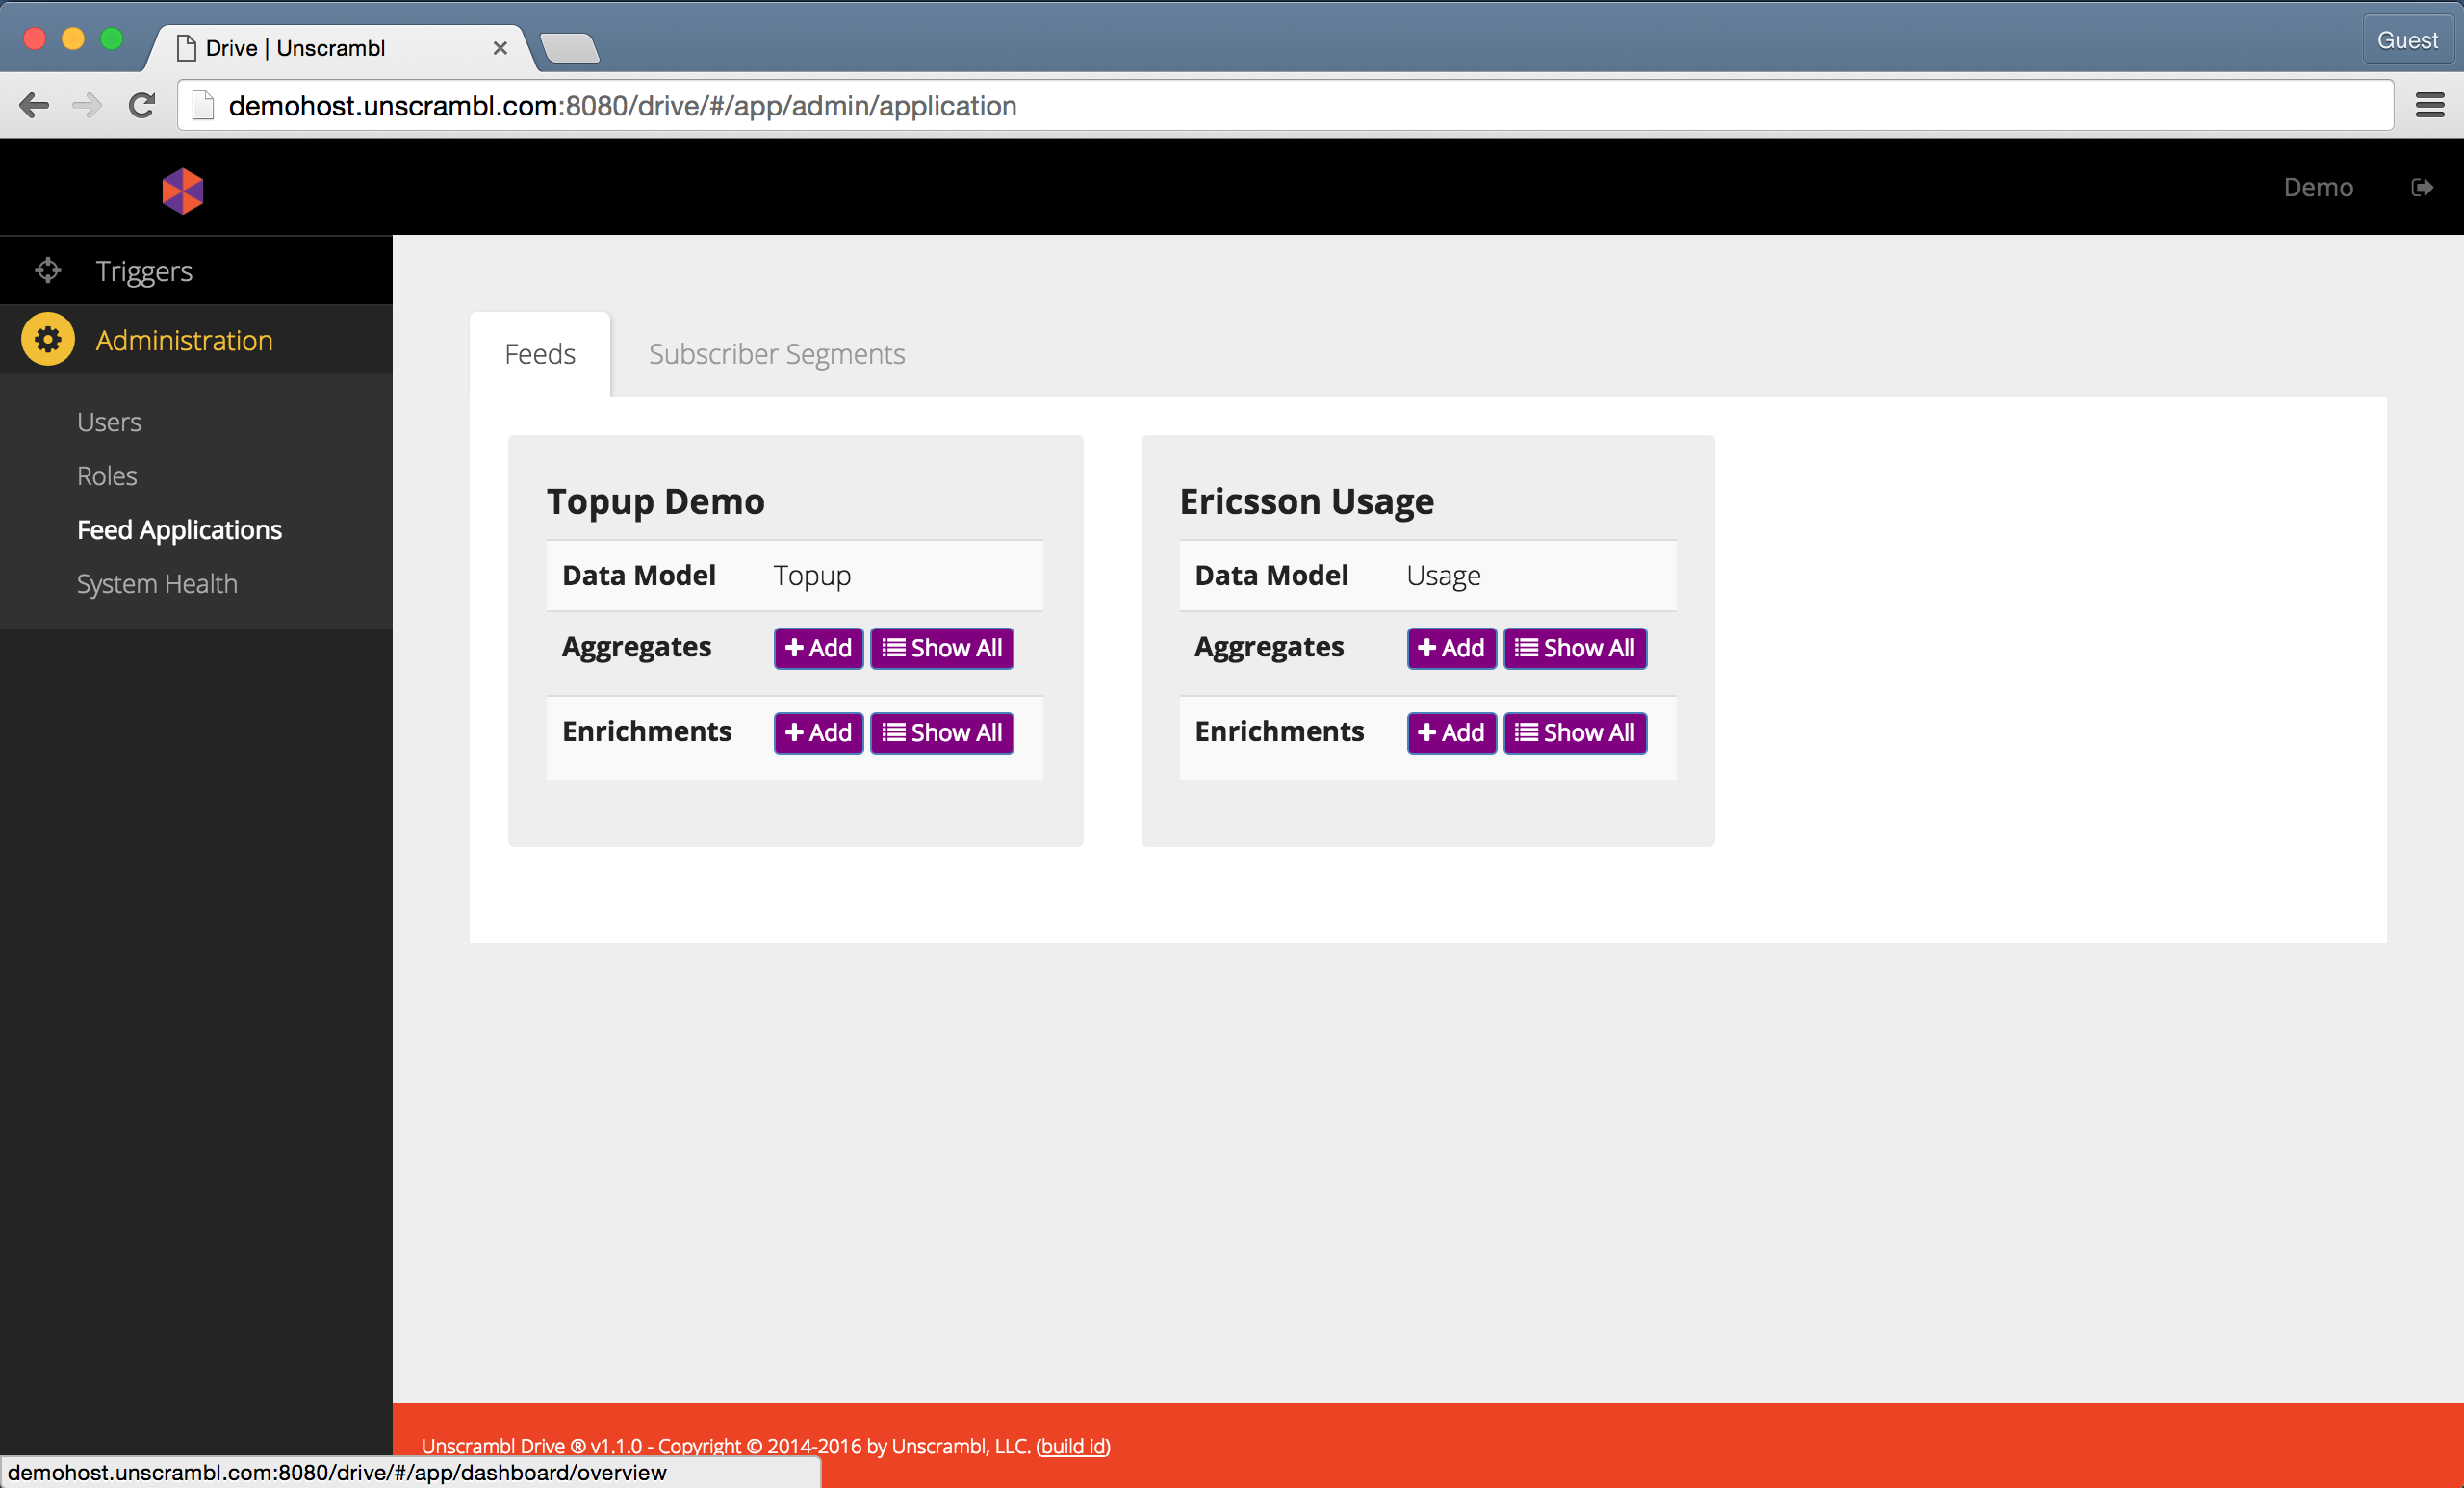
The applications configured in Unscrambl Drive.
This dashboard shows the applications and their associated data model, e.g., ‘Topup’, ‘Voice’, etc.
Users with the appropriate permissions can use this page to view, edit, add and/or delete the aggregates and enrichments associated with a given feed application.
The existing aggregates configured for a feed application can be seen by clicking on the Show button in the
Aggregates row for that application.
The dialog showing the aggregates associated with the Topup Demo application is below:
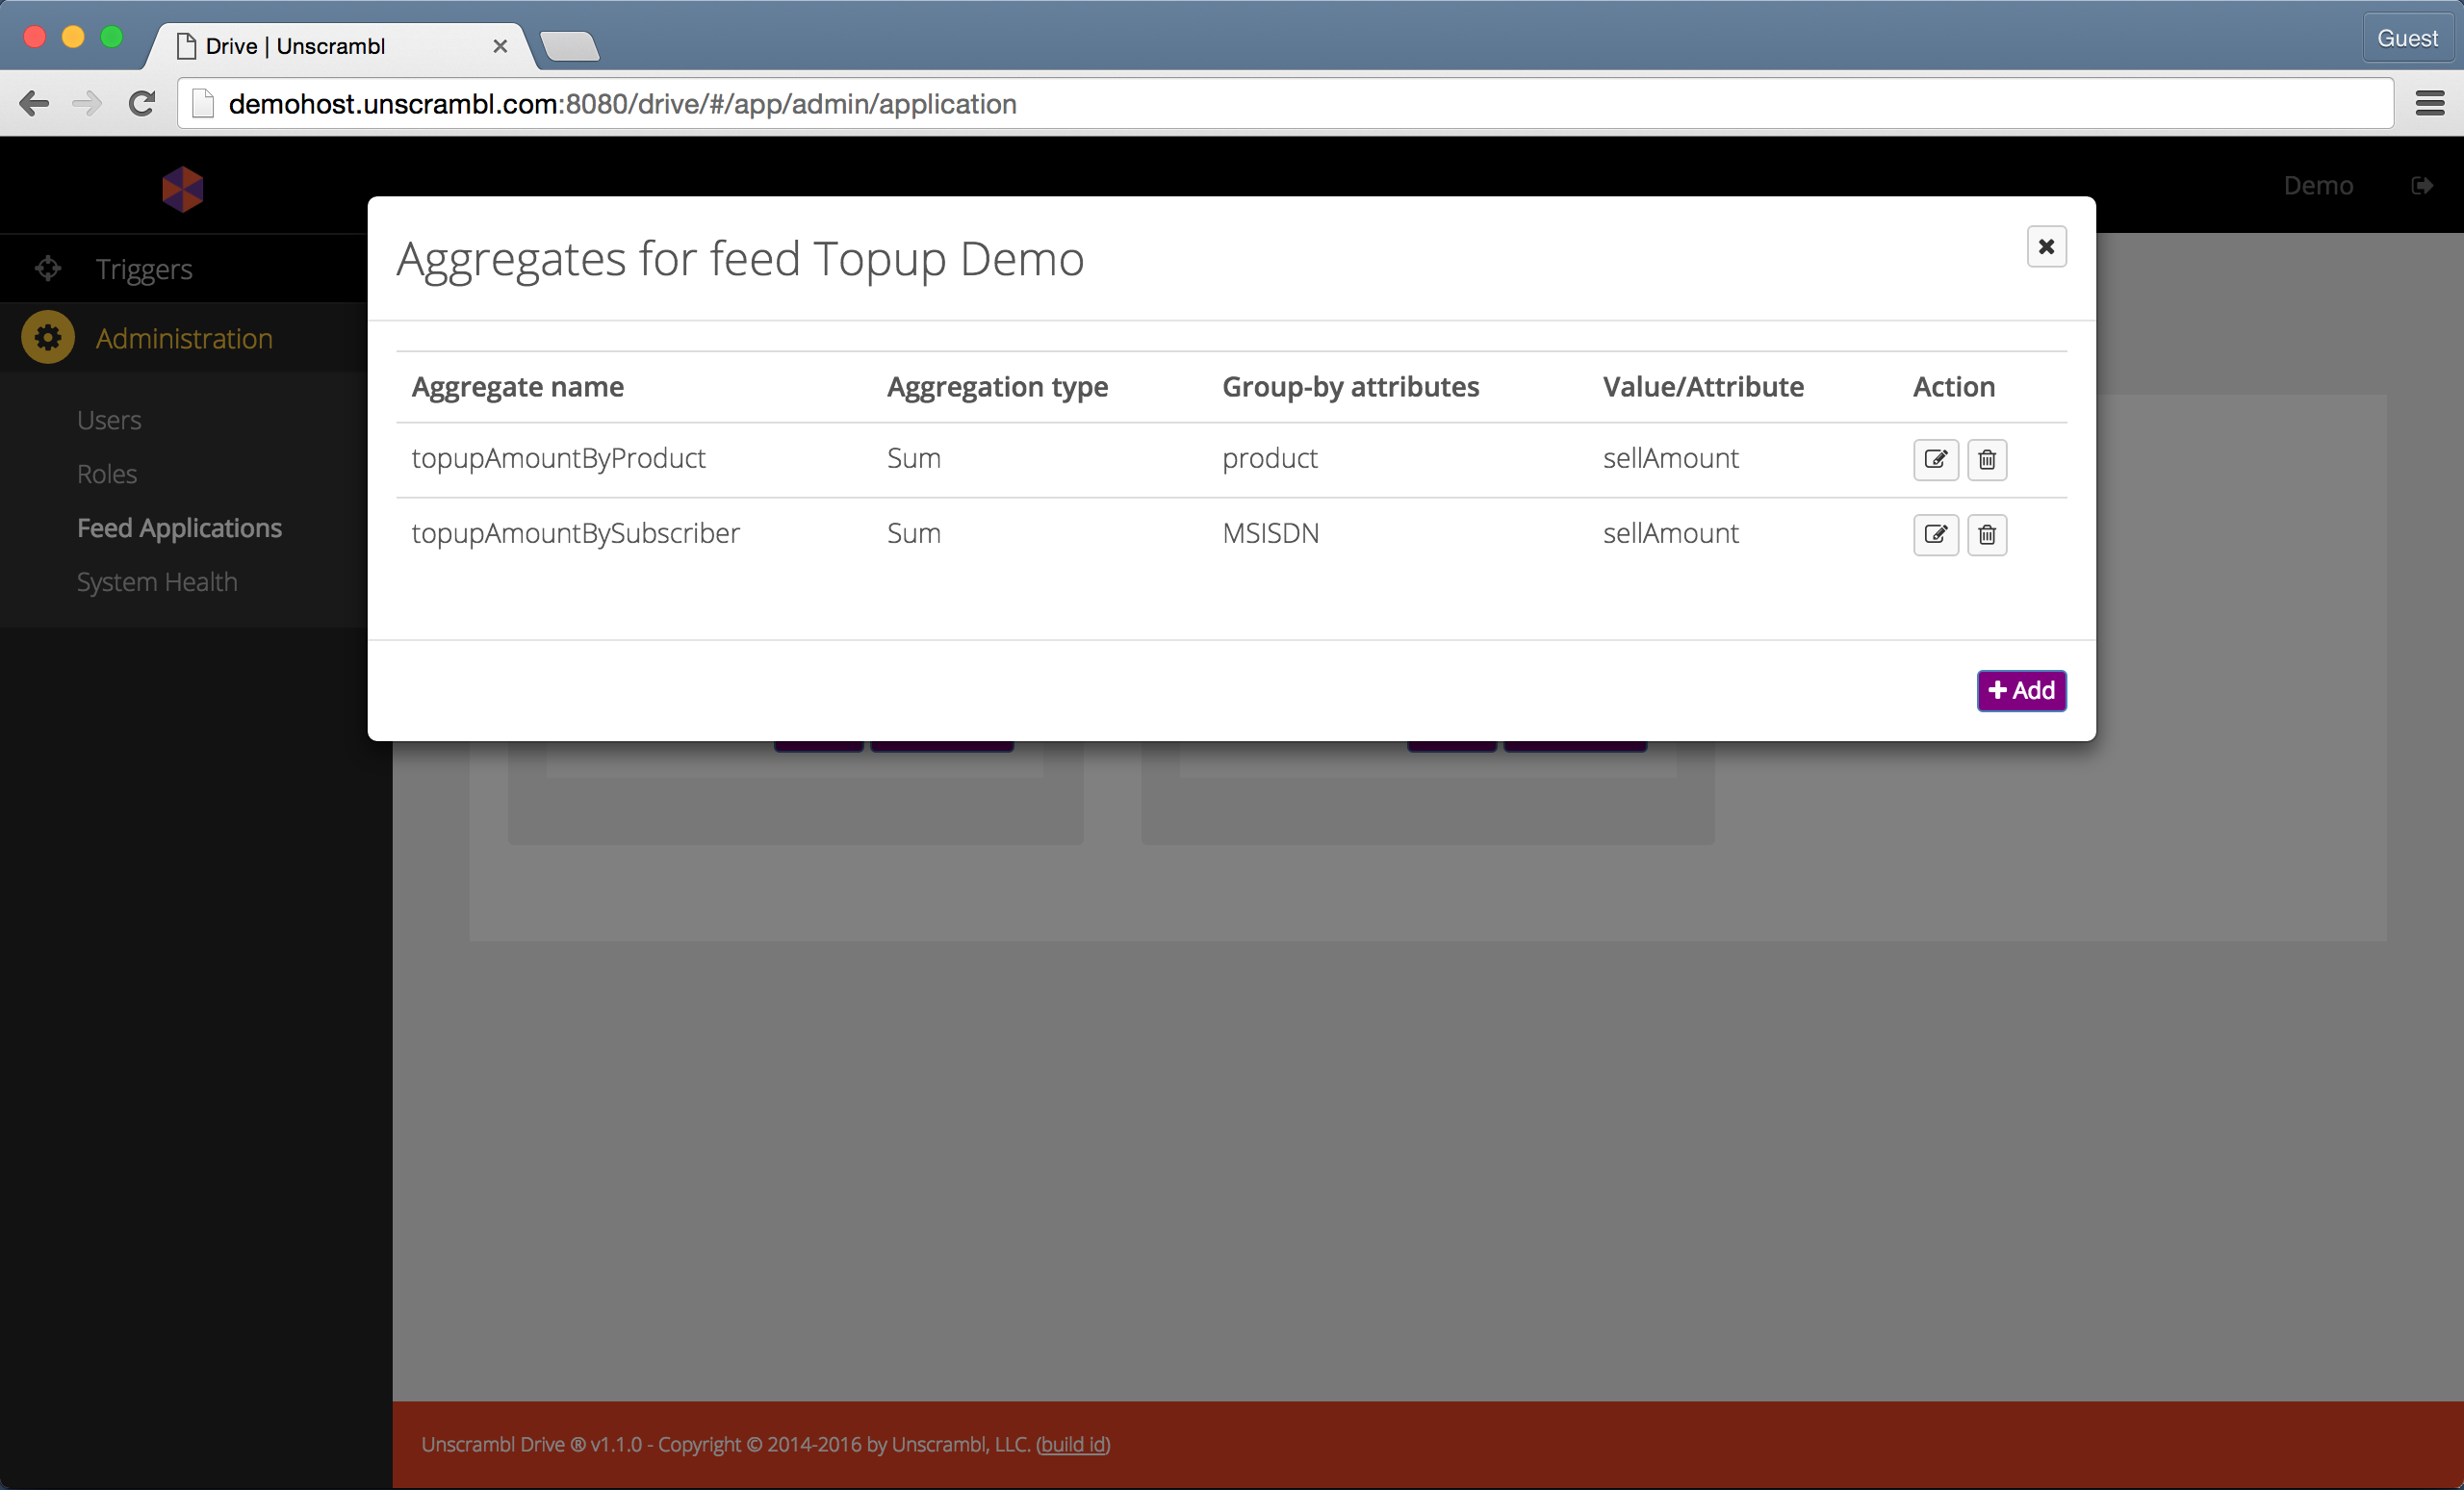
The aggregates associated with the Topup Demo feed.
The aggregates associated with a feed can be edited and removed.
To explain the aggregates a bit further, let us consider the aggregate called topupAmountBySubscriber. The dialog
that opens up upon clicking on the edit button is shown below:
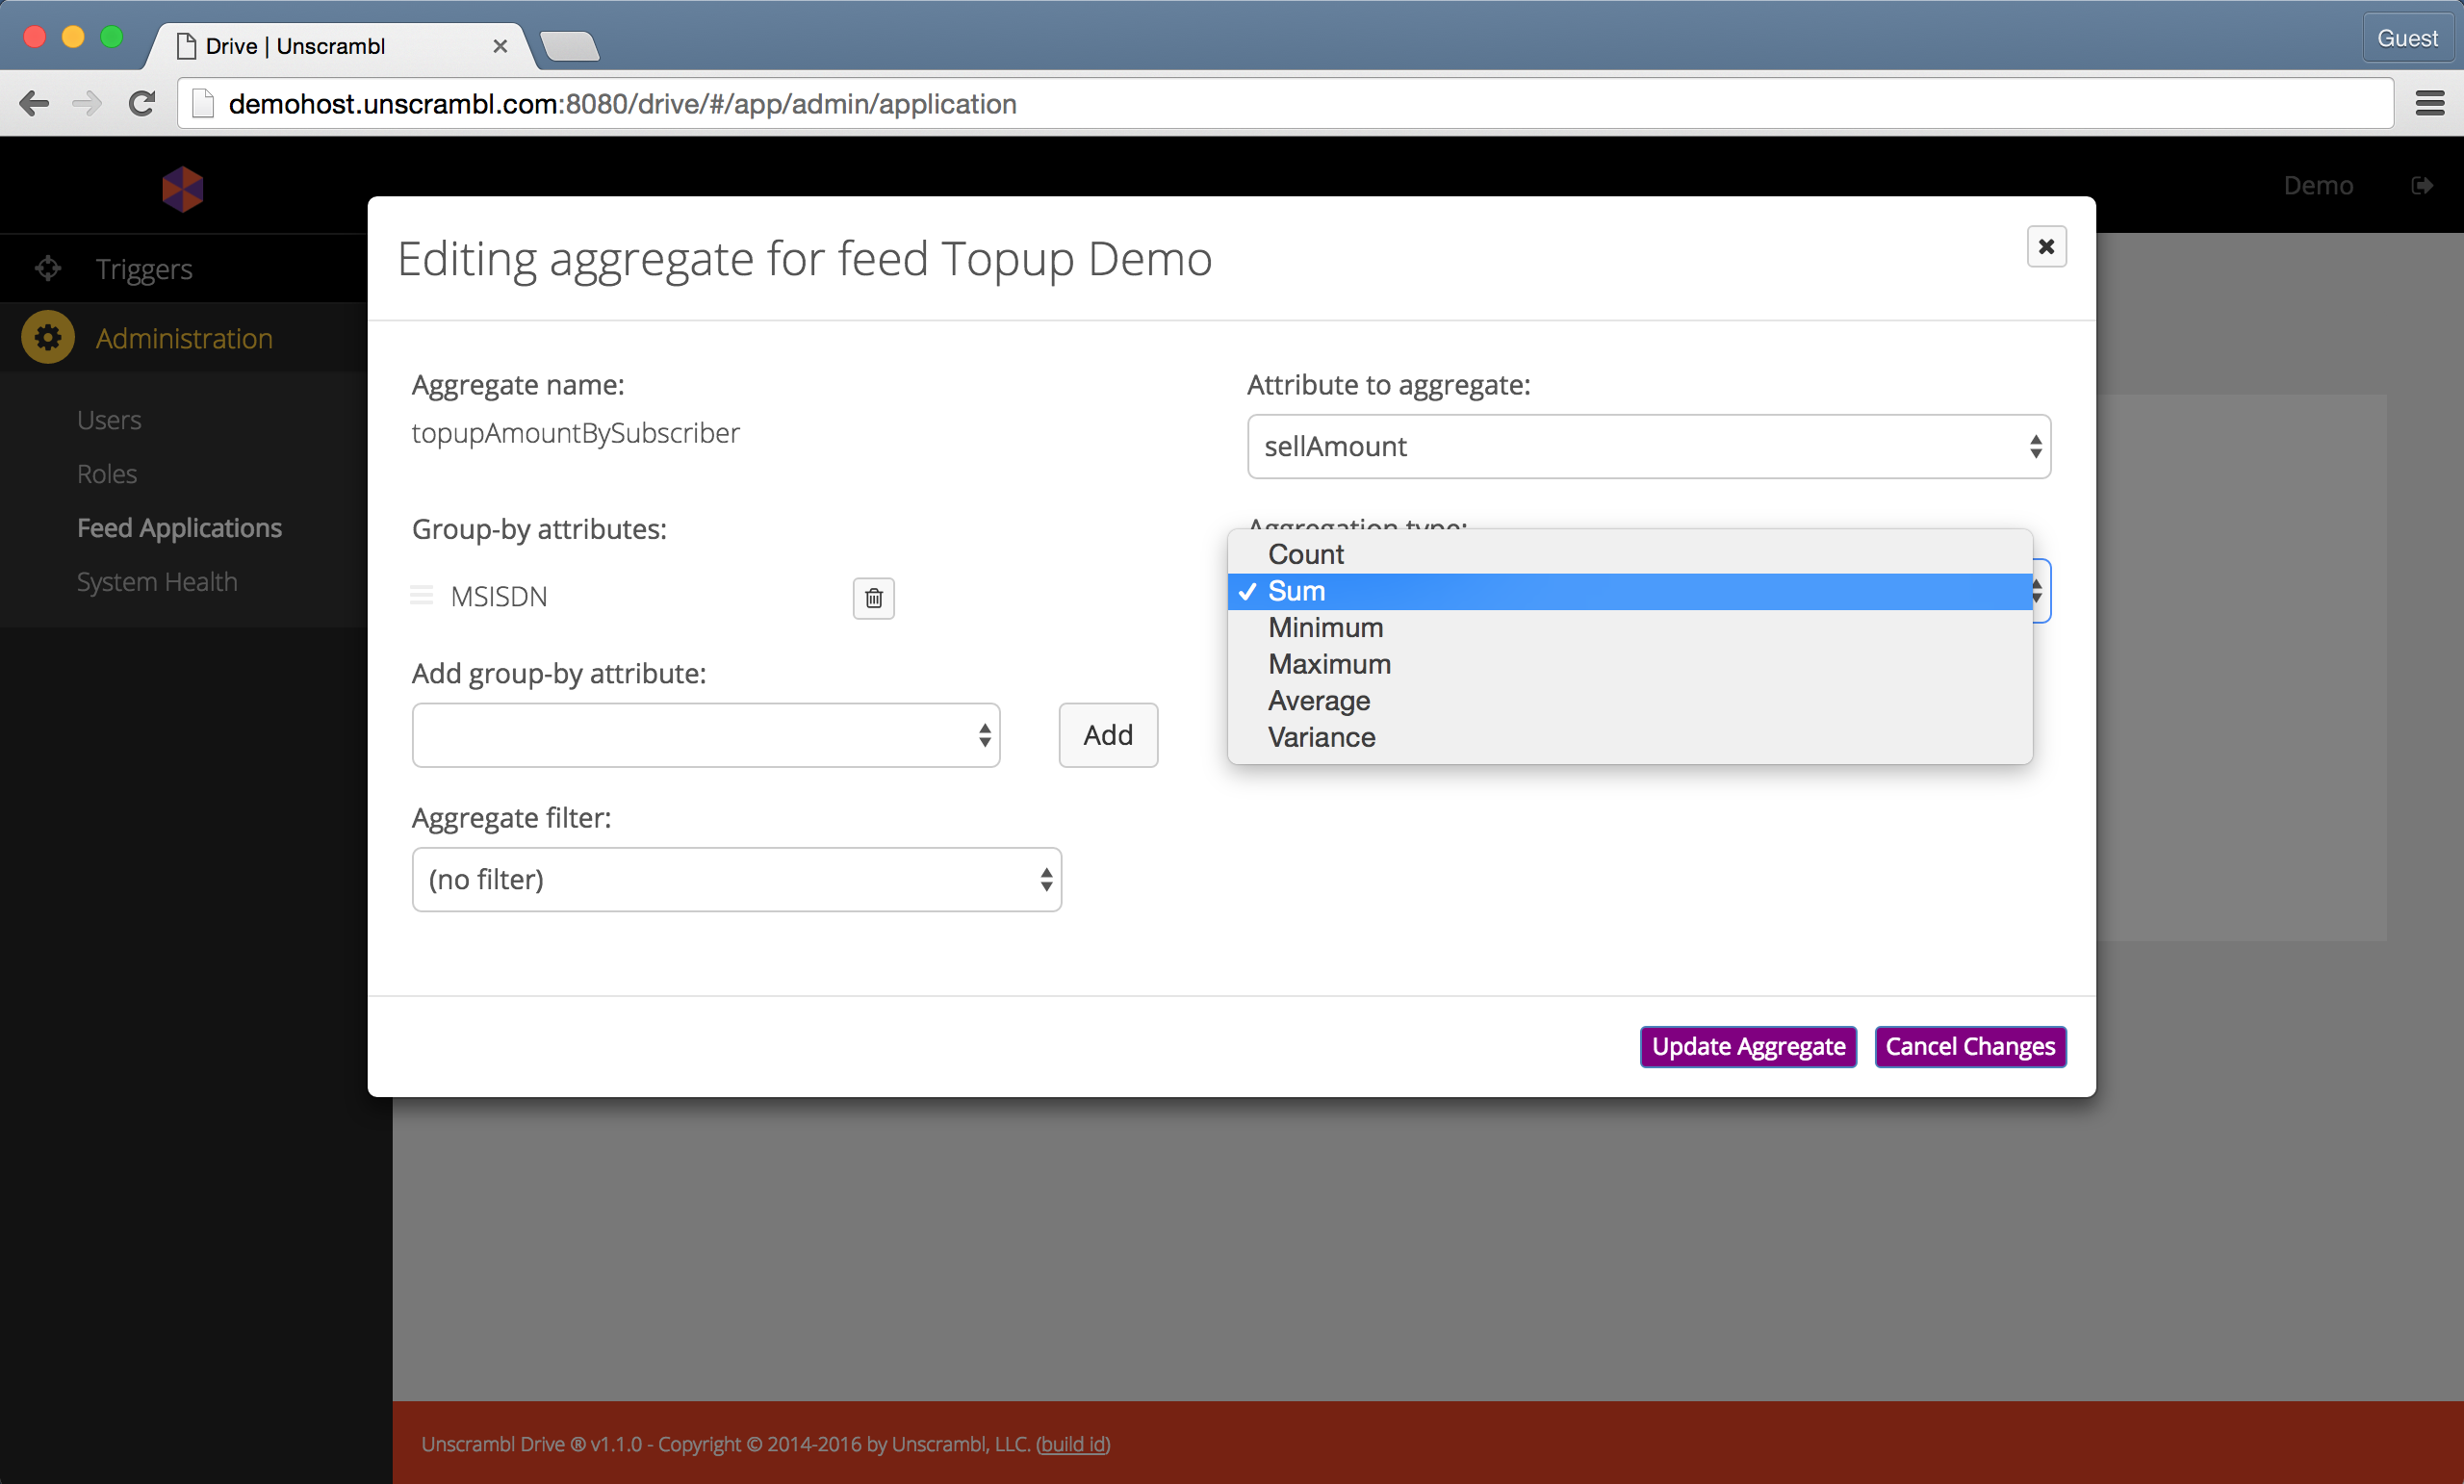
Editing an aggregate.
This aggregate is designed to count the number of calls by subscriber over various time windows (e.g., currentDay,
lastDay, etc.).
topupAmountBySubscriber, i.e. the aggregate Name, is the name that is used to refer to the aggregate when using
it in a trigger.
The Aggregation type, in this case Sum, is used to accumulate the topup amounts, and the group-by attribute, in
this case, MSISDN, is used to produce per-user tallies, since it identifies individual subscribers.
Additional group-by attributes can be added in a manner similar to the group-by clause used in traditional relational database management system (RDBMS) query languages.
A filter condition can also be used when only a subset of tuples is to be considered for an aggregation.
For instance, if the incoming tuples in the feed contain a Boolean isDroppedCall, indicating a dropped call, then
one can calculate droppedCallsBySubscriber by using isDroppedCall equals to True as a filter condition with
the MSISDN as the group-by attribute and Count as the aggregation type.
The list of enrichments associated with a feed can be seen by clicking on the Show button in the Enrichments
row. The enrichments associated with the Topup Demo feed can be seen below:
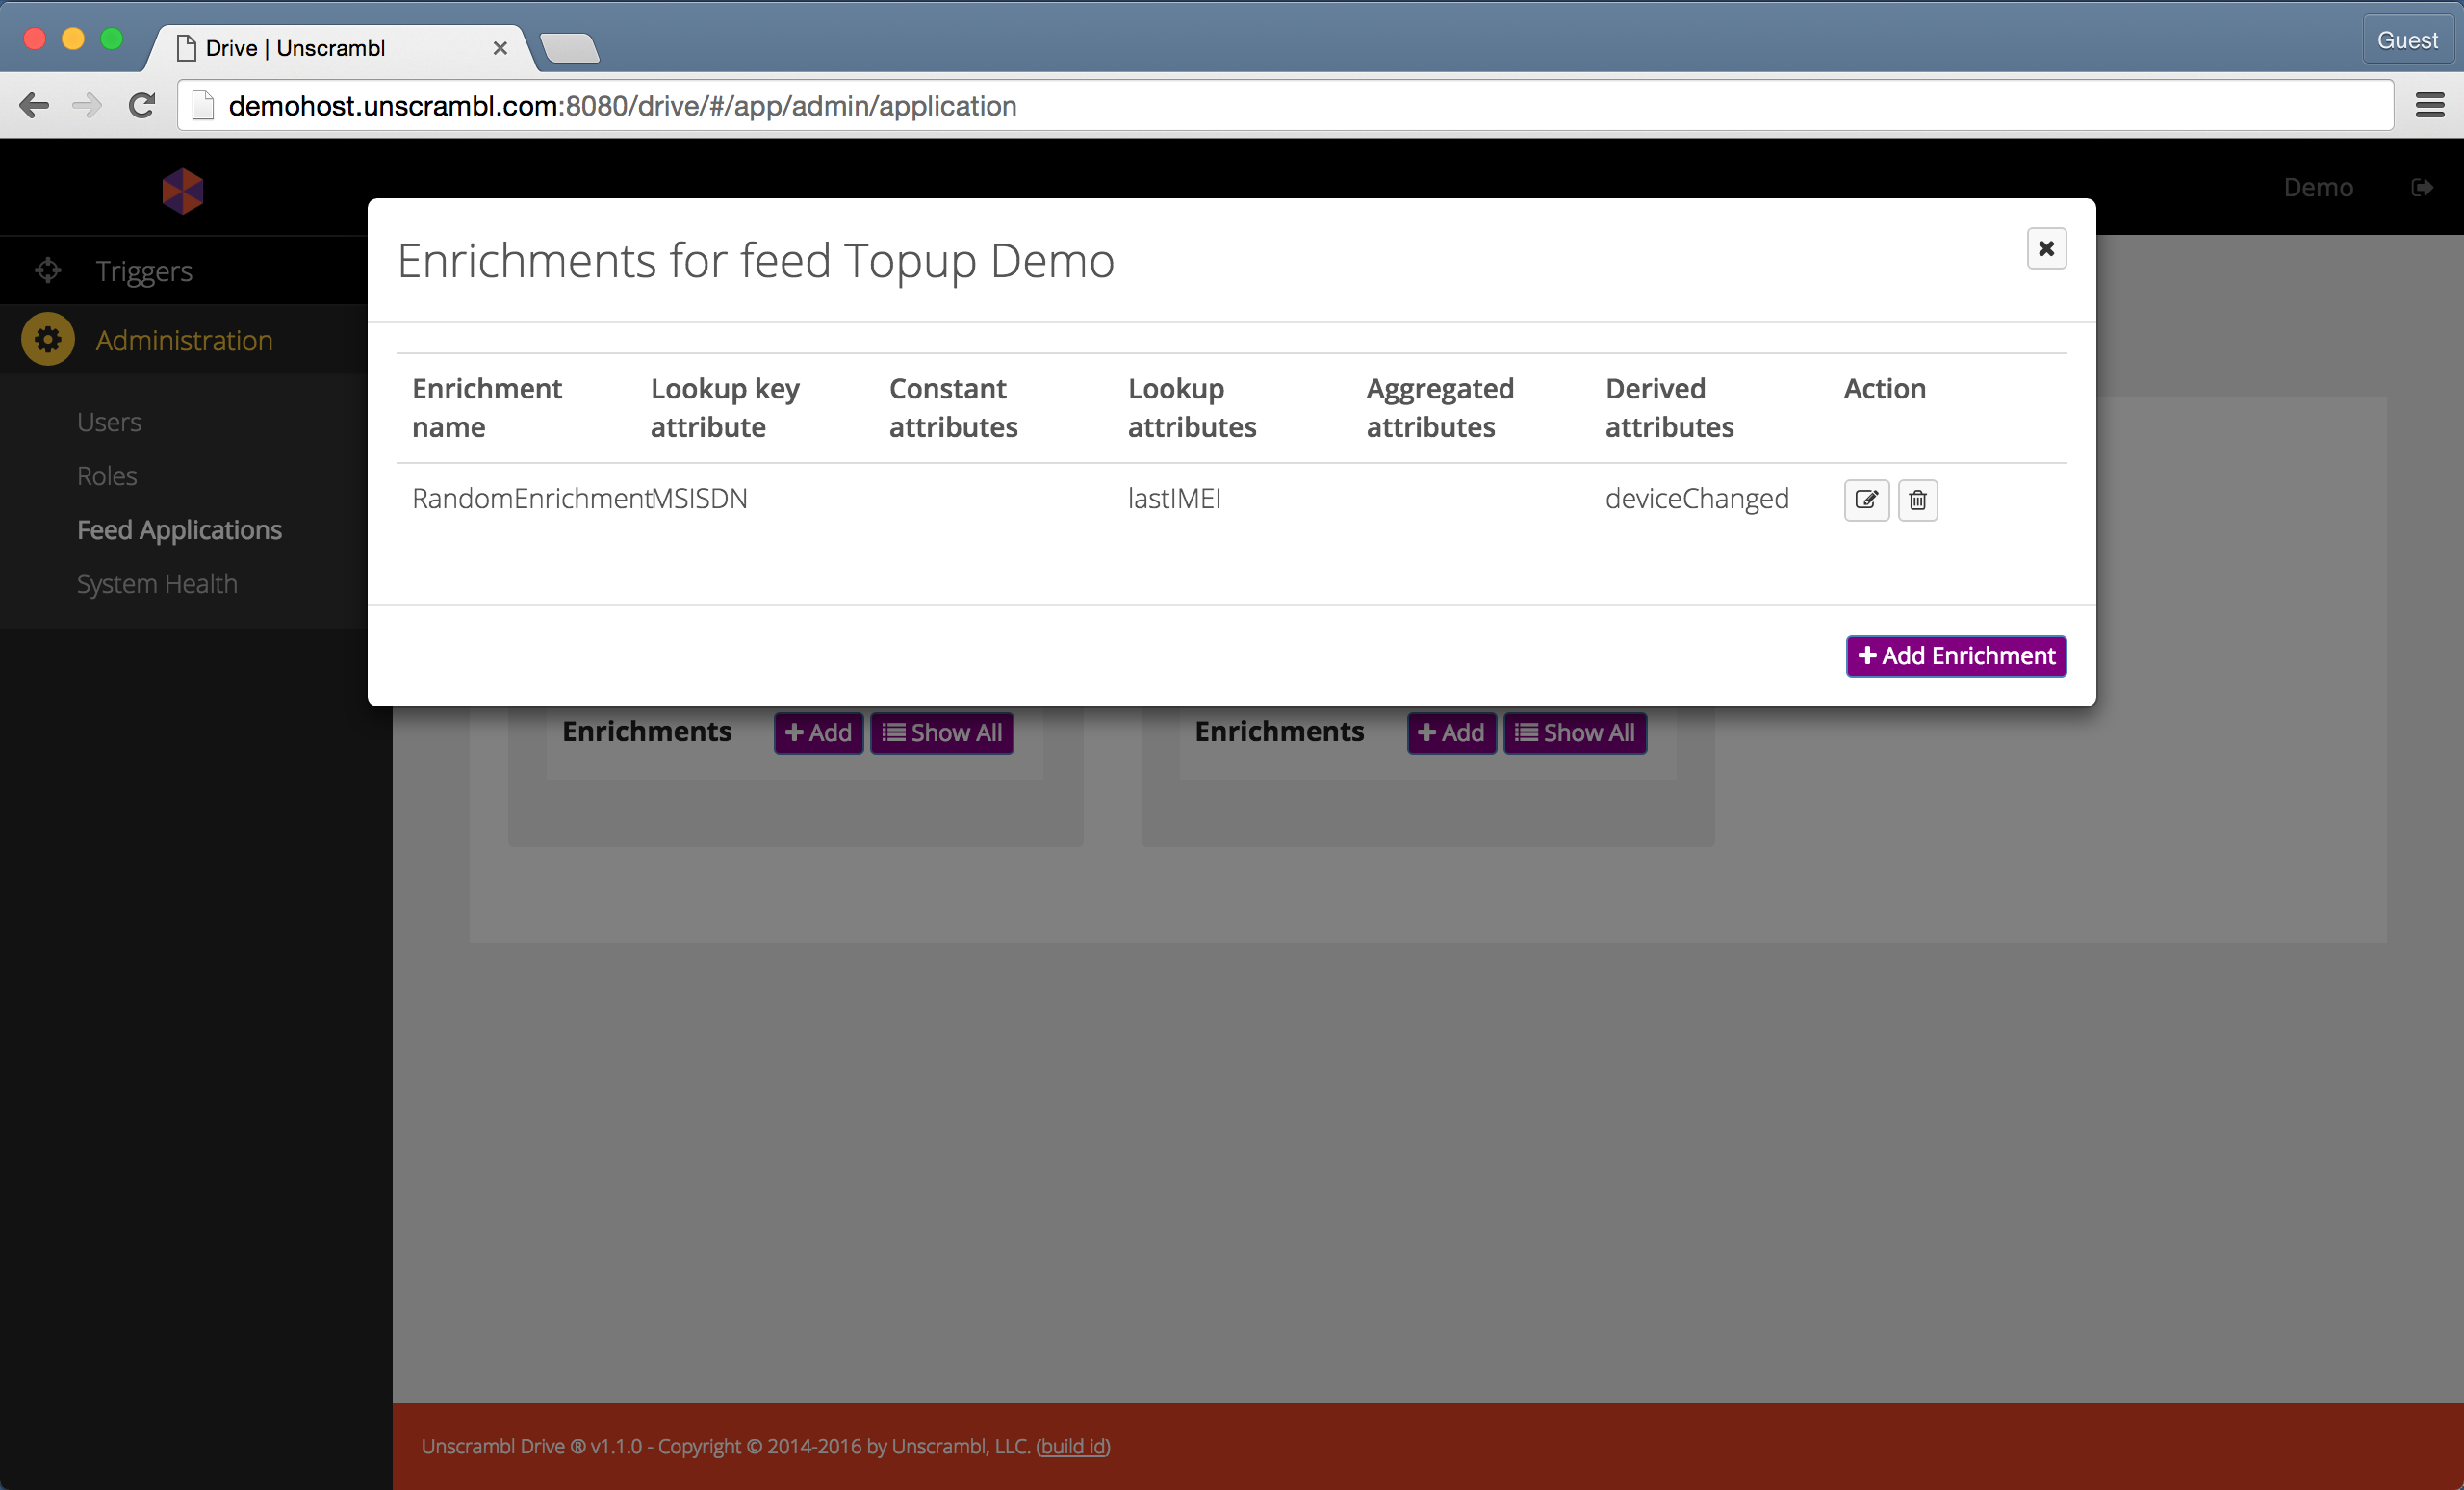
The enrichments associated with the Topup Demo feed.
Unscrambl Drive supports 4 kinds of enrichments:
- The constant attributes enrichment enables one to add attributes to the tuple that have constant value. Such constant attribute may be needed by other enrichments or retained as an attribute in the enriched tuple. Note that retaining and forwarding the constant attributes as part of the output tuple from the enrichment step is optional.
- The lookup-based enrichment, which retrieves attributes from the profile store and possibly add them to the outgoing tuple. Note that retaining and forwarding the looked up attributes as part of the output tuple from the enrichment step is optional.
- The aggregate-based enrichment, which fetches data from
FastPastand possibly adds such attributes to the outgoing tuple. As part of configuring an aggregated attribute, it is necessary to (1) select an aggregate from the list of available aggregates for the feed, (2) select the granularity, which can beHourly,Daily,MonthlyorYearly, (3) select the period which can be one ofCurrentorLastand (4) optionally selectlastN, which can be used to indicate that only a subset of an aggregate is to be used. For instance, when theMonthlygranularity and theLastperiod withlastNset to 7 is chosen, the aggregated value for the last 7 days can be computed. Note that when using theYearlygranularity,lastNcorresponds to months, when using theMonthlygranularity,lastNcorresponds to days, when using theDailygranularity,lastNcorresponds to hours, and, finally, when using theHourlygranularity,lastNcorresponds to 10-minute intervals. Similarly to lookup-based enrichment, aggregate-based enrichment attributes may or may not be retained and forwarded as part of the output tuple. - The derived attributes enrichment, which enables the execution of an external Python function. One such a function takes in a tuple (as well as any other required additional parameters, if any), performs a user-defined computation, and produces a result. This function invocation’s return value can then be retained and forwarded as part of an outgoing tuple. This capability can be used, for instance, to invoke a scoring function on an incoming tuple, which computes a score (e.g., based on previously mined data) that can then be added as an attribute to the corresponding outgoing tuple.
The interface for editing enrichments is shown below:
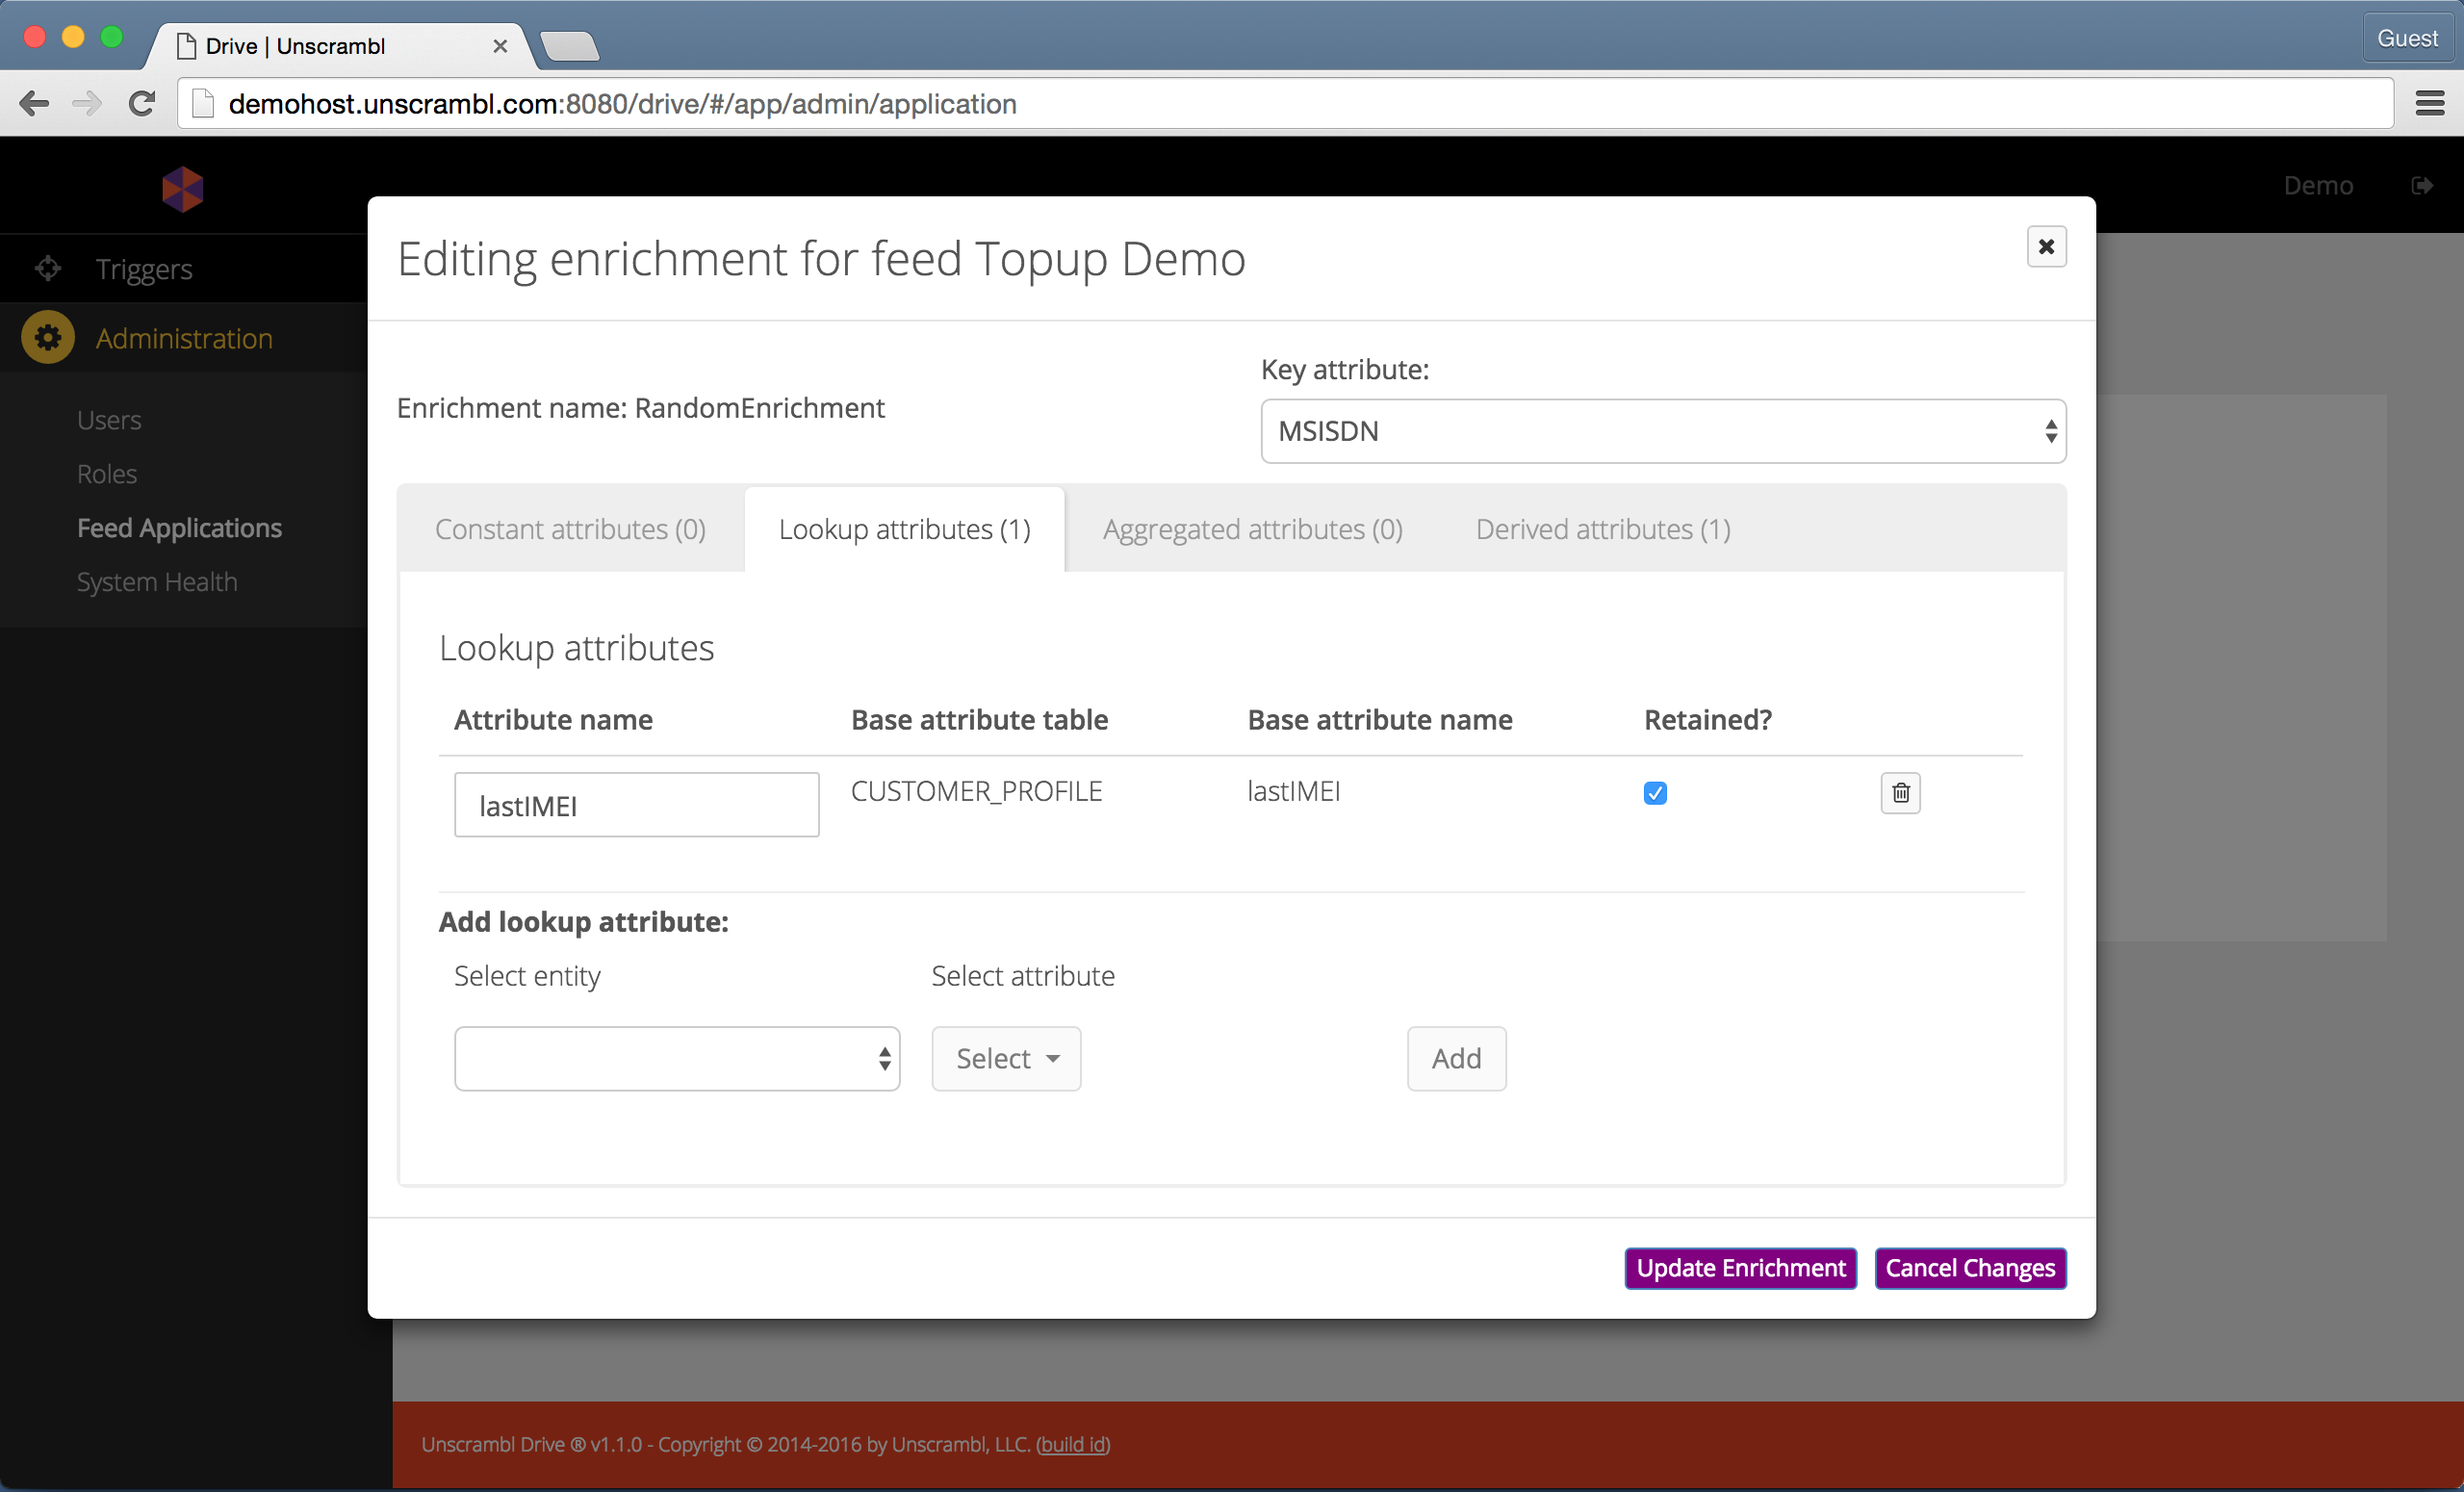
Interface for editing enrichments.
Subscriber Segments
Unscrambl Drive can make use of subscriber segments. Such segments can be used to include or exclude a group of subscribers from being considered as subjects for a trigger.
The set of Subscriber Segments can be inspected by clicking on Feed Applications and then selecting the tab
titled Subscriber Segments.
The example below shows a view of the page with 2 segments: the Data Users and the High Value users.
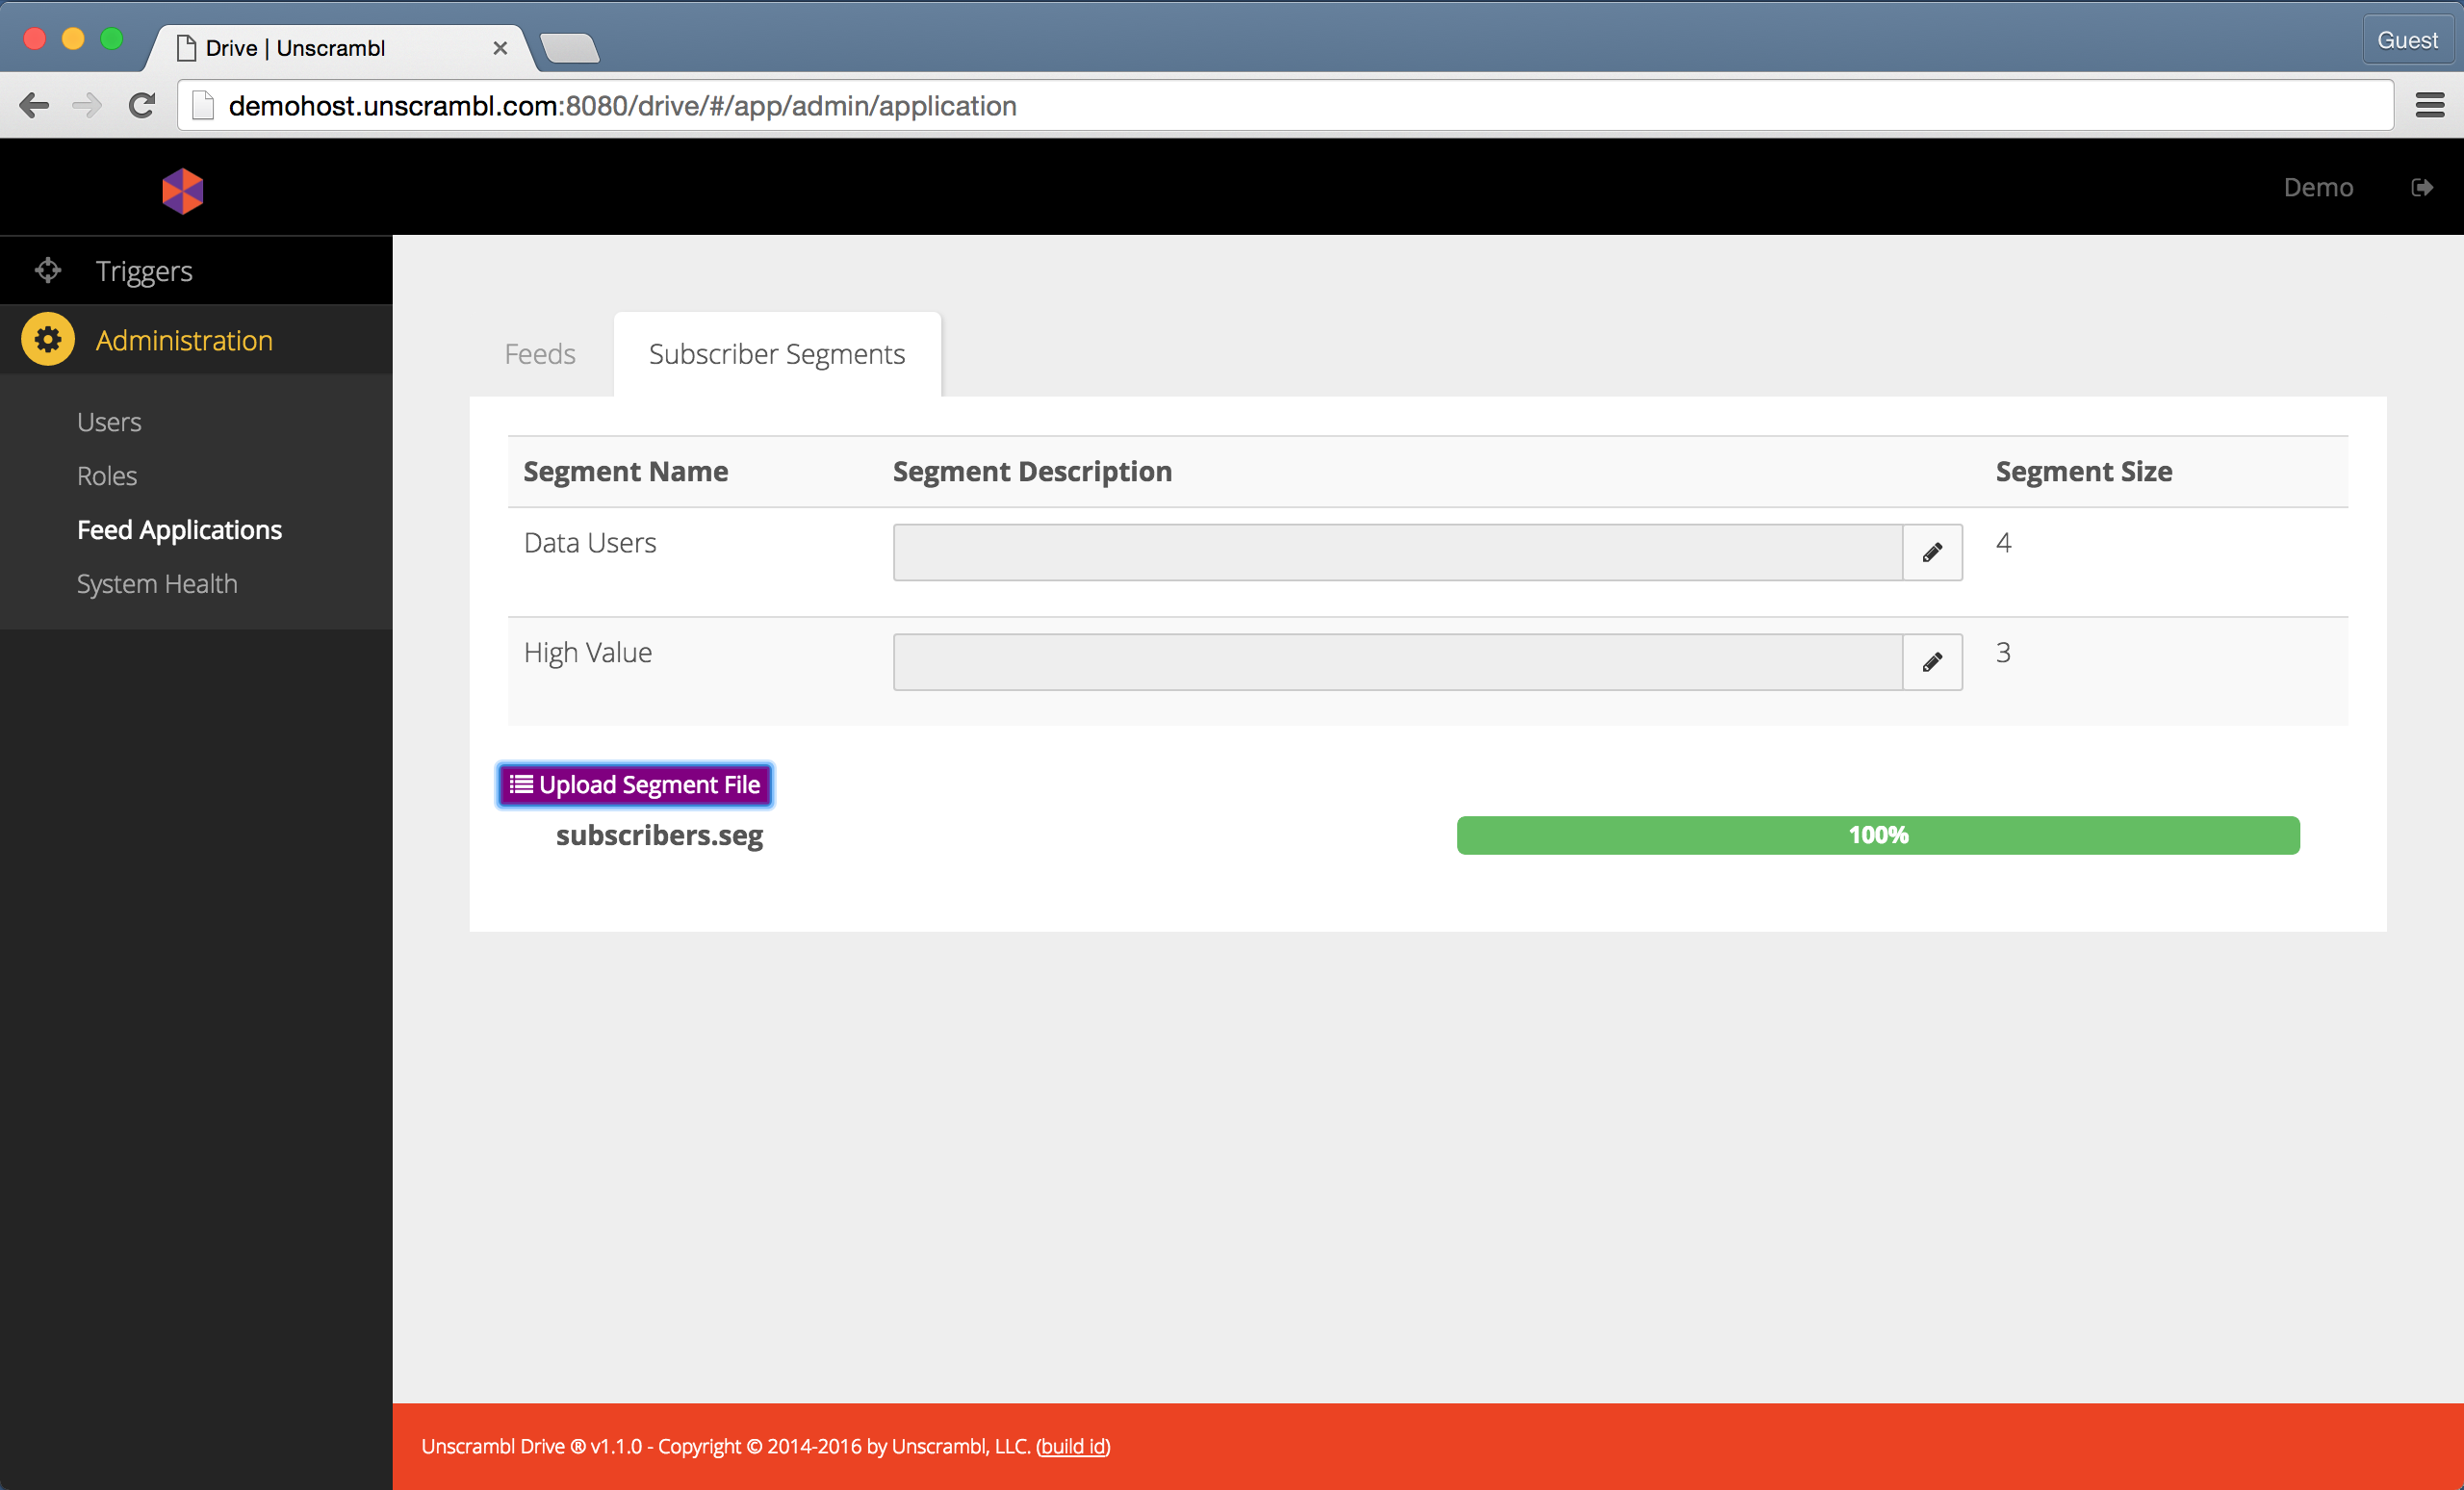
Uploading a segment file.
To add, edit or delete a segment, a text file with its contents specified in a particular format can be uploaded to
Unscrambl Drive using the Upload Segment File button.
Two formats are supported. The first is a plain-text file with a simple linear organization as shown below:
[Data Users]: add
911323232323
918787879988
918787989021
919898990906
[High Value]: add
912323989899
912367367676
912398982337
919828738787
[High Value]: remove
912388728787
[Low Value]: remove_all
Alternatively, the file can also be specified in JSON format, in which case it must have a .json extension. An
example is given below (note that the order of the fields is important):
{
  "segmentUploads": [
    {
      "operation": "Add",
      "segment": "Data Users",
      "users": [
        "911323232323",
        "918787879988",
        "918787989021",
        "919898990906"
      ]
    },
    {
      "operation": "Add",
      "segment": "High Value",
      "users": [
        "912323989899",
        "912367367676",
        "912398982337",
        "919828738787"
      ]
    },
    {
      "operation": "Remove",
      "segment": "High Value",
      "users": [
        "912388728787"
      ]
    },
    {
      "operation": "RemoveAll",
      "segment": "Low Value"
    }
  ]
}
Once uploaded, one can also add a description for the segments:
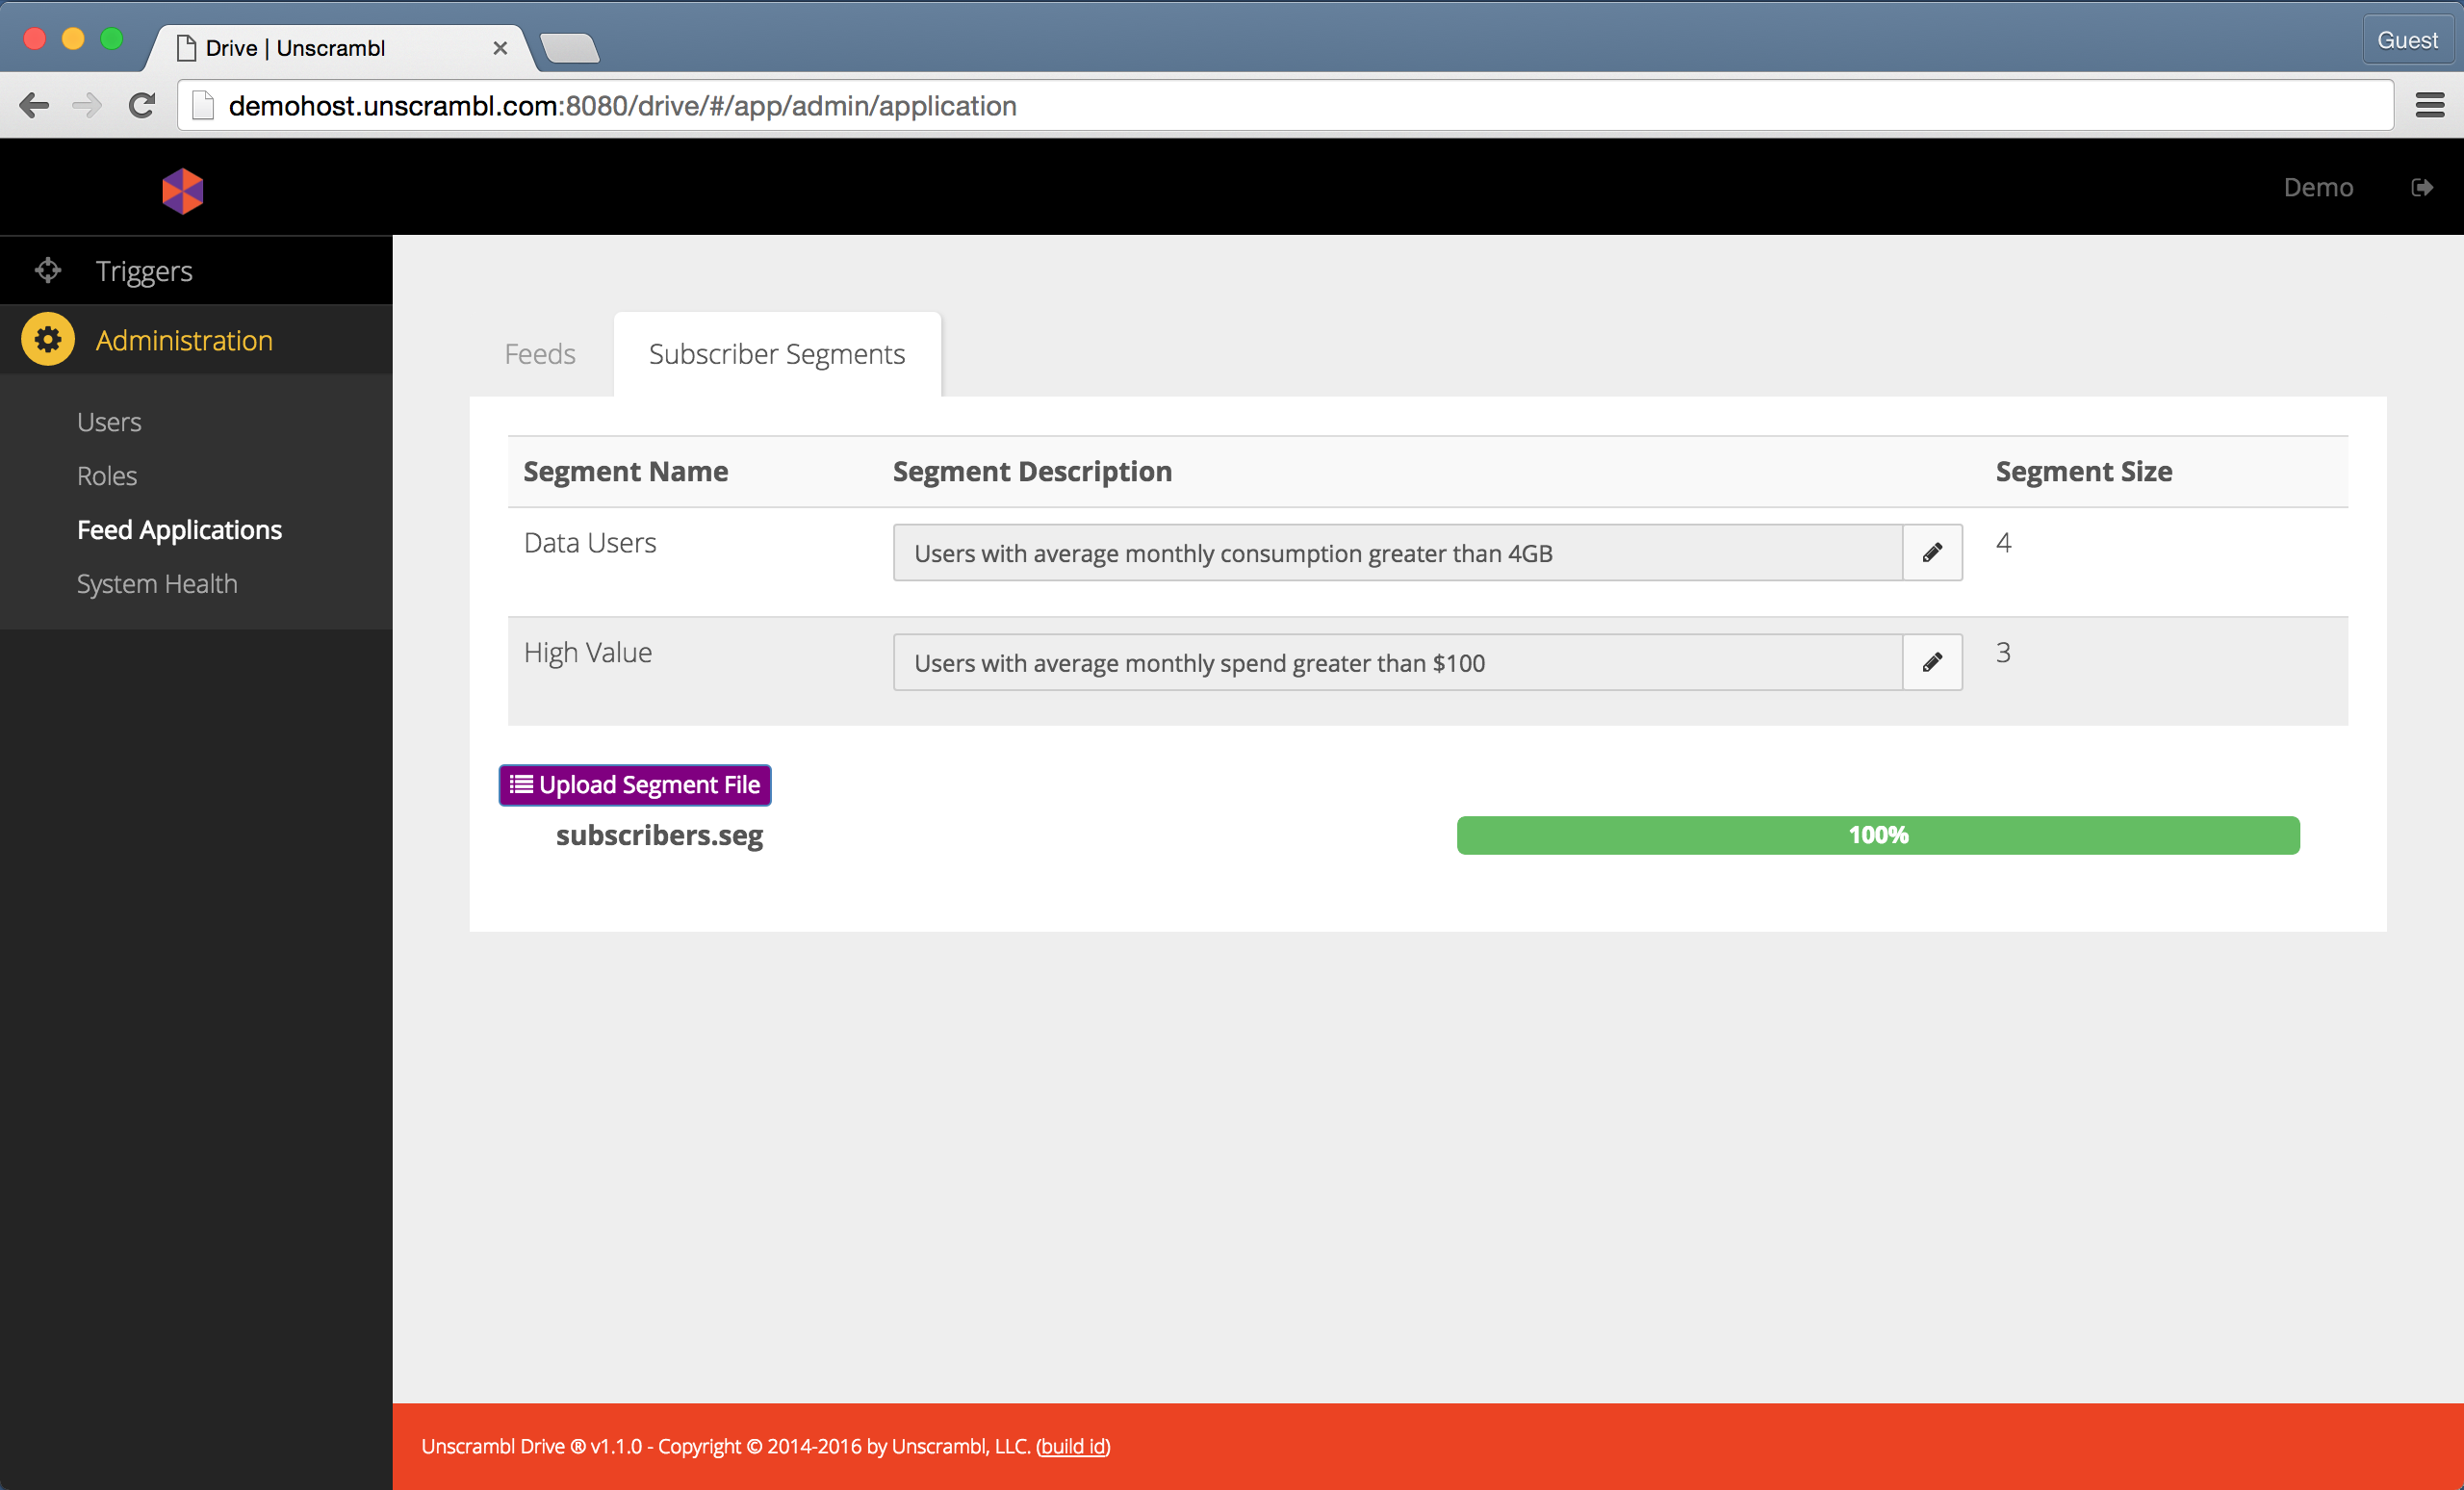
Segments and their descriptions.
Triggers
In this section we describe the process of creating a new trigger.
The first step in creating a new trigger involves naming it and selecting the feed that makes use of it:
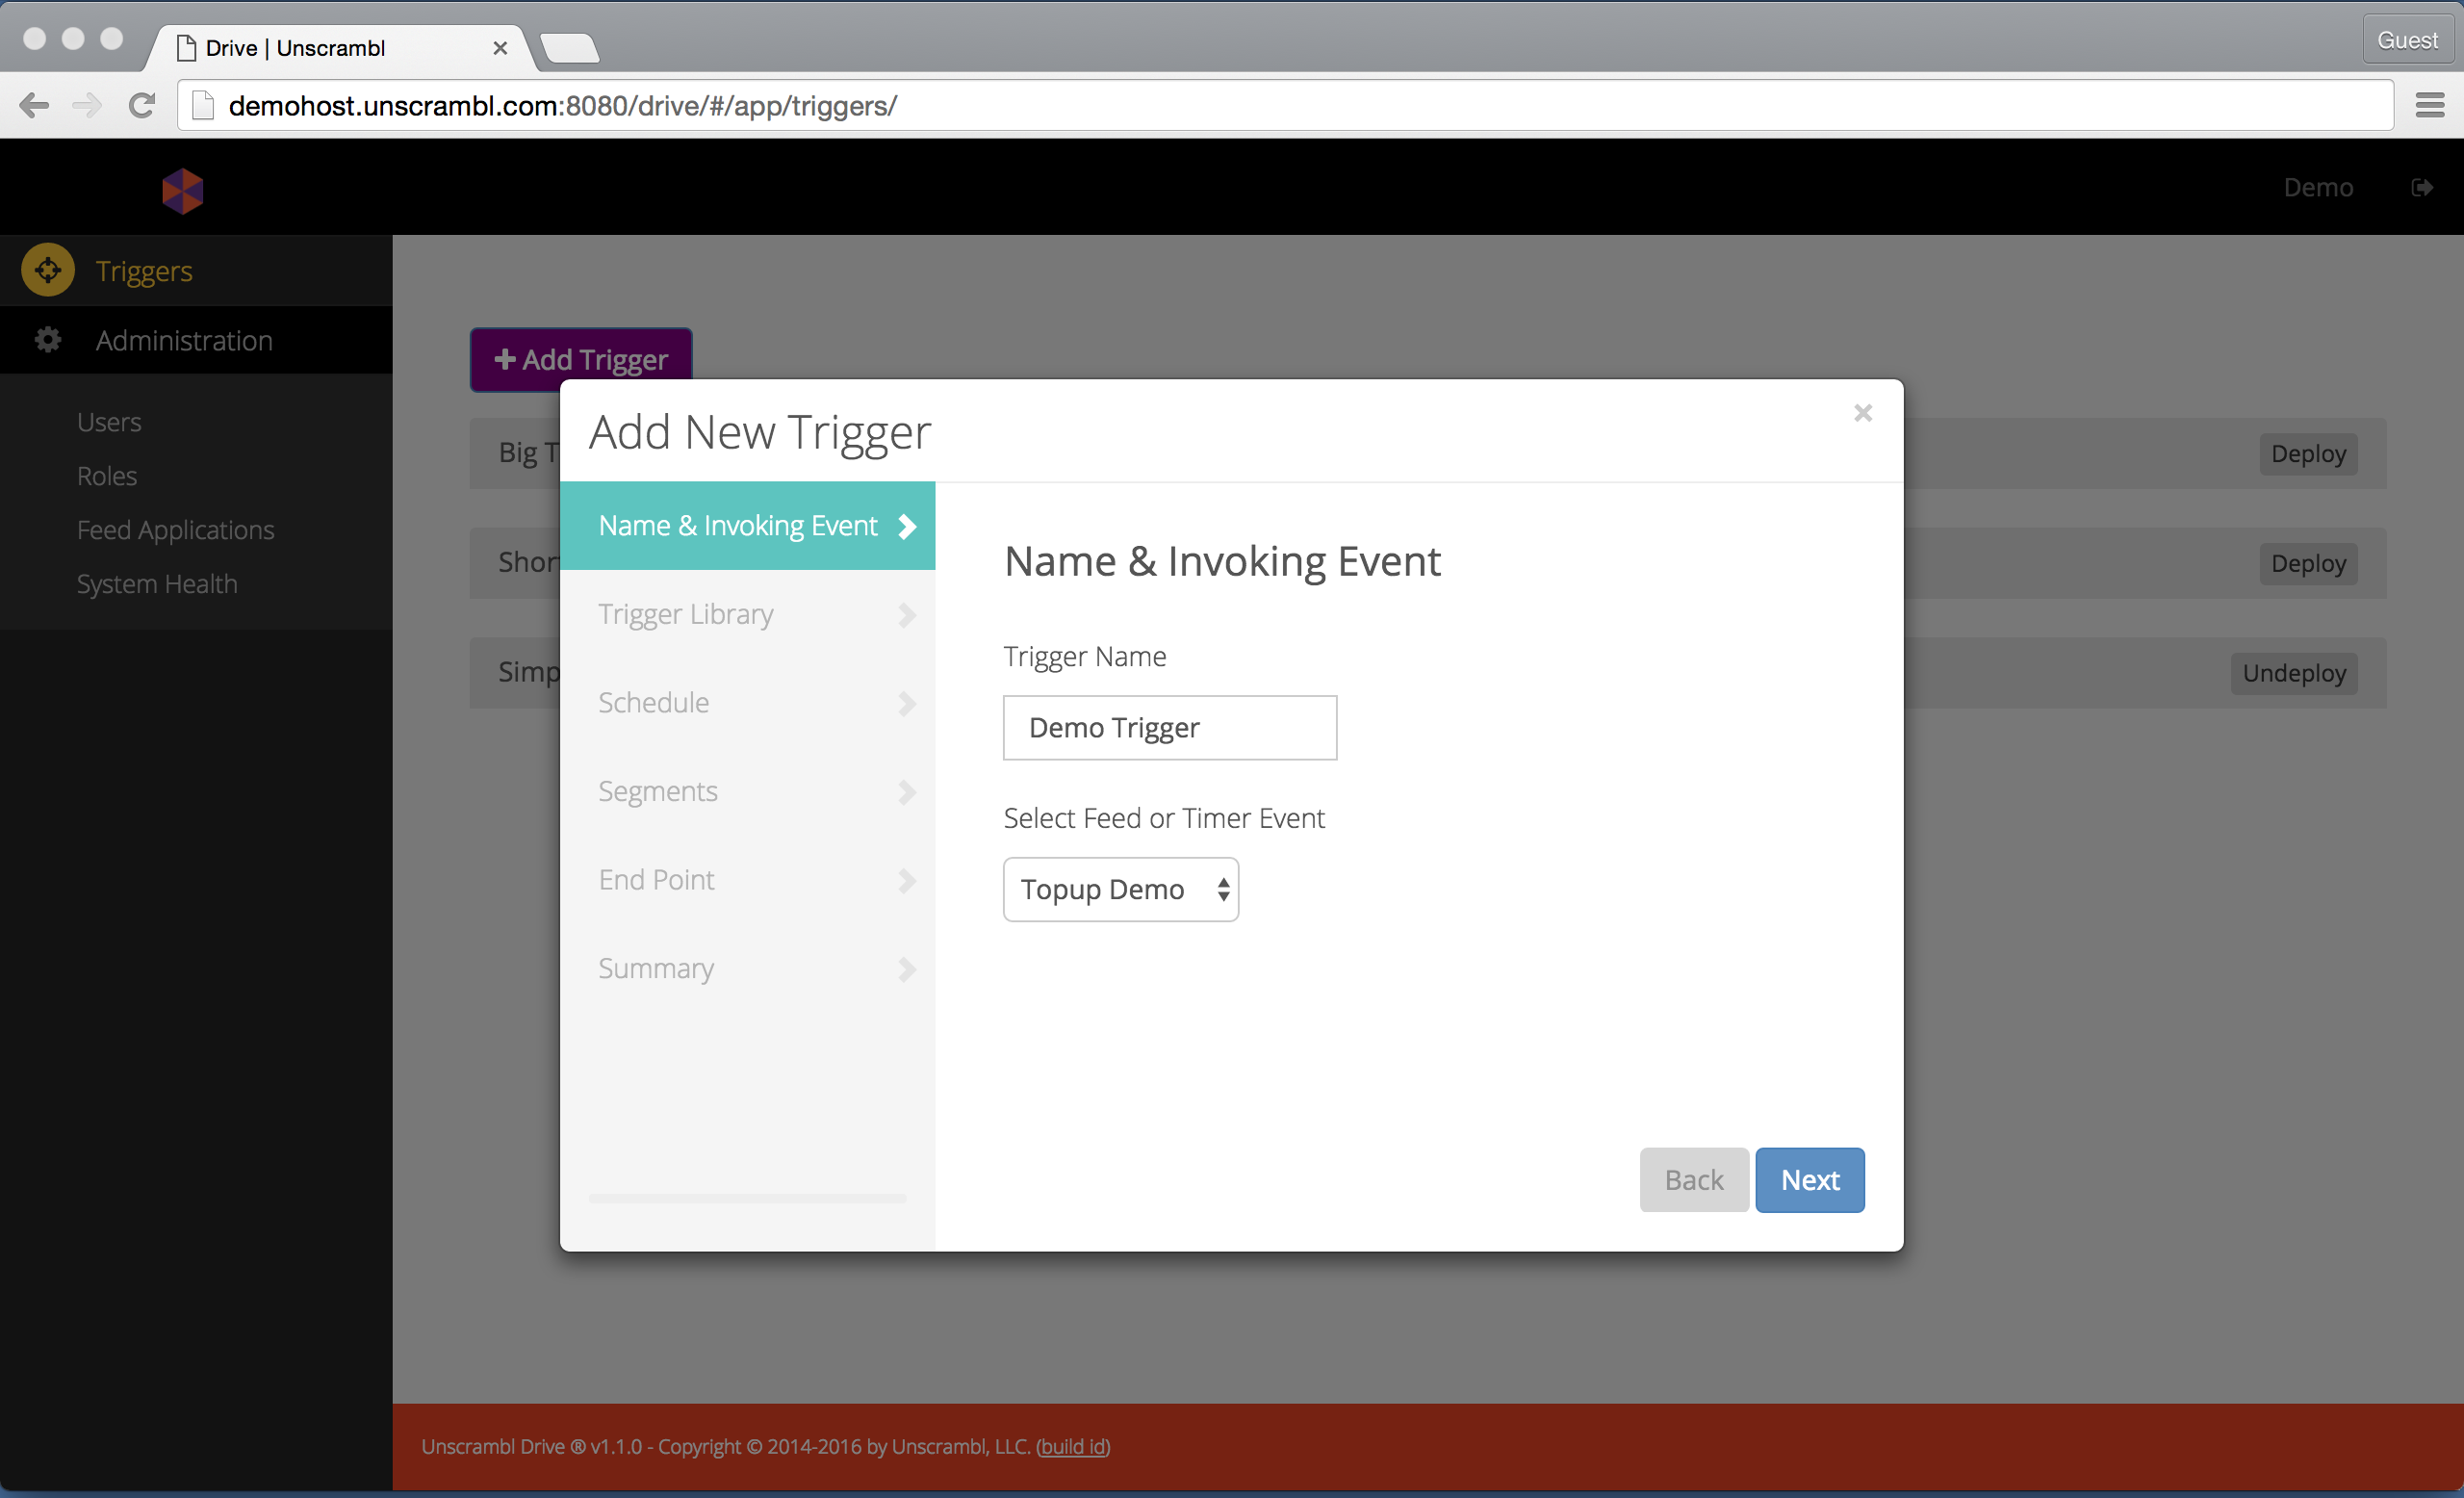
Naming a trigger and selecting a feed.
Note that currently the trigger library step is still unavailable (a yet-to-be released feature).
The next step consists of defining the duration over which the trigger will be active. This is done by selecting the start and the end dates as well as the days of the week and the hours during which the trigger will be active:
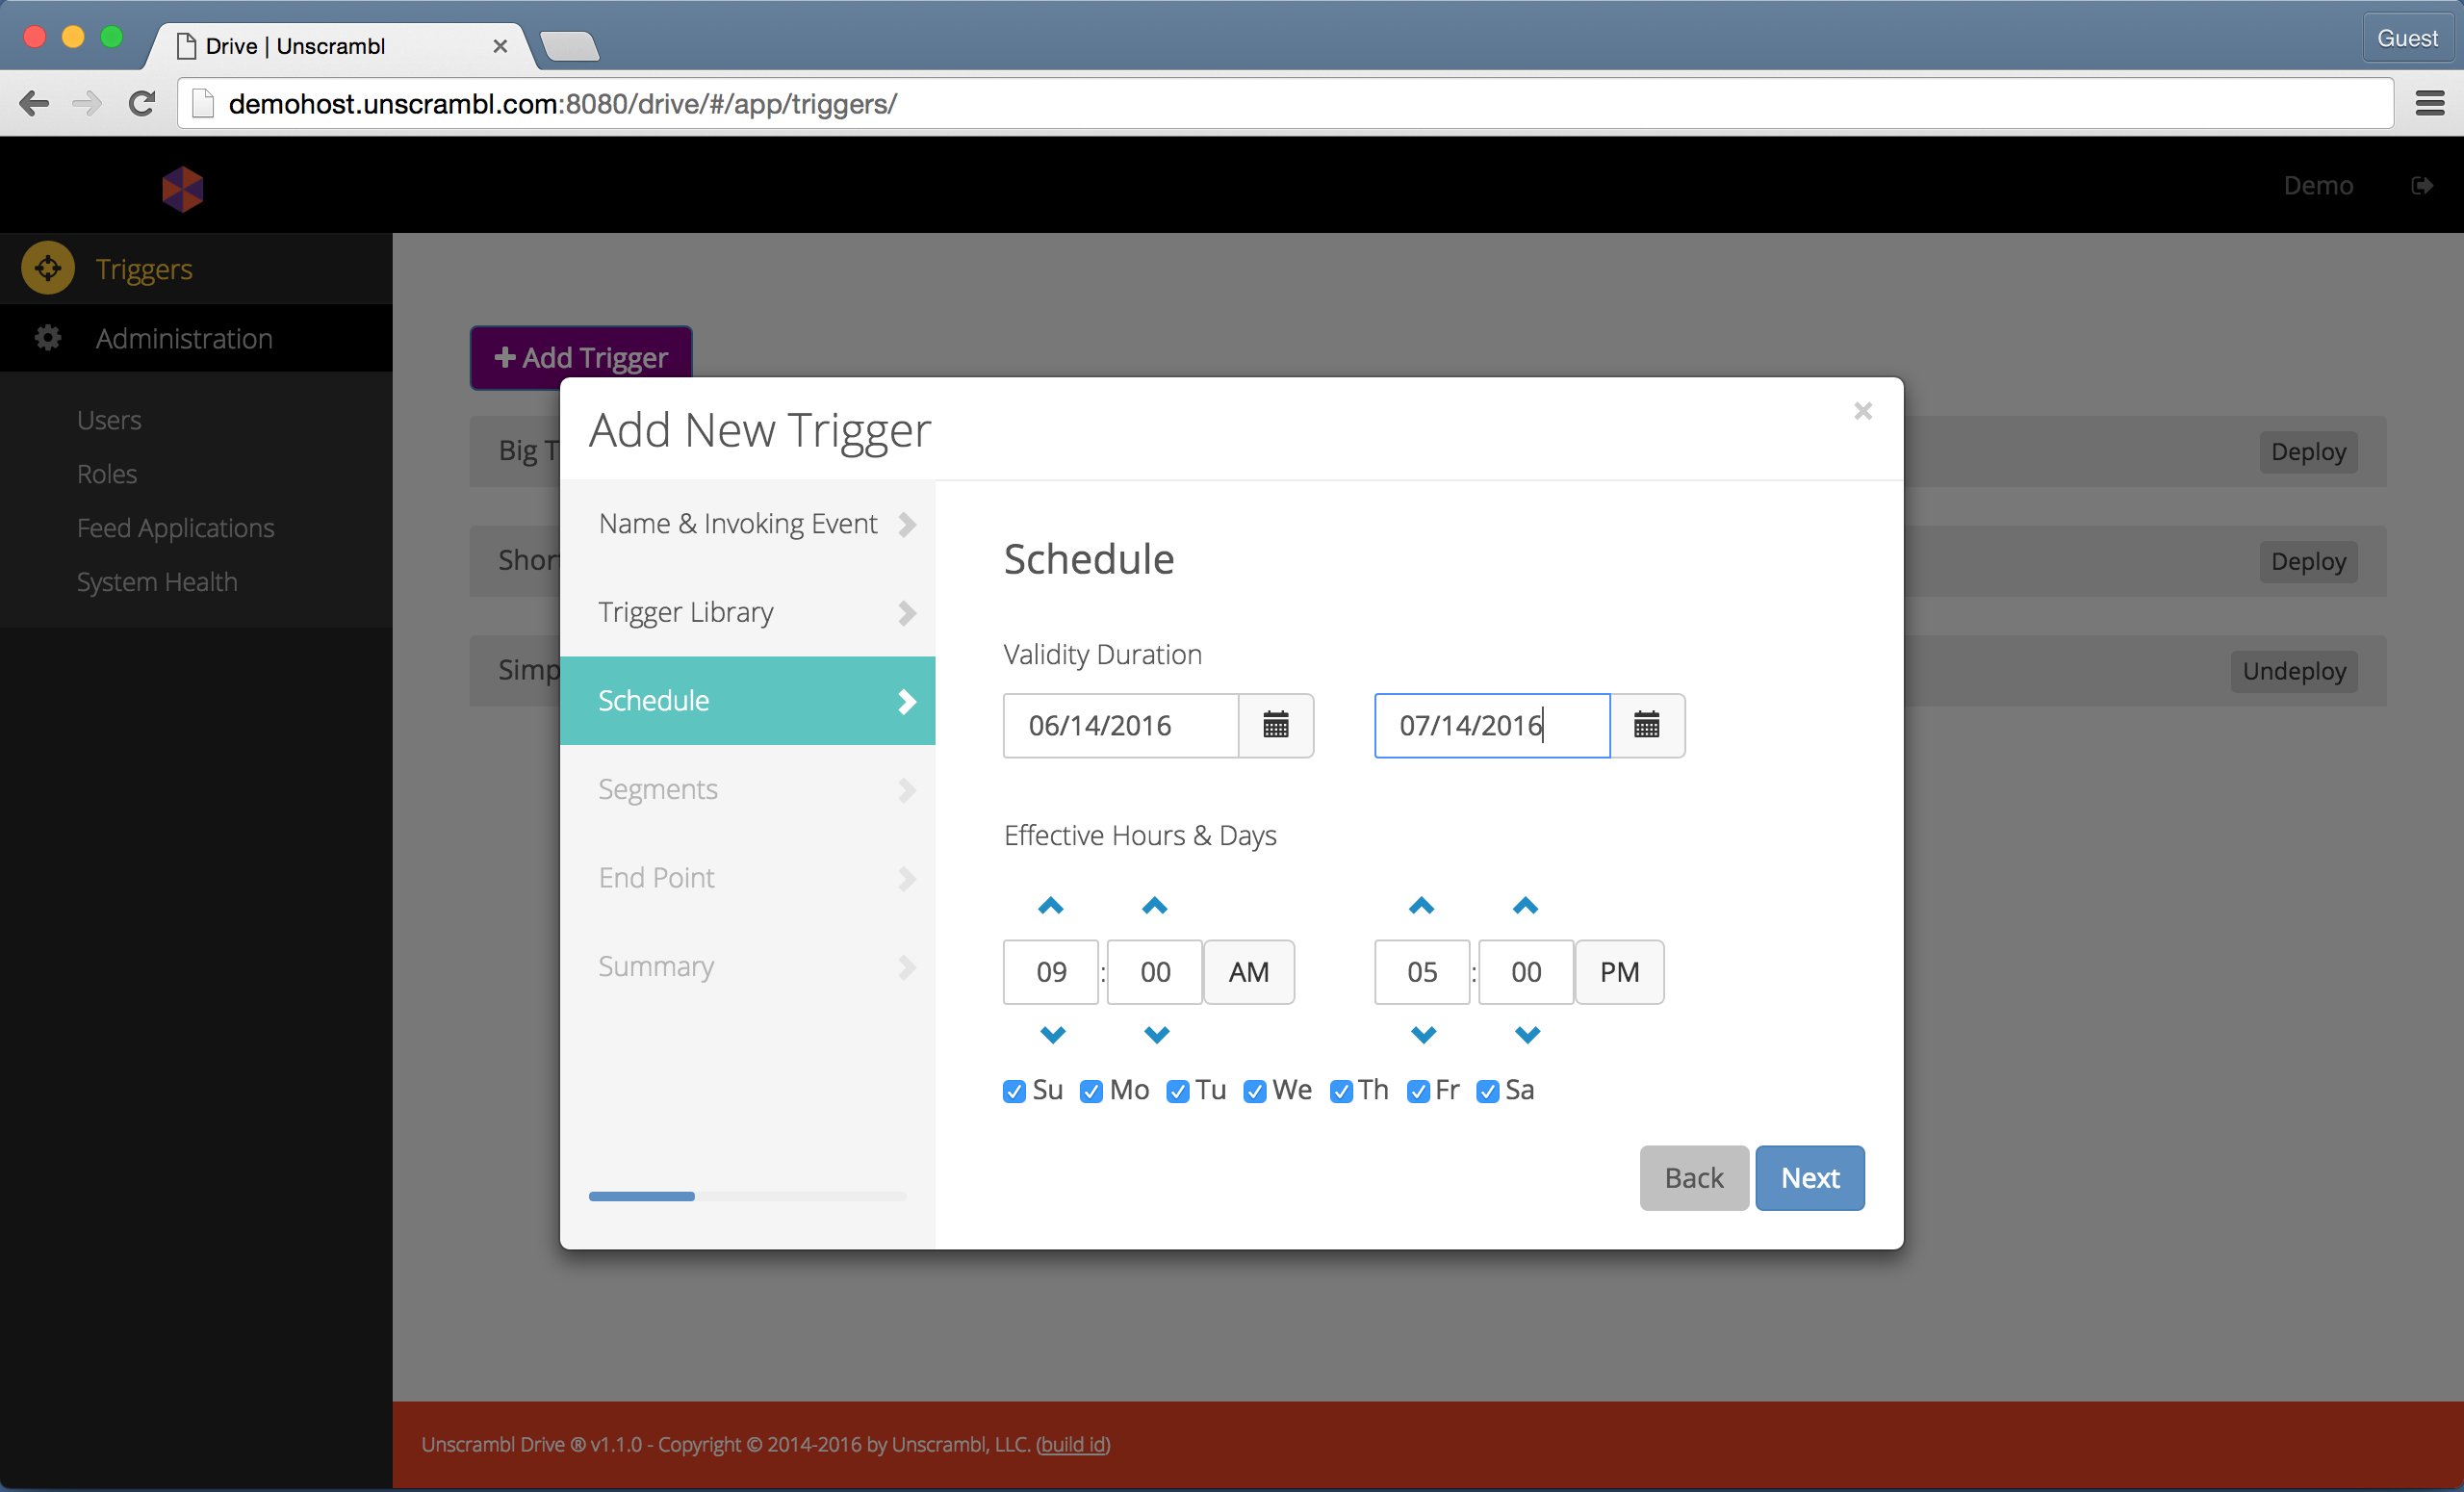
Selecting the validity duration, days, and times.
The next step consists of selecting the subscriber segments that will be included and/or excluded during the trigger evaluation.
When neither the included nor the excluded segments are specified the entire subscriber base is assumed to be the target.
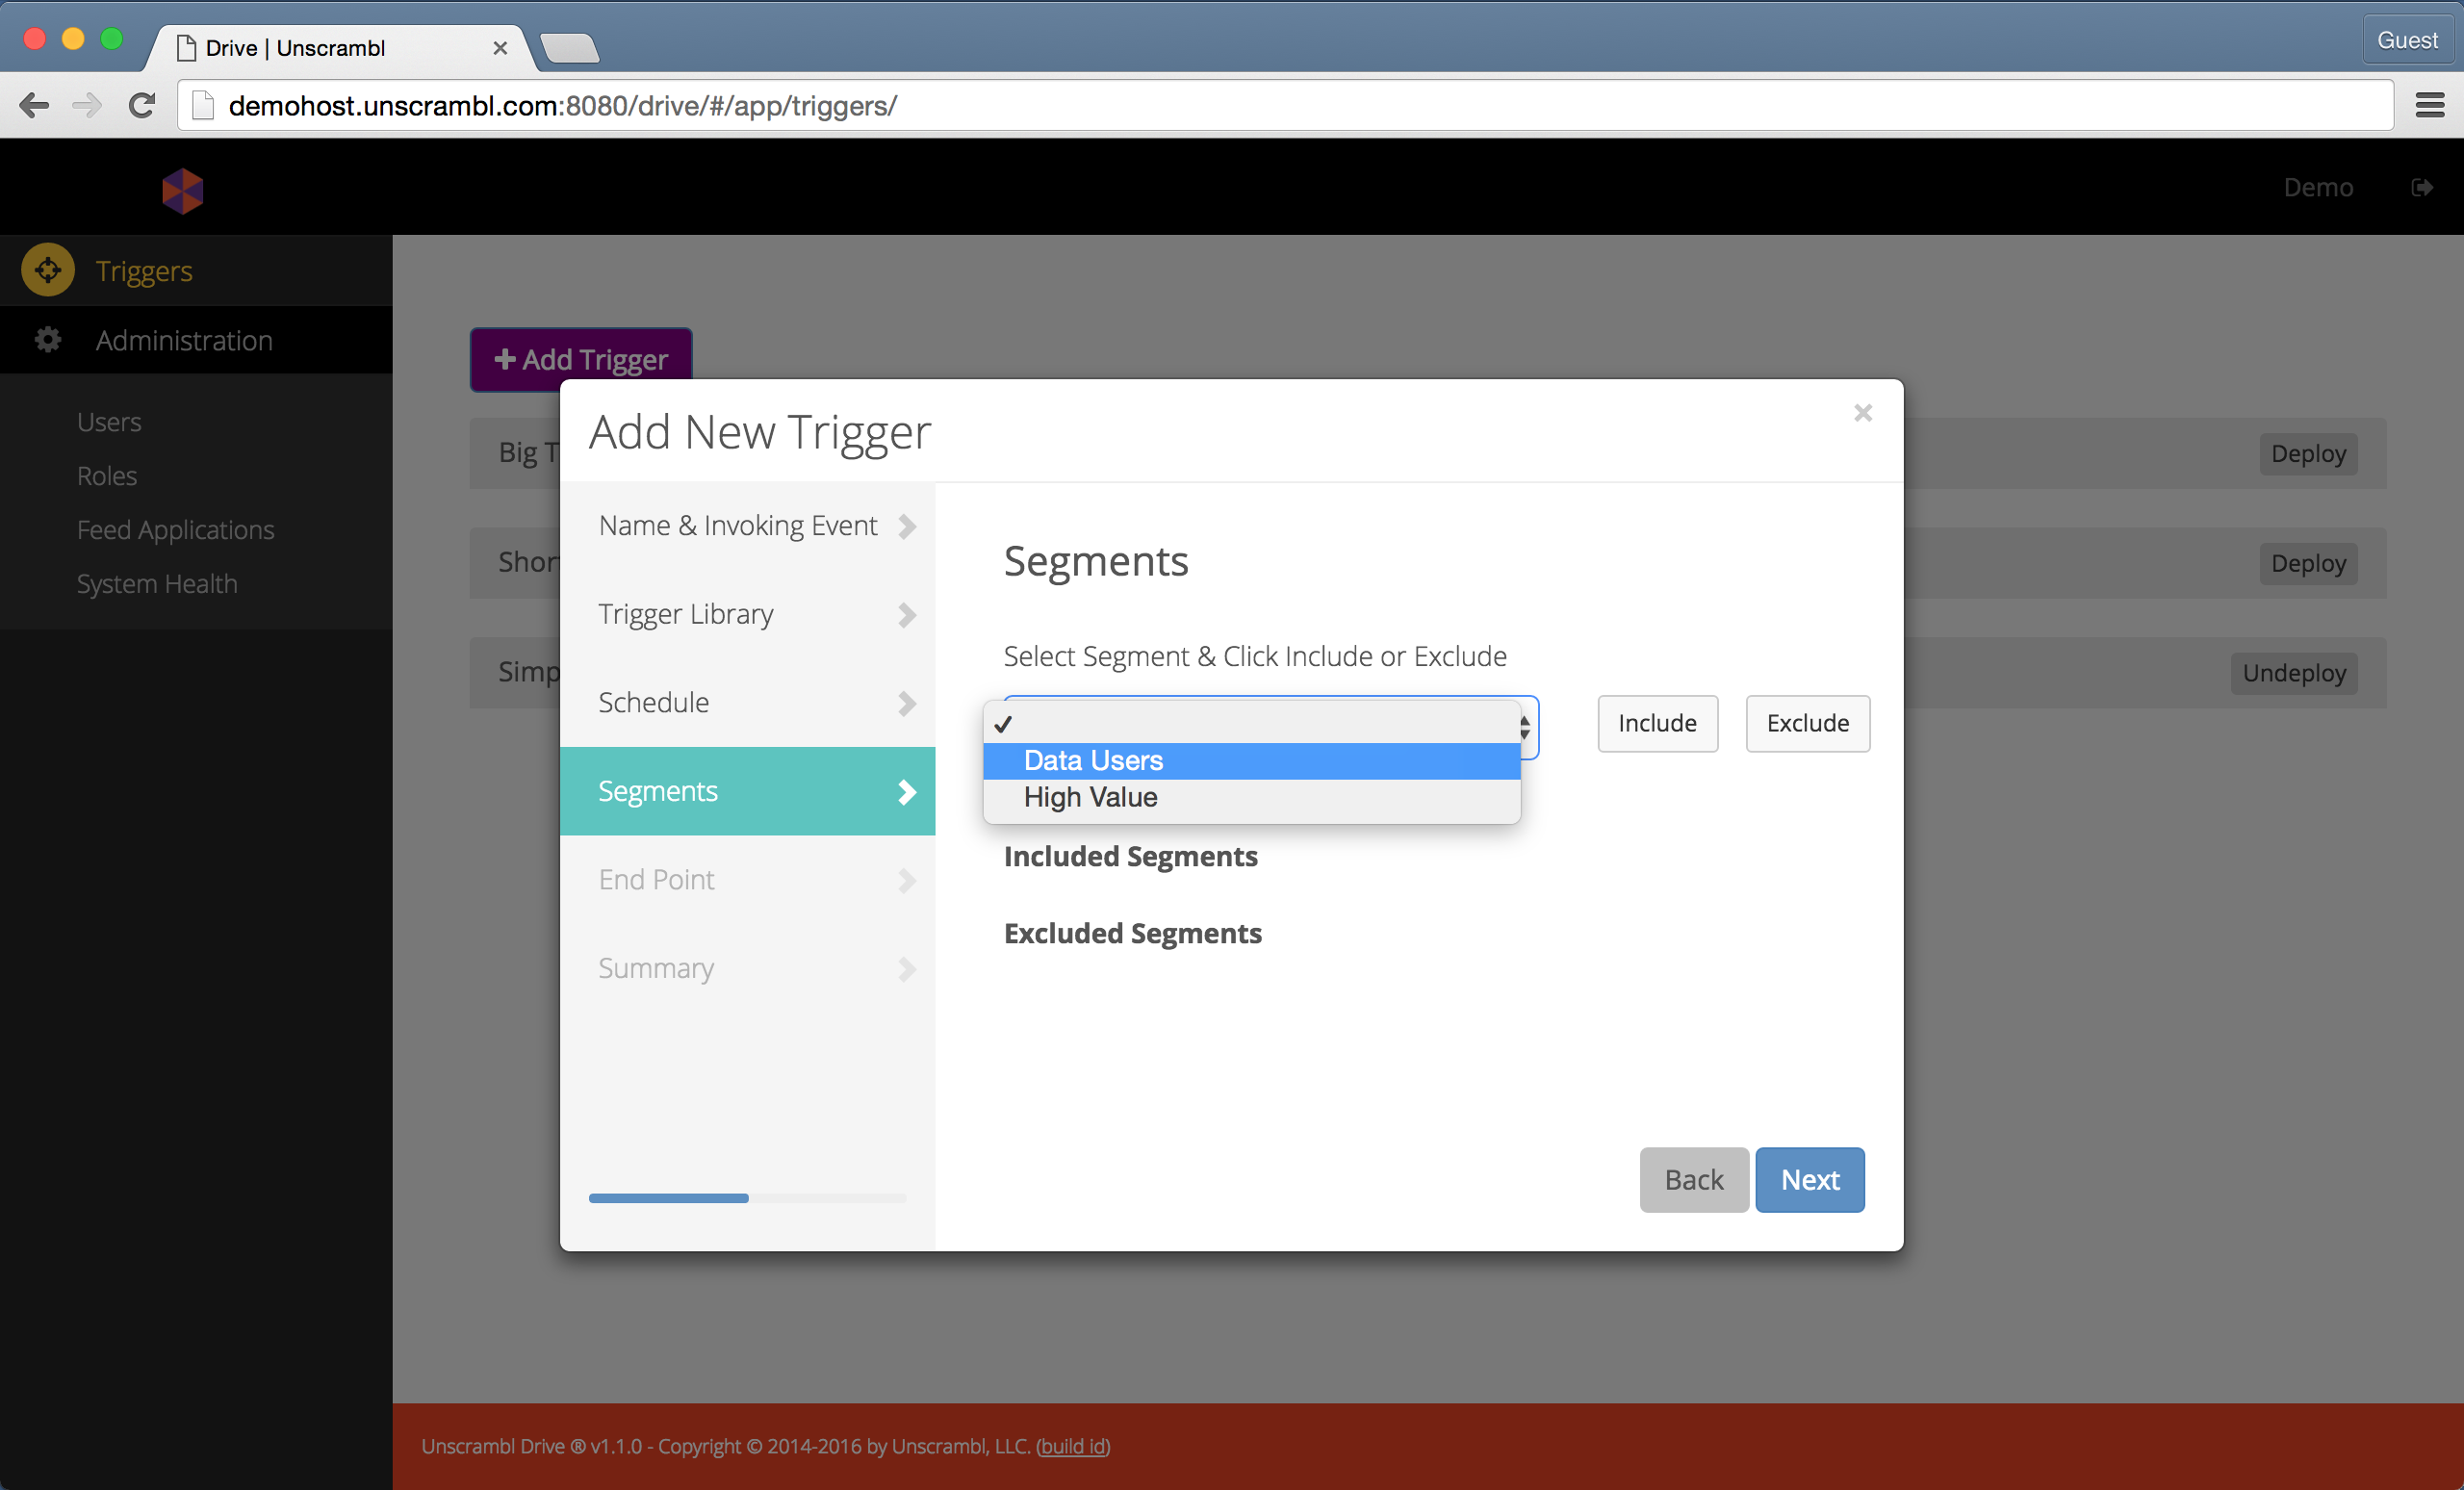
Selecting included and excluded segments.
The figure below shows the Data Users segment included as a target for the trigger that is being created:
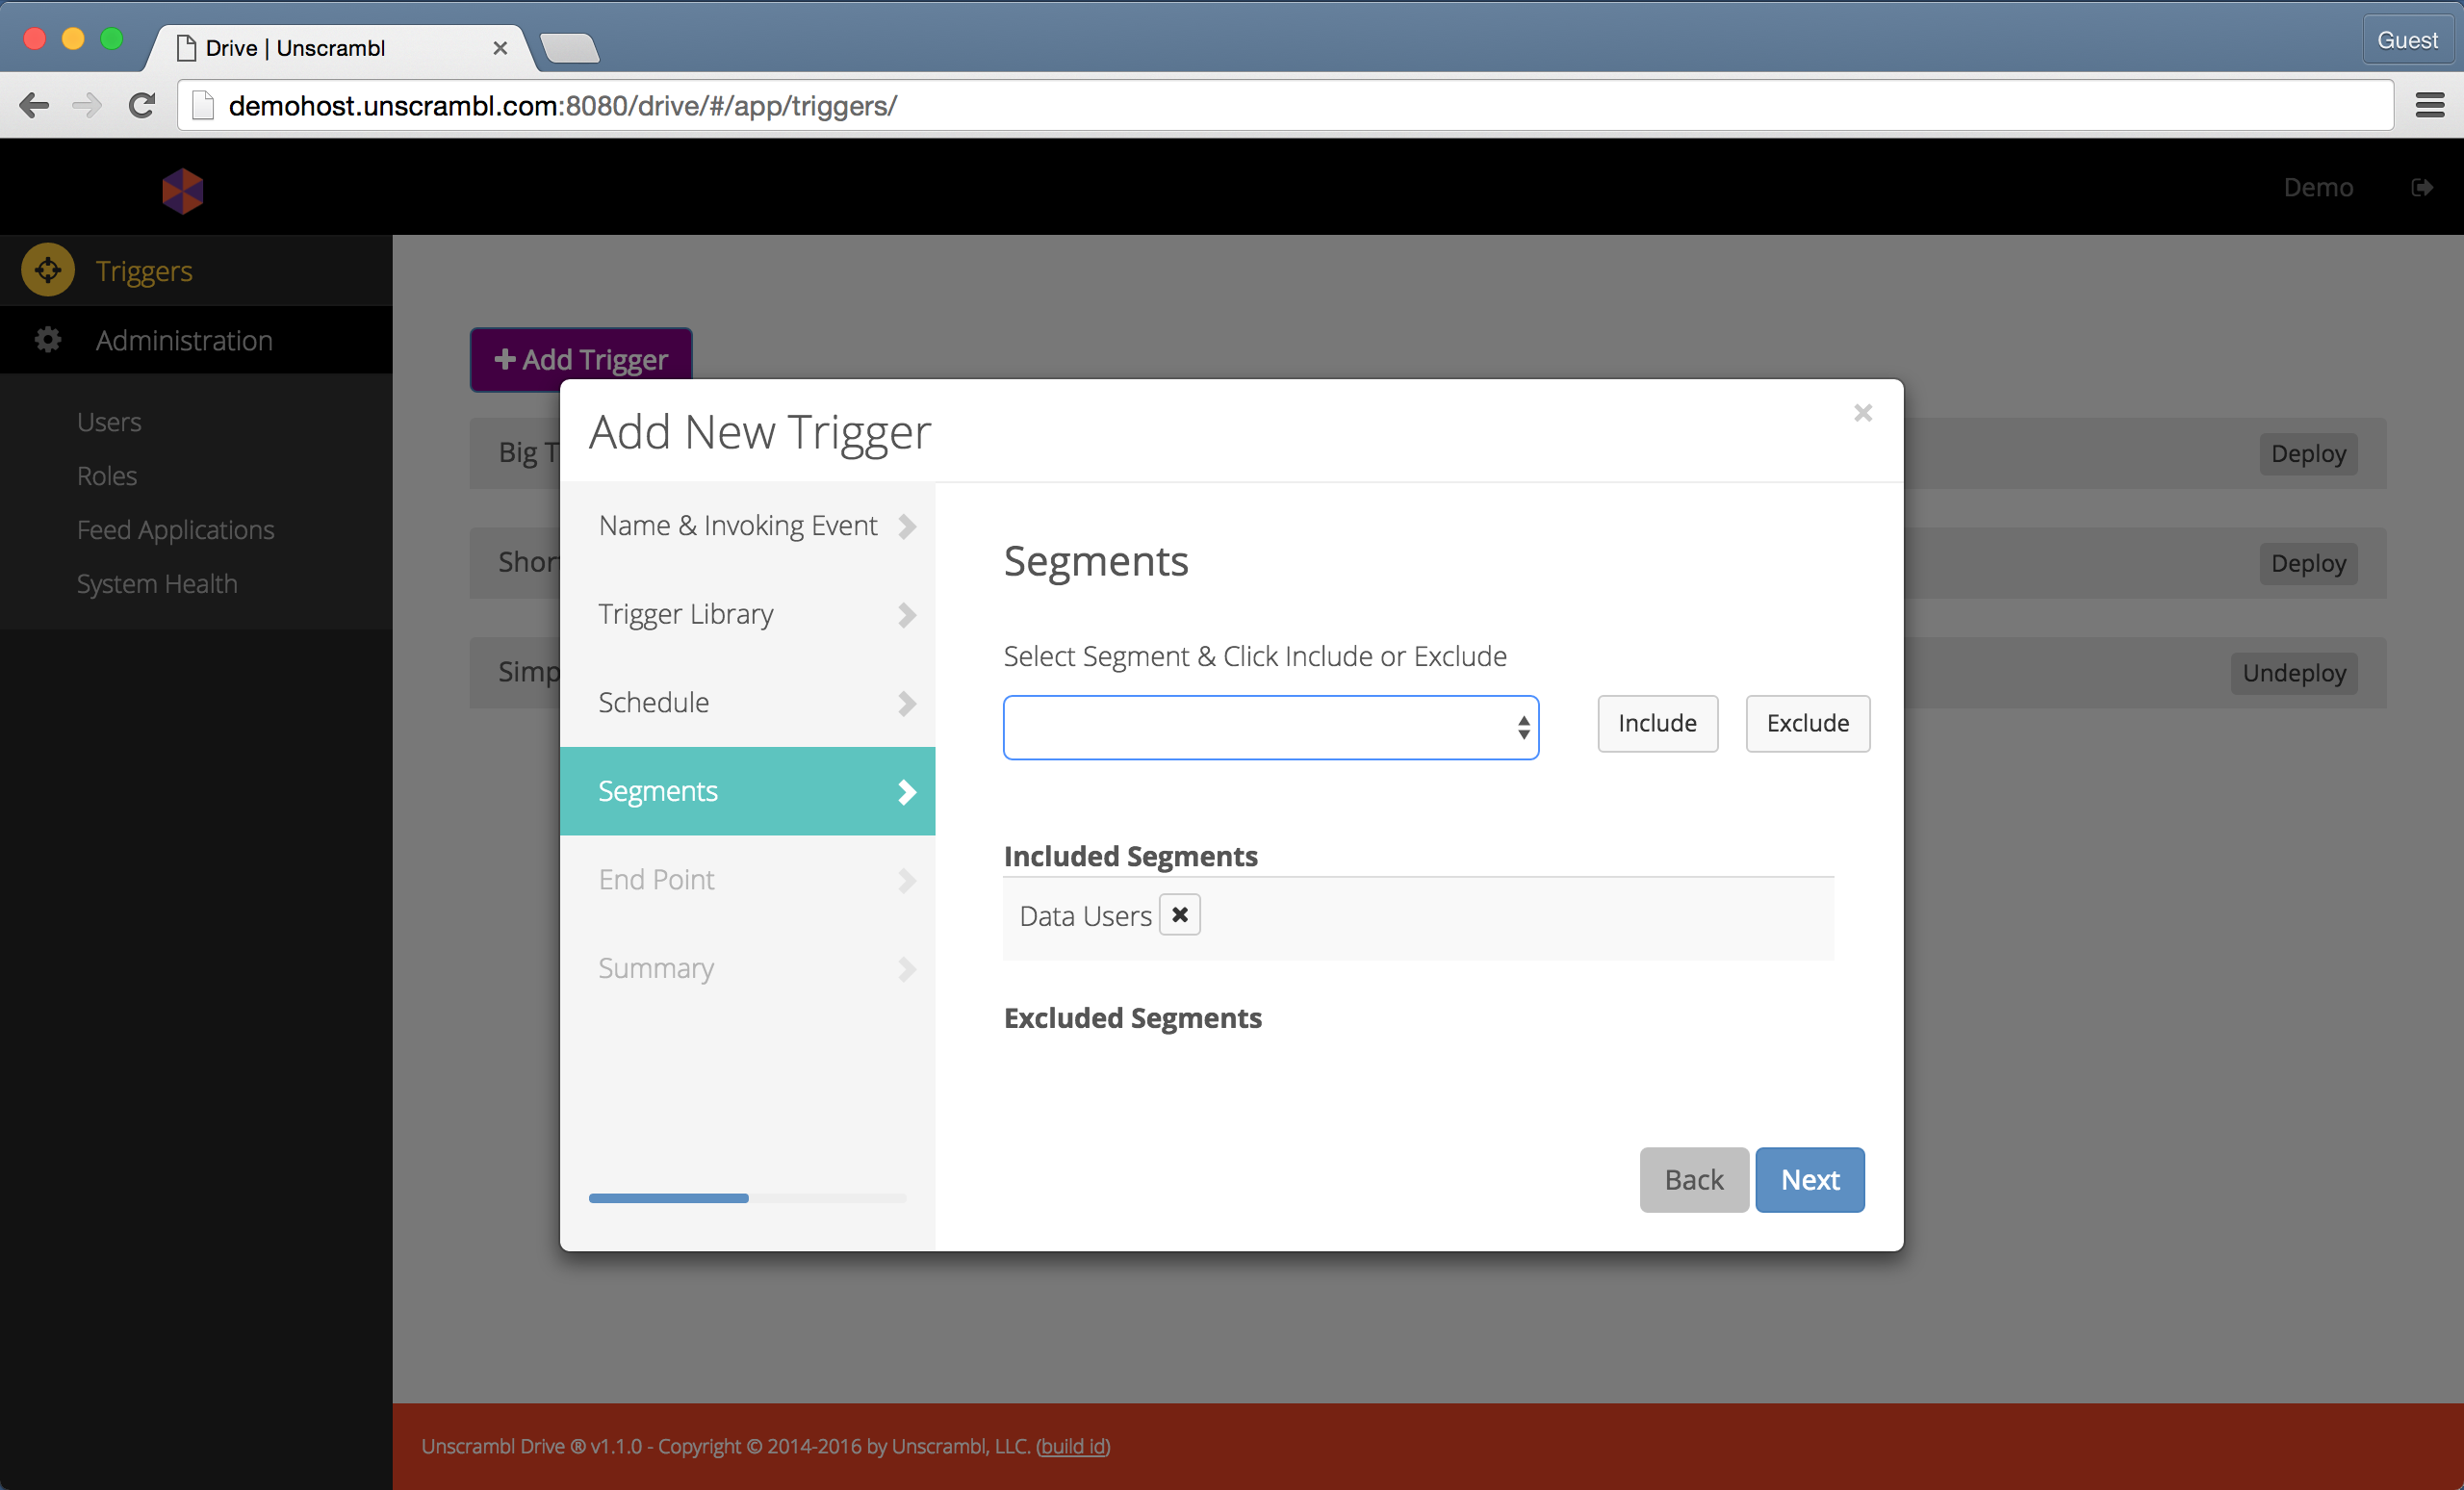
Including a segment as a target for the trigger.
The last step consists of selecting the end point to which the trigger event will be sent. The end point can, for instance, be a message queue, a REST API call or a call to an SMSC client.
Note that the set of available end points is created during the feed configuration.
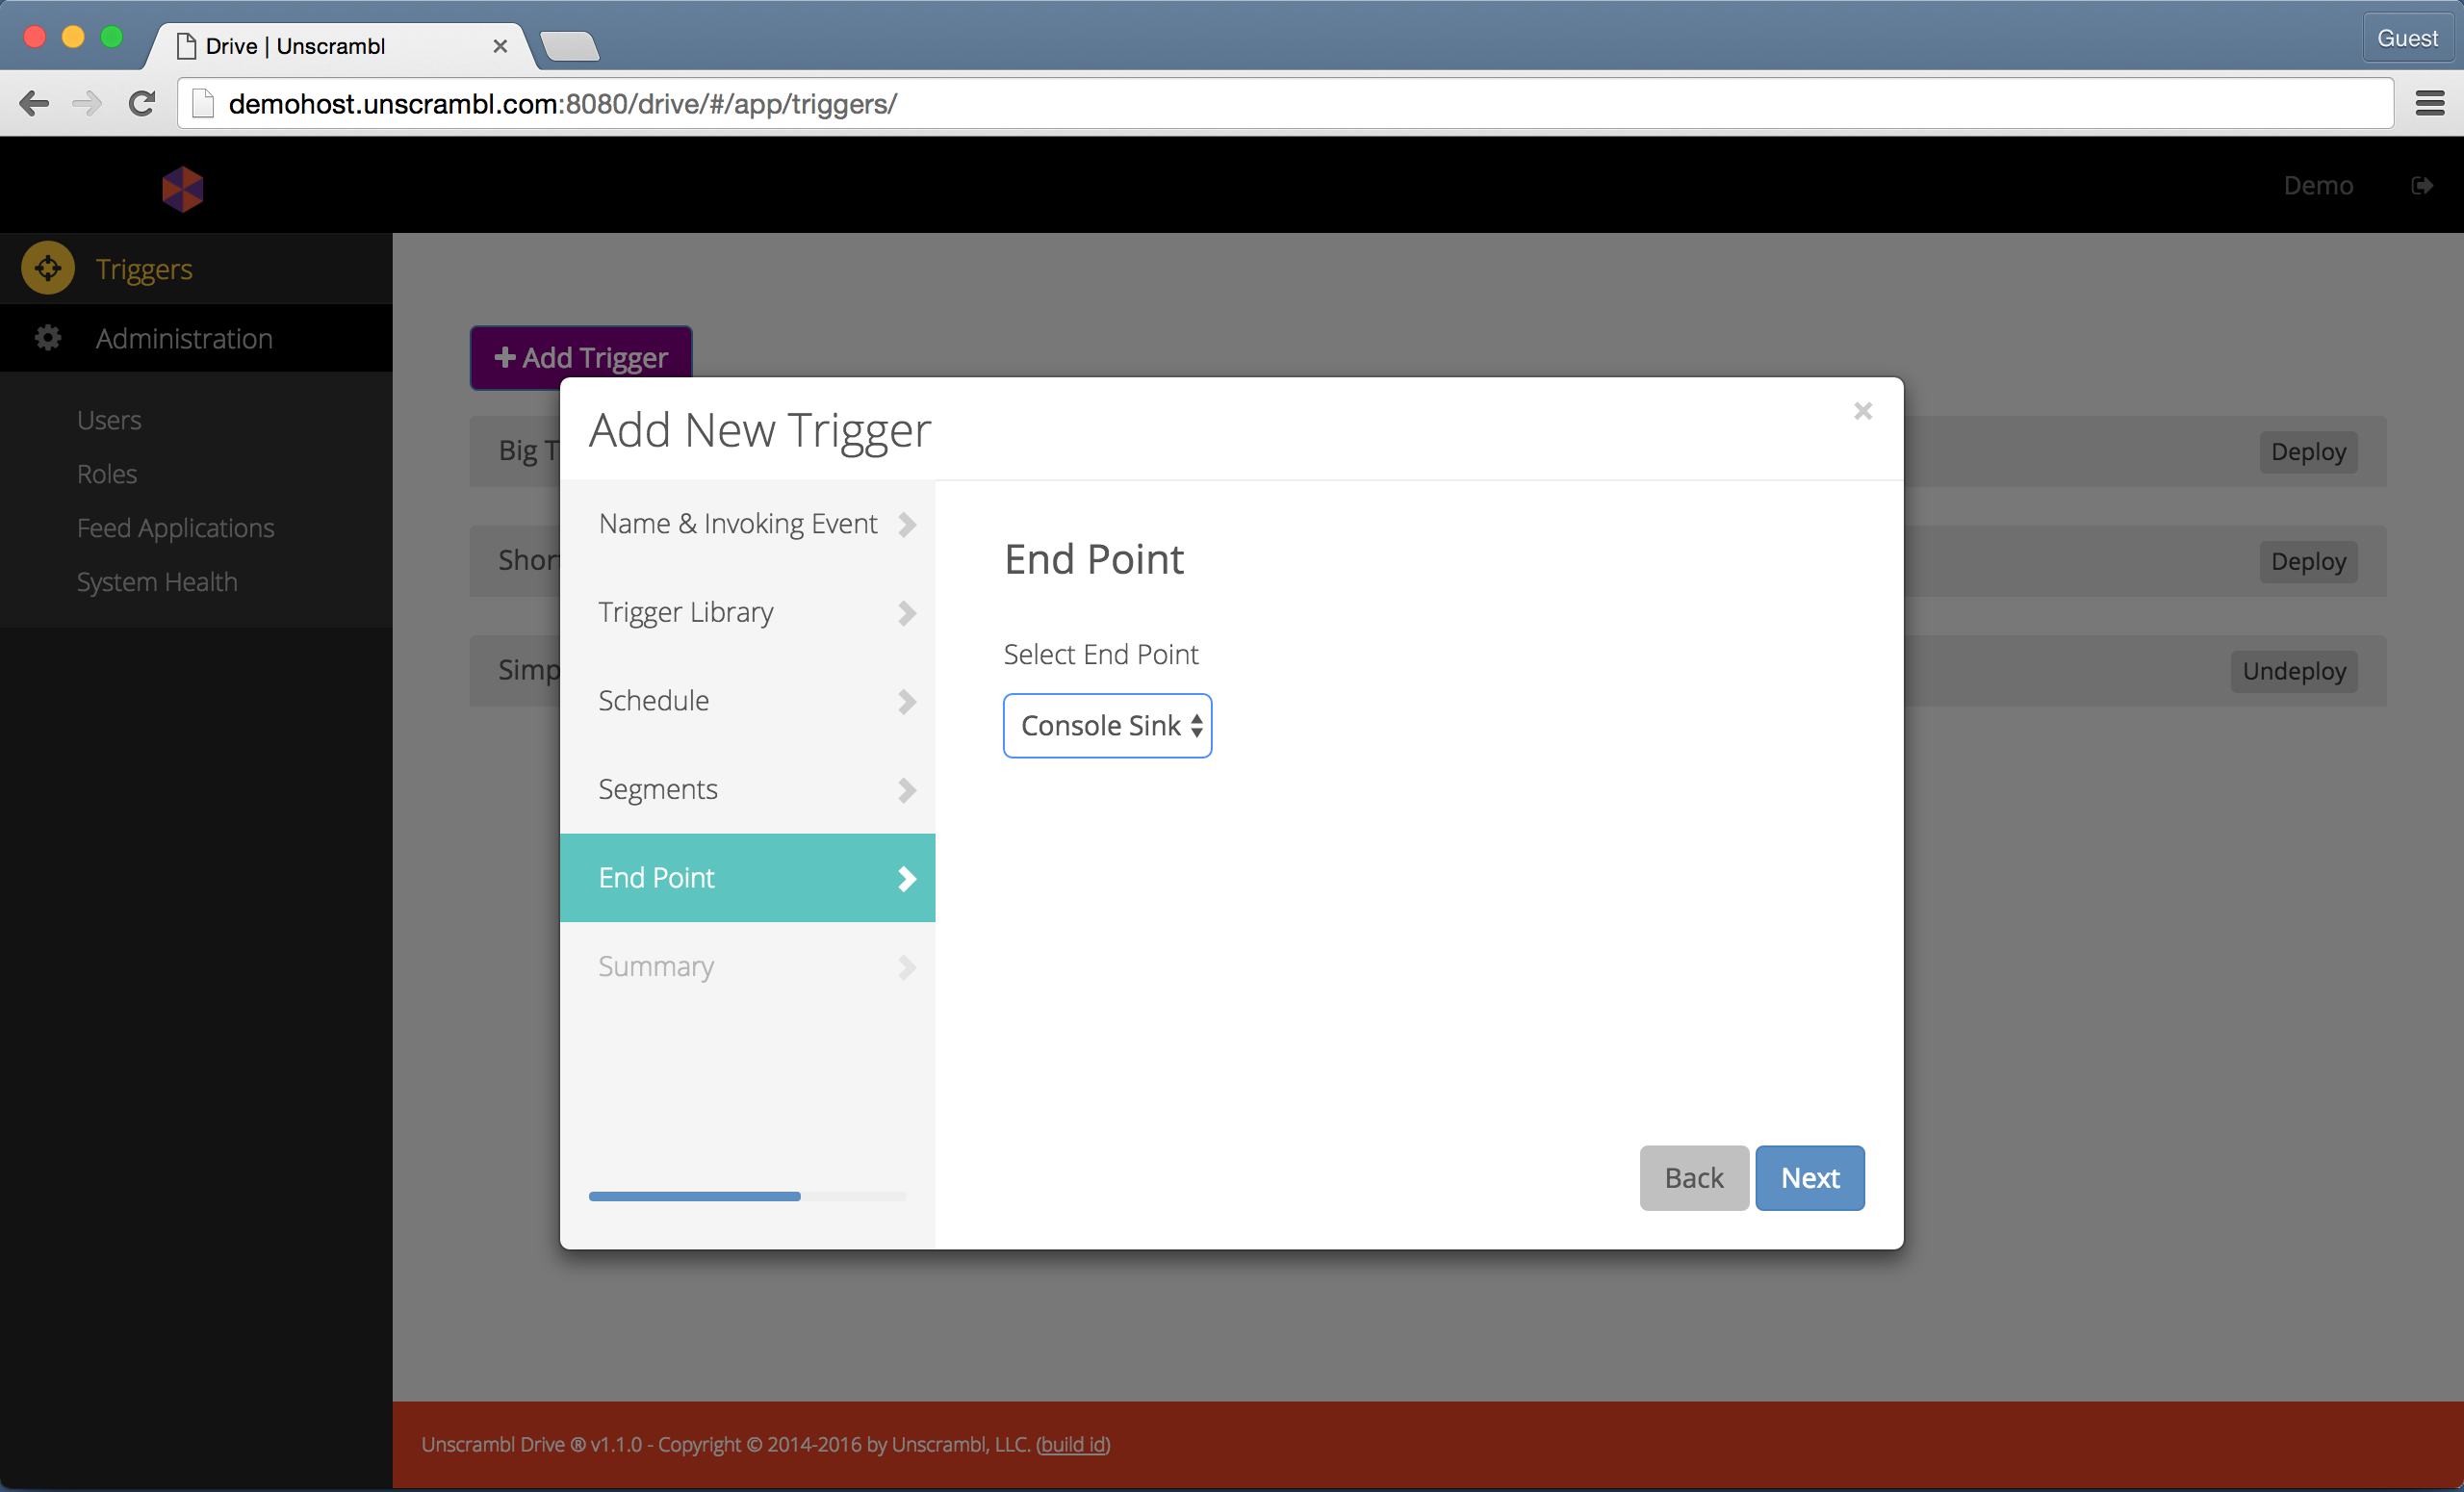
Selecting the end point for trigger events.
The following two steps summarize the trigger to be created and provide a confirmation about the trigger creation in the Unscrambl Drive execution backend.
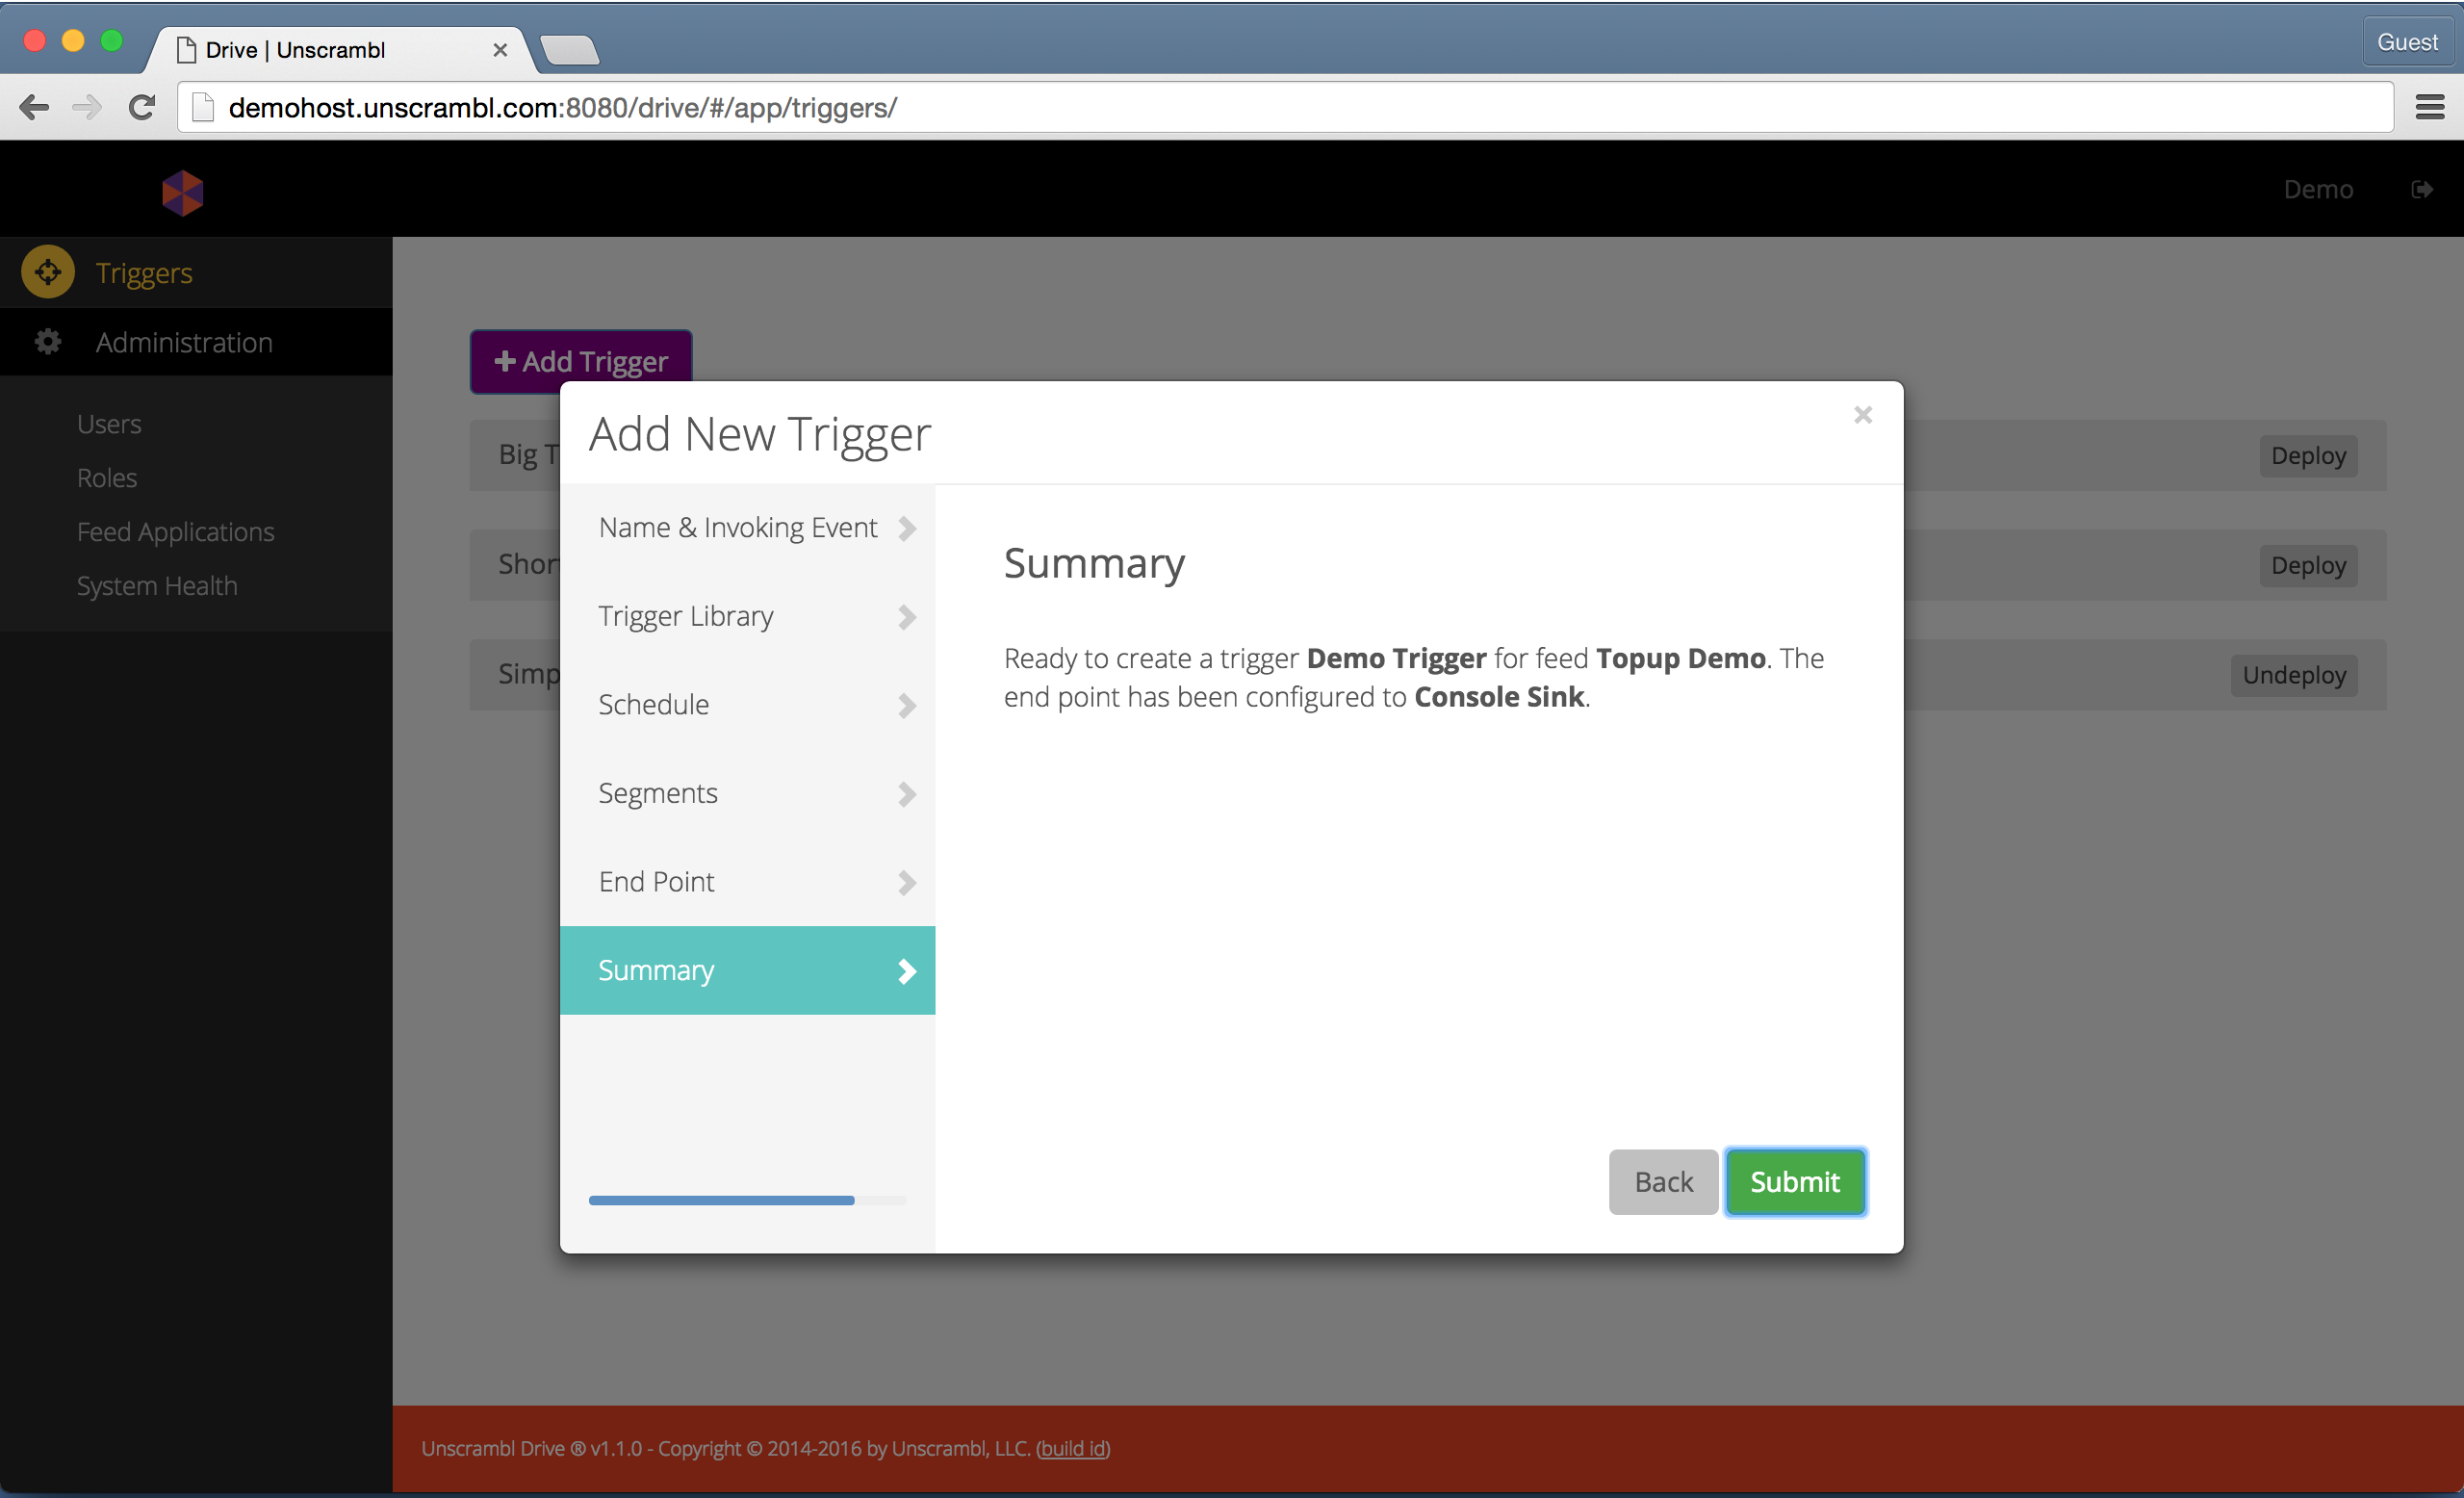
A summary with information about a new prospective trigger.
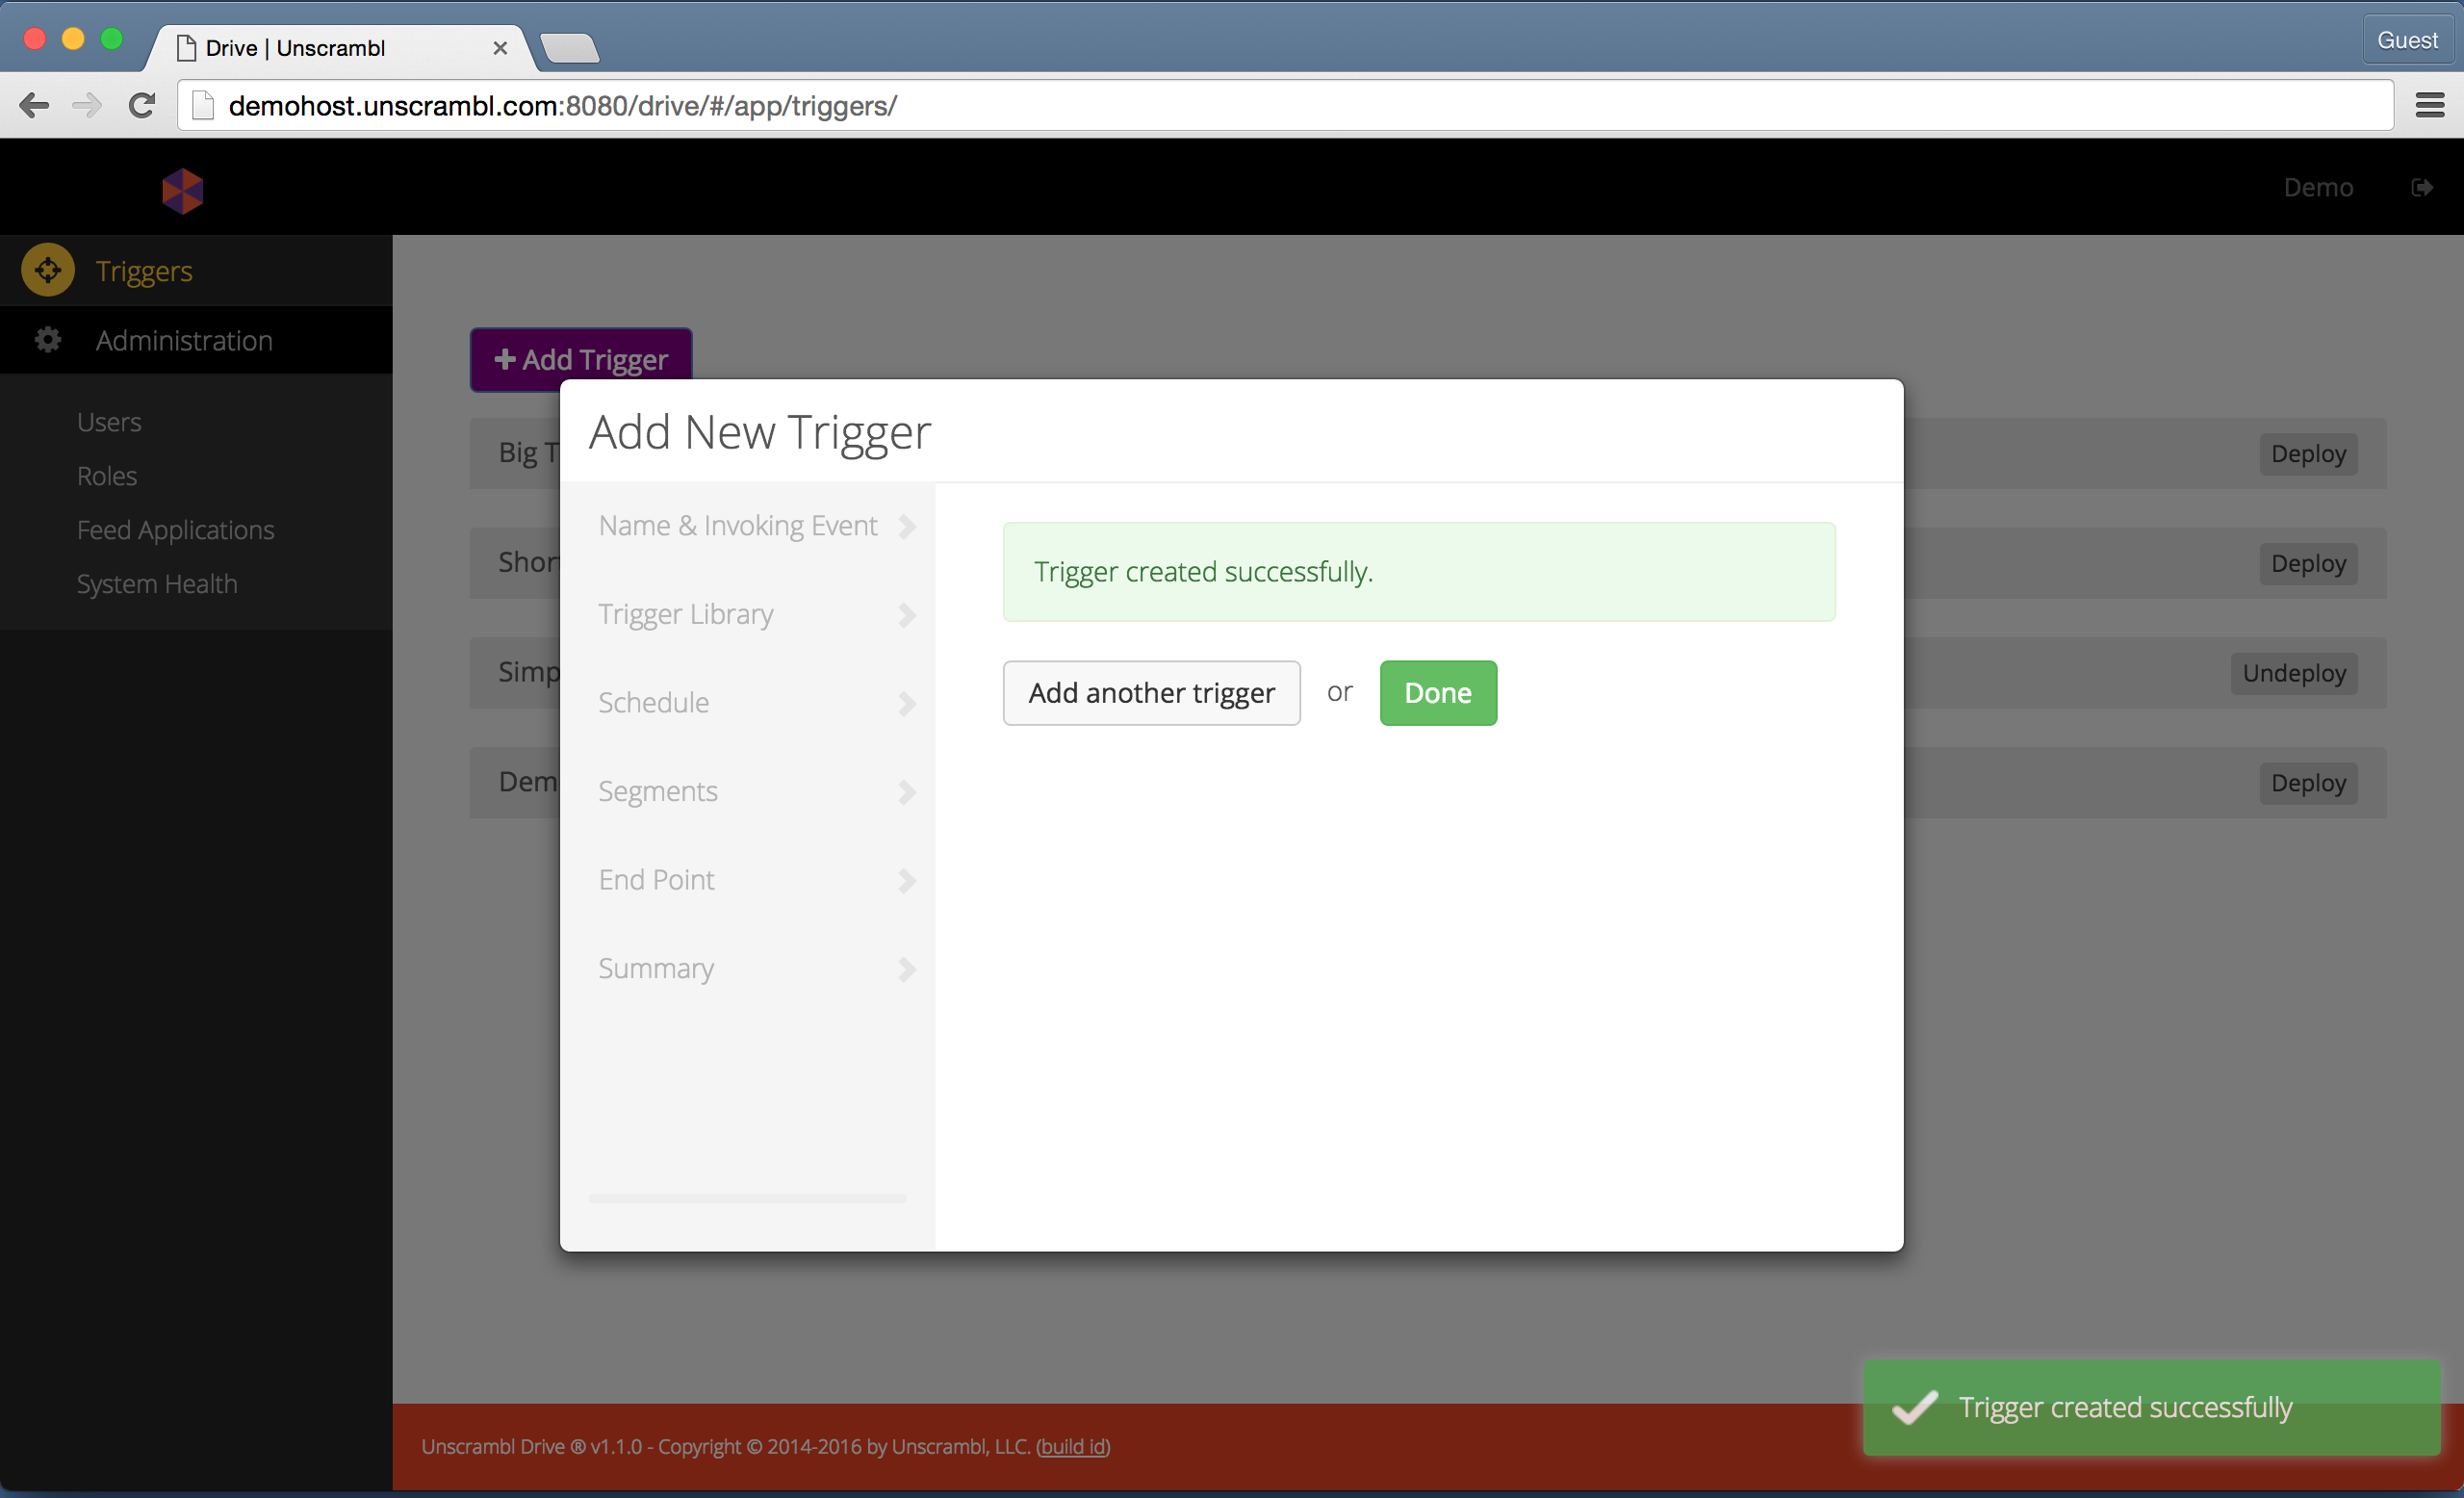
Confirming the creation of a trigger.
The figure below shows the newly created trigger. This page can also be accessed by clicking on the Triggers link in
the navigation bar.
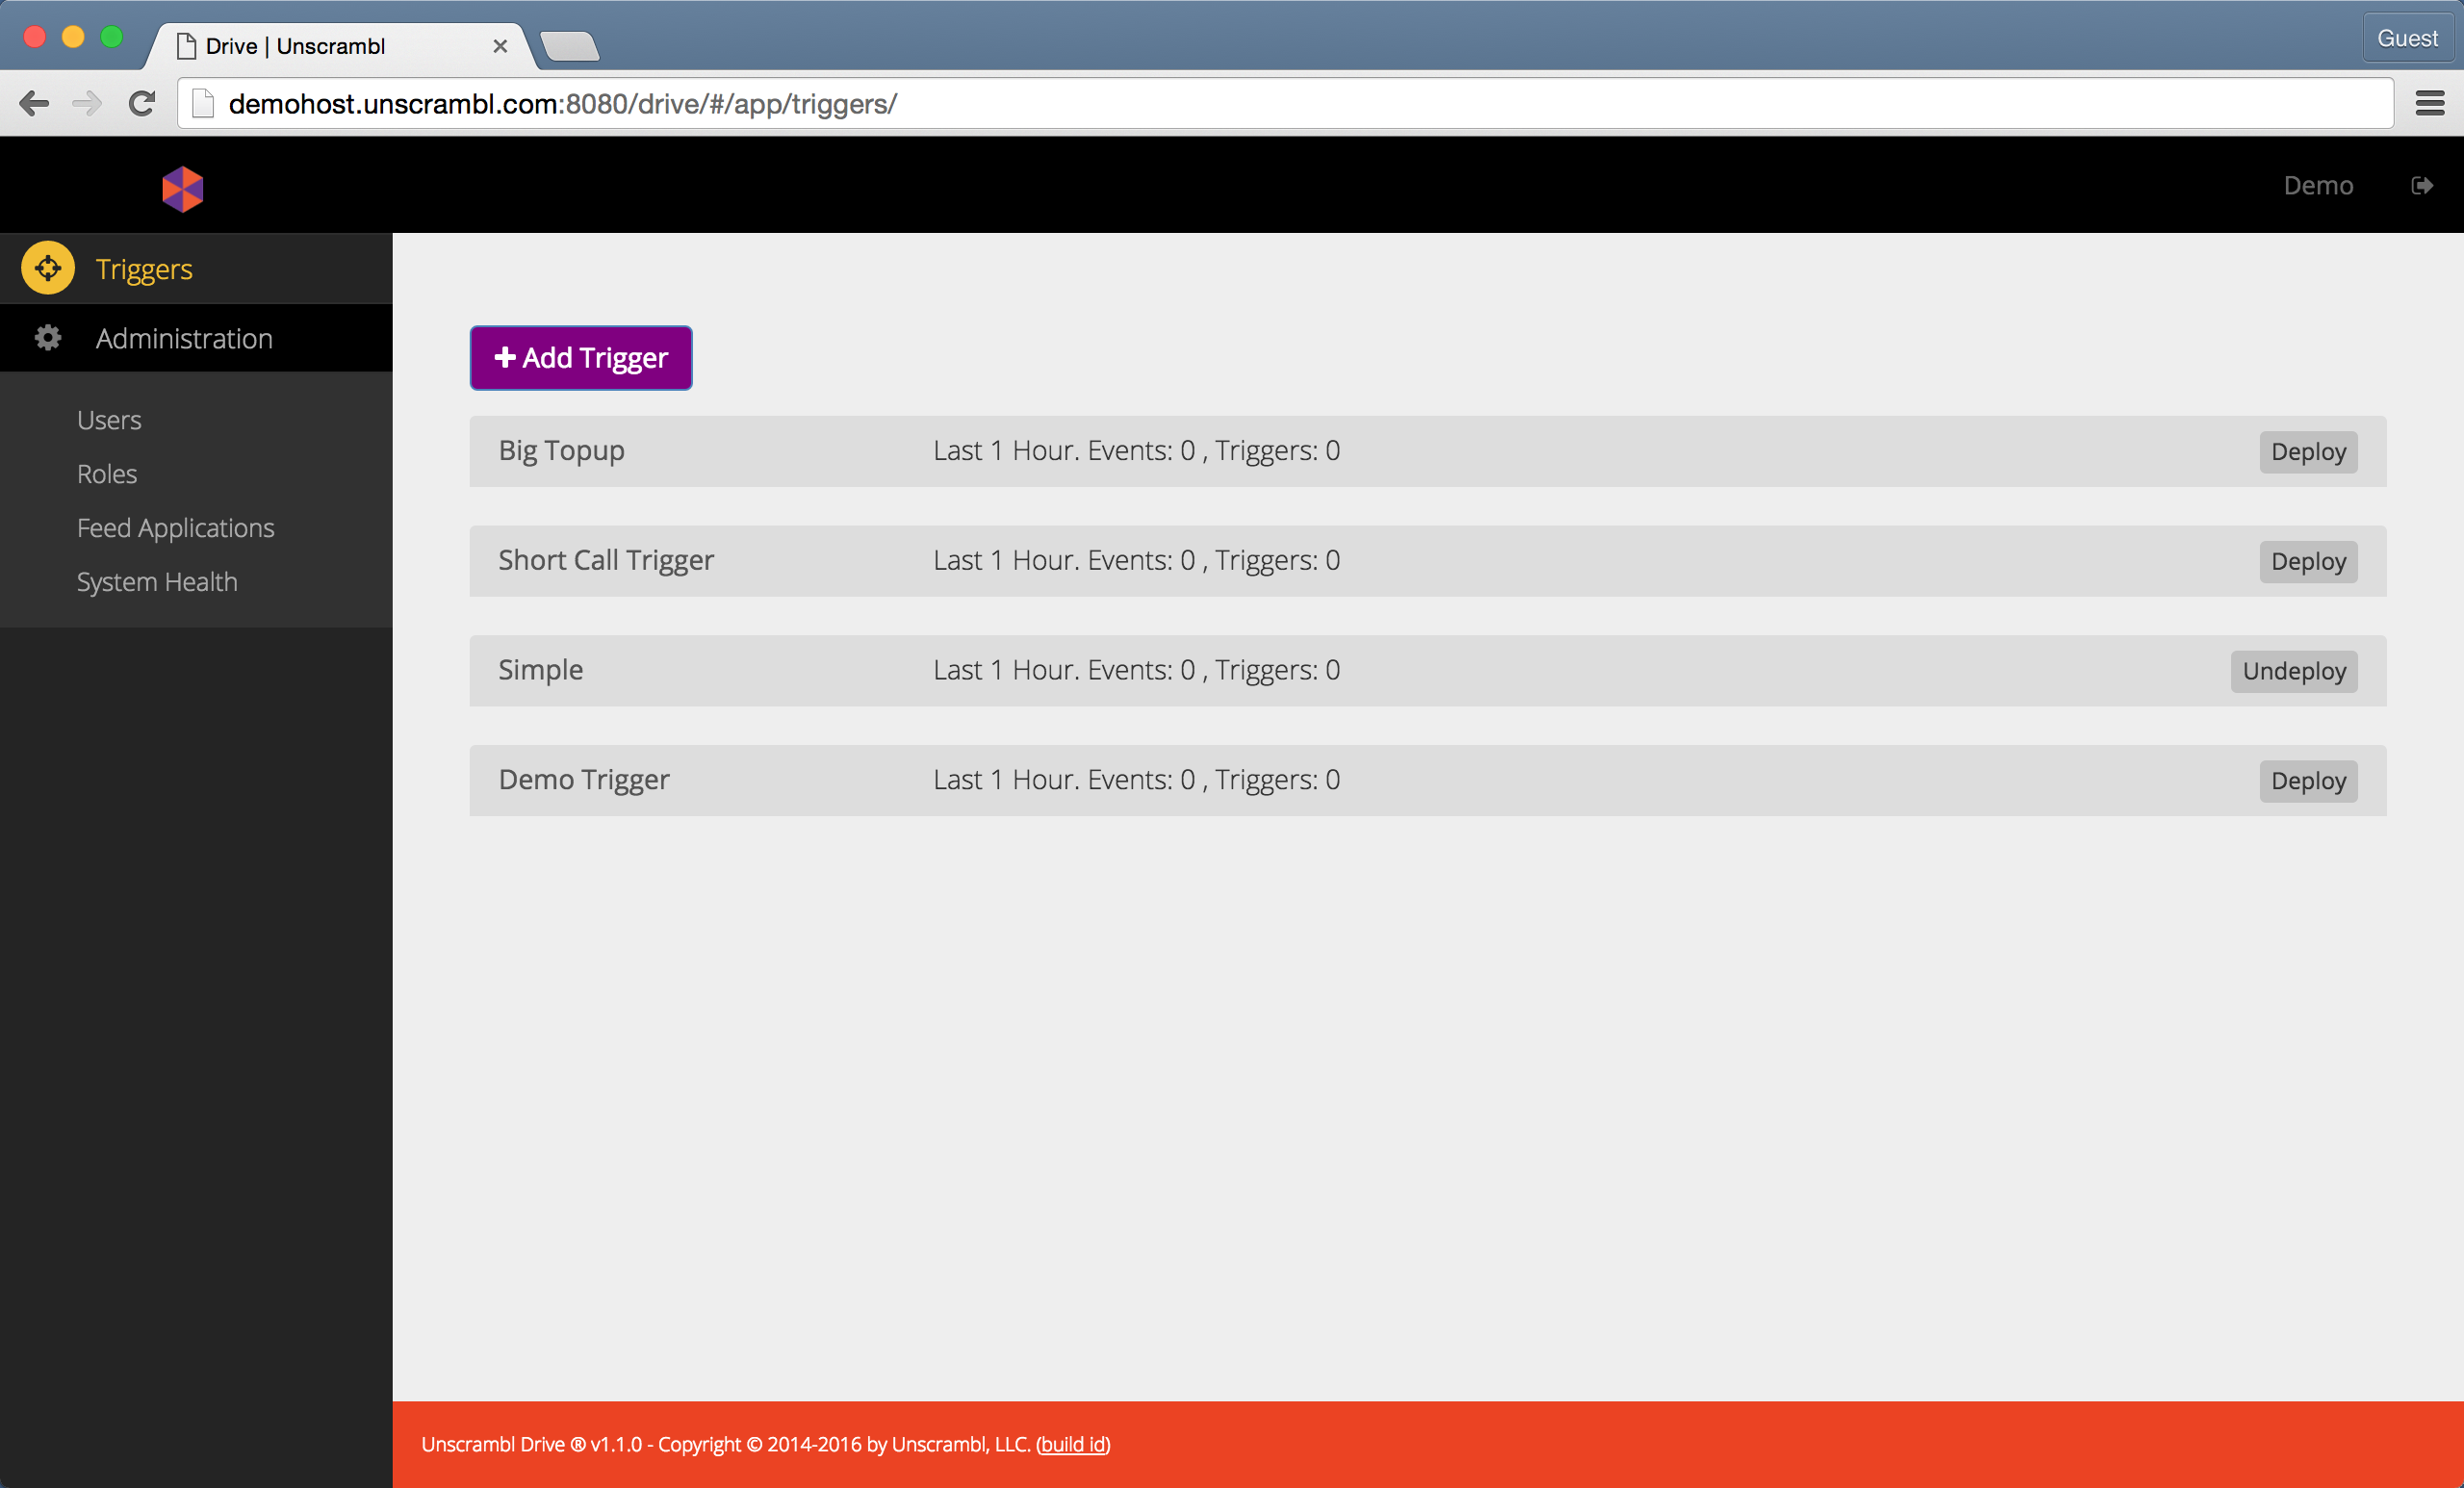
A newly created trigger.
A newly created trigger does not have any conditions in the WHEN clause and no output specifications in the THEN
clause.
A condition can be added by clicking on the + sign under the WHEN clause. This action will add a new row to the
WHEN clause. The left-hand size (LHS) of the condition is selected from a drop-down that lets the user pick one of
the attributes from the incoming tuple or from any accessible aggregates:
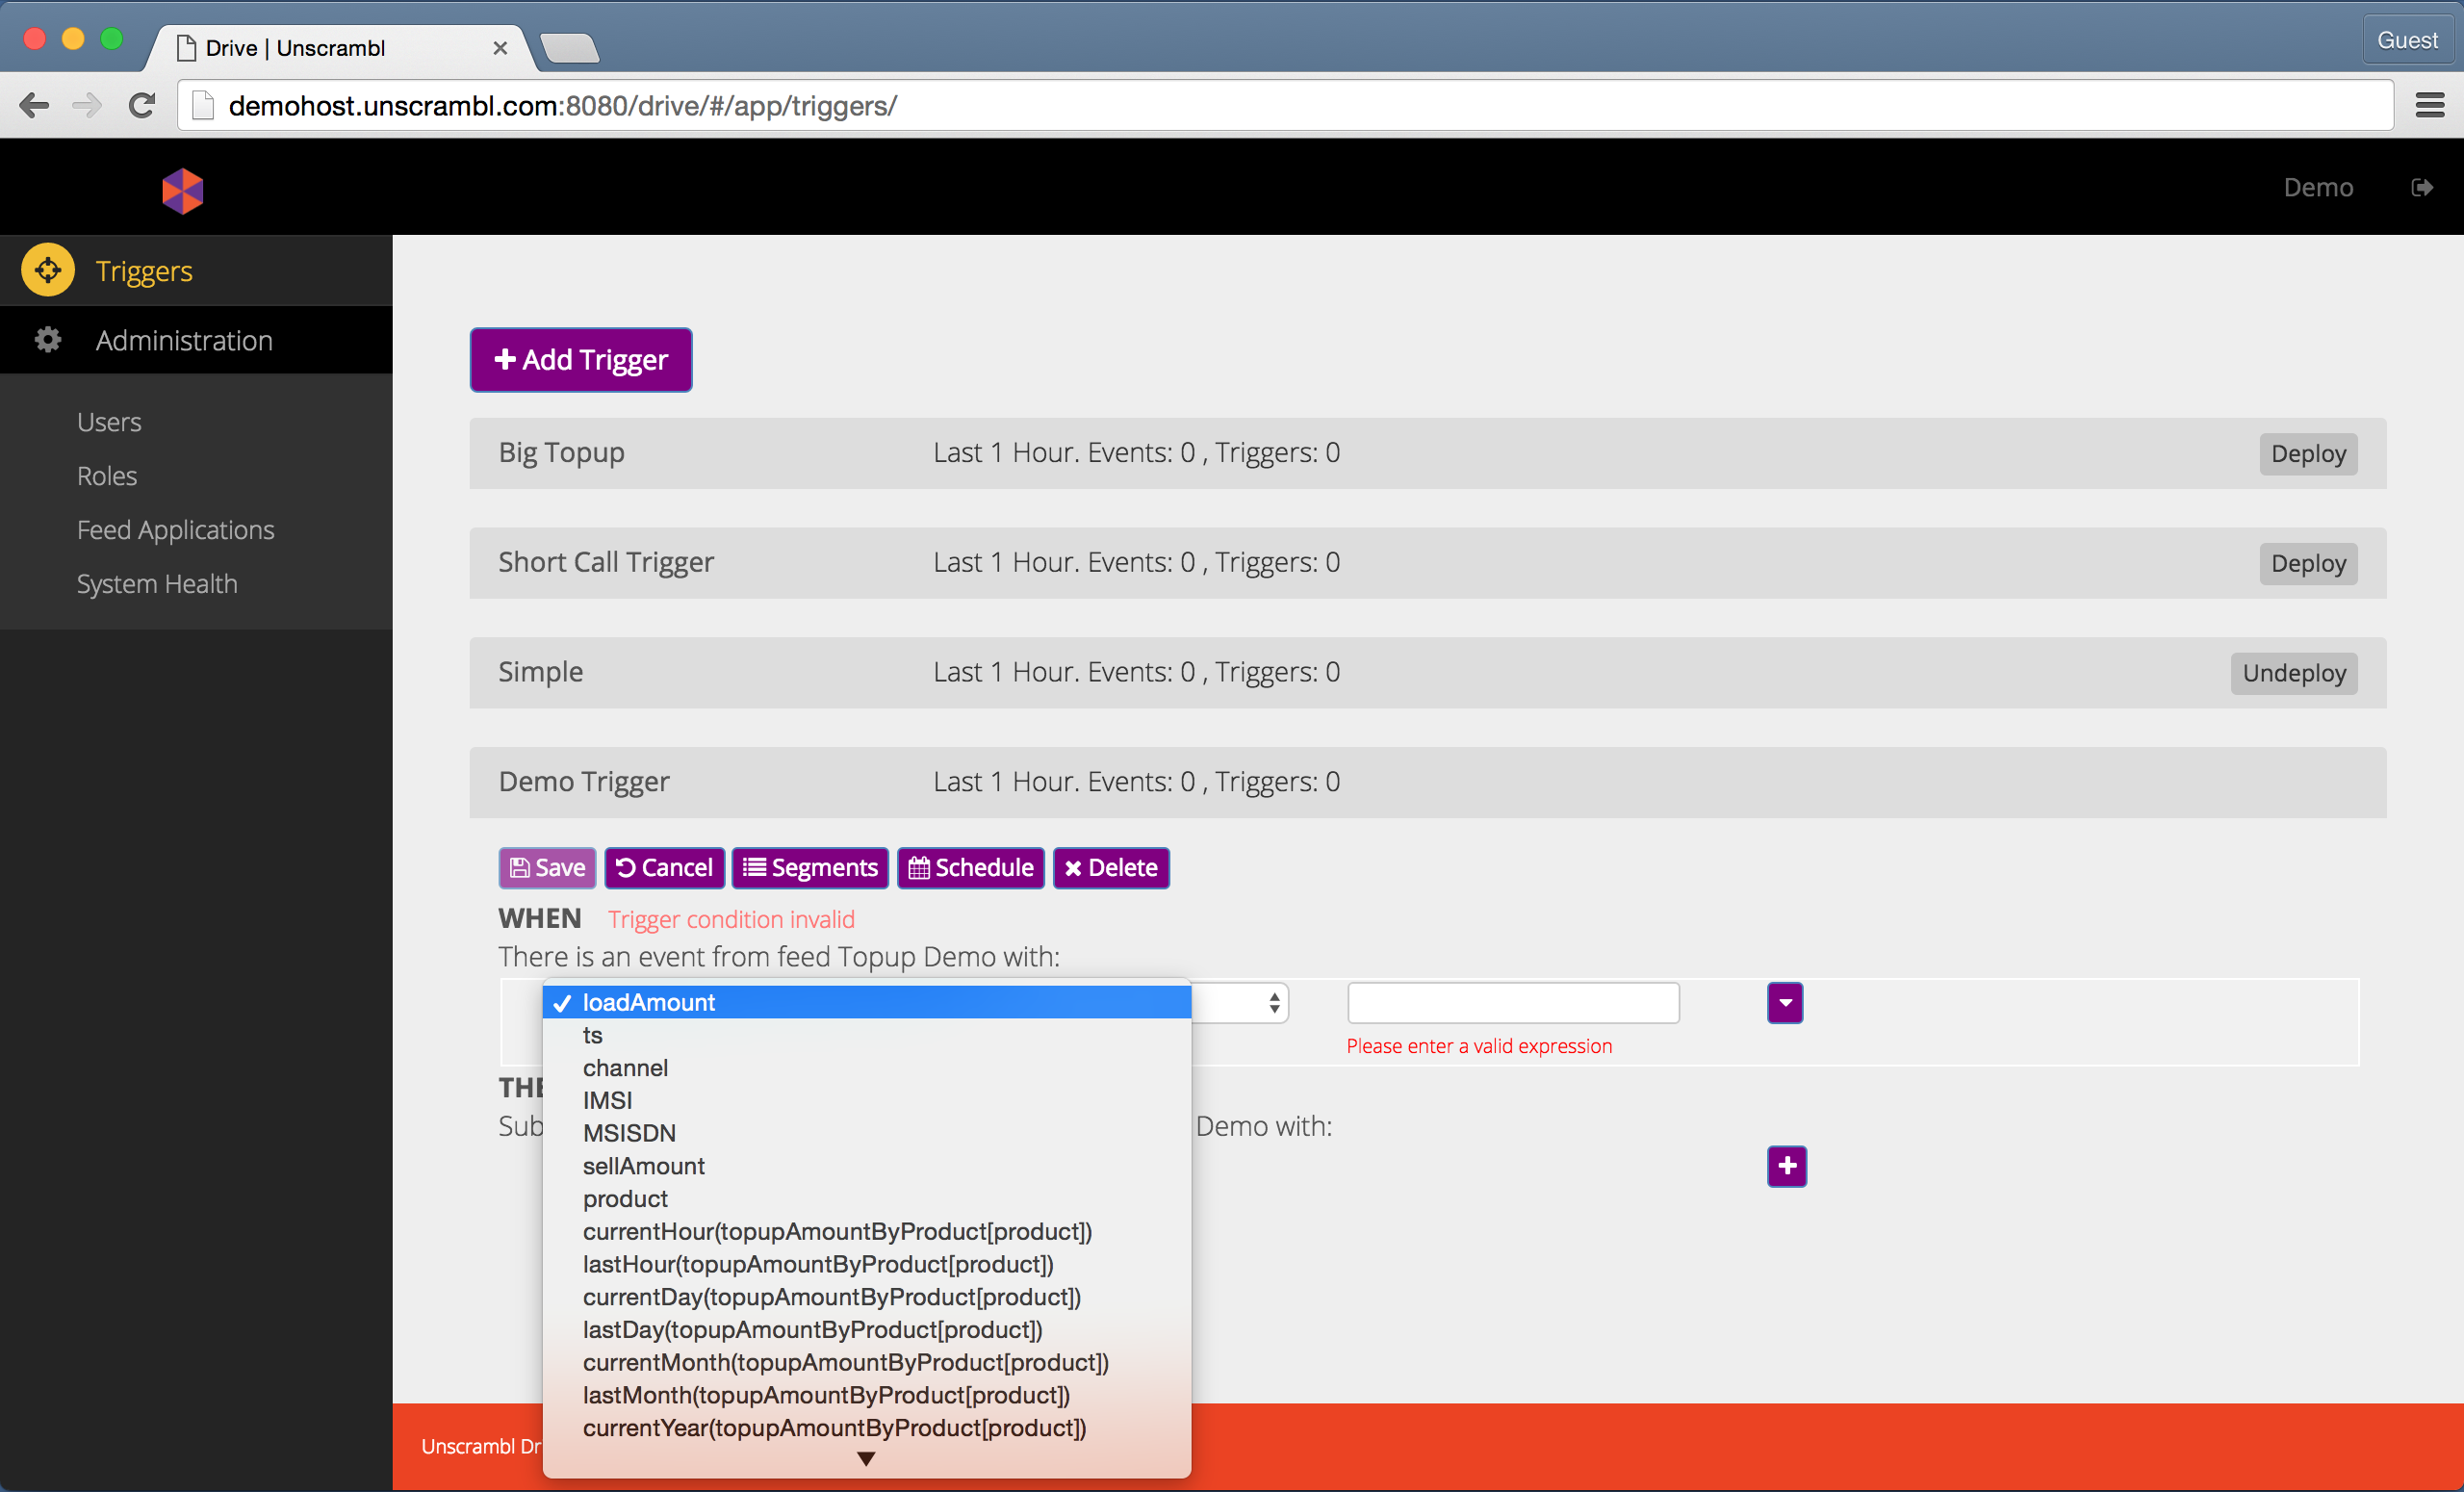
The list of attributes available for condition specification.
The figure below shows the trigger configured with a simple condition and with output attribute assigned. The output attributes can include literals or values from an incoming tuple.
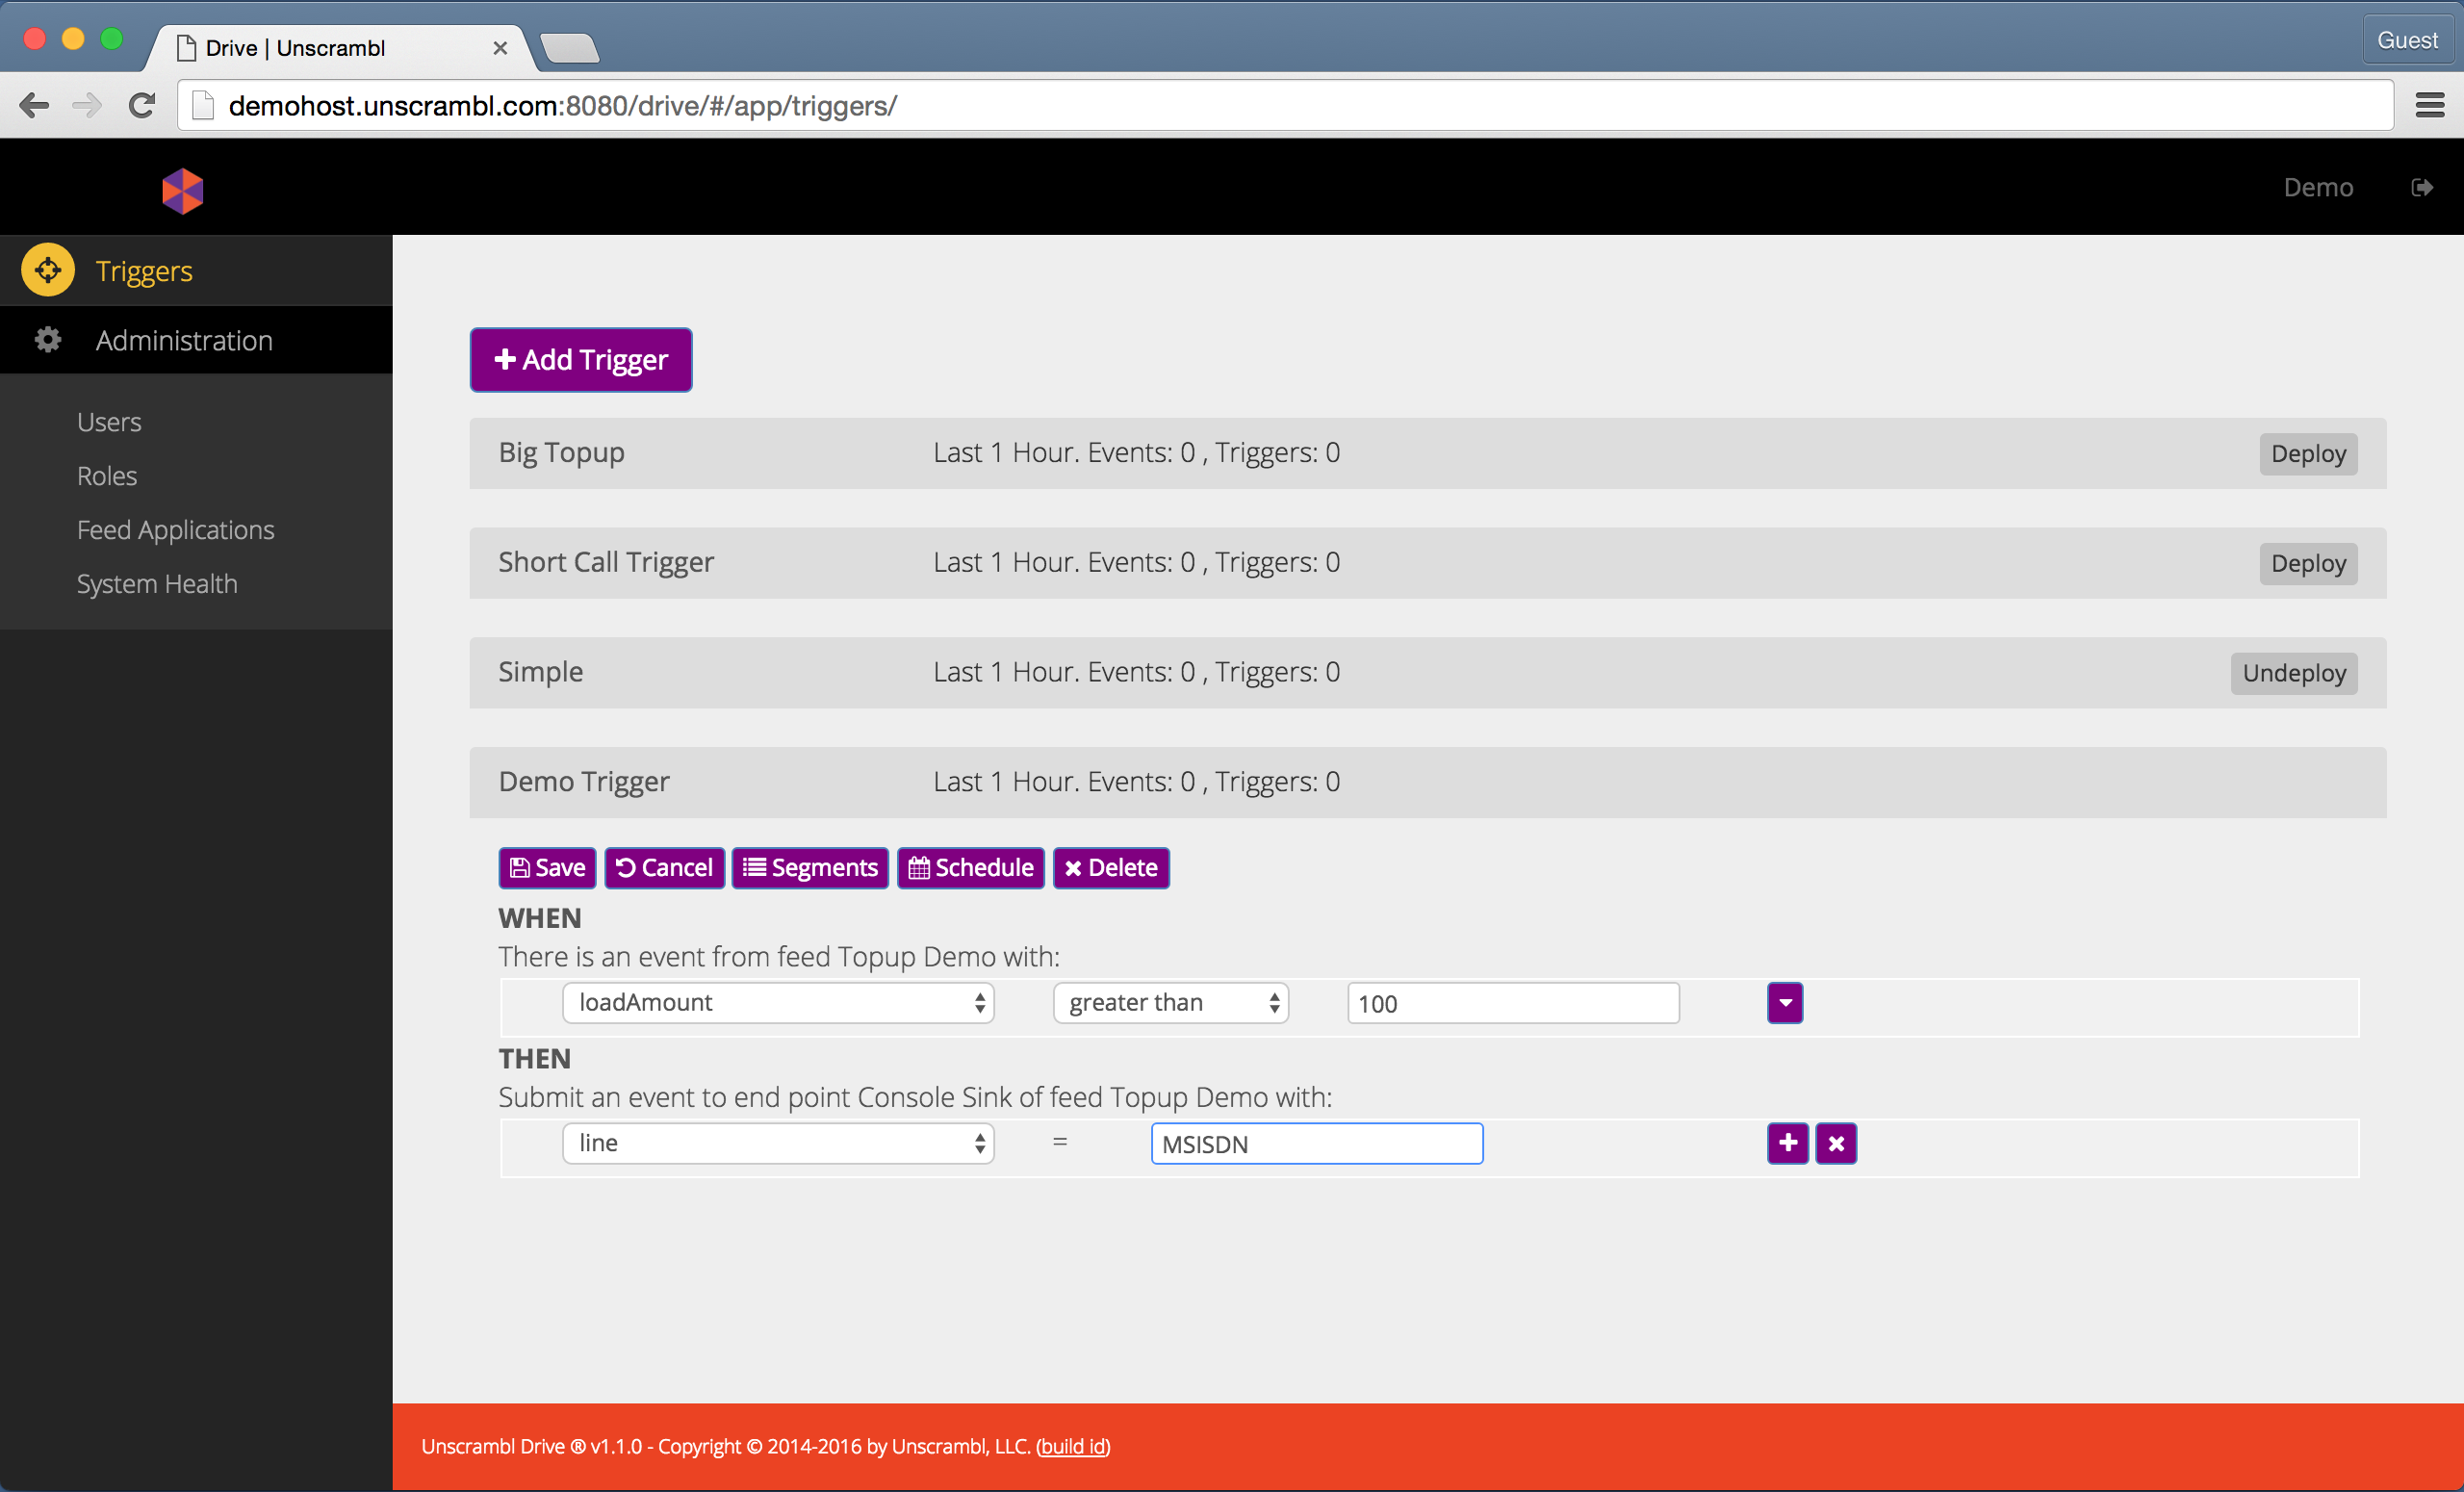
A trigger with a condition and output specification.
Once the first condition has been added to a trigger, adding another condition creates a conjunction between the already specified condition and the new one.
This is done by means of a drop-down to the right of the existing condition. The drop-down, shown in the figure below,
has two options: either all, which implies a logical AND condition, or any, which implies a logical OR
condition.
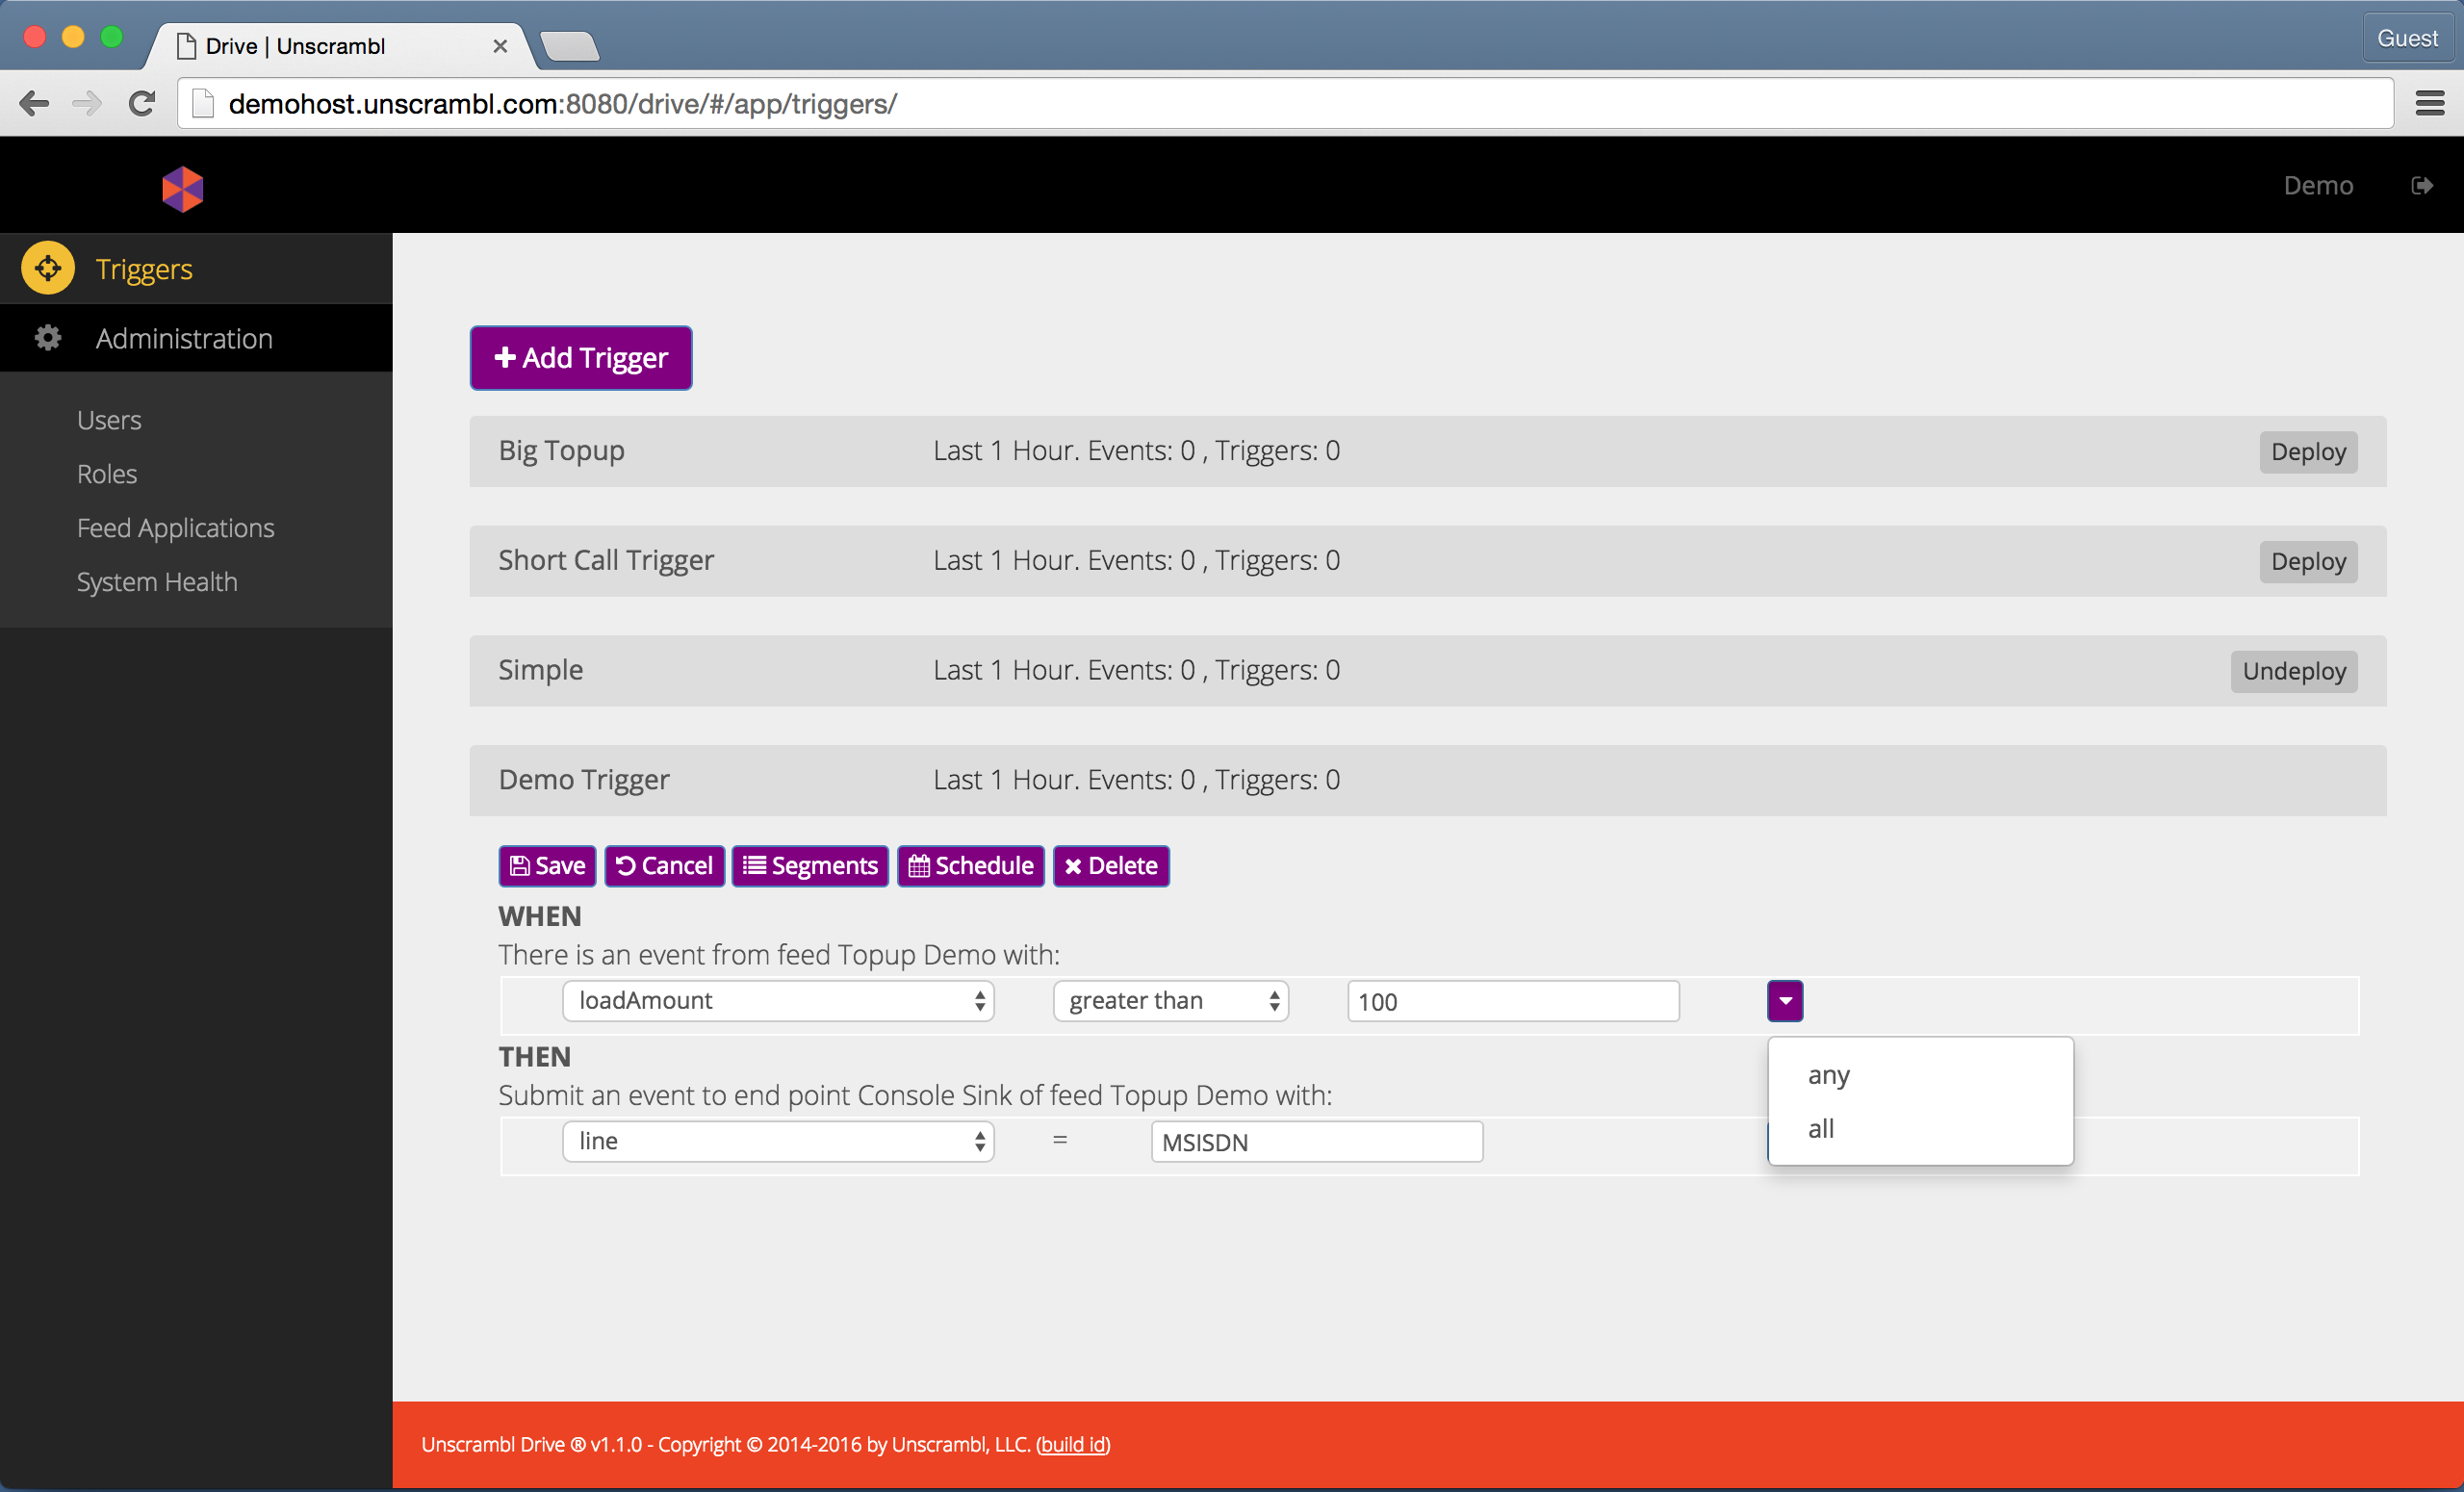
Creating a composite condition.
The figure below shows a trigger with a composite condition. Specifically, the condition evaluates to true when the
loadAmount is both less than 200 and greater than 100.
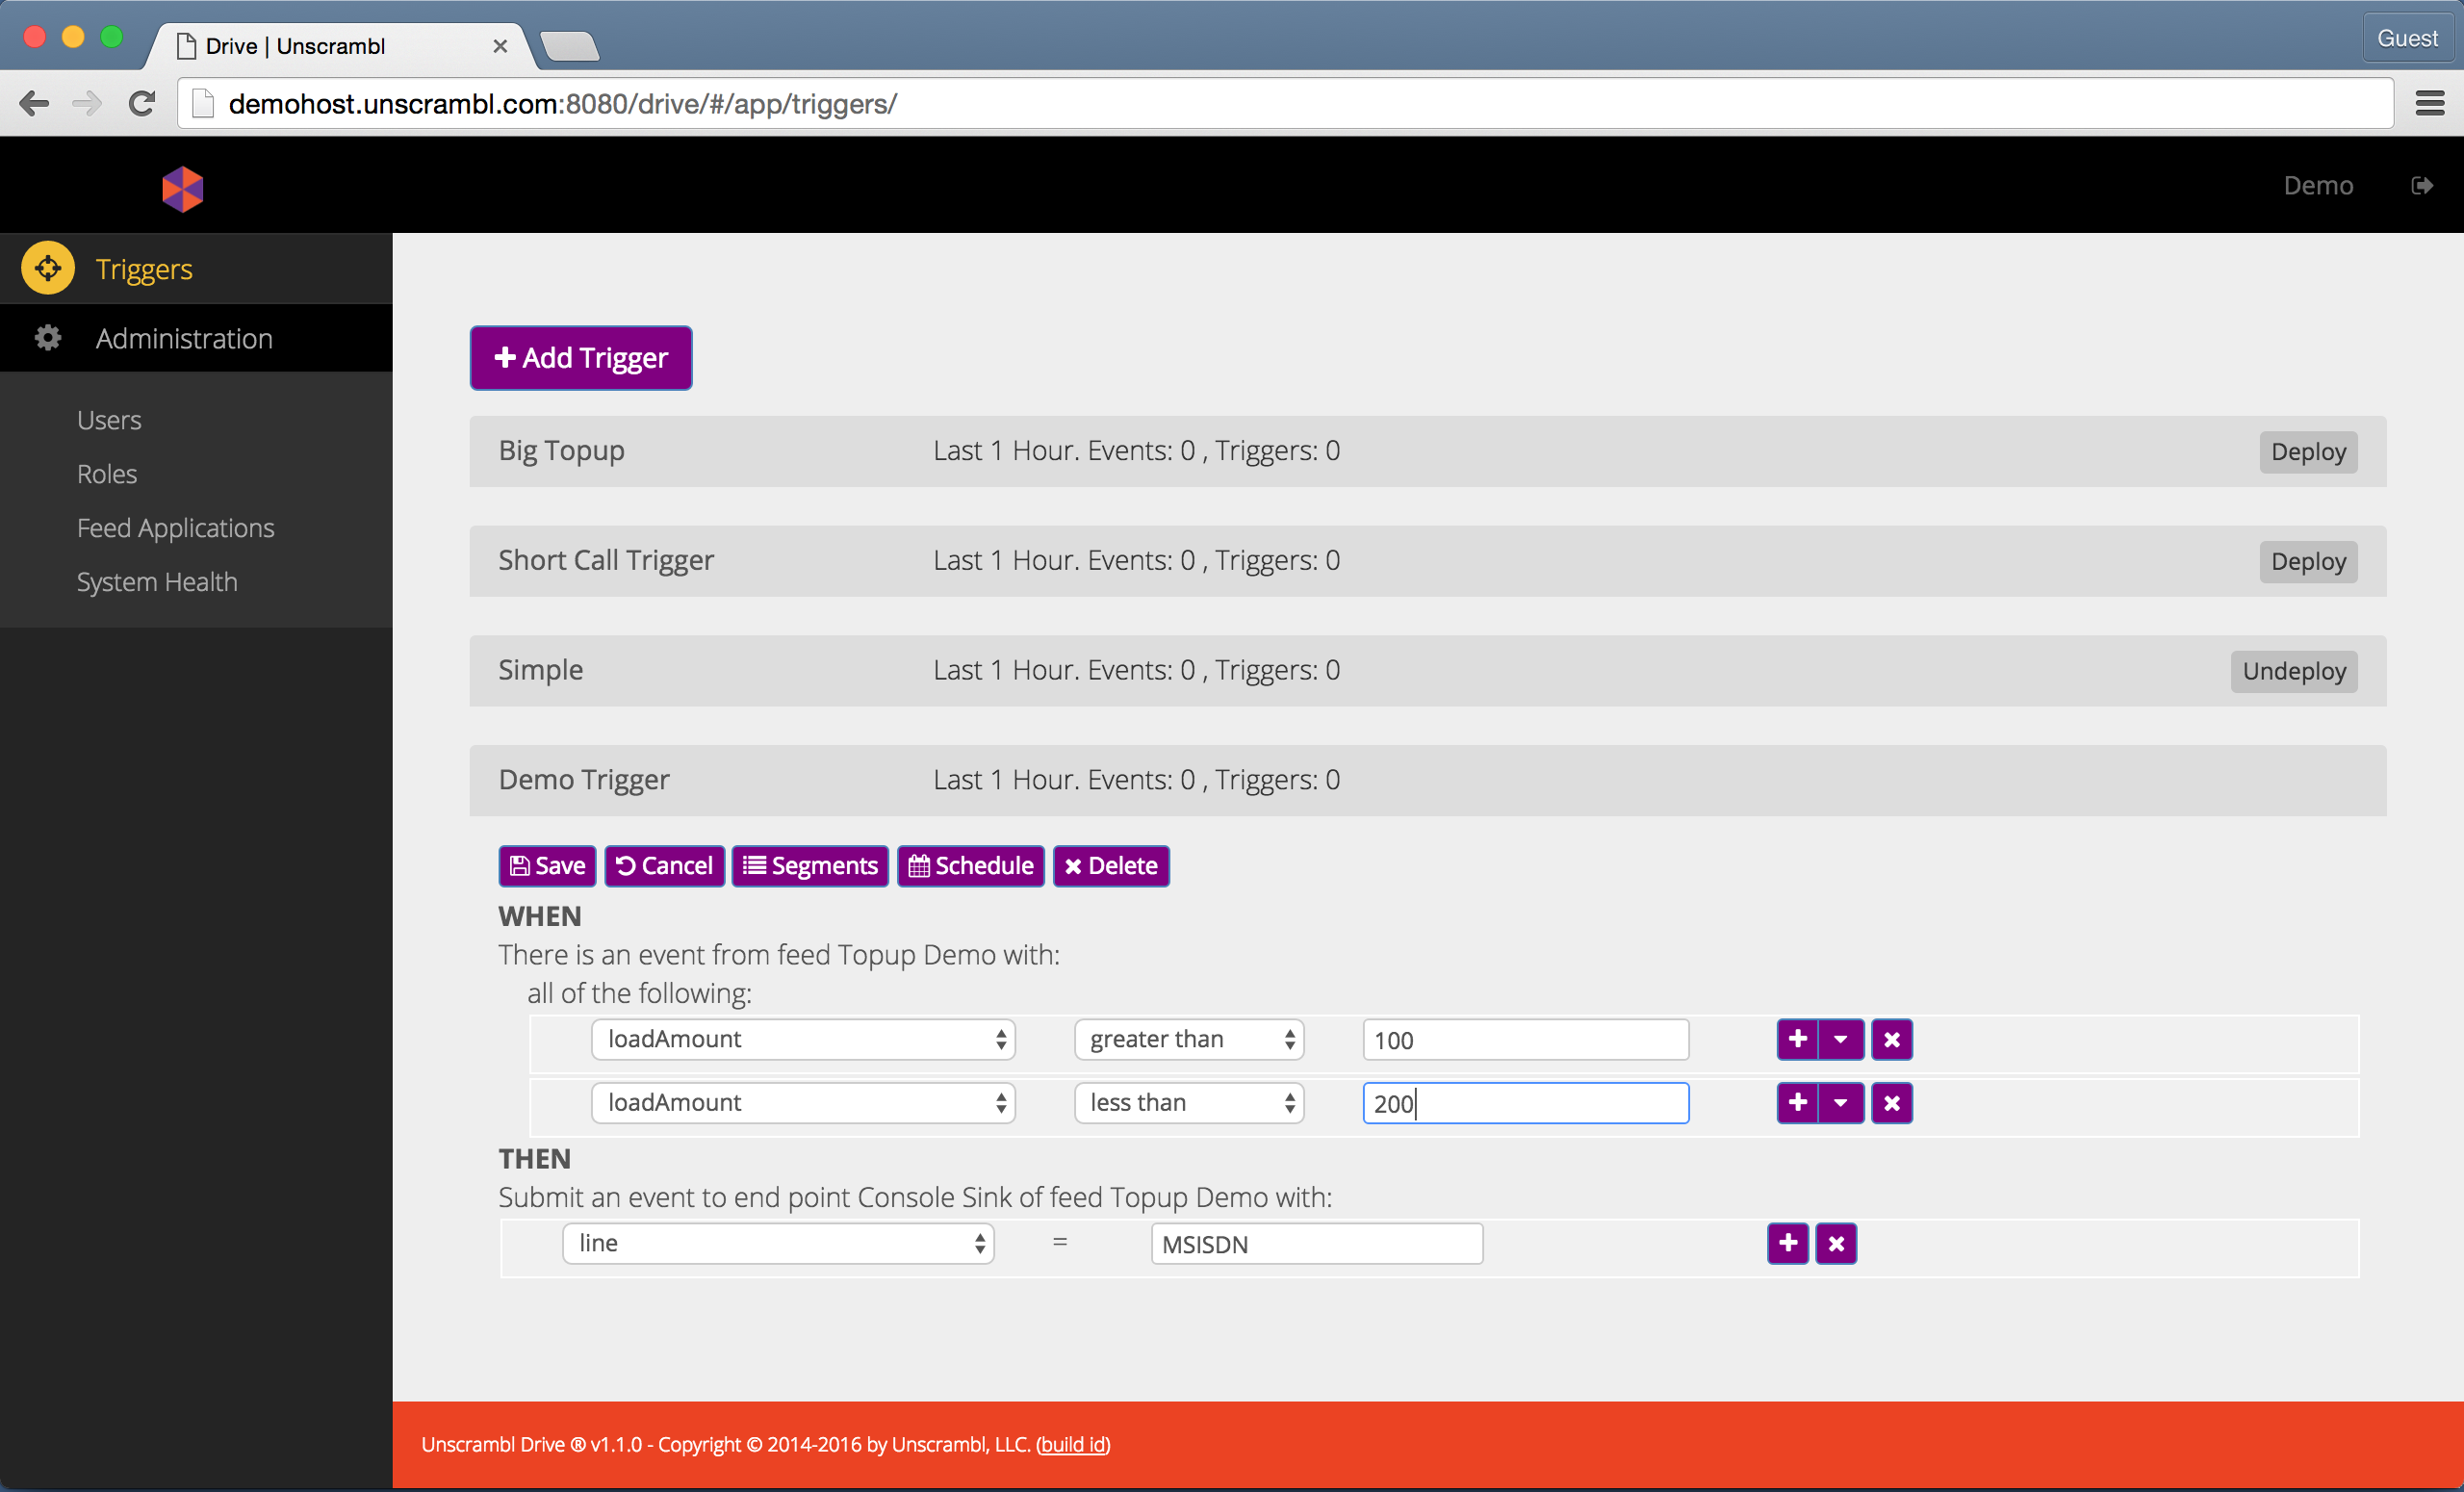
A trigger with a composite condition.
It is also possible to edit the segments to be included or excluded as a target for a trigger. This is done by clicking
on the Segments button that corresponds to the trigger:
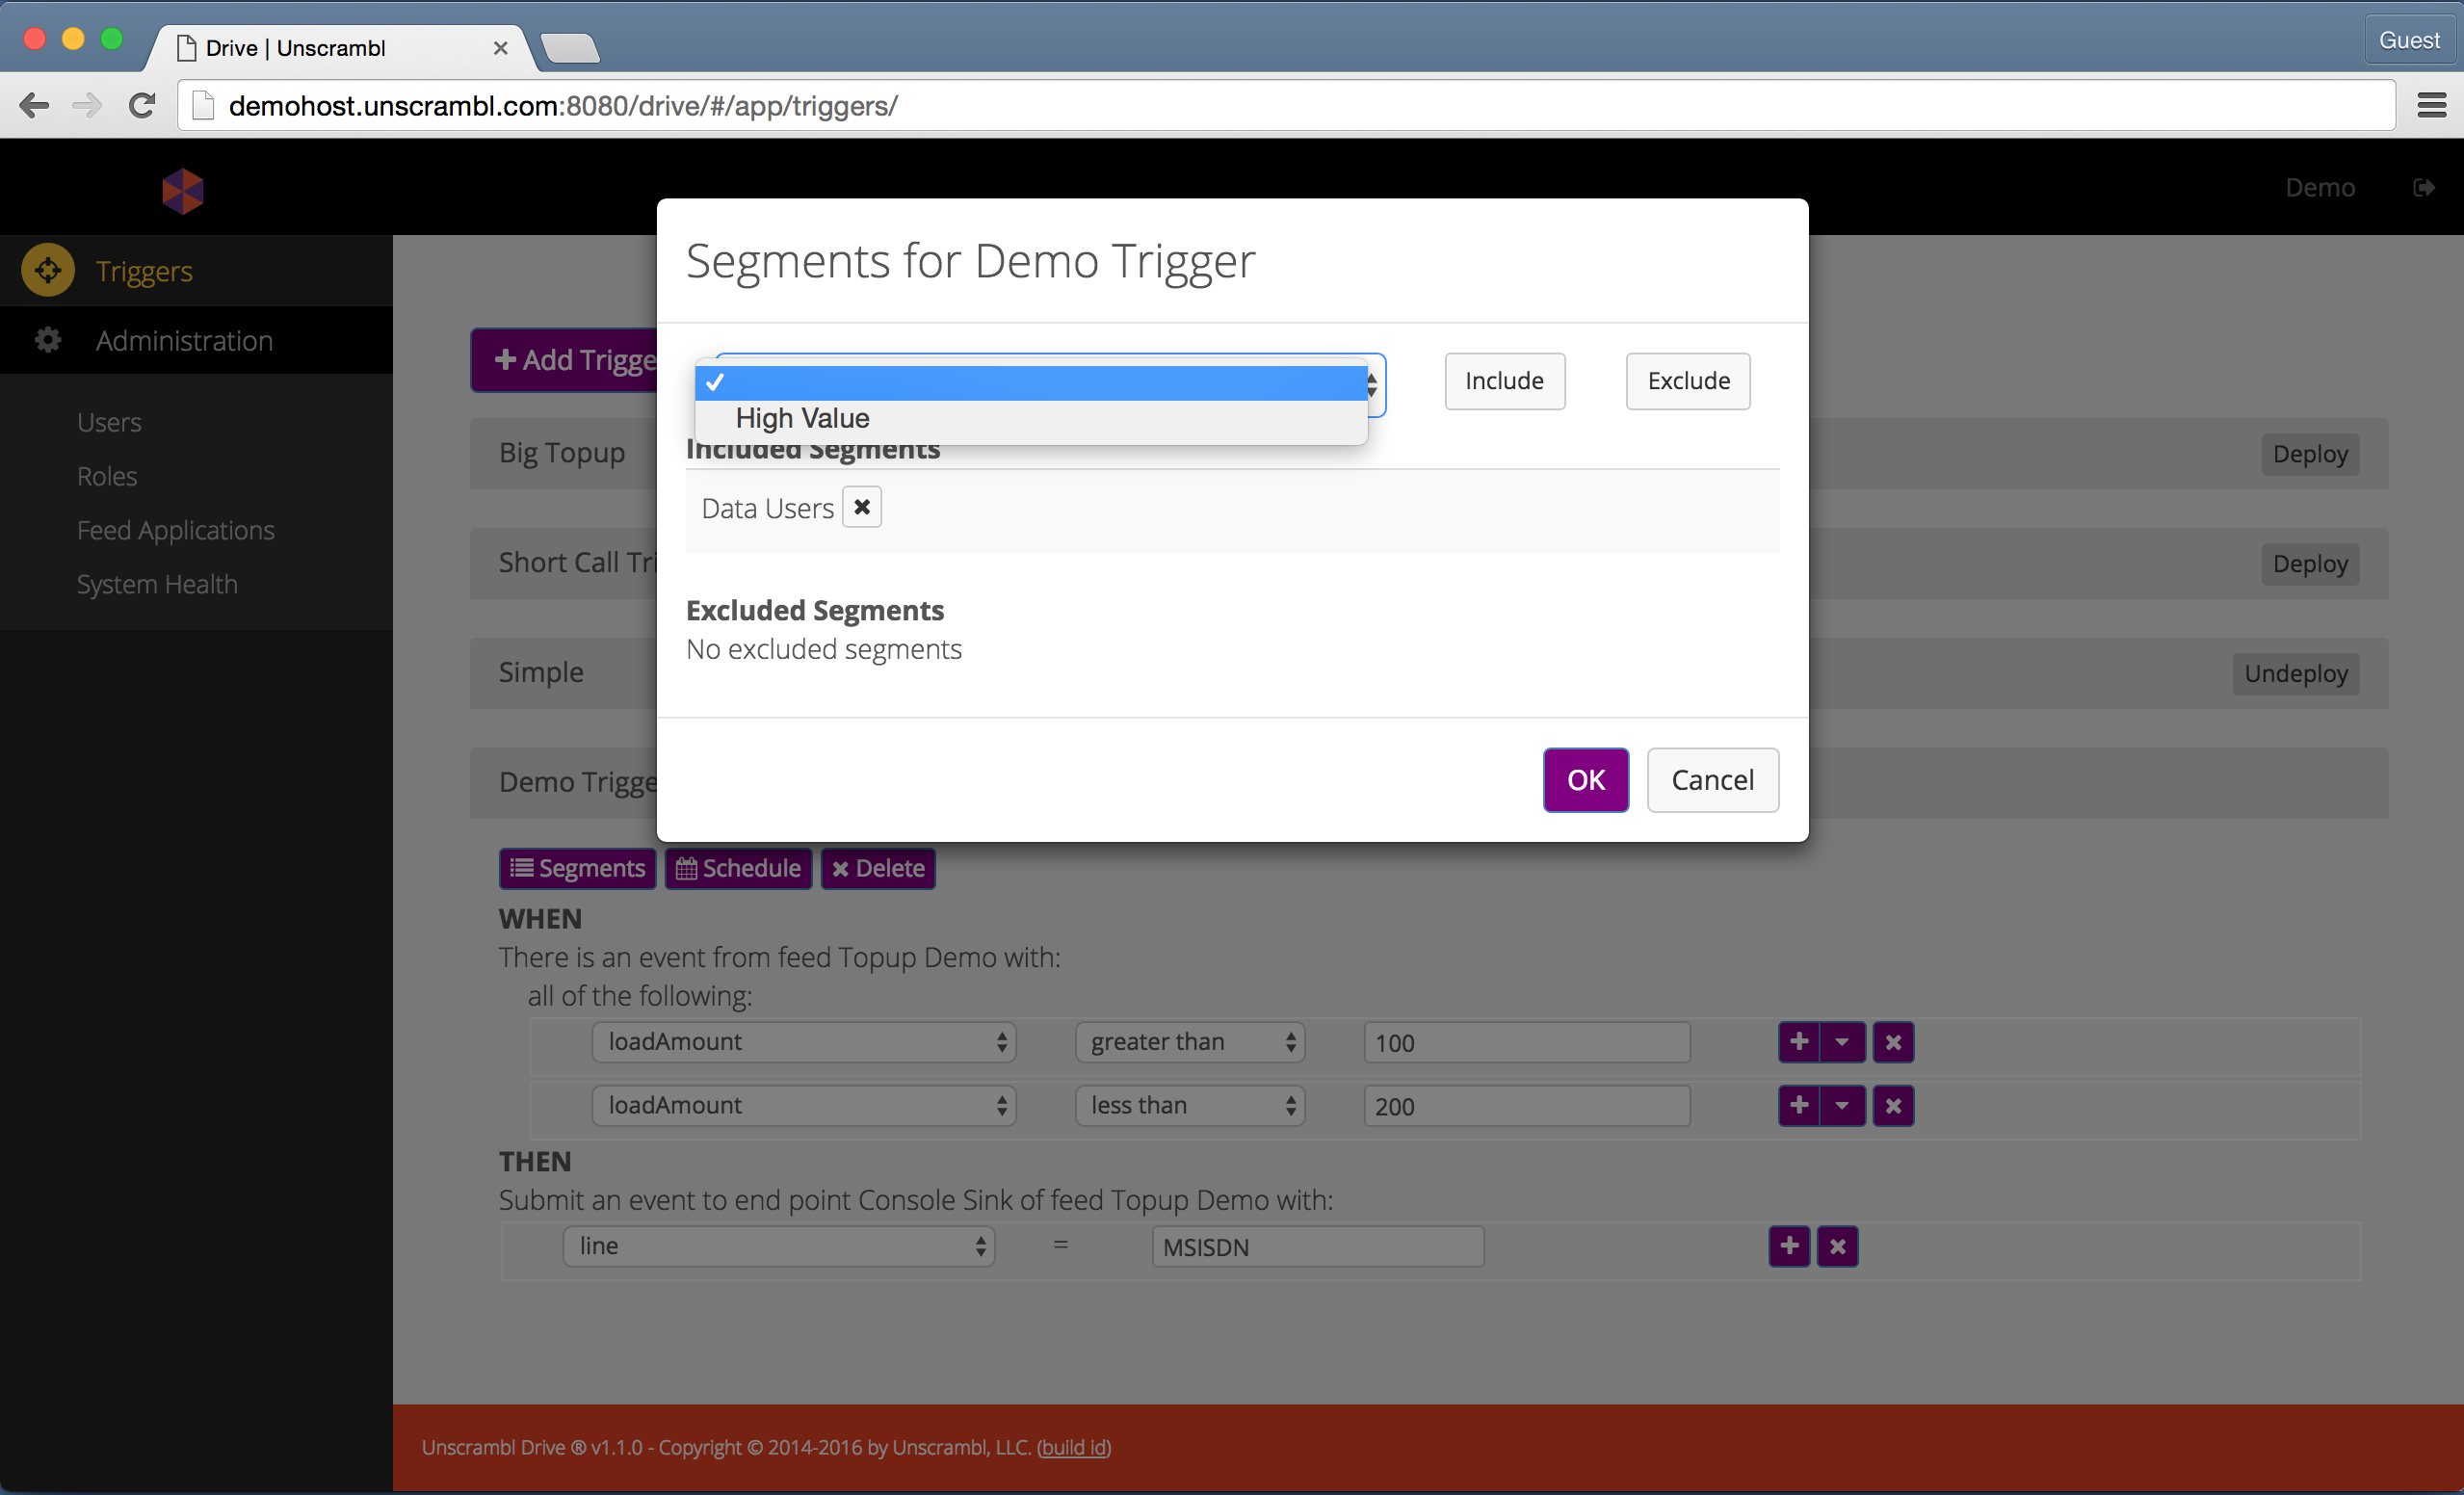
Including/excluding segments for a trigger.
The schedule for a trigger can be configured by clicking on the Schedule button that corresponds to the trigger and
using the resulting dialog to perform the required edits:
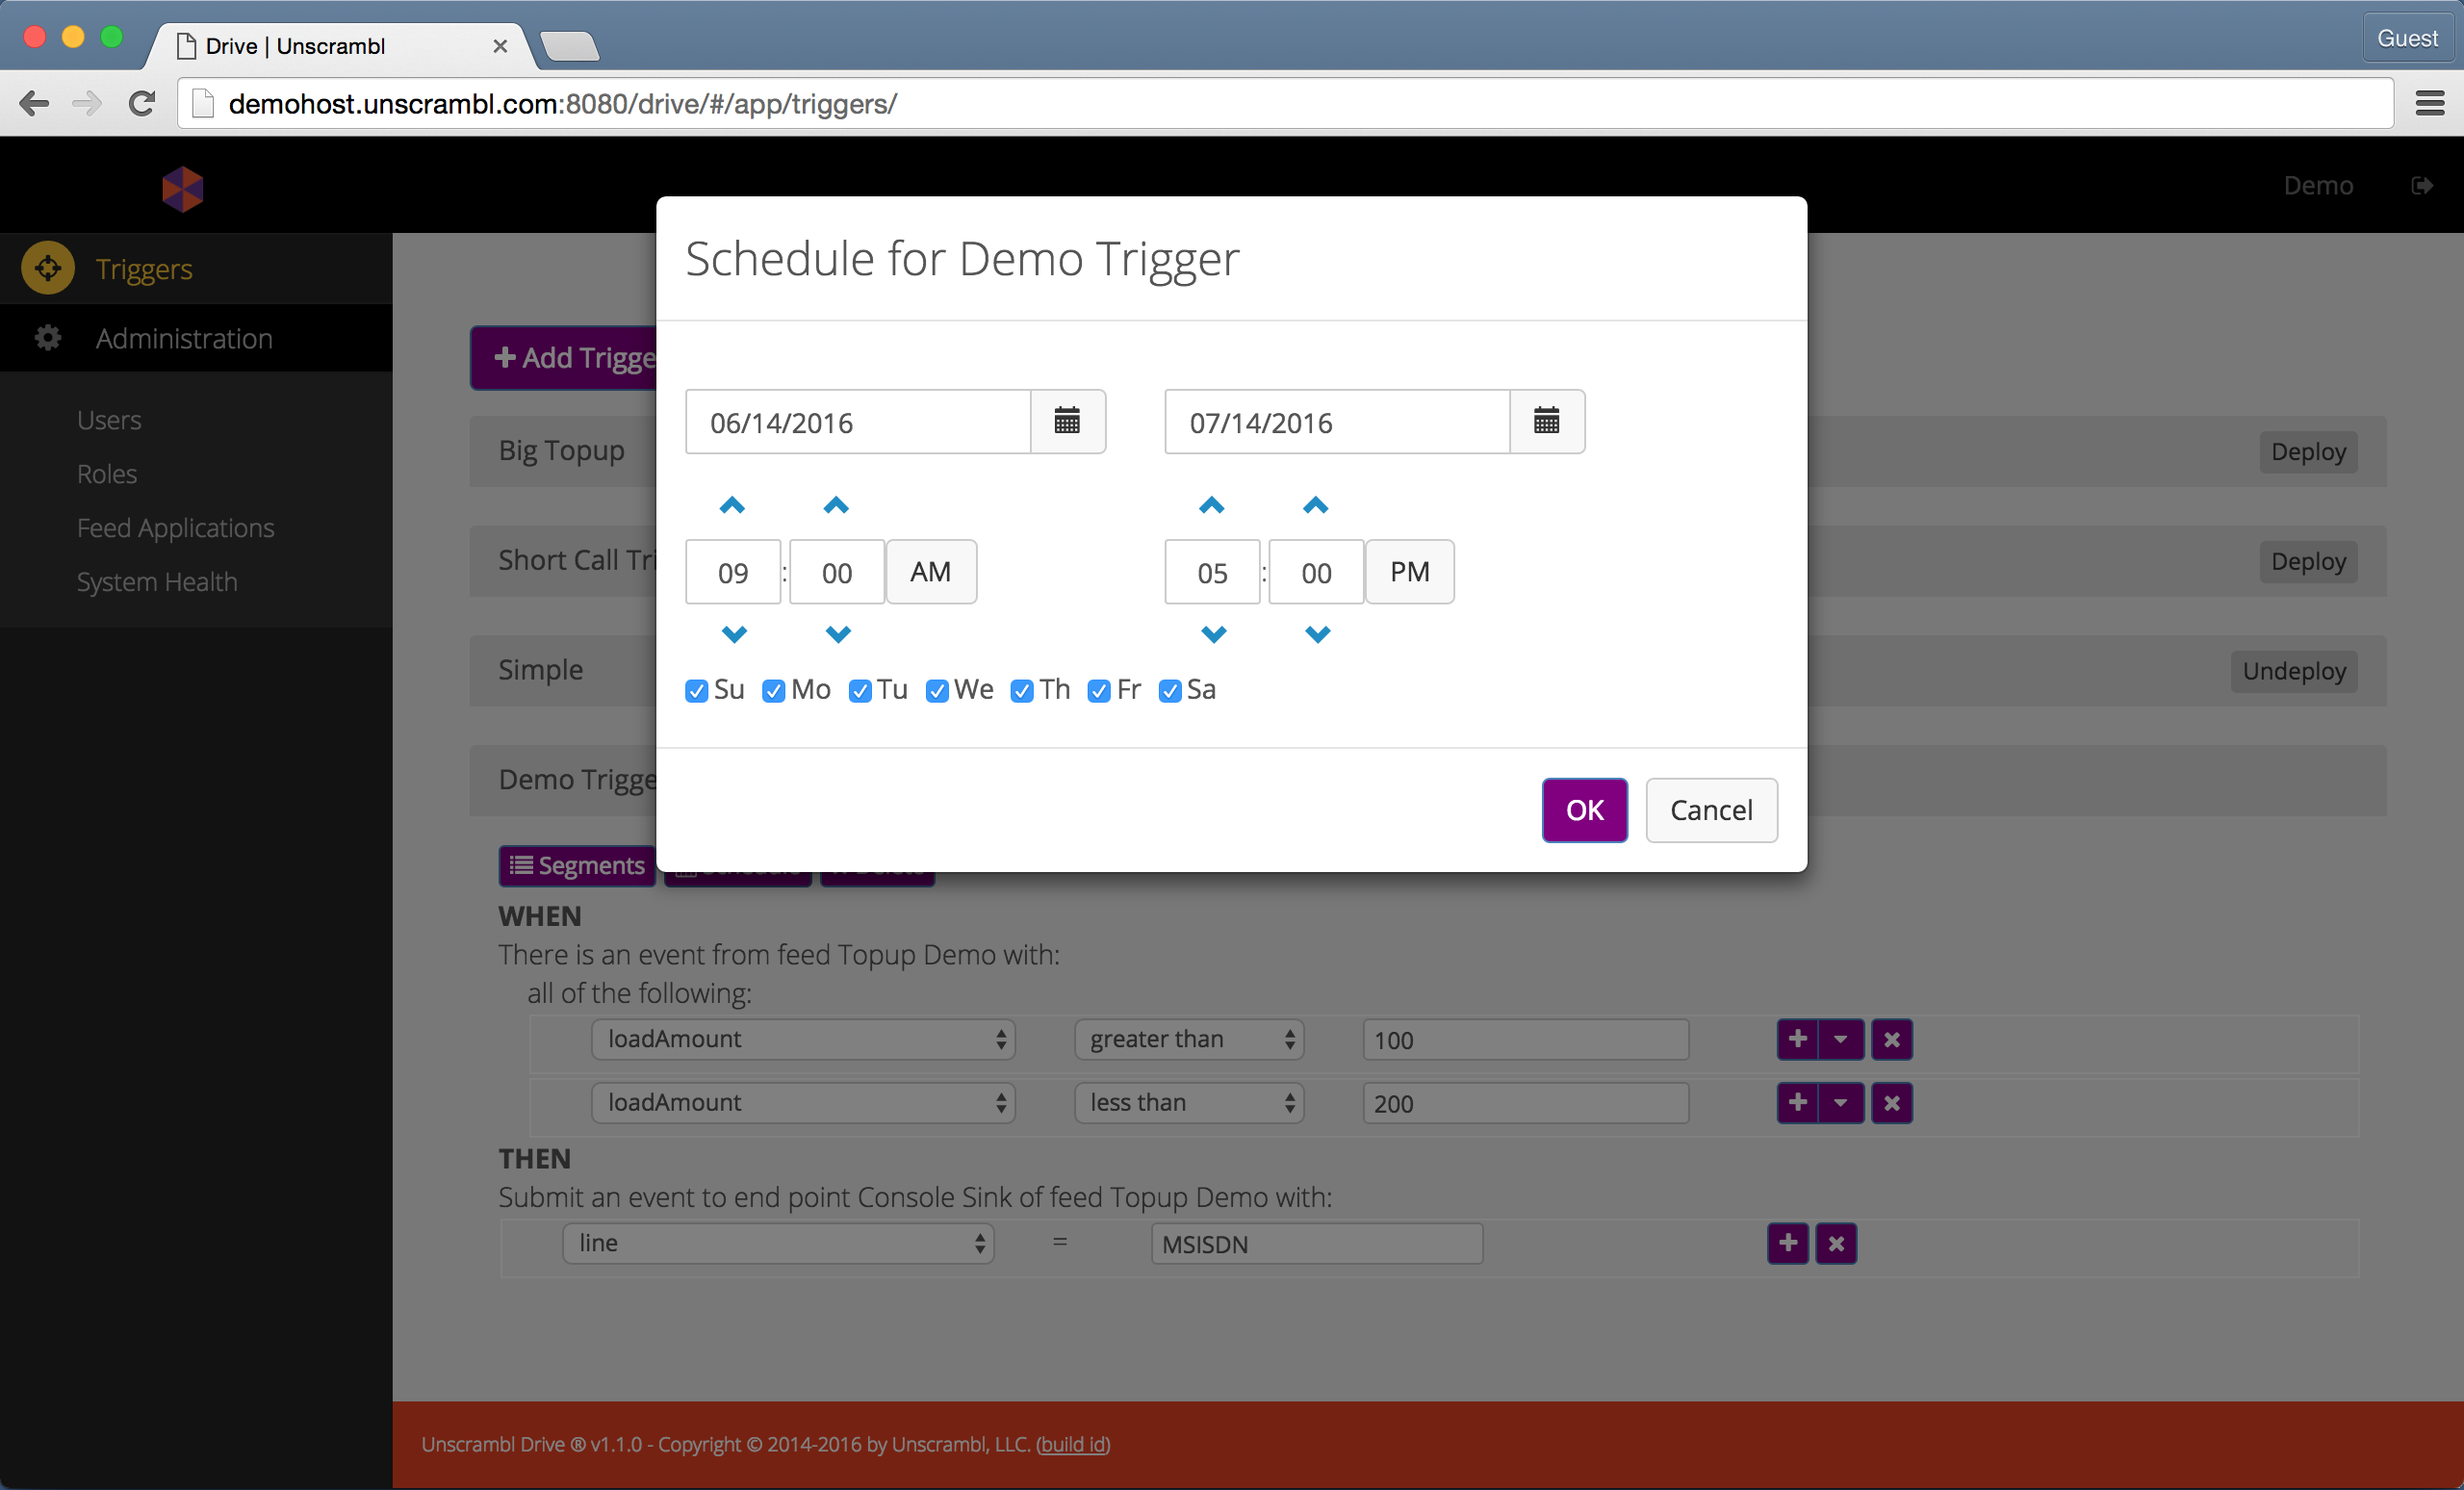
Configuring the schedule for a trigger.
A newly created trigger, by default, is not deployed. A trigger that is not deployed can still be edited but it does not execute as part of the feed.
To deploy a trigger, locate it in the Triggers page, ensure that it is collapsed and then click on the Deploy
button located to the right of the trigger name. Once clicked, a dialog, like the one shown below will be displayed.
Once the Deploy button is clicked, the trigger is deployed.
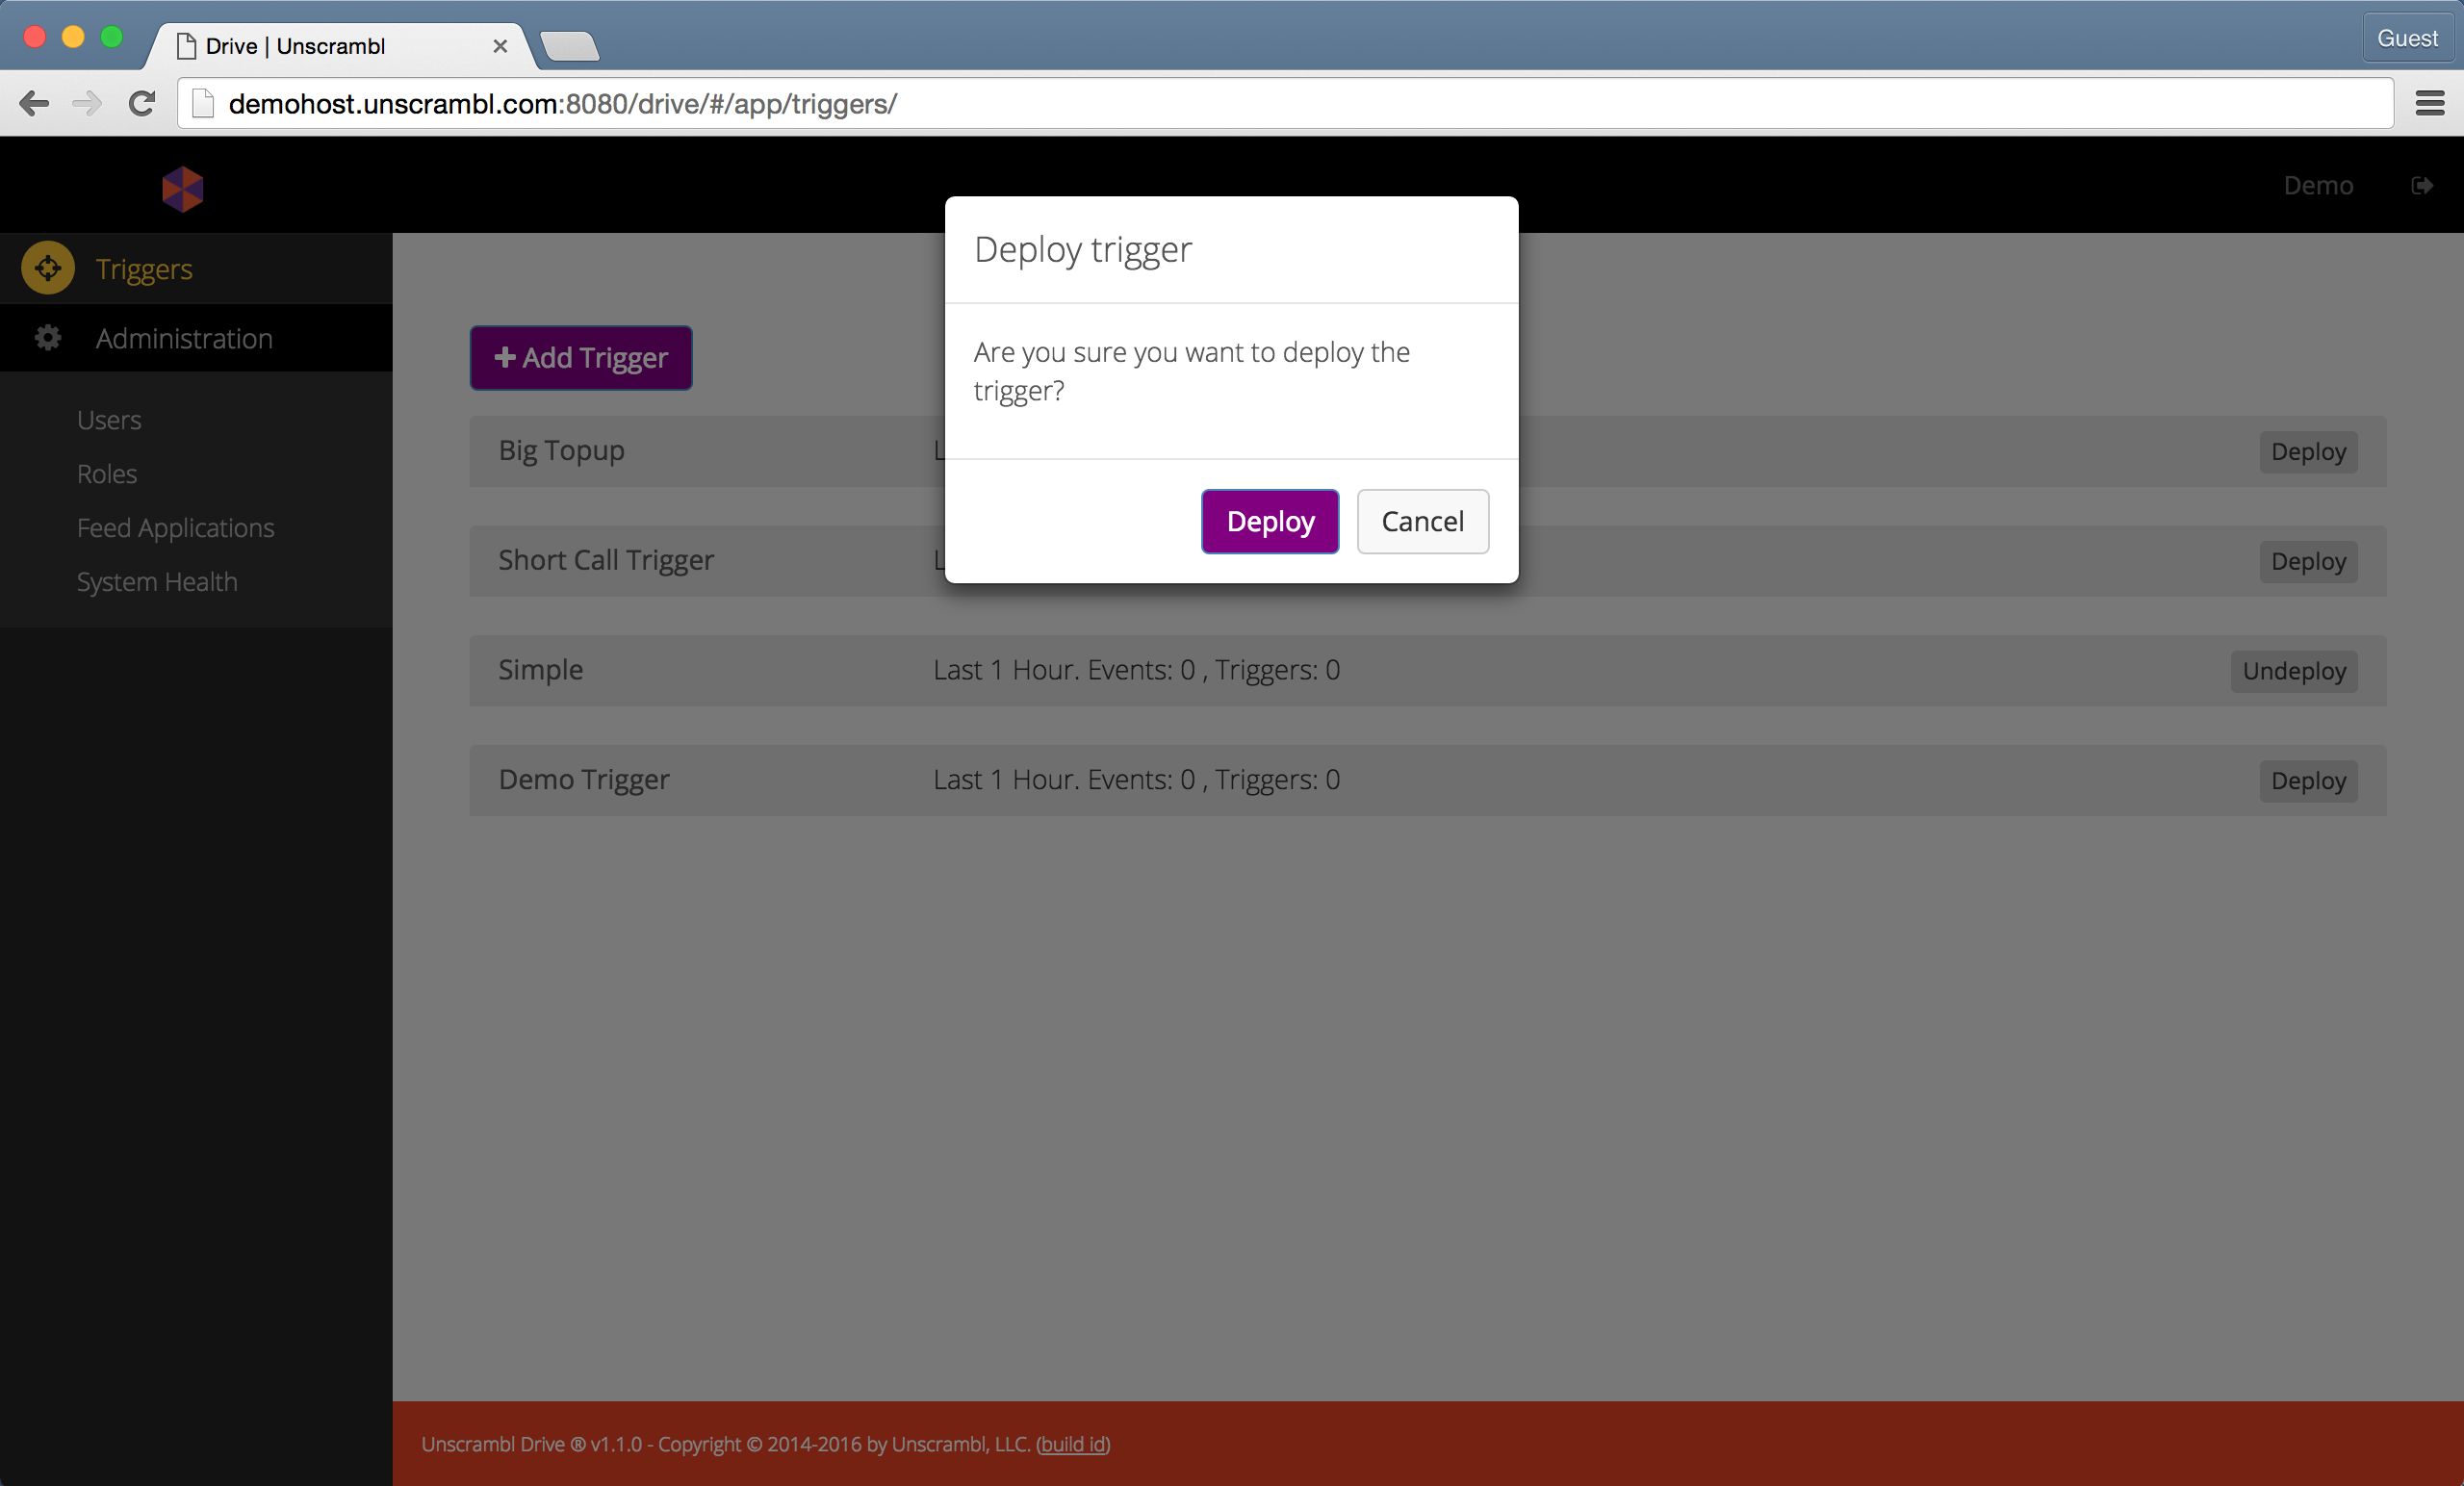
Confirming the deployment of a trigger.
The figure below shows a deployed trigger. The status of the button located to the right of the trigger name acts as an indicator of its deployment status:
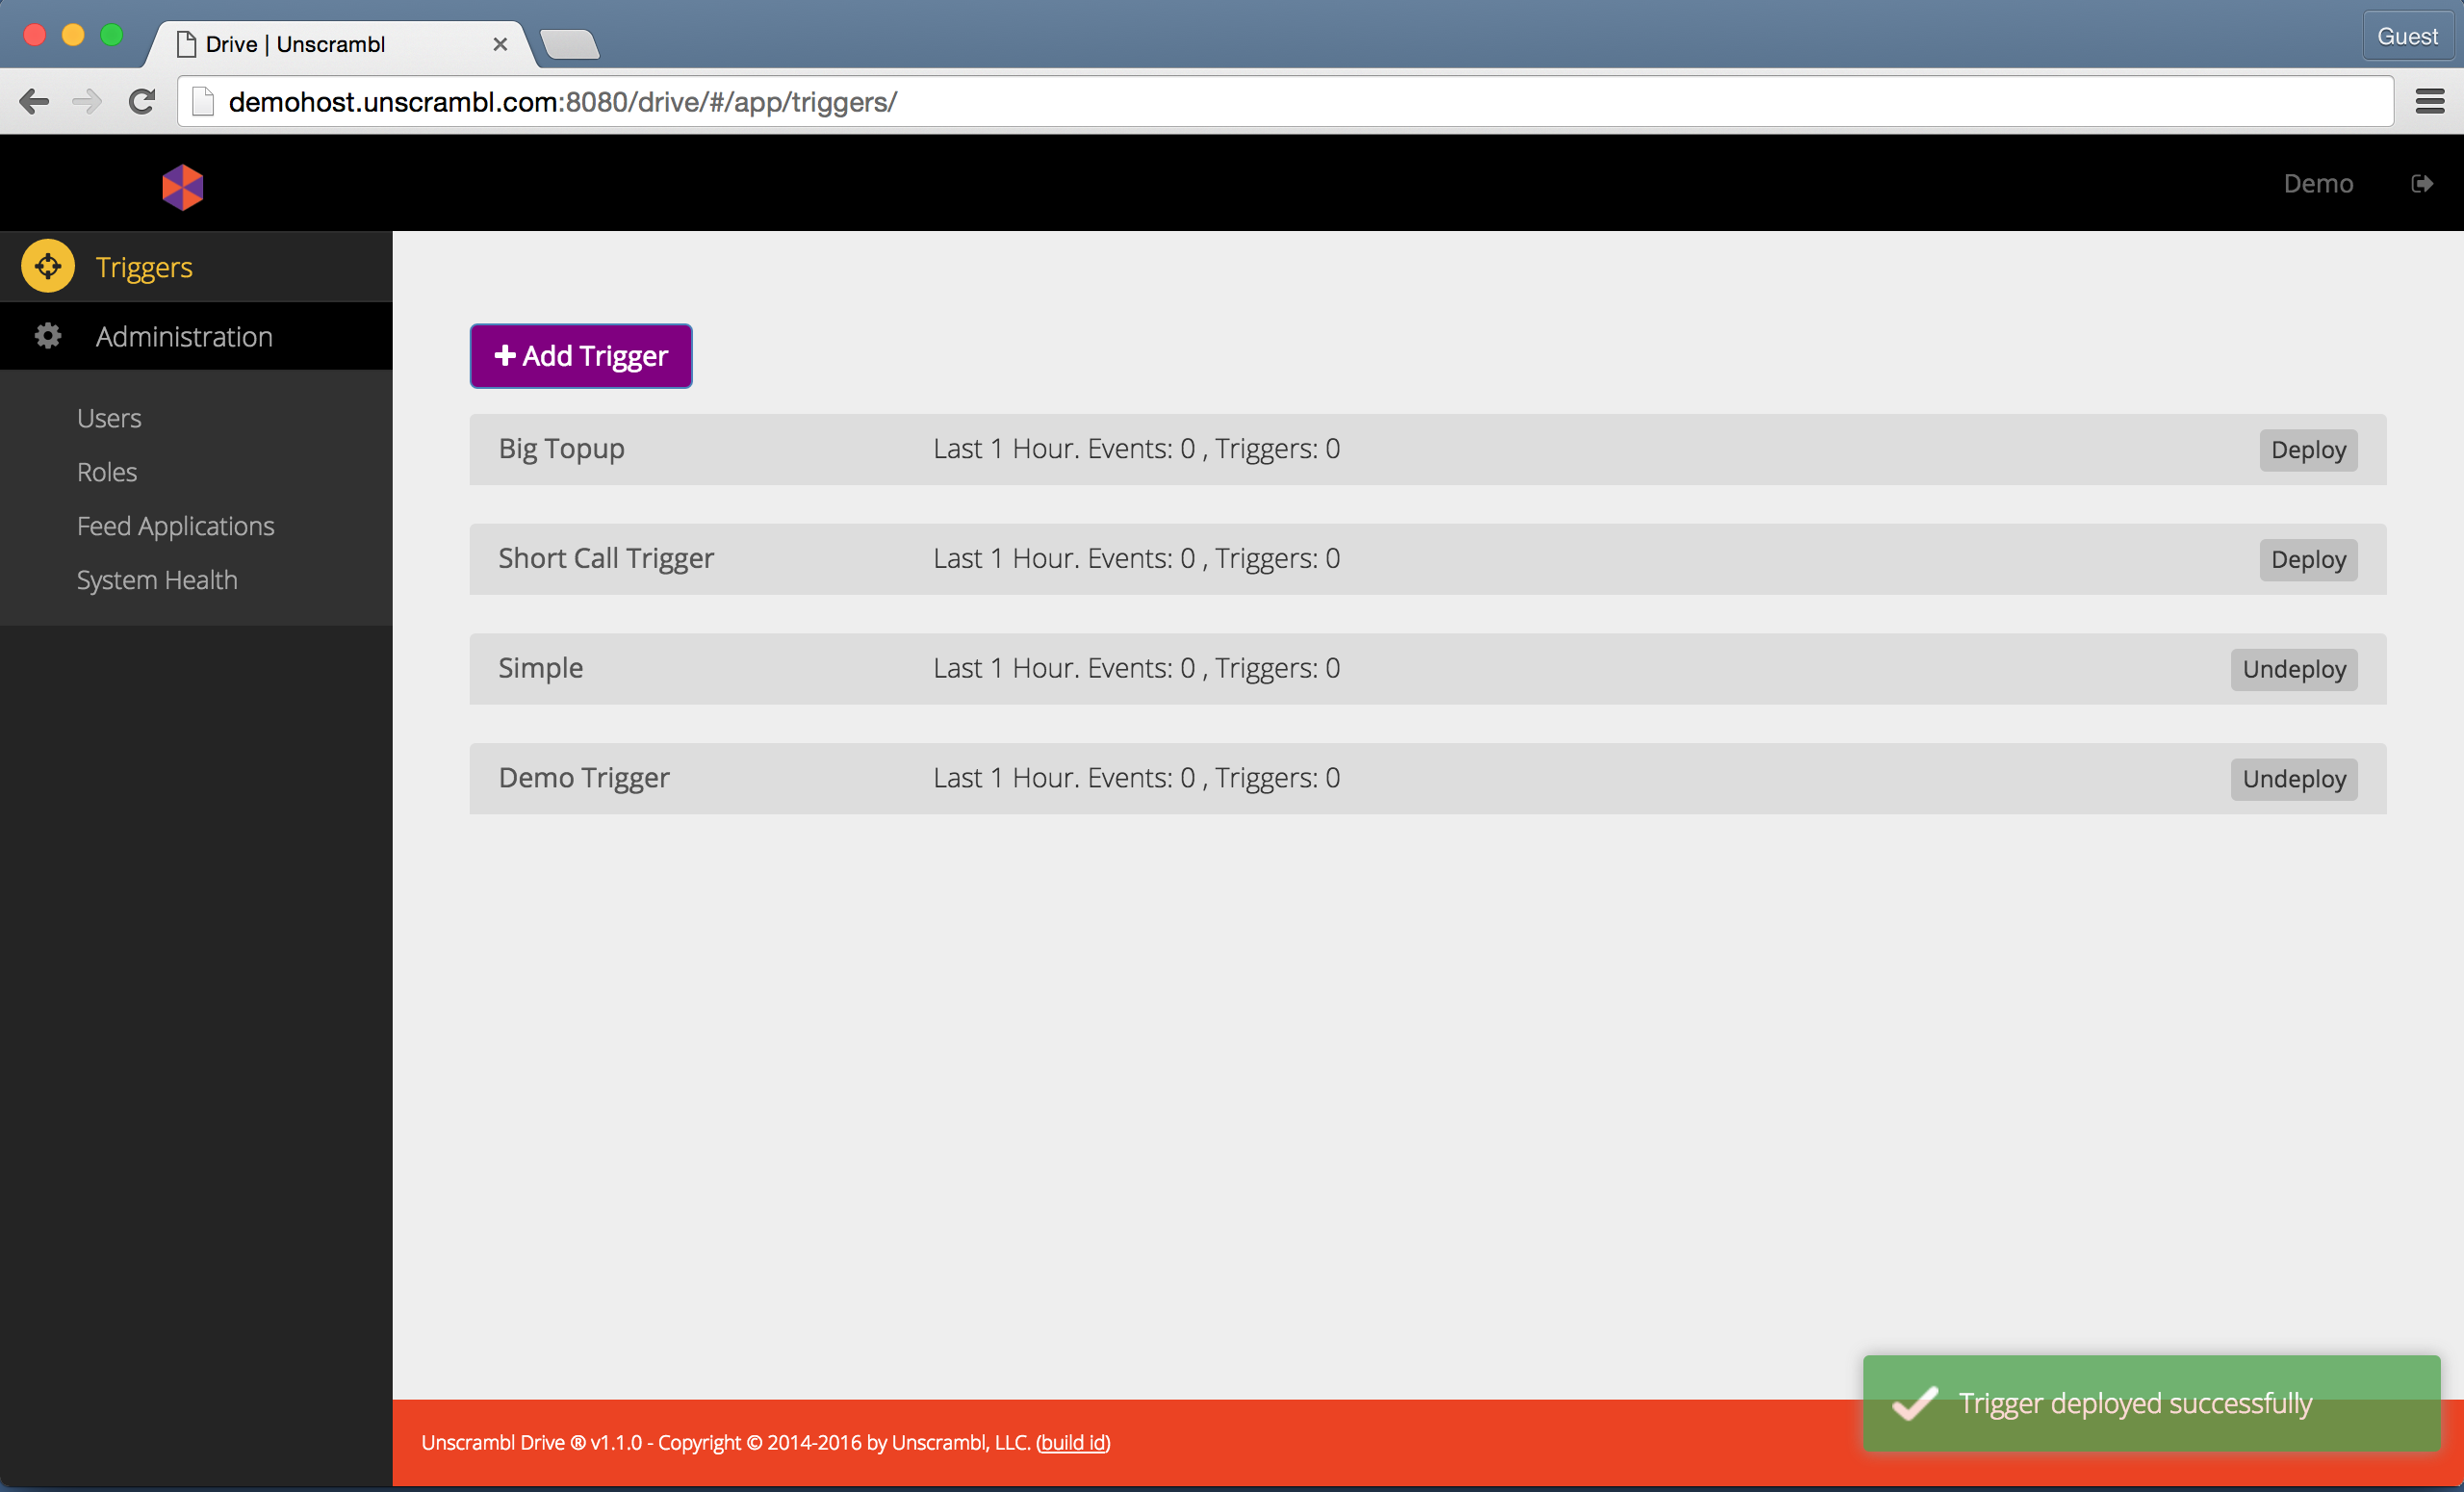
Showing 2 deployed triggers - Simple and Demo Trigger.